
🔥【Vue.js → Nuxt 入門推薦!🌟 新書即將上市 🌟】
📘《想要 SSR 嗎?就使用 Nuxt 吧!Nuxt 讓 Vue.js 更好處理 SEO 搜尋引擎最佳化》
👀 Nuxt v4 內容與範例也可以參考並購買本系列文筆著所著書籍
📦 預計於 2025/08/14 出版,目前天瓏書局預購有 7️⃣8️⃣ 折優惠
👉 點此前往購買:https://pse.is/7yulnj
注意:Nuxt 4 已於 2025/07/16 釋出,本文部分內容或範例可能和最新版本有所不同
Nuxt 3 整合 Vue I18n v9.x 多國語系的模組 Nuxt I18n,已經在 RC 階段準備釋出正式版,在使用上也穩定不少,這篇文章將介紹一些進階的配置與使用方法以及實務上常使用到的 SEO 搜尋引擎最佳化的配置,希望可以幫助到你在使用 Nuxt I18n 實作多國語系時來選擇最佳的配置。
如果你是第一次使用 Nuxt I18n,可以參考這篇文章「Nuxt 3 多國語系模組 Nuxt I18n 的初入門與基本使用方法」來做初始的配置。
如果我們想要在提供切換語系的按鈕或元件上,讓滑鼠指標懸停時可以得知即將前往的網址,你可以使用呼叫 useSwitchLocalePath() 組合式函式產生一個 switchLocalePath 函式,接著就可以使用這個函式傳入語系代碼,就能得到目前路由頁面對應語系代碼的路由連結。
例如我們有一個檔案 pages/about.vue 內容如下:
<template>
  <div>
    <NuxtLink :to="switchLocalePath('en')">English</NuxtLink>
    <NuxtLink :to="switchLocalePath('zh-tw')">繁體中文</NuxtLink>
  </div>
</template>

<script setup>
const switchLocalePath = useSwitchLocalePath()
</script>
switchLocalePath('en'): 將會產生 /en/about
switchLocalePath('zh-tw'): 將會產生 /about
如此一來,元件上就真正擁有一個路由連結可以用來切換頁面,也就表示頁面渲染出來的 HTML,搜尋引擎爬蟲也能分析到這個元件的連結,來進行索引或收錄。
甚至對於使用者來說,也能透過滑鼠指標懸停來預覽即將前往的連結網址,也能直接使用瀏覽器針對連結可以使用右鍵來開啟新分頁的功能。
如果我們在網站上已經存在一些路由連結,在導入 Nuxt I18n 後,你可能會發現預設啟用的路由語系前綴,可能會導致你切換路由頁面時,始終沒有套用到路由語系前綴,那麼你就需要使用 useLocalePath() 組合式函式產生一個 localePath 函式,接著就可以使用這個函式傳入路由路徑,就可以產生目前所使用語系的對應路由連結。
例如,現在頁面於英文語系前綴路徑下 /en,頁面中的路由連結,會因為使用 localePath 函式,而產生的路徑將會不一樣。
<!-- index.vue -->
<template>
  <div>
    <!-- 這個路由路徑僅會是 /about -->
    <NuxtLink to="/about">{{ $t('about') }}</NuxtLink>

    <!-- 這個路由路徑,會因為目前頁面於英文語系前綴路徑下 /en,而產生 /en/about 的路由路徑 -->
    <NuxtLink :to="localePath('about')">{{ $t('about') }}</NuxtLink>
  </div>
</template>

<script setup>
const localePath = useLocalePath()
</script>
當然使用 localePath 函式,你仍然可以傳入 Vue Router 所接受的路徑屬性。
<!-- index.vue -->
<template>
  <div>
    <!-- 這個路由路經,會因為目前頁面於英文語系前綴路徑下 /en,而產生 /en/authors/1 的路由路徑 -->
    <NuxtLink
      :to="
        localePath({
          name: 'authors-authorId',
          params: { authorId: 1 }
        })
      "
    >
      {{ $t('aboutTheAuthor') }}
    </NuxtLink>
  </div>
</template>

<script setup>
const localePath = useLocalePath()
</script>
你也可以在 localePath 函式傳入語系代碼,來表示回傳不同語系的路由路徑。
<template>
  <div>
    <NuxtLink :to="localePath('/', 'en')">{{ $t('home') }}</NuxtLink>
    <NuxtLink :to="localePath('/', 'zh-tw')">{{ $t('home') }}</NuxtLink>
  </div>
</template>

<script setup>
const localePath = useLocalePath()
</script>
此外,你也可以使用 Nuxt I18n 提供的 <NuxtLinkLocal> 元件來建立路由連結。
<template>
  <div>
    <NuxtLinkLocale to="/" locale="en">{{ $t('home') }}</NuxtLinkLocale>
    <NuxtLinkLocale to="/" locale="zh-tw">{{ $t('home') }}</NuxtLinkLocale>
  </div>
</template>
如果你想為每個頁面或元件中,定義特定的翻譯,你可以使用 useI18n() 組合式函式產生個 t 的函式來做翻譯內容的呈現,並且可以使用 I18n 自訂的區塊來定義翻譯。
你可以在 useI18n() 組合式函式,傳入選項 useScope: 'local' 與 messages 來定義在元件中使用的翻譯,接著從 useI18n() 組合式函式回傳的物件中,解構出 t 函式來做使用 (沒有錢字符號 $),就可以在 template 中使用 t('hello') 來呈現元件中翻譯的文字 Hello, World! 或你好,世界!
<template>
  <p>{{ t('hello') }}</p>
</template>

<script setup>
const { t } = useI18n({
  useScope: 'local',
  messages: {
    en: {
      hello: 'Hello, World!'
    },
    zh: {
      hello: '你好, 世界!'
    }
  }
})
</script>
你也可以在 SFC 中使用 I18n 自訂的區塊來定義翻譯,例如 <i18n lang="json">。
<template>
  <p>{{ t('hello') }}</p>
</template>

<script setup>
const { t } = useI18n({
  useScope: 'locale'
})
</script>

<i18n lang="json">
{
  "en": {
    "hello": "Hello, World!"
  },
  "zh-tw": {
    "hello": "你好, 世界!"
  }
}
</i18n>
自訂的區塊除了 json 也支援 yaml 語法
<i18n lang="yaml">
en:
  hello: 'Hello, World!'
zh-tw:
  hello: '你好, 世界!'
</i18n>
你可以在翻譯檔案內定義翻譯文字時,使用具名變數的方式提供後續做格式化文字使用,例如 {msg}。
{
  "message": {
    "hello": "你好, {msg}!"
  }
}
你就能在 tamplate 中使用 $t 時傳入具名的變數 { msg: 'Ryan' },來傳入可能會變動的文字變數。
<template>
  <div>
    <p>{{ $t('message.hello', { msg: 'Ryan' }) }}</p>
  </div>
</template>
最終就會輸出
你好, Ryan!
你也可以透過數字的方式來建立匿名變數模板,最終將會對應列表的元素索引。
{
  "message": {
    "hello": "你好, {0}! 歡迎參加 {1} 年 {2},預祝 {0} 順利完賽~"
  }
}
在 tamplate 中使用 $t 時傳入一個陣列,來依序組合對應索引的文字。
<template>
  <div>
    <p>{{ $t('message.hello', ['Ryan', 2023, 'iThome 鐵人賽']) }}</p>
  </div>
</template>
最終就會輸出
你好, Ryan! 歡迎參加 2023 年 iThome 鐵人賽,預祝 Ryan 順利完賽~
Nuxt I18n 整合的 Vue I18n 也有其他豐富實用的格式化方式與自訂格式化的方法,可以參考 Vue I18n 的文件。
在某些情況下,除了使用多國語系的路由語系前綴來區分不同語系的頁面外,你可能還會需要針對 URL 進行翻譯,這時你可以透過 i18n 的配置來進行自訂路由。
export default defineNuxtConfig({
  modules: ['@nuxtjs/i18n'],
  i18n: {
    // ...
    customRoutes: 'config',
    pages: {
      about: {
        'zh-tw': '/關於', // 你可以使用 /關於 網址來訪問 about 頁面(不需要路由語系前綴,因為 zh-tw 是預設語系)
        en: '/about-us', // 你可以使用 /en/about-us 網址來訪問 about 頁面
        fr: '/a-propos', // 你可以使用 /fr/a-propos 網址來訪問 about 頁面
        es: '/sobre'     // 你可以使用 /es/sobre 網址來訪問 about 頁面
      }
    }
  }
})
這些自訂的路由,都需要以 / 開頭,且不需要包含路由語系前綴。
此外,如果你使用了自訂語系的路由路徑,你可以透過 localePath 函式來取得正確的路由路徑,但是需要以具名路由的方式來傳入路由屬性。
<template>
  <div>
    <NuxtLink :to="localePath({ name: 'about' })">{{ $t('about') }}</NuxtLink>
  </div>
</template>

<script setup>
const localePath = useLocalePath()
</script>
自訂語系的路由路徑很適合來做在地化的 URL 連結。
你可以透過 useLocaleHead() 組合式函式,來產生 SEO 相關的 Meta Tag 以針對搜尋引擎最佳化來控制頁面中國際化的 Head 的相關設定。
首先我們先專案 Nuxt Config 中的 i18n 配置調整如下:
export default defineNuxtConfig({
  modules: ['@nuxtjs/i18n'],
  i18n: {
    baseUrl: 'http://localhost:3000',
    langDir: 'locales',
    locales: [
      {
        code: 'en',
        iso: 'en-US',
        file: 'en.json'
      },
      {
        code: 'zh-tw',
        iso: 'zh-TW',
        file: 'zh-tw.json'
      }
    ],
    defaultLocale: 'zh-tw',
    strategy: 'prefix_except_default'
  }
})
建立你所需要的翻譯檔案 locales/en.json 與 locales/zh-tw.json
locales/en.json
{
  "hello": "Hello!",
  "language": "Language",
  "home": "Home",
  "about": "About"
}
locales/zh-tw.json
{
  "hello": "你好!",
  "language": "語言",
  "home": "首頁"
}
接著,你可以在頁面元件 pages/index.vue 中來使用 useLocaleHead() 函式,並傳入選項 addSeoAttributes: true 表示產生 SEO 相關屬性。
<script setup>
const i18nHead = useLocaleHead({
  addSeoAttributes: true
})
</script>
i18nHead 物件將會依據目前的偏好語系代碼 zh-tw,來產生 SEO 相關的屬性。
{
  "htmlAttrs": {
    "lang": "zh-TW"
  },
  "link": [
    {
      "hid": "i18n-alt-en",
      "rel": "alternate",
      "href": "http://localhost:3000/en",
      "hreflang": "en"
    },
    {
      "hid": "i18n-alt-en-US",
      "rel": "alternate",
      "href": "http://localhost:3000/en",
      "hreflang": "en-US"
    },
    {
      "hid": "i18n-alt-zh",
      "rel": "alternate",
      "href": "http://localhost:3000/",
      "hreflang": "zh"
    },
    {
      "hid": "i18n-alt-zh-TW",
      "rel": "alternate",
      "href": "http://localhost:3000/",
      "hreflang": "zh-TW"
    },
    {
      "hid": "i18n-xd",
      "rel": "alternate",
      "href": "http://localhost:3000/",
      "hreflang": "x-default"
    },
    {
      "hid": "i18n-can",
      "rel": "canonical",
      "href": "http://localhost:3000/"
    }
  ],
  "meta": [
    {
      "hid": "i18n-og-url",
      "property": "og:url",
      "content": "http://localhost:3000/"
    },
    {
      "hid": "i18n-og",
      "property": "og:locale",
      "content": "zh_TW"
    },
    {
      "hid": "i18n-og-alt-en-US",
      "property": "og:locale:alternate",
      "content": "en_US"
    }
  ]
}
接著你就可以透過 i18nHead 物件內所提供的值,來添加網頁的 Head。
<script setup>
const localeHead = useLocaleHead({
  addSeoAttributes: true
})

useHead({
  htmlAttrs: {
    lang: localeHead.value.htmlAttrs.lang
  },
  link: [...(localeHead.value.link || [])],
  meta: [...(localeHead.value.meta || [])]
})
</script>
透過 useHead 設定 htmlAttrs.lang,渲染出的 HTML 就會在 <html> 添加 lang 屬性及語系,例如 <html lang="zh-TW">。
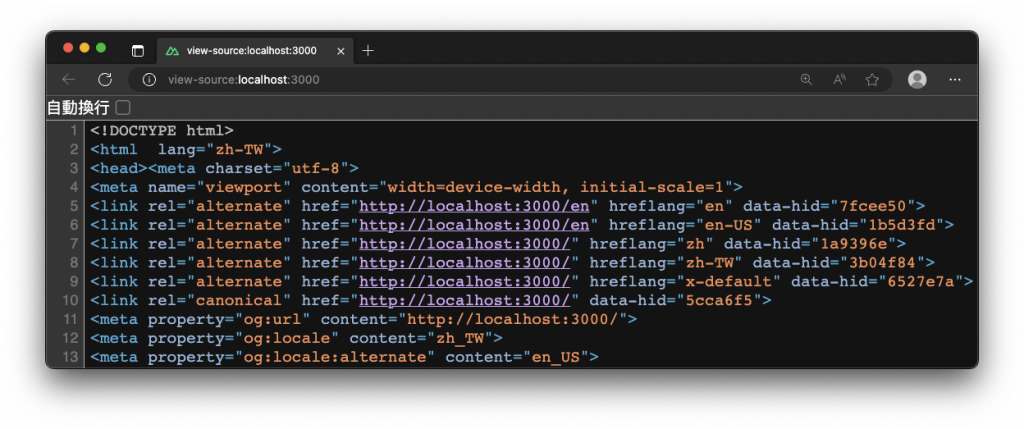
透過 useHead 設定 Head 中的 link,來為添加頁面連結與 Hreflang 標籤屬性,例如 <link rel="alternate" href="http://localhost:3000/en" hreflang="en" data-hid="7fcee50">,為搜尋引擎提供各個語系的指路路標。
透過 useHead 設定 Head 中的 Meta Tag 則包含了 Open Graph 語系相關的標記。
你可以打開網頁的原始碼,來觀察頁面上所設置的相關屬性。
useLocaleHead() 函式所產生 htmlAttrs.lang 屬性與 Hreflang 標籤屬性的語系代碼,會依據你目前的語系與定義在 i18n 配置內的 iso 所產生,所以為了 SEO 及遵守最佳化的規則,各國語系代碼,所定義的 iso 選項,一定要遵照標準,例如 Google 支援的語言與地區代碼,使用第一個代碼是語系代碼 (採 ISO 639-1 格式),後面接著選用的第二個代碼,代表替代網址的地區代碼 (採 ISO 3166-1 Alpha 2 格式)。
首先我們先將專案 Nuxt Config 中的 i18n 選項調整成如下配置:
export default defineNuxtConfig({
  modules: ['@nuxtjs/i18n'],
  i18n: {
    baseUrl: 'http://localhost:3000',
    langDir: 'locales',
    locales: [
      {
        code: 'en',
        iso: 'en-US',
        file: 'en.json'
      },
      {
        code: 'zh-tw',
        iso: 'zh-TW',
        file: 'zh-tw.json'
      }
    ],
    defaultLocale: 'zh-tw',
    strategy: 'prefix_except_default'
  }
})
建立 locales/en.json 與 locales/zh-tw.json
locales/en.json
{
  "layouts": {
    "default": {
      "title": "{title} - My Blog"
    }
  },
  "pages": {
    "home" : {
      "title": "Home",
      "description": "This is home.",
      "language": "Language"
    }
  }
}
locales/zh-tw.json
{
  "layouts": {
    "default": {
      "title": "{title} - 我的部落格"
    }
  },
  "pages": {
    "home" : {
      "title": "首頁",
      "description": "這裡是首頁",
      "language": "語言"
    }
  }
}
為了避免重複的程式碼及最好的開發體驗,建議使用佈局模板來搭配路由頁面來進行全域的設置,此外我也在預設的布局模板中,將 useHead 所設定的頁面標題 title,以提供路由頁面可以使用 definePageMeta() 函式傳入 title 屬性與 layouts.default.title 翻譯文字的模板進行組合,來設定具有多國語系支援的頁面標題。
<template>
  <div>
    <slot />
  </div>
</template>

<script setup>
const route = useRoute()
const { t } = useI18n()
const localeHead = useLocaleHead({
  addDirAttribute: true,
  identifierAttribute: 'id',
  addSeoAttributes: true
})

useHead({
  htmlAttrs: {
    lang: localeHead.value.htmlAttrs.lang,
    dir: localeHead.value.htmlAttrs.dir
  },
  title: () => t('layouts.default.title', { title: t(route.meta.title ?? '') }),
  link: [...(localeHead.value.link || [])],
  meta: [...(localeHead.value.meta || [])]
})
</script>
接著,我們就可以建立一個路由首頁 page/index.vue,頁面使用多國語系的翻譯文字 $t('pages.home.description') 與 $t('pages.home.language') ,頁面上也提供一個可以切換除目前使用的語系外的路由連結,來切換至不同的語系。最後也使用了 definePageMeta() 函式傳入這個頁面的名稱所要使用的翻譯選項 (pages.home.title),這樣預設布局模板就會組合頁面名稱,來實現頁面標題的多國語系支援。
<template>
  <div class="flex flex-col items-center bg-white">
    <h1 class="mt-24 text-6xl font-medium text-blue-500">
      {{ $t('pages.home.description') }}
    </h1>
    <div class="my-8 flex flex-row justify-center">
      <label class="text-gray-600">{{ $t('pages.home.language') }}</label>
      <span class="ml-4 font-bold text-gray-800">{{ currentLocale }}</span>
    </div>

    <nav>
      <template v-for="(locale, index) in availableLocales" :key="locale.code">
        <template v-if="index"> | </template>
        <NuxtLink
          class="inline-flex items-center rounded-md border border-transparent bg-blue-100 px-4 py-2 text-sm font-medium text-blue-700 hover:bg-blue-200 focus:outline-none focus:ring-2 focus:ring-blue-500 focus:ring-offset-2"
          :to="switchLocalePath(locale.code)"
          >{{ locale.name ?? locale.code }}
        </NuxtLink>
      </template>
    </nav>
  </div>
</template>

<script setup>
definePageMeta({
  title: 'pages.home.title'
})

const { locale: currentLocale, locales } = useI18n()
const switchLocalePath = useSwitchLocalePath()

const availableLocales = computed(() => {
  return locales.value.filter((i) => i.code !== currentLocale.value)
})
</script>
最後,不要忘了在 app.vue 檔案內添加 與 元件。
<template>
  <div>
    <NuxtLayout>
      <NuxtPage />
    </NuxtLayout>
  </div>
</template>
最終效果如下:
Nuxt I18n 的使用方法與支援功能非常的豐富,你可以根據你的需求來決定切換語系的方式,當然,如果你需要根據語系來連動 NuxtLink 路由連結的網址路徑,你就需要使用 Nuxt I18n 所提供的函式來根據命名路由來自動產生,此外各個語系的頁面網址,也能依據實際情況來建立在地化的網址,針對 SEO 搜尋引擎最佳化,Nuxt I18n 也提供了許多便利的方式,更多 Nuxt I18n 的使用方法,也可以翻閱官方的文件,最後,希望這篇文章能幫助到你更深入的使用 Nuxt I18n 模組來建立多國語系的支援。
感謝大家的閱讀,歡迎大家給予建議與討論,也請各位大大鞭小力一些:)
如果對這個 Nuxt 3 系列感興趣,可以訂閱接收通知,也歡迎分享給喜歡或正在學習 Nuxt 3 的夥伴。
參考資料
最近接觸了 i18n,不知道該怎麼解決將 i18n 文字中的某幾個字使用不同樣式,例如要將 "description": "這裡是首頁" 這段文字的 "首頁“ 兩字添加額外 css 樣式。
請問大大過去經驗中有解決過這問題嗎?
這個部分我倒是沒有實作過,如果在翻譯文字的模板中使用到 HTML 的標記或語法,應該會出現錯誤或無法執行,而且也是不理想的做法,可能導致 XSS 之類的問題。
目前想到的方式你可以參考一下。
在翻譯檔中的字串,也是可以拿來當作標籤的樣式或類別的名稱字串,以此你就可以來對元件中的 HTML 標籤來設置不同語系要使用的樣式或類別名稱,來控制不同的顯示效果。
locales/en.json
{
  "term1": "This is ",
  "term2": "home.",
  "style": "color:red",
  "class": "en-class"
}
locales/zh-tw.json
{
  "term1": "這裡是",
  "term2": "首頁",
  "style": "color:blue",
  "class": "zh-tw-class"
}
元件中就能使用如下程式碼
<div>
  <p>
    {{ $t('term1') }}<span :style="$t('style')">{{ $t('term2') }}</span>
  </p>
  <p>
    {{ $t('term1') }}<span :class="$t('calss')">{{ $t('term2') }}</span>
  </p>
</div>
更進階一點你也可以參考 Vue i18n 提供的 Component Interpolation 範例
https://vue-i18n.intlify.dev/guide/advanced/component.html
或自訂格式化來實現
https://github.com/kazupon/vue-i18n/tree/dev/examples/formatting/custom/src
感謝大大提供方向


 iThome鐵人賽