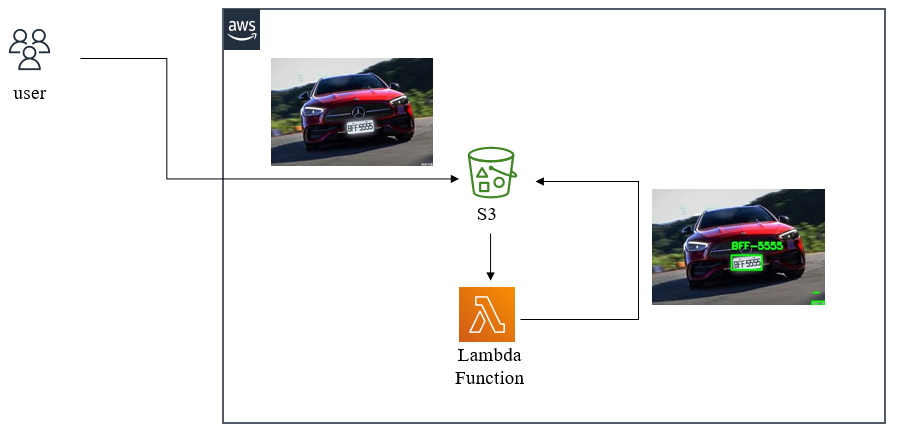
步驟1: 在搜尋框裡搜尋S3,之後打開S3,如下圖所示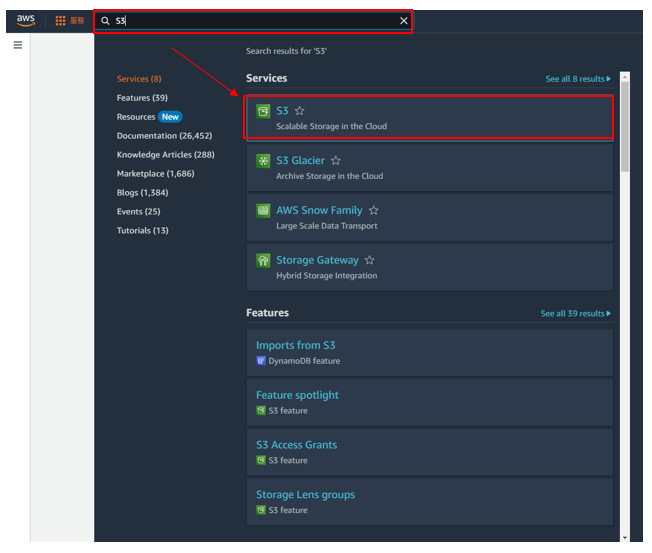
步驟2: 進入S3,點選建立佇體,如下圖所示
步驟3: 先命名S3儲存桶的名稱,如下圖所示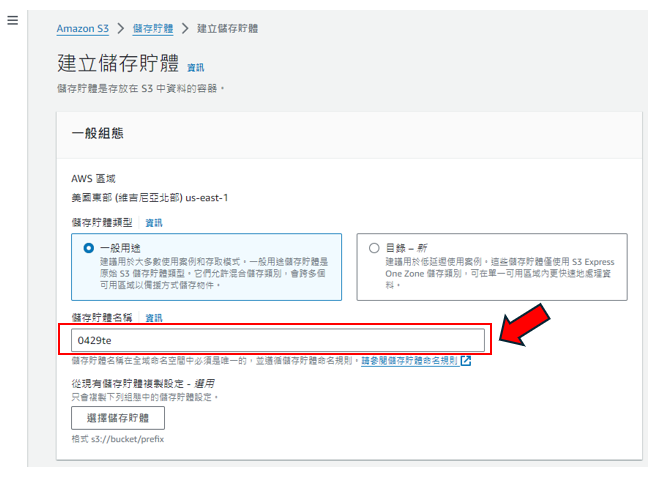
步驟4: 將點選"ACL已啟用",如下圖所示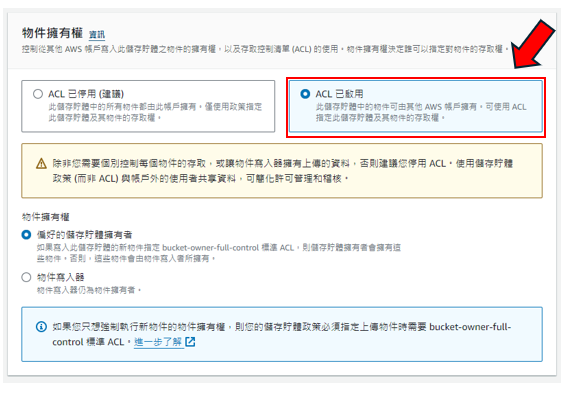
步驟5: 將"封鎖公開存取權"改為不勾選的狀態,記得要勾選"我確認目前的設定可能導致此儲存貯體和其內的物件變成公開狀態。",如下圖所示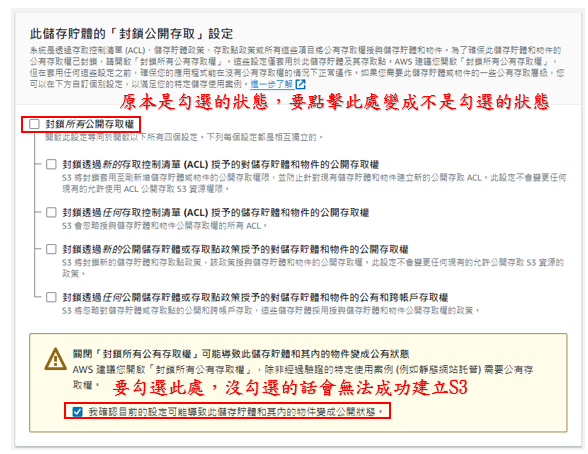
步驟6: 第3~5的步驟做完後,即可建立儲存桶,如下圖所示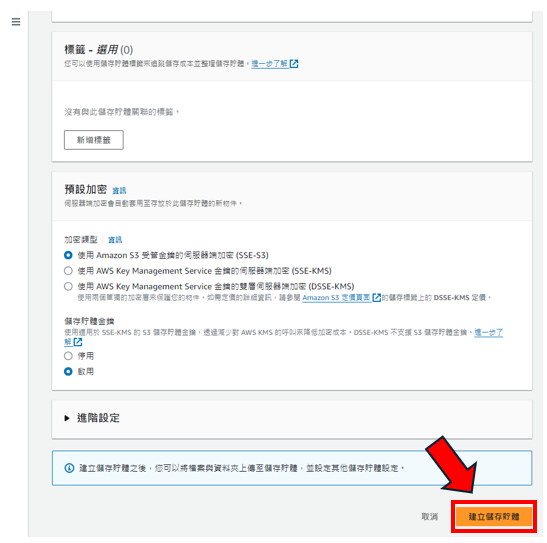
步驟7: 回到剛進S3時候的頁面,點選建立好的儲存桶,如下圖所示
步驟8: 點選"上傳" ,如下圖所示
步驟9: 點選"新增檔案",之後就可以選取您想要辨識的圖片,如下圖所示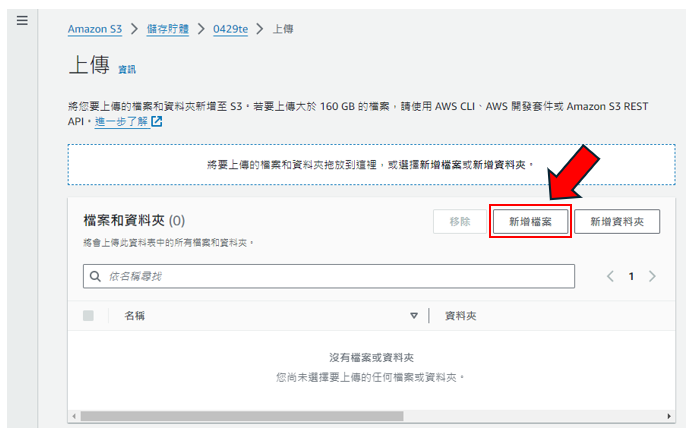
步驟10: 按"上傳",如下圖所示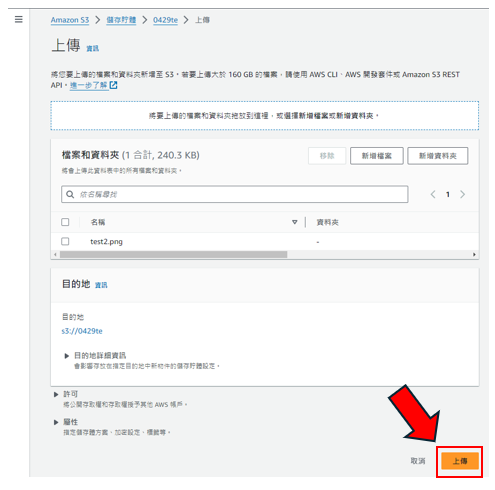
步驟11: 回到剛進S3時候的頁面,確認是否上傳成功,如下圖所示
步驟12: 需要上傳opencv至S3上,後面會利用到"物件URL"的連結(上傳方式和第8~10的步驟相同,只是上傳的是opencv檔案,並不是圖檔而已),如下圖所示
步驟13: 點選您上傳的opencv,框起來的地方就是"物件URL"的連結,複製起來,等等會用到,如下圖所示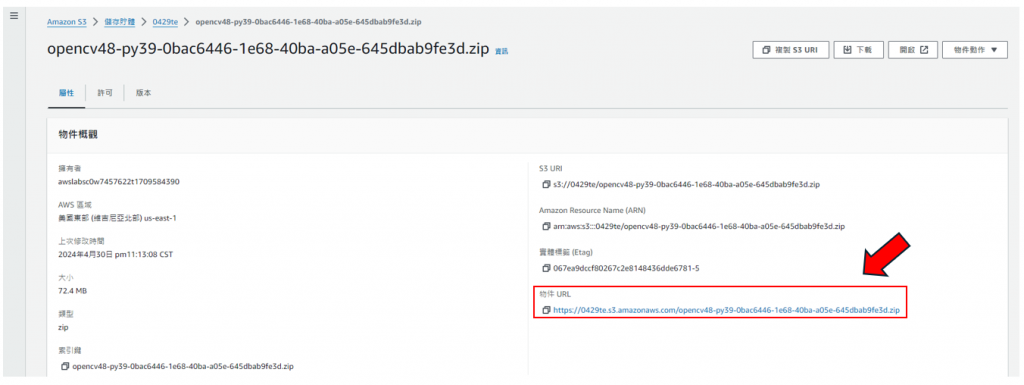
步驟14: 在搜尋框上搜尋Lambda,之後打開Lambda,如下圖所示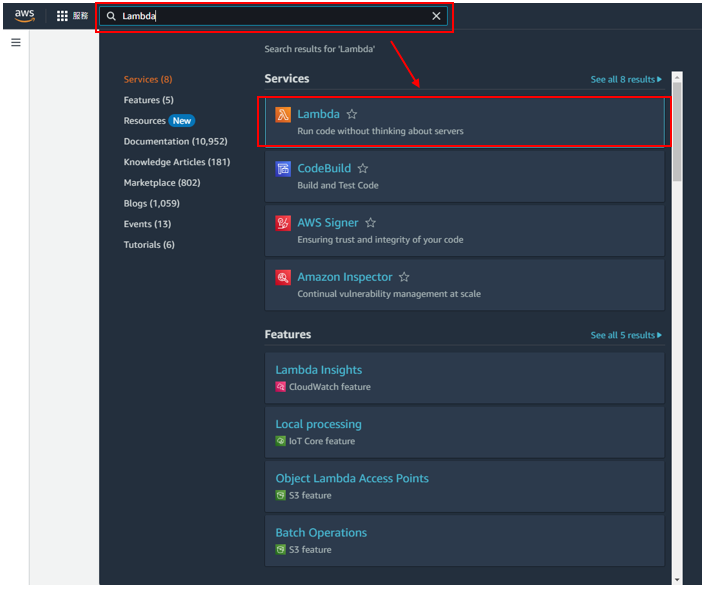
步驟15: 點選"層",如下圖所示
-步驟16: 點選"建立Layer",如下圖所示
-步驟17: 特別要注意的是執行時間需與opencv所下載的python版本一致,其他都照著做即可,如下圖所示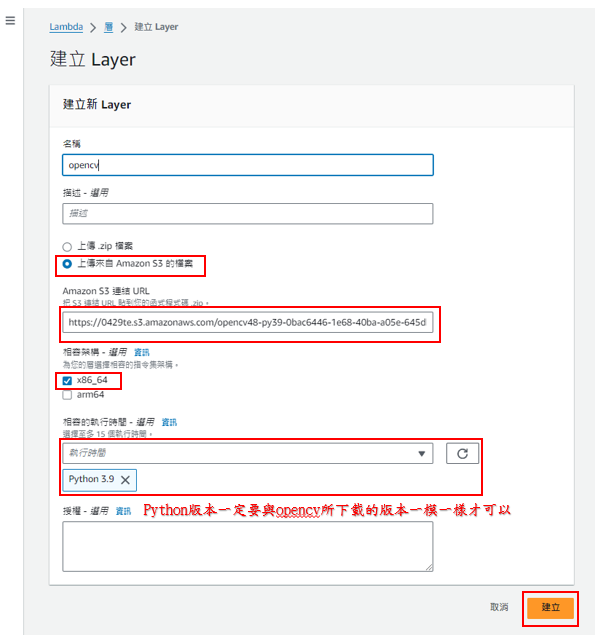
步驟18: 回到剛進lambda時候的頁面,點選"建立函式",如下圖所示
步驟19: 照著下圖做,特別需要注意的是要點選現有角色,現有角色為"LabRole",如下圖所示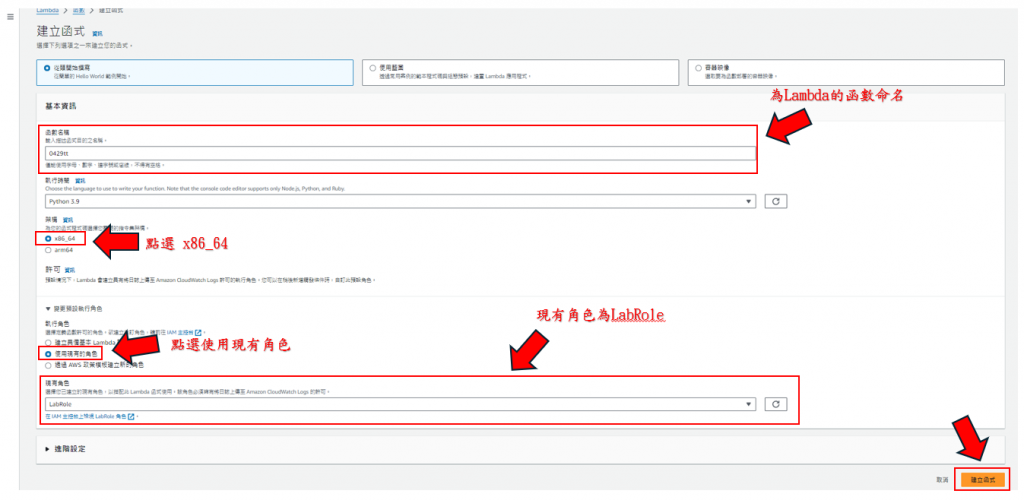
步驟20: 建立完後,將滑鼠滑到至最下面的頁面,就可找到"新增層",如下圖所示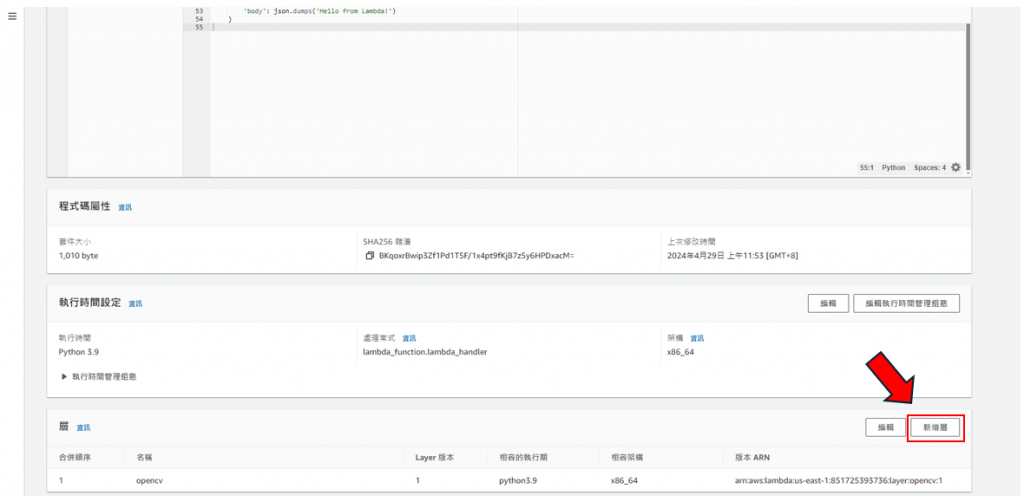
步驟21: 照著下圖做,要注意的點是,我在步驟17是命名為opencv,所以要選您命名的,除非跟我命名的是一模一樣的,如下圖所示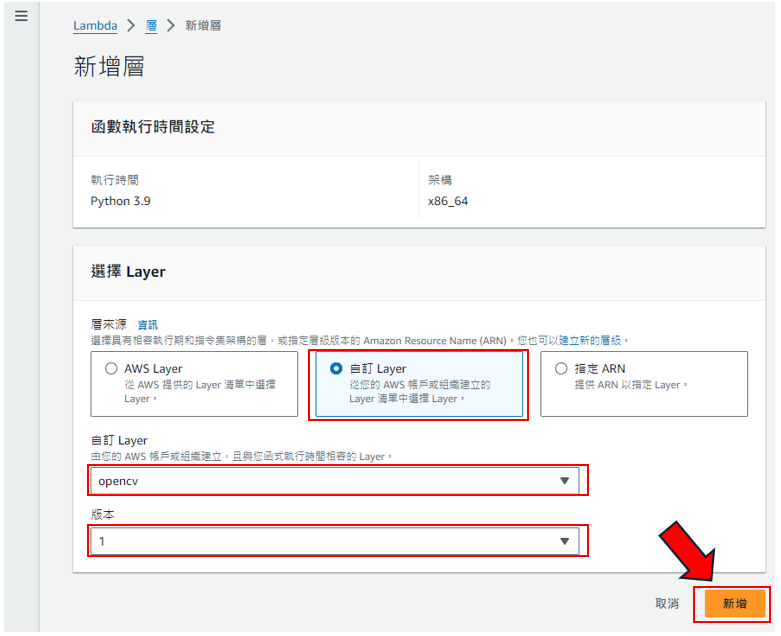
步驟22: 回到剛進lambda時候的頁面,複製程式碼
import json
import base64
import boto3
from datetime import datetime
import os
import cv2
import numpy as np

def lambda_handler(event, context):
    s3 = boto3.client('s3')

    # Get the bucket name and the uploaded file name
    bucket_name = event['Records'][0]['s3']['bucket']['name']
    file_name = event['Records'][0]['s3']['object']['key']

    print('Bucket name: {}'.format(bucket_name))
    print('Upload file name: {}'.format(file_name))

    # Get current unix time
    created = int(datetime.now().timestamp())

    # OCR
    client = boto3.client('rekognition')
    response = client.detect_text(Image={'S3Object':{'Bucket':bucket_name,'Name':file_name}})
    print(json.dumps(response))

    # Text detection
    img_path = '/tmp/input_img.jpg'  # Path to temporarily store the input image
    output_img_path = '/tmp/output_img.jpg'  # Path to store the output image
    s3.download_file(bucket_name, file_name, img_path)  # Download image from S3
    img = cv2.imread(img_path)
    detectedText = response['TextDetections']

    # Iterate through detectedText to get the required name/value pairs
    for text in detectedText:
        # Get bounding box coordinates
        box = text['Geometry']['BoundingBox']
        h, w, _ = img.shape
        x1, y1, x2, y2 = int(box['Left'] * w), int(box['Top'] * h), int((box['Left'] + box['Width']) * w), int((box['Top'] + box['Height']) * h)
        # Draw rectangle around detected text
        cv2.rectangle(img, (x1, y1), (x2, y2), (0, 255, 0), 2)
        # Put text label
        cv2.putText(img, text['DetectedText'], (x1, y1 - 10), cv2.FONT_HERSHEY_SIMPLEX, 0.5, (0, 255, 0), 2)

    # Save annotated image
    cv2.imwrite(output_img_path, img)

    # Upload annotated image to S3
    s3.upload_file(output_img_path, bucket_name, 'annotated_' + file_name)

    return {
        'statusCode': 200,
        'body': json.dumps('Hello from Lambda!')
    }
把複製的程式碼貼到框框內,之後按"Deploy",如下圖所示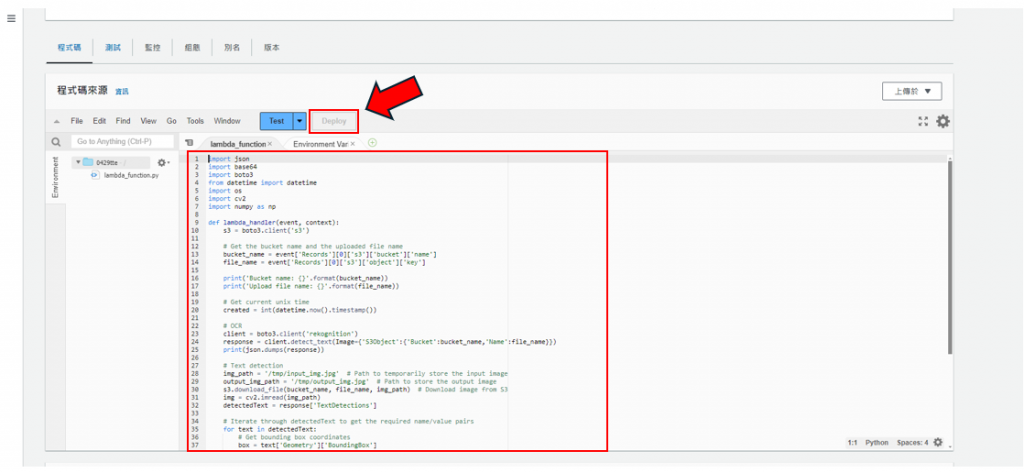
步驟23: 按Test旁邊的箭號,之後點框起來的地方,如下圖所示
步驟24: 下面的程式碼為測試事件所用的程式碼,程式碼為JSON所用的,需要注意的點是程式碼內的"0429te"是我步驟1~6所建立的儲存桶名稱,所以必須要換成您所用命名的名稱,除非步驟都和我的一模一樣,還有"test2.png"的檔案,需要換成您上傳至S3的圖檔,檔名與副檔名都要相同才行!!!
{
  "Records": [
    {
      "eventVersion": "2.1",
      "eventSource": "aws:s3",
      "awsRegion": "us-west-2",
      "eventTime": "2024-04-29T00:00:00.000Z",
      "eventName": "ObjectCreated:Put",
      "userIdentity": {
        "principalId": "EXAMPLE"
      },
      "requestParameters": {
        "sourceIPAddress": "127.0.0.1"
      },
      "responseElements": {
        "x-amz-request-id": "EXAMPLE123456789",
        "x-amz-id-2": "EXAMPLE123/5678abcdefghijklambdaisawesome/mnopqrstuvwxyzABCDEFGH"
      },
      "s3": {
        "s3SchemaVersion": "1.0",
        "configurationId": "testConfigRule",
        "bucket": {
          "name": "0429te",
          "ownerIdentity": {
            "principalId": "EXAMPLE"
          },
          "arn": "arn:aws:s3:::0429te"
        },
        "object": {
          "key": "test2.png",
          "size": 1024,
          "eTag": "0123456789abcdef0123456789abcdef",
          "sequencer": "0A1B2C3D4E5F678901"
        }
      }
    }
  ]
}
如下圖所示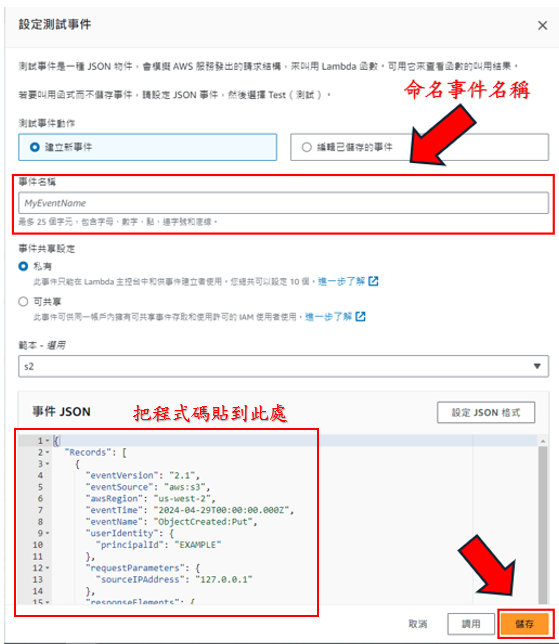
步驟25: 點擊"組態",如下圖所示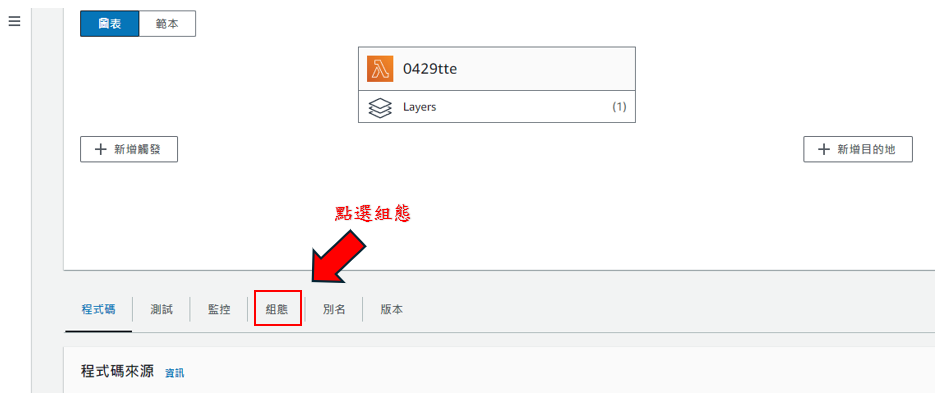
步驟26: 點選左側的一般組態,再點擊"編輯",如下圖所示
步驟27: 需要把時間設定成1分鐘以上,如下圖所示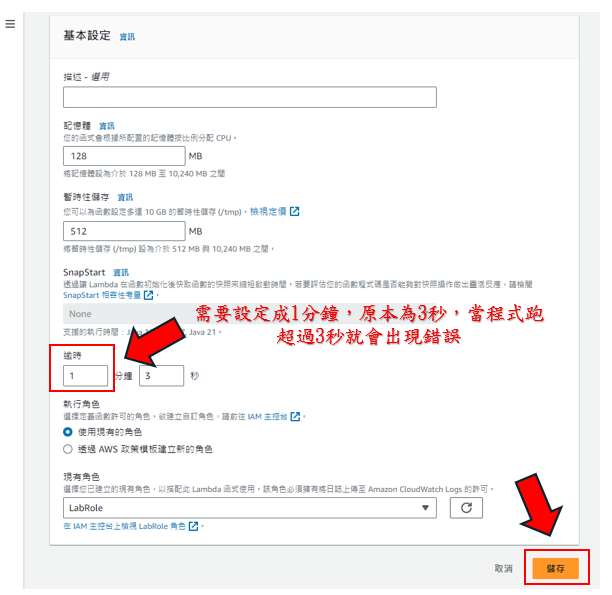
步驟28: 點擊"Test",辨識後的文字就會回傳至S3了,如下圖所示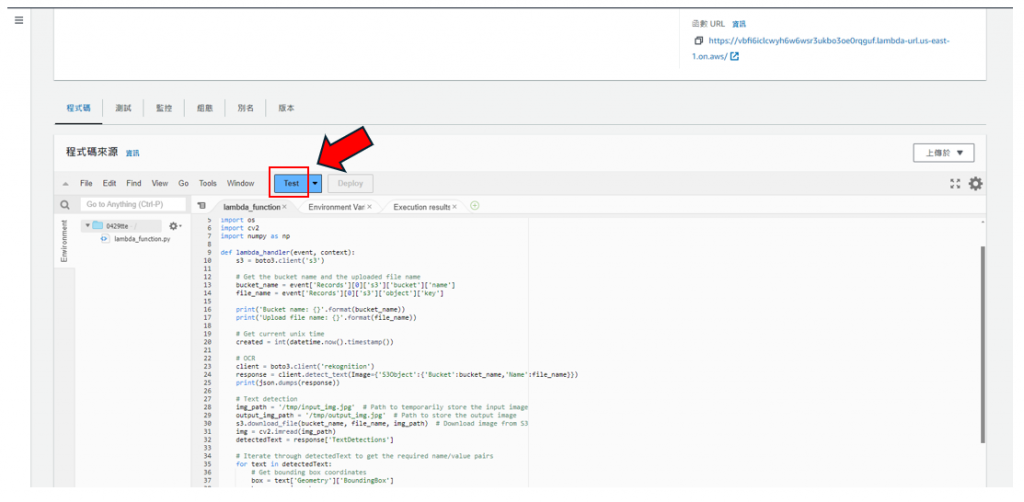
步驟29: 回到剛進S3時候的頁面,點擊回傳後的新圖檔,如下圖所示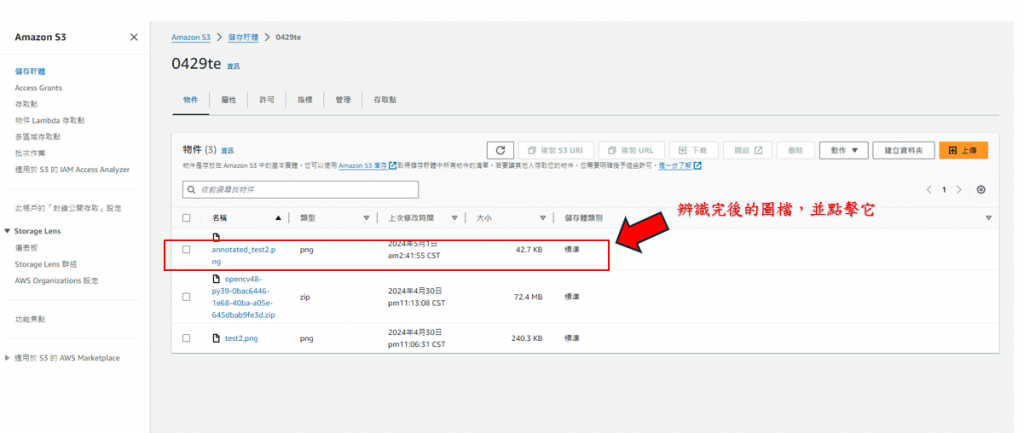
步驟30: 點擊"許可",如下圖所示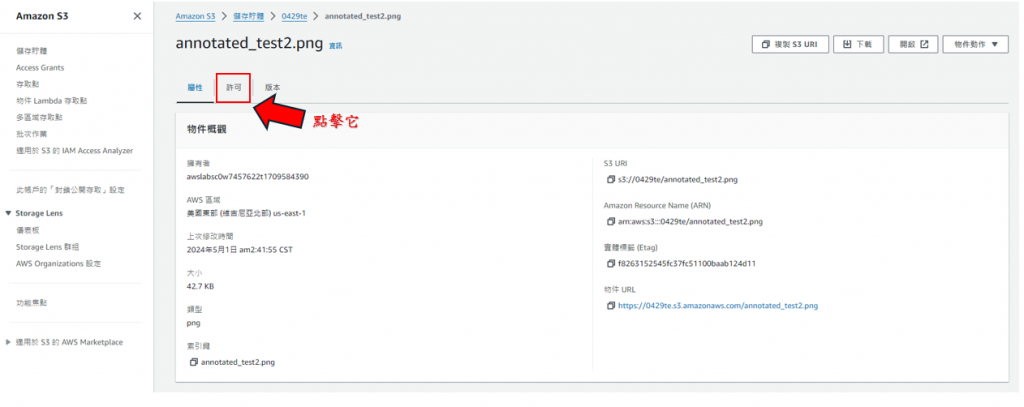
步驟31: 點擊"編輯",如下圖所示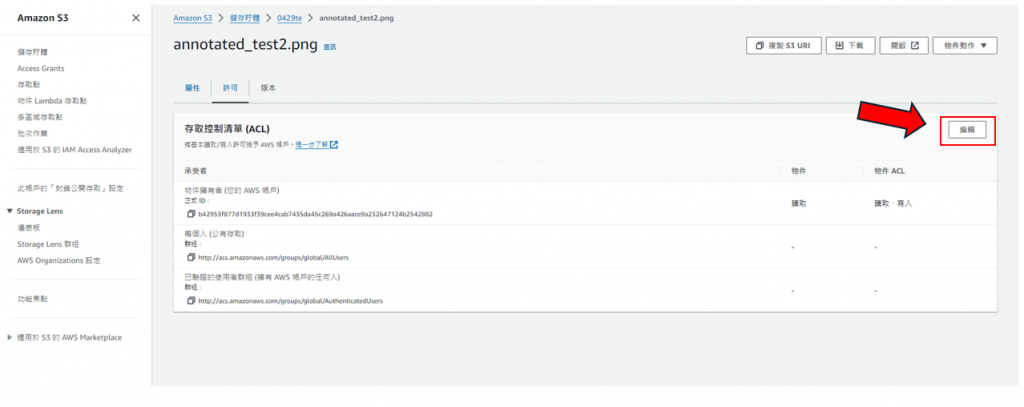
步驟32: 存取控制清單(ACL)裡有框起來的範圍都要勾,還有"我了解這些變更對此物件的影響。"也要勾,如下圖所示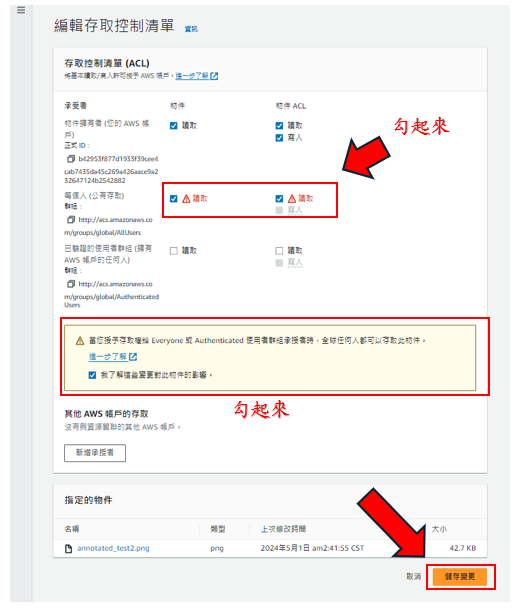
步驟33: 回到"屬性"介面,點擊框起來的連結即可下載辨識完的圖檔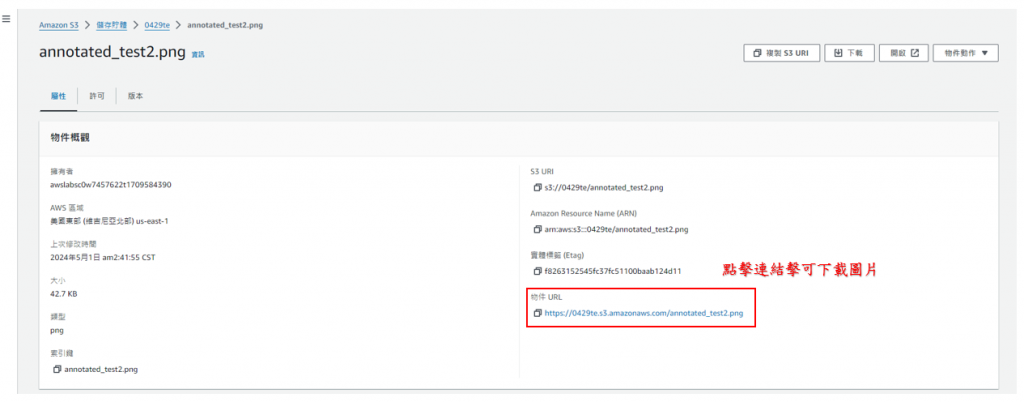
測試程式碼由chatgpt幫我寫的
