使用XAMPP來架設一個個人網域資料庫,透過Androidstudio安卓開發系統讀取發送及讀取數據,有Androidstudio開發經驗及php撰寫經驗容易上手,以下言論純個人開發經驗分享,如有大神能建議及改善的地方非常歡迎留言!!!
XAMPP、Android Studio、VScode Download
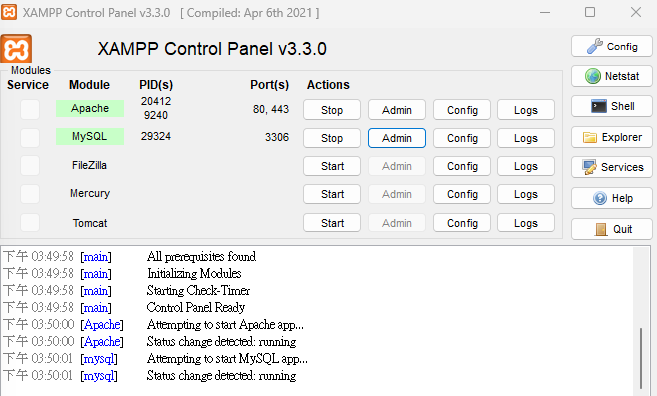
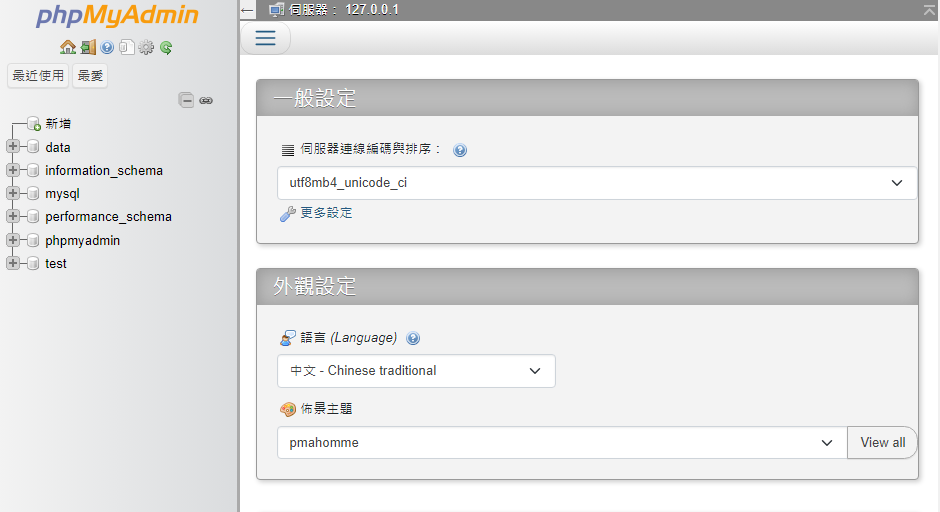
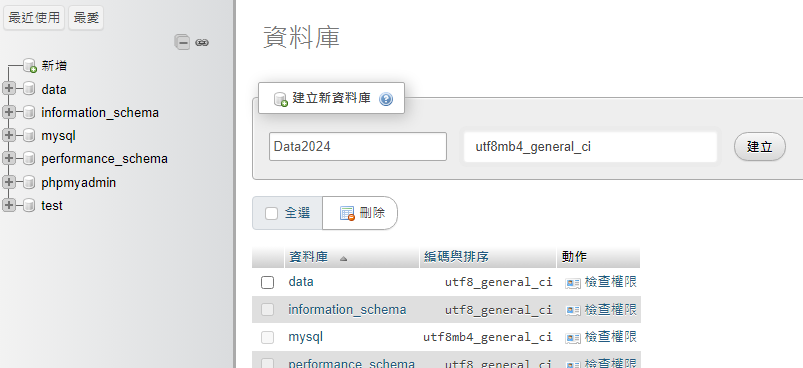
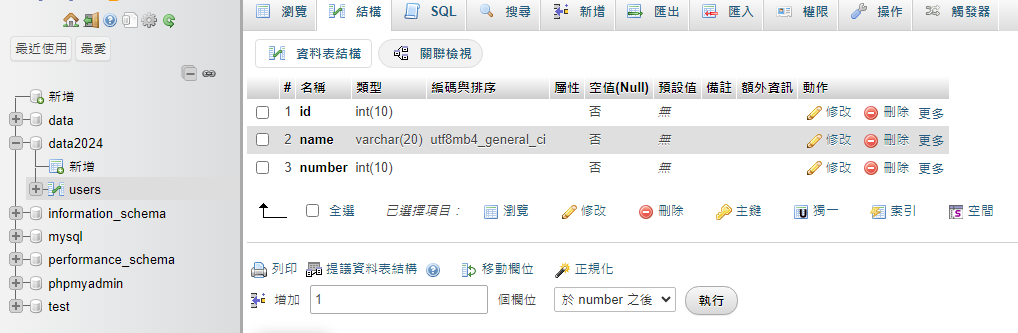
XAMPP伺服器架設與創建資料庫

Android Studio簡易操作教學
<?xml version="1.0" encoding="utf-8"?>
<androidx.constraintlayout.widget.ConstraintLayout xmlns:android="http://schemas.android.com/apk/res/android"
    xmlns:app="http://schemas.android.com/apk/res-auto"
    xmlns:tools="http://schemas.android.com/tools"
    android:layout_width="match_parent"
    android:layout_height="match_parent"
    tools:context=".MainActivity">

    <TextView
        android:id="@+id/textView"
        android:layout_width="wrap_content"
        android:layout_height="wrap_content"
        android:text="本日運勢"
        android:textSize="48sp"
        app:layout_constraintBottom_toTopOf="@+id/button"
        app:layout_constraintEnd_toEndOf="parent"
        app:layout_constraintStart_toStartOf="parent"
        app:layout_constraintTop_toTopOf="parent" />

    <Button
        android:id="@+id/button"
        android:layout_width="wrap_content"
        android:layout_height="wrap_content"
        android:text="點擊抽籤~~"
        android:textSize="24sp"
        app:layout_constraintBottom_toTopOf="@+id/guideline2"
        app:layout_constraintEnd_toEndOf="parent"
        app:layout_constraintStart_toStartOf="parent" />

    <androidx.constraintlayout.widget.Guideline
        android:id="@+id/guideline2"
        android:layout_width="wrap_content"
        android:layout_height="wrap_content"
        android:orientation="horizontal"
        app:layout_constraintGuide_percent="0.5" />
</androidx.constraintlayout.widget.ConstraintLayout>
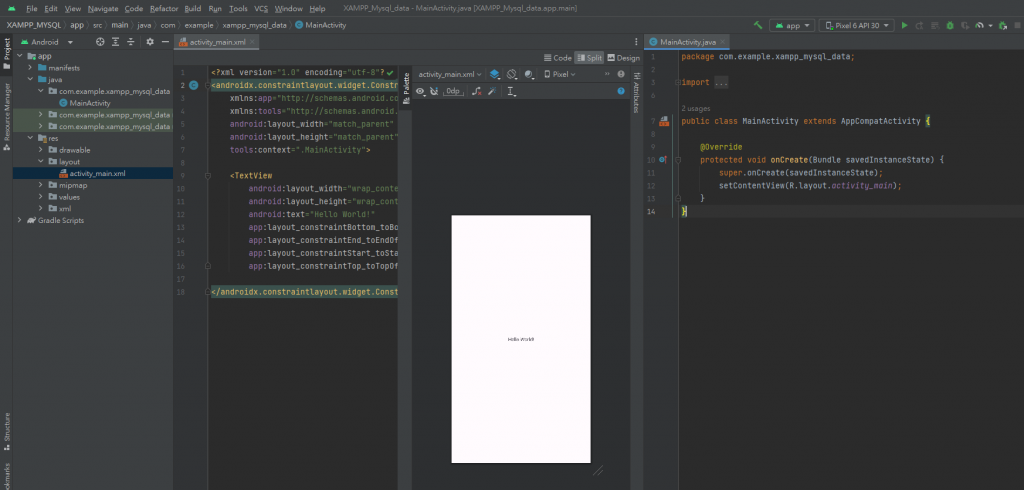
定義了TextView、Button控鍵,這裡的id很重要!
.java需要靠這邊定義的id來1對1控制(物件導向)
我這邊id分別定義TextView ButtontextView,Button button。
接著來控制他們吧!
package com.example.xampp_mysql_data;

import androidx.appcompat.app.AppCompatActivity;

import android.os.Bundle;
import android.view.View;
import android.widget.Button;
import android.widget.TextView;


public class MainActivity extends AppCompatActivity {

    TextView textView;
    Button button;

    @Override
    protected void onCreate(Bundle savedInstanceState) {
        super.onCreate(savedInstanceState);
        setContentView(R.layout.activity_main);

        textView=findViewById(R.id.textView);
        button=findViewById(R.id.button);

        button.setOnClickListener(new View.OnClickListener() {
            @Override
            public void onClick(View view) {
                textView.setText("挖操大吉阿!!!");
            }
        });
    }
}
使用了TextView文字控鍵與Button按鈕控鍵
TextView textView;
Button button;
後面的R.id.textView就是剛剛定義的專屬id
將定義的id對應你輸入的變數
textView=findViewById(R.id.textView);
button=findViewById(R.id.button);
按鈕setOnClickListener監聽器觸發時,textView.setText("挖操大吉阿!!!");設定textView的文字,""裡面是字串可以自行輸入玩看看。
button.setOnClickListener(new View.OnClickListener() {
            @Override
            public void onClick(View view) {
                textView.setText("挖操大吉阿!!!");
            }
        });
接著來設計我們要進行發送與接收的UI介面吧!
Android Studio activity_main_mysql.xml
創建一個新頁面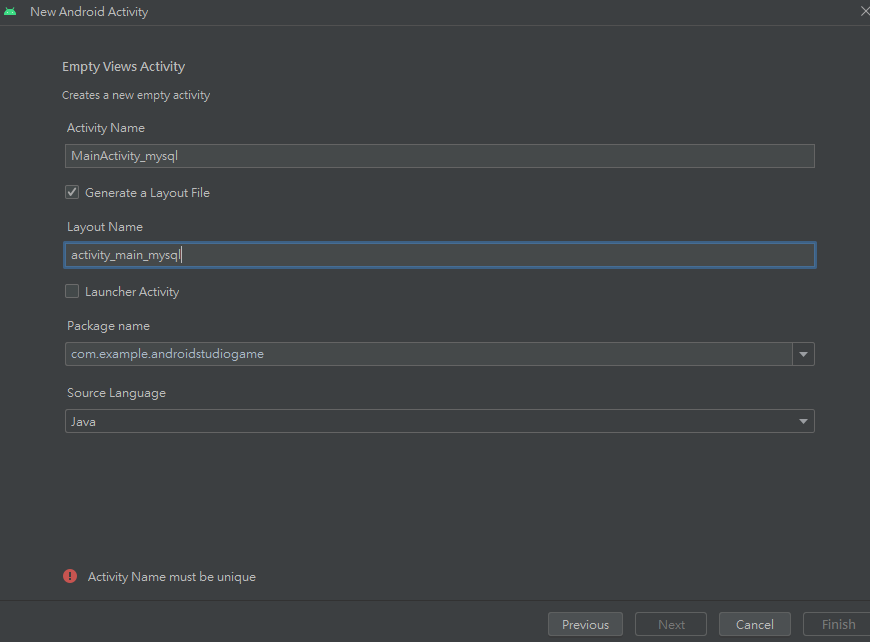
在AndroidManifest.xml打開網路權限<uses-permission android:name="android.permission.INTERNET" />
Apache 的 HTTP 套件useLibrary 'org.apache.http.legacy'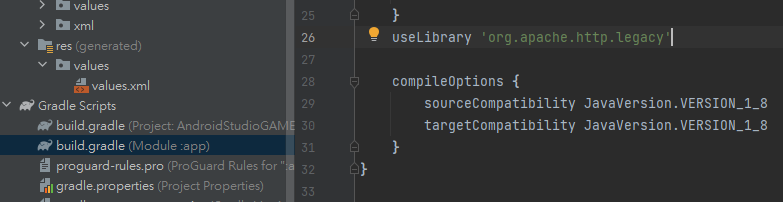
設計使用者介面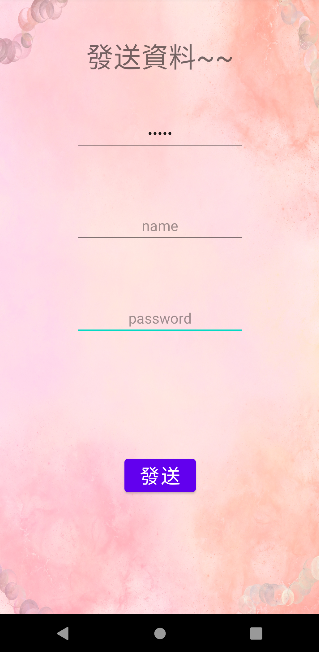
<?xml version="1.0" encoding="utf-8"?>
<androidx.constraintlayout.widget.ConstraintLayout xmlns:android="http://schemas.android.com/apk/res/android"
xmlns:app="http://schemas.android.com/apk/res-auto"
xmlns:tools="http://schemas.android.com/tools"
android:layout_width="match_parent"
android:layout_height="match_parent"
android:background="@drawable/pink"
tools:context=".MainActivity">

<androidx.constraintlayout.widget.Guideline
    android:id="@+id/guideline4"
    android:layout_width="wrap_content"
    android:layout_height="wrap_content"
    android:orientation="horizontal"
    app:layout_constraintGuide_percent="0.25" />

<androidx.constraintlayout.widget.Guideline
    android:id="@+id/guideline3"
    android:layout_width="wrap_content"
    android:layout_height="wrap_content"
    android:orientation="horizontal"
    app:layout_constraintGuide_percent="0.4" />

<Button
    android:id="@+id/button_send"
    android:layout_width="wrap_content"
    android:layout_height="wrap_content"
    android:text="發送"
    android:textSize="24sp"
    app:layout_constraintBottom_toBottomOf="parent"
    app:layout_constraintEnd_toEndOf="parent"
    app:layout_constraintStart_toStartOf="parent"
    app:layout_constraintTop_toTopOf="@+id/guideline2" />

<androidx.constraintlayout.widget.Guideline
    android:id="@+id/guideline2"
    android:layout_width="wrap_content"
    android:layout_height="wrap_content"
    android:orientation="horizontal"
    app:layout_constraintGuide_percent="0.55" />

<EditText
    android:id="@+id/editTextText_name"
    android:layout_width="wrap_content"
    android:layout_height="wrap_content"
    android:ems="10"
    android:hint="name"
    android:inputType="text"
    android:textAlignment="center"
    app:layout_constraintBottom_toTopOf="@+id/guideline3"
    app:layout_constraintEnd_toEndOf="parent"
    app:layout_constraintStart_toStartOf="parent" />

<EditText
    android:id="@+id/editTextNumberPassword_number"
    android:layout_width="wrap_content"
    android:layout_height="wrap_content"
    android:ems="10"
    android:hint="password"
    android:inputType="numberPassword"
    android:textAlignment="center"
    app:layout_constraintBottom_toTopOf="@+id/guideline2"
    app:layout_constraintEnd_toEndOf="parent"
    app:layout_constraintStart_toStartOf="parent" />

<EditText
    android:id="@+id/editTextNumberPassword_id"
    android:layout_width="wrap_content"
    android:layout_height="wrap_content"
    android:ems="10"
    android:hint="id"
    android:inputType="numberPassword"
    android:textAlignment="center"
    app:layout_constraintBottom_toTopOf="@+id/guideline4"
    app:layout_constraintEnd_toEndOf="parent"
    app:layout_constraintStart_toStartOf="parent" />

<TextView
    android:id="@+id/textView"
    android:layout_width="wrap_content"
    android:layout_height="wrap_content"
    android:text="發送資料~~"
    android:textAlignment="center"
    android:textSize="34sp"
    app:layout_constraintBottom_toTopOf="@+id/editTextNumberPassword_id"
    app:layout_constraintEnd_toEndOf="parent"
    app:layout_constraintStart_toStartOf="parent"
    app:layout_constraintTop_toTopOf="parent" />
</androidx.constraintlayout.widget.ConstraintLayout>
Android Studio MainActivity_mysql.java
使用到的控鍵定義
TextView textView;
EditText editTextNumberPassword_account,editTextText_password,editTextNumberPassword_name;
Button button_send;
一對一的ID指定
textView=findViewById(R.id.textView);
button_send=findViewById(R.id.button_send);
editTextNumberPassword_account=findViewById(R.id.editTextNumberPassword_id);
editTextText_password=findViewById(R.id.editTextText_name);
editTextNumberPassword_name=findViewById(R.id.editTextNumberPassword_number);
按鈕setOnClickListener監聽器,觸發時創建三個字串儲存並發送至sendDataToServer函執執行
button_send.setOnClickListener(new View.OnClickListener() {
            @Override
            public void onClick(View view) {
                String account = editTextNumberPassword_account.getText().toString();
                String password = editTextText_password.getText().toString();
                String name = editTextNumberPassword_name.getText().toString();

                sendDataToServer(account, password ,name);
            }
        });
PHP Code
$link = mysqli_connect("localhost", "root", "", "data");
$link -> set_charset("UTF8");
檢查資料庫連接是否成功,連接失敗會回傳錯誤題是
if (!$link) {
    die("Connection failed: " . mysqli_connect_error());
}
http中post是請求資料,$_POST獲取值存入$變數裡
if ($_SERVER['REQUEST_METHOD'] === 'POST') {
    $account = $_POST['account'];
    $password = $_POST['password'];
    $name = $_POST['name'];
到xampp建立的mysql資料庫中對應變數
$sql = "INSERT INTO `users` (`account`, `password`, `name`) VALUES ('$account', '$password', '$name')";
執行前面構建查詢,成功會輸出 "Record inserted successfully",否則會顯示獲取錯誤訊息。
    if (mysqli_query($link, $sql)) {
        echo "Record inserted successfully";
    } else {
        echo "Error: " . $sql . "<br>" . mysqli_error($link);
    }
}
關閉資料庫連接
$link -> close();
XAMPP-MySQL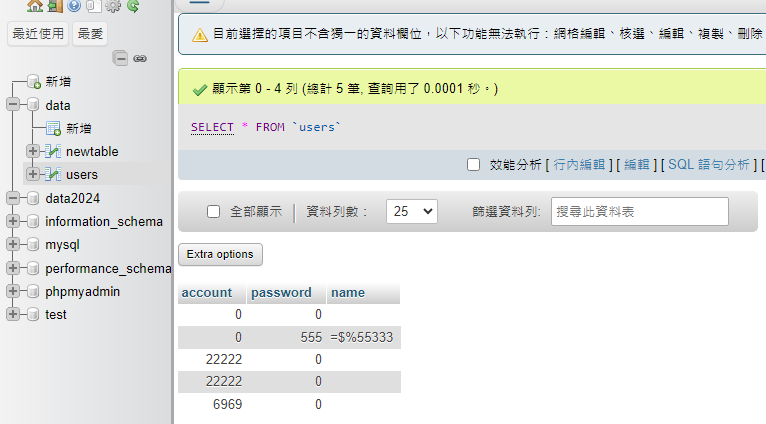
後續會持續更新讀取資料庫資料,以上言論純個人開發經驗分享,如有大神能建議及改善的地方非常歡迎留言!!!
 xiangcheng

 iThome鐵人賽