資料增強技術如旋轉、翻轉、調整大小和裁剪經常一起使用來生成更多的訓練資料。另外,請注意,資料增強僅適用於訓練集,而不適用於測試集,因為資料增強旨在增加模型的泛化能力,在測試集上使用會改變測試資料的分布,從而不能正確評估模型的性能。
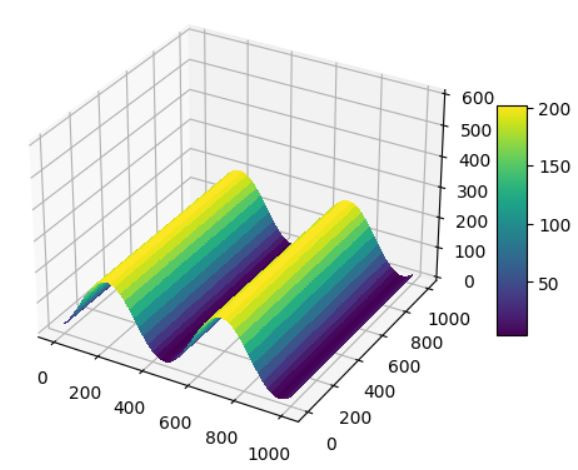
我們先用以下範例去實作
import numpy as np
import matplotlib.pyplot as plt

def plot_3d(img):
    fig, ax = plt.subplots(subplot_kw={"projection": "3d"})
    # X, Y, Z information
    y, x = img.shape
    X = np.arange(0, x)
    Y = np.arange(0, y)
    X, Y= np.meshgrid(X, Y)
    Z = img
    ax.set_zlim(0, 600) # 自行設定
    # Plot the surface
    surf = ax.plot_surface(
        X, Y, Z,
        cmap='viridis',
        linewidth=0,
        antialiased=False)
    fig.colorbar(surf, shrink=0.5, aspect=8) # 自行設定
    plt.show()
# reference: https://matplotlib.org/stable/gallery/mplot3d/surface3d.html
import numpy as np
import matplotlib.pyplot as plt

def generate_img(n):
  x = np.linspace(0, 4 * np.pi, 1000)
  y = np.linspace(0, 4 * np.pi, 1000)
  X, Y = np.meshgrid(x, y)
  wave = np.random.randint(100,300) + 100 * np.sin(X - np.random.randint(0,n))  # 設定sin(x) 加上隨機高度在100~300以上
  plot_3d(wave)
  return wave
image_ori = generate_img(2)
import torchvision.transforms as transforms
from PIL import Image

angel = 3
image_new = Image.fromarray(image_ori)
for j in range(10):
    img_aug = transforms.RandomHorizontalFlip()(image_new)
    img_aug = transforms.RandomVerticalFlip()(img_aug)
    img_aug = transforms.RandomRotation( 3 + 2*j )(img_aug)
    plot_3d(np.array(img_aug))
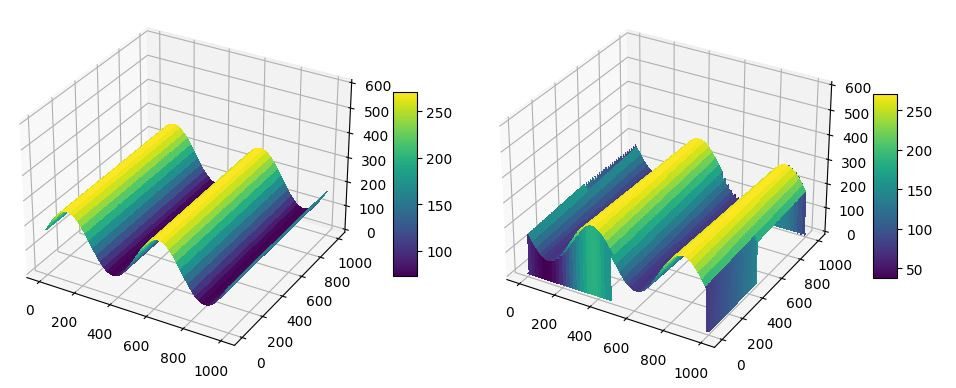
可以改用Roll Shift的方式進行擴增。
angel = 3
image_new = Image.fromarray(image_ori)
for j in range(10):
    img_aug = transforms.RandomHorizontalFlip()(image_new)
    img_aug = transforms.RandomVerticalFlip()(img_aug)
    # img_aug = transforms.RandomRotation( 3 + 2*j )(img_aug)
    img_aug = np.roll(np.array(img_aug,dtype=float), shift=20*j,axis=1)
    plot_3d(np.array(img_aug))

自動化資料擴增技術首先由 AutoAugment 提出,該方法自動找出針對目標資料集的最佳資料擴增策略 (policy)。AutoAugment 通過學習選擇的擴增策略,在大多數情況下優於人工挑選的擴增方法及參數。然而使用該方法訓練來選擇擴增方法非常耗費運算資源和時間,因此後來提出了 Fast AutoAugment (Fast AA),該方法使用 Population Based Augmentation (PBA) 的方式,通過基於 population-based training 來搜尋最佳的超參數。Fast AutoAugment 的核心概念是將擴增資料視為訓練資料中的缺失資料,並運用貝氏優化 (Bayesian optimization) 找出合適的策略來恢復這些缺失資料,通過匹配擴增資料與非擴增資料之間的分布來找出最佳的擴增策略。
此清單方便各位研究時,不用一個個去查還有哪些擴增方法。


Transforms 套件

其他方法:混入雜訊 Additive Noise
AutoAugment: Learning Augmentation Strategies from Data
Fast AutoAugment


 iThome鐵人賽