學習深度學習不僅是掌握一些理論知識,更重要的是能夠在實際應用中有效地修改和優化模型。這一過程不僅要求學生掌握基礎coding知識,還需要學會如何使用流行的深度學習框架如PyTorch來實現模型的訓練與優化。
閱讀和理解研究論文是學習和應用最新技術的重要步驟。以下是一些建議:
選擇合適的論文:從知名期刊或會議(如NeurIPS、ICML、CVPR等)中選擇論文。
在選擇論文時,應該考慮論文的質量和相關性。可以通過查閱高影響力的期刊和會議,或者參考其他研究者的推薦來選擇合適的論文。
閱讀摘要和結論:先閱讀摘要和結論,了解論文的主要貢獻和結果。
理解方法部分:仔細閱讀方法部分,了解作者使用的模型和技術。
分析實驗結果:查看實驗結果和圖表,理解模型的性能和優勢。
閱讀論文時,應該重點關注以下幾個方面:
PyTorch是一個靈活且強大的深度學習框架,適合進行模型的修改與優化。以下是一些實踐步驟:
我們將使用MNIST資料集來訓練一個ResNet模型,並在模型中間加入Attention機制。以下是具體的實現步驟和代碼。
可使用 https://colab.research.google.com/
首先,確保你已經安裝了PyTorch和torchvision庫。如果還沒有安裝,可以使用以下命令進行安裝:
$ pip install torch torchvision
from tqdm import tqdm
import torch
import torch.nn as nn
import torch.optim as optim
import torchvision
import torchvision.transforms as transforms
from torch.utils.data import DataLoader
# 定義資料轉換
transform = transforms.Compose([
    transforms.ToTensor(),
    transforms.Normalize((0.5,), (0.5,))
])

# 下載並加載MNIST資料集
trainset = torchvision.datasets.MNIST(root='./data', train=True, download=True, transform=transform)
trainloader = DataLoader(trainset, batch_size=64, shuffle=True)

testset = torchvision.datasets.MNIST(root='./data', train=False, download=True, transform=transform)
testloader = DataLoader(testset, batch_size=64, shuffle=False)
我們將使用自定義的ResNet模型,並在其中加入Attention機制。以下是如何實現的步驟:
class BasicBlock(nn.Module):
    def __init__(self, in_channels, out_channels, stride=1):
        super(BasicBlock, self).__init__()
        self.conv1 = nn.Conv2d(in_channels, out_channels, kernel_size=3, stride=stride, padding=1, bias=False)
        self.bn1 = nn.BatchNorm2d(out_channels)
        self.conv2 = nn.Conv2d(out_channels, out_channels, kernel_size=3, stride=1, padding=1, bias=False)
        self.bn2 = nn.BatchNorm2d(out_channels)

        self.shortcut = nn.Sequential()
        if stride != 1 or in_channels != out_channels:
            self.shortcut = nn.Sequential(
                nn.Conv2d(in_channels, out_channels, kernel_size=1, stride=stride, bias=False),
                nn.BatchNorm2d(out_channels)
            )

    def forward(self, x):
        out = nn.ReLU()(self.bn1(self.conv1(x)))
        out = self.bn2(self.conv2(out))
        out += self.shortcut(x)
        out = nn.ReLU()(out)
        return out

class ResNet(nn.Module):
    def __init__(self, block, num_blocks, num_classes=10):
        super(ResNet, self).__init__()
        self.in_channels = 64

        self.conv1 = nn.Conv2d(1, 64, kernel_size=3, stride=1, padding=1, bias=False)
        self.bn1 = nn.BatchNorm2d(64)
        self.layer1 = self._make_layer(block, 64, num_blocks[0], stride=1)
        self.layer2 = self._make_layer(block, 128, num_blocks[1], stride=2)
        self.attention = AttentionBlock(128)
        self.layer3 = self._make_layer(block, 256, num_blocks[2], stride=2)
        self.layer4 = self._make_layer(block, 512, num_blocks[3], stride=2)
        self.linear = nn.Linear(512, num_classes)

    def _make_layer(self, block, out_channels, num_blocks, stride):
        strides = [stride] + [1] * (num_blocks - 1)
        layers = []
        for stride in strides:
            layers.append(block(self.in_channels, out_channels, stride))
            self.in_channels = out_channels
        return nn.Sequential(*layers)

    def forward(self, x):
        out = nn.ReLU()(self.bn1(self.conv1(x)))
        out = self.layer1(out)
        out = self.layer2(out)
        out = self.attention(out)
        out = self.layer3(out)
        out = self.layer4(out)
        out = nn.AvgPool2d(4)(out)
        out = out.view(out.size(0), -1)
        out = self.linear(out)
        return out
這邊使用了self attention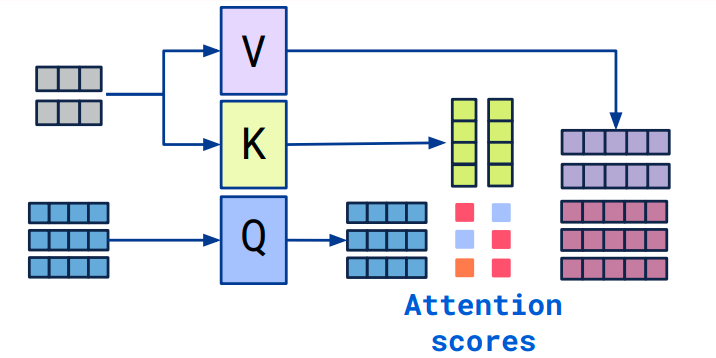
reference: https://medium.com/@sachinsoni600517/understanding-self-attention-in-transformers-ba06c57aed37
class AttentionBlock(nn.Module):
    def __init__(self, in_channels):
        super(AttentionBlock, self).__init__()
        self.query_conv = nn.Conv2d(in_channels, in_channels // 8, kernel_size=1)
        self.key_conv = nn.Conv2d(in_channels, in_channels // 8, kernel_size=1)
        self.value_conv = nn.Conv2d(in_channels, in_channels, kernel_size=1)
        self.softmax = nn.Softmax(dim=-1)

    def forward(self, x):
        batch_size, C, width, height = x.size()
        query = self.query_conv(x).view(batch_size, -1, width * height).permute(0, 2, 1)
        key = self.key_conv(x).view(batch_size, -1, width * height)
        attention = self.softmax(torch.bmm(query, key))
        value = self.value_conv(x).view(batch_size, -1, width * height)
        out = torch.bmm(value, attention.permute(0, 2, 1))
        out = out.view(batch_size, C, width, height)
        return out + x
我們可以訓練和評估這個修改過的模型:
要記得把 model, label, image 都移動到同一個設備上,不能一個 gpu 一個 cpu。
def train(model, trainloader, criterion, optimizer, num_epochs=10):
    model.train()
    for epoch in tqdm(range(num_epochs)):
        running_loss = 0.0
        for images, labels in trainloader:
            # 將資料移動到設備
            images = images.to(device)
            labels = labels.to(device)
            optimizer.zero_grad()
            outputs = model(images)
            loss = criterion(outputs, labels)
            loss.backward()
            optimizer.step()
            running_loss += loss.item()
        print(f"Epoch [{epoch+1}/{num_epochs}], Loss: {running_loss/len(trainloader)}")

# 設置設備
device = torch.device('cuda' if torch.cuda.is_available() else 'cpu')
# 初始化模型、損失函數和優化器
model = ResNet(BasicBlock, [2, 2, 2, 2]).to(device)
criterion = nn.CrossEntropyLoss()
optimizer = optim.Adam(model.parameters(), lr=0.001)

# 訓練模型
train(model, trainloader, criterion, optimizer, num_epochs=10)
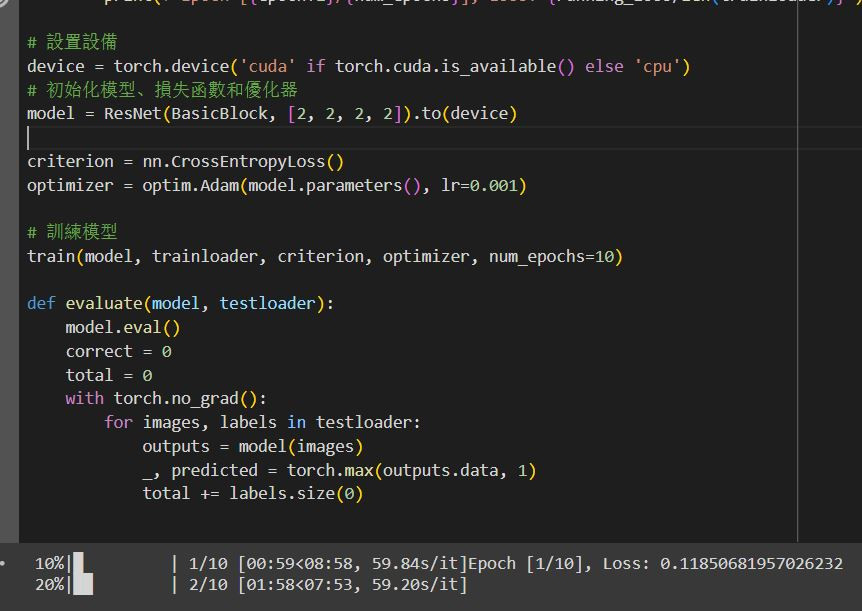
# 定義評估函數
def evaluate(model, testloader):
    model.eval()
    correct = 0
    total = 0
    with torch.no_grad():
        for images, labels in testloader:
            outputs = model(images)
            _, predicted = torch.max(outputs.data, 1)
            total += labels.size(0)
            correct += (predicted == labels).sum().item()

    accuracy = 100 * correct / total
    print(f"Accuracy of the model on the test images: {accuracy}%")