本次學習目標
我們在 Quarkus 中新增以下依賴,該依賴實作 MicroProfile Health。該依賴用於幫助應用程式實現健康檢查的端點。默認會註冊 liveness、readiness 等探針,服務啟動時都會返回 UP 狀態。
implementation 'io.quarkus:quarkus-smallrye-health'
預設提供端點路徑是以下,期會搭配 quarkus.smallrye-health.root-path 根路徑,預設是 health。更多的配置可以至官方。
| 探針 | 路徑 | 對應配置 |
|---|---|---|
| liveness | live | quarkus.smallrye-health.liveness-path |
| readiness | ready | quarkus.smallrye-health.readiness-path |
| startup | started | quarkus.smallrye-health.startup-path |
MicroProfile Health 規範透過以下定義來支援這種健康檢測的契約:
/health/live 和 /health/ready 端點的訪問/q/health/live 和 /q/health/ready 端點liveness 和 readiness
當引入該依賴後,運行專案。並透過 curl 嘗試獲取 liveness、ready 等。沒錯這樣你的健康檢查就完成了。
$ curl http://localhost:8080/q/health/live
{
    "status": "UP",
    "checks": [
    ]
}
$ curl http://localhost:8080/q/health/ready
{
    "status": "UP",
    "checks": [
    ]
}
$ curl http://localhost:8080/q/health/started
{
    "status": "UP",
    "checks": [
    ]
}
liveness
底層平台向 /q/health/live 端點發出 HTTP 請求,以確定是否應該重新啟動應用程式。
如果服務是啟動的,則返回 200 的結果 UP;如果無法上線,返回 503 的結果 DOWN;無法被計算健康檢查,返回 500。此探針,預設端點在 /q/health/live
readiness
底層平台向 /q/health/ready 端點發出 HTTP 請求,以確定應用程式是否準備好接受流量。
如果服務已經準備好處理請求,返回 200 UP。相較於 liveness 不同,因為他表示服務已經啟動,但可能還不能處理任何請求(資料庫在做初始變動)。如果服務還不能接受任何請求,則返回 503 DOWN。同樣的無法被系統識別,則返回 500。此探針,預設端點在 /q/health/ready
接著引入一個連線 PostgreSQL 和 mqtt 的依賴。嘗試透過 MQTT 發送訊息,並接收訊息最後儲存至資料庫。
    implementation 'io.quarkus:quarkus-hibernate-orm-panache'
    implementation 'io.quarkus:quarkus-jdbc-postgresql'
    implementation 'io.quarkus:quarkus-messaging-mqtt'
依賴導入完成後再安裝 PostgreSQL 和 EMQX 環境,讓 Quarkus 來進行交互。
$ docker compose -f infra/docker-compose.yaml up -d
環境安裝完後,配置連線資訊,如果要操作記得 IP 需要換成自己的環境 IP。
# configure your datasource
quarkus.datasource.db-kind = postgresql
quarkus.datasource.username = itachi
quarkus.datasource.password = 123456
quarkus.datasource.jdbc.url = jdbc:postgresql://172.25.150.200:5432/itachi

# drop and create the database at startup (use `update` to only update the schema)
quarkus.hibernate-orm.database.generation = drop-and-create


mp.messaging.outgoing.deviceOut.type=smallrye-mqtt
mp.messaging.outgoing.deviceOut.host=172.25.150.200
mp.messaging.outgoing.deviceOut.port=1883
mp.messaging.outgoing.deviceOut.auto-generated-client-id=true
mp.messaging.outgoing.deviceOut.qos=1
mp.messaging.outgoing.deviceOut.topic=test/device


mp.messaging.incoming.deviceIn.type=smallrye-mqtt
mp.messaging.incoming.deviceIn.host=172.25.150.200
mp.messaging.incoming.deviceIn.port=1883
mp.messaging.incoming.deviceIn.auto-generated-client-id=true
mp.messaging.incoming.deviceIn.qos=1
mp.messaging.incoming.deviceIn.topic=test/device
producer.generate.duration=1
當以上都完成後,運行 Quarkus 吧! 結果如下,沒錯最後 Quarkus 框架還是幫你弄好了,將會自動註冊一個 readiness 健康檢查,在 check 部分,以驗證是否能連接資料庫。而 MQTT 的探針分別針對 deviceIn 和 deviceOut Topic。
$ curl http://localhost:8080/q/health/live
{
    "status": "UP",
    "checks": [
        {
            "name": "SmallRye Reactive Messaging - liveness check",
            "status": "UP",
            "data": {
                "deviceIn": "[OK]",
                "deviceOut": "[OK]"
            }
        }
    ]
}
$ curl http://localhost:8080/q/health/ready
{
    "status": "UP",
    "checks": [
        {
            "name": "Database connections health check",
            "status": "UP",
            "data": {
                "<default>": "UP"
            }
        },
        {
            "name": "SmallRye Reactive Messaging - readiness check",
            "status": "UP",
            "data": {
                "deviceIn": "[OK]",
                "deviceOut": "[OK]"
            }
        }
    ]
}
$ curl http://localhost:8080/q/health/started
{
    "status": "UP",
    "checks": [
        {
            "name": "SmallRye Reactive Messaging - startup check",
            "status": "UP",
            "data": {
                "deviceIn": "[OK]",
                "deviceOut": "[OK]"
            }
        }
    ]
}
假設服務需要與第三方進行交互,那也是可以自訂義端點。如下,分別定義 liveness 和 readiness。
@ApplicationScoped
@Liveness
public class LivenessProbe implements HealthCheck {
    @Override
    public HealthCheckResponse call() {
        return HealthCheckResponse
                .named("Custom Liveness Prob")
                .withData("time", String.valueOf(new Date()))
                .up()
                .build();
    }
}
以 liveness 來說,在 Quarkus 註冊流程如下。
HealthCheck 必須是 CDI bean,它使用 @ApplicationScoped 進行註釋,創建了一個CDI bean 實例
使用 @Liveness 表示它是一個 liveness 的健康檢查
實作 HealthCheck 介面,並覆寫 call() 方法
只要調用 /q/health/live 端點,就會調用 call() 方法,並返回一個 HealthCheckResponse 物件
每個健康檢查都有一個名稱(named),其反映健康檢查的意圖
上下文數據可以以鍵值對的形式添加到健康檢查中。(withData)
狀態始終返回 UP(up())
readiness
自訂義針對外部服務進行探針,相反的使用 @Readiness 註解實作,下面是針對外部服務進行實作。這邊定義了一個 externalURL 環境變數,用於讓探針針對該變數進行週期性的戳動作。其使用 HTTP GET 方式且狀態是 200 就表示成功。
@ConfigMapping(prefix = "health")
public interface HealthCheckConfig {

    Readiness readiness();

    interface Readiness {
        String externalURL();
    }
}

@ApplicationScoped
public class ReadinessProbe {
    @Inject
    HealthCheckConfig healthCheckConfig;

    @Readiness
    HealthCheck checkURL() {
        return new UrlHealthCheck(healthCheckConfig.readiness().externalURL())
                .name("ExternalURL health check").requestMethod(HttpMethod.GET).statusCode(200);
    }
}
定義完後,可以如下看到定義的 ExternalURL health check。
$ curl http://localhost:8080/q/health/ready
{
    "status": "UP",
    "checks": [
        {
            "name": "ExternalURL health check",
            "status": "UP",
            "data": {
                "host": "GET https://www.fruityvice.com/api/fruit/banana"
            }
        },
        {
            "name": "Database connections health check",
            "status": "UP",
            "data": {
                "<default>": "UP"
            }
        },
        {
            "name": "SmallRye Reactive Messaging - readiness check",
            "status": "UP",
            "data": {
                "deviceIn": "[OK]",
                "deviceOut": "[OK]"
            }
        }
    ]
}
以上透過 Quarkus 輕鬆地透過框架配置了健康檢查部分。如果使用 Quarkus Kubernetes 依賴,生成 Kubernetes YAML 時,會在 Pod 層級資源中自動配置 liveness 和 readiness 等探針,其預設值不會特別去異動,就相信專業。接著將其部署至 Kubernetes 上。產生的 Deployment 如下
apiVersion: apps/v1
kind: Deployment
metadata:
  annotations:
    app.quarkus.io/quarkus-version: 3.13.3
    app.quarkus.io/build-timestamp: 2024-08-27 - 14:38:39 +0000
  labels:
    app.kubernetes.io/name: app-health
    app.kubernetes.io/version: 1.0.0-SNAPSHOT
    app.kubernetes.io/managed-by: quarkus
  name: app-health
spec:
  replicas: 1
  selector:
    matchLabels:
      app.kubernetes.io/name: app-health
      app.kubernetes.io/version: 1.0.0-SNAPSHOT
  template:
    metadata:
      annotations:
        app.quarkus.io/quarkus-version: 3.13.3
        app.quarkus.io/build-timestamp: 2024-08-27 - 14:38:39 +0000
      labels:
        app.kubernetes.io/managed-by: quarkus
        app.kubernetes.io/name: app-health
        app.kubernetes.io/version: 1.0.0-SNAPSHOT
    spec:
      containers:
        - env:
            - name: KUBERNETES_NAMESPACE
              valueFrom:
                fieldRef:
                  fieldPath: metadata.namespace
          image: registry.hub.docker.com/cch0124/app-health:1.0.0-SNAPSHOT
          imagePullPolicy: Always
          livenessProbe:
            failureThreshold: 3
            httpGet:
              path: /q/health/live
              port: 8080
              scheme: HTTP
            initialDelaySeconds: 5
            periodSeconds: 10
            successThreshold: 1
            timeoutSeconds: 10
          name: app-health
          ports:
            - containerPort: 8080
              name: http
              protocol: TCP
          readinessProbe:
            failureThreshold: 3
            httpGet:
              path: /q/health/ready
              port: 8080
              scheme: HTTP
            initialDelaySeconds: 5
            periodSeconds: 10
            successThreshold: 1
            timeoutSeconds: 10
          startupProbe:
            failureThreshold: 3
            httpGet:
              path: /q/health/started
              port: 8080
              scheme: HTTP
            initialDelaySeconds: 5
            periodSeconds: 10
            successThreshold: 1
            timeoutSeconds: 10
下表整理上述所提的內容。
| Health check endpoints | HTTP status | JSON payload status |
|---|---|---|
| /q/health/live and /q/health/ready | 200 | UP |
| /q/health/live and /q/health/ready | 503 | DOWN |
| /q/health/live and /q/health/ready | 500 | Undetermined * |
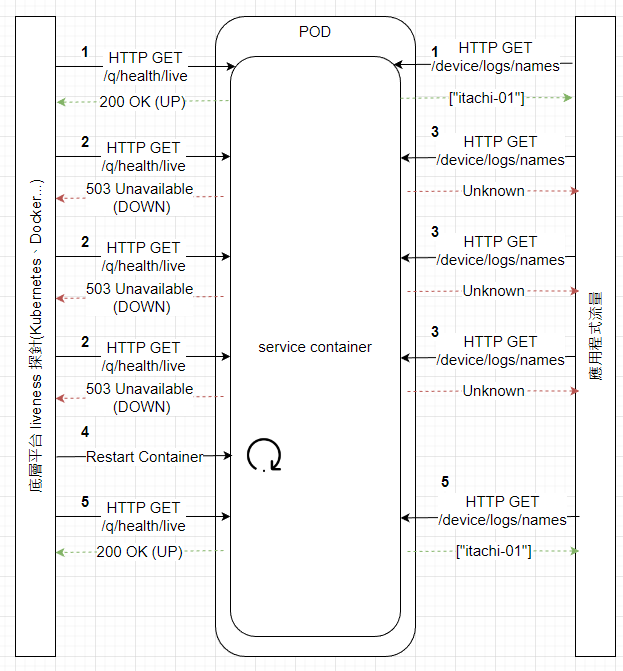
從本範例中我們可以大致如下圖模擬 liveness 檢查流程

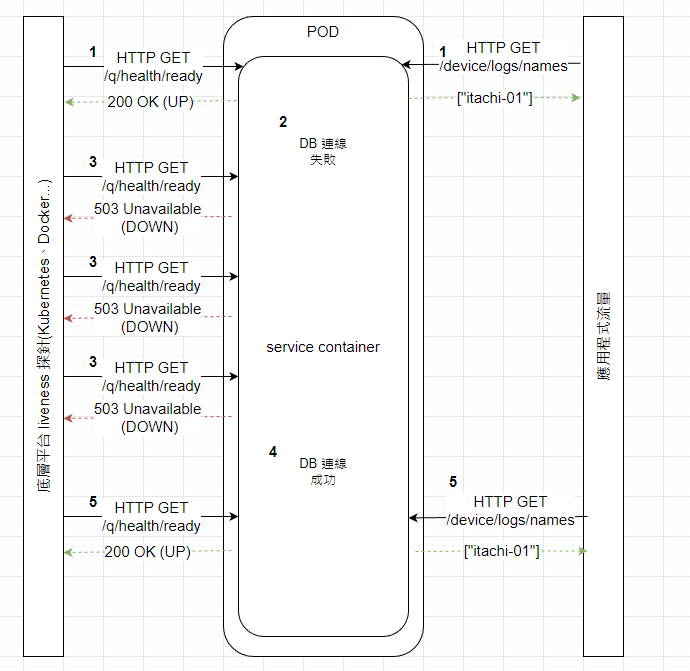
liveness 檢查和應用程式接收流量正程執行liveness 檢查失敗從本範例中我們可以大致如下圖模擬 readiness 檢查流程

readiness 檢查和應用程式接收流量正程執行readiness 檢查失敗,因為 DB 無法正常連線嘗試將 EMQX 服務停止。
docker stop emqx
此時去看 Pod 狀態,發現 Ready 變 False,且是 Readiness 探針是 503 屬於非成功。因此會不斷的嘗試
$ kubectl describe pods app-health-7bc94b5cdf-zlqwk
Name:             app-health-7bc94b5cdf-zlqwk
Namespace:        default
Priority:         0
...
Conditions:
  Type              Status
  Initialized       True
  Ready             False
  ContainersReady   False
  PodScheduled      True
Events:
  Type     Reason     Age                 From               Message
  ----     ------     ----                ----               -------
  Normal   Scheduled  56m                 default-scheduler  Successfully assigned default/app-health-7bc94b5cdf-zlqwk to k3d-ithome-lab-cluster-agent-1
  Normal   Pulling    56m                 kubelet            Pulling image "registry.hub.docker.com/cch0124/app-health:1.0.0-SNAPSHOT"
  Normal   Pulled     56m                 kubelet            Successfully pulled image "registry.hub.docker.com/cch0124/app-health:1.0.0-SNAPSHOT" in 7.466872458s (7.466893449s including waiting)
  Normal   Created    56m                 kubelet            Created container app-health
  Normal   Started    56m                 kubelet            Started container app-health
  Warning  Unhealthy  5s (x21 over 3m5s)  kubelet            Readiness probe failed: HTTP probe failed with statuscode: 503
且 Service 對應的 Endpoints 會將 Pod 地址移除,如下。其最短移除時間可以這樣計算 (failureThreshold - 1) * periodSeconds + timeoutSeconds。
$ kubectl get endpoints
NAME            ENDPOINTS         AGE
...
app-health                        80m
如果將 emqx 給啟用則 Service 將其 Pod 位置加入至 Endpoints 資源上。
$ kubectl get endpoints -w
NAME            ENDPOINTS         AGE
app-health      10.42.1.13:8080   113m
 kubectl get pods -w -owide
NAME                                  READY   STATUS    RESTARTS       AGE     IP           NODE                              NOMINATED NODE   READINESS GATES
app-health-7bc94b5cdf-zlqwk           1/1     Running   0              114m    10.42.1.13   k3d-ithome-lab-cluster-agent-1    <none>           <none>
可以從上面結果得到以下結論:
/q/health/ready 端點的 HTTP 狀態碼來判斷如果將 liveness 探針的目標端點指向為存在的路徑,其會被 kubelet 殺掉並重啟,如下。重啟時間週期是
第一次探針:失敗(因為 /q/health/live 不存在)
第二次探針:失敗(因為 /q/health/live 不存在)
第三次探針:失敗(因為 /q/health/live 不存在)
由於每次探針的間隔是 10 秒,加上有 3 次失敗機會(failureThreshold)。所以最短在 30 秒後(10 秒 * 2 + 10 秒),Kubernetes 就會判定 Pod 不健康,並觸發重啟,計算上是 (failureThreshold - 1) * periodSeconds + timeoutSeconds。
$ kubectl get pods -o wide -w
app-health-7bc94b5cdf-zlqwk           0/1     Running   0               127m    10.42.1.13   k3d-ithome-lab-cluster-agent-1    <none>           <none>
app-health-6496d8dbc4-qgcdn           0/1     Running   2 (21s ago)     29s     10.42.0.9    k3d-ithome-lab-cluster-agent-0    <none>           <none>
app-health-6496d8dbc4-qgcdn           0/1     Running   2 (22s ago)     30s     10.42.0.9    k3d-ithome-lab-cluster-agent-0    <none>           <none>
app-health-7bc94b5cdf-zlqwk           1/1     Running   0               127m    10.42.1.13   k3d-ithome-lab-cluster-agent-1    <none>           <none>
app-health-6496d8dbc4-qgcdn           1/1     Running   2 (24s ago)     32s     10.42.0.9    k3d-ithome-lab-cluster-agent-0    <none>           <none>
app-health-7bc94b5cdf-zlqwk           1/1     Terminating   0               127m    10.42.1.13   k3d-ithome-lab-cluster-agent-1    <none>           <none>
app-health-7bc94b5cdf-zlqwk           0/1     Terminating   0               127m    <none>       k3d-ithome-lab-cluster-agent-1    <none>           <none>
app-health-7bc94b5cdf-zlqwk           0/1     Terminating   0               127m    10.42.1.13   k3d-ithome-lab-cluster-agent-1    <none>           <none>
app-health-7bc94b5cdf-zlqwk           0/1     Terminating   0               127m    10.42.1.13   k3d-ithome-lab-cluster-agent-1    <none>           <none>
app-health-7bc94b5cdf-zlqwk           0/1     Terminating   0               127m    10.42.1.13   k3d-ithome-lab-cluster-agent-1    <none>           <none>
app-health-6496d8dbc4-qgcdn           0/1     Running       3 (2s ago)      63s     10.42.0.9    k3d-ithome-lab-cluster-agent-0    <none>           <none>
app-health-6496d8dbc4-qgcdn           0/1     Running       3 (9s ago)      70s     10.42.0.9    k3d-ithome-lab-cluster-agent-0    <none>           <none>
app-health-6496d8dbc4-qgcdn           1/1     Running       3 (11s ago)     72s     10.42.0.9    k3d-ithome-lab-cluster-agent-0    <none>           <none>
app-health-6496d8dbc4-qgcdn           0/1     Running       4 (2s ago)      103s    10.42.0.9    k3d-ithome-lab-cluster-agent-0    <none>           <none>
app-health-6496d8dbc4-qgcdn           0/1     Running       4 (9s ago)      110s    10.42.0.9    k3d-ithome-lab-cluster-agent-0    <none>           <none>
app-health-6496d8dbc4-qgcdn           1/1     Running       4 (11s ago)     112s    10.42.0.9    k3d-ithome-lab-cluster-agent-0    <none>           <none>
從 events 可以清楚知道原因其其顯示在 Message 欄位,這對於除錯無可厚非是個好資源。
$  kubectl get events --sort-by='.lastTimestamp'
LAST SEEN   TYPE      REASON              OBJECT                             MESSAGE
7m46s       Normal    Scheduled           pod/app-health-6496d8dbc4-qgcdn    Successfully assigned default/app-health-6496d8dbc4-qgcdn to k3d-ithome-lab-cluster-agent-0
11m         Warning   Unhealthy           pod/app-health-7bc94b5cdf-zlqwk    Readiness probe failed: HTTP probe failed with statuscode: 503
7m47s       Normal    ScalingReplicaSet   deployment/app-health              Scaled up replica set app-health-6496d8dbc4 to 1
7m47s       Normal    SuccessfulCreate    replicaset/app-health-6496d8dbc4   Created pod: app-health-6496d8dbc4-qgcdn
7m41s       Normal    Pulled              pod/app-health-6496d8dbc4-qgcdn    Successfully pulled image "registry.hub.docker.com/cch0124/app-health:1.0.0-SNAPSHOT" in 5.506520701s (5.506540622s including waiting)
7m39s       Normal    Pulled              pod/app-health-6496d8dbc4-qgcdn    Successfully pulled image "registry.hub.docker.com/cch0124/app-health:1.0.0-SNAPSHOT" in 1.49692412s (1.49693049s including waiting)
7m23s       Normal    Pulled              pod/app-health-6496d8dbc4-qgcdn    Successfully pulled image "registry.hub.docker.com/cch0124/app-health:1.0.0-SNAPSHOT" in 1.619209349s (1.619233429s including waiting)
7m15s       Normal    SuccessfulDelete    replicaset/app-health-7bc94b5cdf   Deleted pod: app-health-7bc94b5cdf-zlqwk
7m15s       Normal    ScalingReplicaSet   deployment/app-health              Scaled down replica set app-health-7bc94b5cdf to 0 from 1
6m47s       Warning   Unhealthy           pod/app-health-6496d8dbc4-qgcdn    Liveness probe failed: HTTP probe failed with statuscode: 404
6m47s       Normal    Killing             pod/app-health-6496d8dbc4-qgcdn    Container app-health failed liveness probe, will be restarted
6m47s       Warning   Unhealthy           pod/app-health-6496d8dbc4-qgcdn    Readiness probe failed: Get "http://10.42.0.9:8080/q/health/ready": EOF
6m46s       Normal    Pulling             pod/app-health-6496d8dbc4-qgcdn    Pulling image "registry.hub.docker.com/cch0124/app-health:1.0.0-SNAPSHOT"
6m44s       Normal    Pulled              pod/app-health-6496d8dbc4-qgcdn    Successfully pulled image "registry.hub.docker.com/cch0124/app-health:1.0.0-SNAPSHOT" in 1.530334886s (1.530354226s including waiting)
6m44s       Normal    Created             pod/app-health-6496d8dbc4-qgcdn    Created container app-health
6m44s       Normal    Started             pod/app-health-6496d8dbc4-qgcdn    Started container app-health
2m40s       Warning   BackOff             pod/app-health-6496d8dbc4-qgcdn    Back-off restarting failed container app-health in pod app-health-6496d8dbc4-qgcdn_default(cc9614a0-0583-40b0-9d3b-85e944c47172)
liveness 探針觀察到的行為是
若整題來看,檢康檢查可以帶來以下優勢
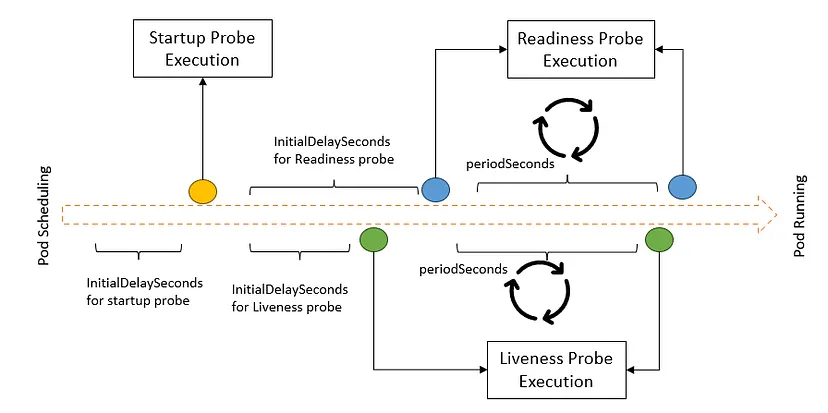
下圖為探針的執行順序,執行完 startupProbe 後就會往後交給 liveness 和 readiness 執行。

From https://blog.devgenius.io/k8s-for-de-probes-b598a1adeecf
