今天加速一下🚀
在 React 的世界,因為在 JSX 中寫 CSS 非常不方便,所以在 2019 年(竟然才五年!)出現了 Tailwind 讓你可以直接 inline 用預先定義的 class 設計你的 component,其實概念跟 Bootstrap 是一樣的!
Tailwind 有分 Tailwind CSS 跟 Tailwind UI,後者有許多完成的 components & templates,是他們團隊做的,有需要的話可以看看或直接購買他們的 templates 省設計的時間。
另一方面,在去年一月底,造福全世界的 shadcn/ui 誕生,如果你要找免費又好看的 components 這個就是了!他們受到 Vercel 支持,因此在 Vercel 介面也可以看到很多 shadcn 設計語彙。使用上不用像 MUI 要一次 npm 下載整大包 8MB,shadcn-ui 只有 4kB!如自助餐,你需要 button 時 npx shadcn-ui@latest add button,就會下載到你在啟動時設定的 ui 資料夾,而這些 components 都是你可以自己修改的~
Remix 從今年四月起會預裝 Tailwind。然後如果使用 VSCode 的話建議可以安裝 Tailwind CSS IntelliSense extension,這樣你 hover 那個 class
在 tailwind.css 檔案中,你可以使用 base、components、utilities 設定不同階層要套用的 class,我目前都只有設定到 base 而已,其他太深的請 CSS 專接幫忙解釋。以下只會說說 font 要怎麼設定~
// /app/tailwind.css
// @import 要在第一部分
@import url('https://fonts.googleapis.com/css2?family=Open+Sans:ital,wght@0,300..800;1,300..800&display=swap');

@tailwind base;
@tailwind components;
@tailwind utilities;

@layer base {
    * {
        @apply border-border font-open-sans scroll-smooth;
    }

    body {
        @apply text-foreground;
    }

    main {
        @apply bg-background text-foreground;
    }

    section {
        @apply bg-background text-foreground;
    }

    h1 {
        @apply text-4xl md:text-6xl font-bold tracking-tight;
    }

    p {
        // 如果不設定 tailwind.config.ts 可以寫 css
        font-family: 'Open Sans', sans-serif;

        // 如果設定了 config 可以直接 apply class,請見下段
        @apply font-open-sans
    }
...
上面匯入了 font 了,接著要在 config 設定你的 extend class,這樣就可以直接使用 inline class。
import type { Config } from 'tailwindcss'

const config = {
    content: [
        './pages/**/*.{ts,tsx,js,jsx}',
        './components/**/*.{ts,tsx,js,jsx}',
        './app/**/*.{ts,tsx,js,jsx}',
        './src/**/*.{ts,tsx,js,jsx}',
    ],
    prefix: '',
    theme: {
        extend: {
            // 在 extend 裡面這樣寫就可以跟平常一樣用 font-open-sans 寫 inline 了
            fontFamily: {
                'open-sans': ['"Open Sans"', 'Inter', 'sans-serif'],
            }
        }
    }
}
Beautifully designed components that you can copy and paste into your apps. Accessible. Customizable. Open Source.
因為他其實不是 Component Library,所以匯入不像是傳統上 import ... from '@ui-library',而是你指定的下載資料夾 import Button from '~/components/ui/button.tsx',其實就是匯入他幫你做好 reusable component,而這些 component 都是你可以自由改變的。
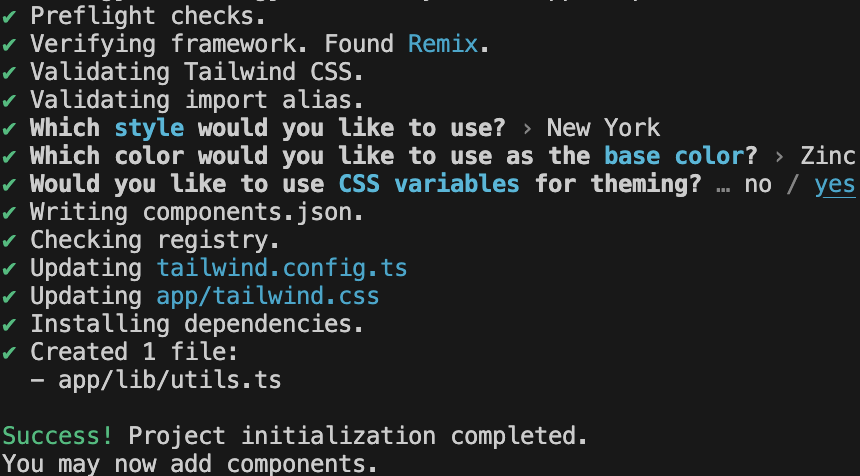
在安裝完 tailwind 之後,使用 npx shadcn@latest init,然後呢:
Which style would you like to use? › New York
Which color would you like to use as base color? › Zinc
Do you want to use CSS variables for colors? › no / yes

好的我本來以為還需要設定路徑、global css 位置,與 react router,結果就如官網給的 Remix installation guide 一樣,從昨天開始,會自己偵測 Remix Framework 了!

完成之後,會看到新的檔案:/component.json,以及你的 tailwind.css 裡更新成了 shadcn theme 配置,如果想要用其他的顏色可以在 Themes 取得~
