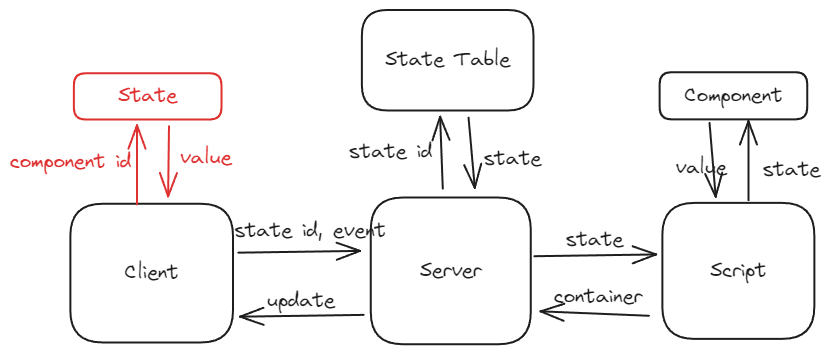
有了 Button 的實作,對於 Textbox 也可以清楚的實作了。
不過,在和 Button 不同的是,我們在 client 端會需要維護一個 state,負責把 component id map 到使用者輸入的資料。
// global
var state = {}
newTextbox.onchange = function(e) {
    state[e.target.id] = e.target.value
}
當使用者完成在文字輸入框中的輸入並移開焦點時,會觸發畫面更新機制。
newTextbox.onblur = function(e) {
    rerun({
        type: 'input',
        id: e.target.id,
        value: e.target.value,
    })
}
所以 createTextbox會這樣寫:
var state = {}

function createTextbox(comp) {
    // ... (其他 DOM 元素的程式碼)

    const newTextbox = document.createElement('input')
    newTextbox.id = comp.id
    newTextbox.className = 'input'
    newTextbox.type = 'text'
    newTextbox.value = state[comp.id] || ''
    newTextbox.onblur = function(e) {
        rerun({
            type: 'input',
            id: e.target.id,
            value: e.target.value,
        })
    }
    newTextbox.onchange = function(e) {
        state[e.target.id] = e.target.value
    }
    ctrld.appendChild(newTextbox)
    return fd
}
由於在實作 Button 時 Server 邏輯已經補好了,所以這裡只要追加 component:
type Textbox struct {
	Type  string `json:"type"`
	ID    string `json:"id"`
	Label string `json:"label"`
}

func newTextbox(label string) *Textbox {
	return &Textbox{
		Type:  "textbox",
		ID:    label,
		Label: label,
	}
}

func Textbox(state *tgstate.State, c *Container, label string) string {
	textbox := newTextbox(label)
	c.Comps = append(c.Comps, textbox)
	return state.GetString(textbox.ID)
}
在 script function 就可以這樣使用:
name := tg.Textbox(state, root, "What's your name")
tg.Text(root, "Hi "+name)
