Current Sprint: 1. 完成 HappyPath: 可以建立一場遊戲,玩到結束
repo: https://github.com/side-project-at-SPT/ithome-ironman-2024-san-juan
swagger docs: https://side-project-at-spt.github.io/ithome-ironman-2024-san-juan/
昨天開了專案,並把服務上線
今天把 rspec & swagger 裝起來
api 開發完成後,可以用 swagger 文件的方式分享給其他成員串接,而套件 rswag 提供了從 spec 生成 swagger 的能力,讓你寫測試時同時寫好 swagger docs。
$ bundle add rspec-rails

# Generate boilerplate configuration files
# (check the comments in each generated file for more information)
$ rails generate rspec:install
      # create  .rspec
      # create  spec
      # create  spec/spec_helper.rb
      # create  spec/rails_helper.rb
$ bundle add rswag
$ rails g rswag:install
    # generate  rswag:specs:install
    #    rails  generate rswag:specs:install
    #   create  spec/swagger_helper.rb
    # generate  rswag:api:install
    #    rails  generate rswag:api:install
    #   create  config/initializers/rswag_api.rb
    #    route  mount Rswag::Api::Engine => '/api-docs'
    # generate  rswag:ui:install
    #    rails  generate rswag:ui:install
    #   create  config/initializers/rswag_ui.rb
    #    route  mount Rswag::Ui::Engine => '/api-docs'
$ rails rswag
# Generating Swagger docs ...
# No examples found.
# Swagger doc generated at /your-repo-root/swagger/v1/swagger.yaml

# Finished in 0.00004 seconds (files took 0.71248 seconds to load)
# 0 examples, 0 failures
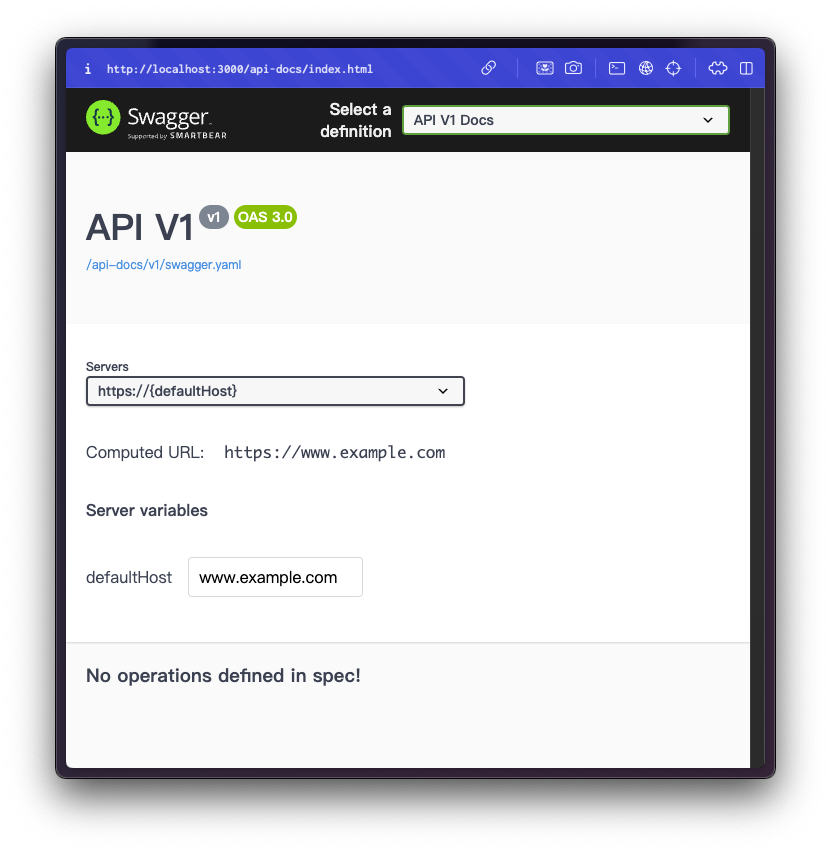
開啟 server 後,訪問 http://localhost:3000/api-docs/index.html 看看吧
DEPRECATION WARNING: Rswag::Ui: WARNING: The method will be renamed to "openapi_endpoint" in v3.0
# /config/initializers/rswag_ui.rb:11

Rswag::Ui.configure do |c|
  ...

- c.swagger_endpoint "/api-docs/v1/swagger.yaml", "API V1 Docs"
+ c.openapi_endpoint "/api-docs/v1/swagger.yaml", "API V1 Docs"

  ...
end
新增產生 swagger docs CI,將 swagger 部署在 GitHub page
執行產生 swagger docs CI 時,略過檢查
# /spec/rails_helper.rb:31

...

begin
- ActiveRecord::Migration.maintain_test_schema!
+ ActiveRecord::Migration.maintain_test_schema! unless ENV.fetch("API_DOC_MODE", nil)
rescue ActiveRecord::PendingMigrationError => e
  abort e.to_s.strip
end

...
設定 swagger config
# at /spec/swagger_helper.rb

# frozen_string_literal: true

require 'rails_helper'

RSpec.configure do |config|
  # Specify a root folder where Swagger JSON files are generated
  # NOTE: If you're using the rswag-api to serve API descriptions, you'll need
  # to ensure that it's configured to serve Swagger from the same folder
  config.openapi_root = Rails.root.join('swagger').to_s

  # Define one or more Swagger documents and provide global metadata for each one
  # When you run the 'rswag:specs:swaggerize' rake task, the complete Swagger will
  # be generated at the provided relative path under openapi_root
  # By default, the operations defined in spec files are added to the first
  # document below. You can override this behavior by adding a openapi_spec tag to the
  # the root example_group in your specs, e.g. describe '...', openapi_spec: 'v2/swagger.json'
  config.openapi_specs = {
    'v1/swagger.yaml' => {
      openapi: '3.0.1',
      info: {
        title: 'API V1',
        version: 'v1'
      },
      paths: {},
      servers: [
        {
          url: 'http://localhost:3000',
          description: 'Development environment'
        },
        {
          url: 'https://ithome-ironman-2024-san-juan.zeabur.app/', # 改成你的 domain name
          description: 'Production environment at Zeabur'
        }
      ]
    }
  }

  # Specify the format of the output Swagger file when running 'rswag:specs:swaggerize'.
  # The openapi_specs configuration option has the filename including format in
  # the key, this may want to be changed to avoid putting yaml in json files.
  # Defaults to json. Accepts ':json' and ':yaml'.
  config.openapi_format = :yaml
end
把 gen 好的 html 放在 public/ (手動 SSG)
至 GitHub repo Settings > Pages > Build and deployment Source 選 GitHub Actions
現在推 code 之後,可以在 https://your-account.github.io/reop-name/ 看到 swagger
接下來新增一個簡單的 endpoint
$ rails g controller walking_skeleton
      # create  app/controllers/walking_skeleton_controller.rb
      # invoke  rspec
      # create    spec/requests/walking_skeleton_spec.rb
# spec/requests/walking_skeleton_spec.rb

require 'swagger_helper'

RSpec.describe 'WalkingSkeleton', type: :request do
  path '/walking-skeleton' do
    get 'Examine the walking skeleton' do
      tags 'Walking Skeleton'
      produces 'application/json'

      response '200', 'Walk' do
        schema type: :object,
          properties: {
            message: { type: :string }
          },
          required: [ 'message' ]

        run_test!
      end
    end
  end
end
接受所有 method 的請求
# config/routes.rb

Rails.application.routes.draw do
  # ...

  match "walking-skeleton", to: "walking_skeleton#show", via: :all

  # ...
end
# app/controllers/walking_skeleton_controller.rb

class WalkingSkeletonController < ApplicationController
  def show
    respond_to do |format|
      format.json { render json: { message: "Walk #{Time.current}" } }
      format.html { render plain: "Server is up and running -- #{Time.current}" }
    end
  end
end
在 ApplicationController 新增 MimeResponds 的功能
# app/controllers/application_controller.rb

class ApplicationController < ActionController::API
  include ActionController::MimeResponds
end
$ rails rsawg
$ rails s

# swagger 的位置在 http://localhost/api-docs
成功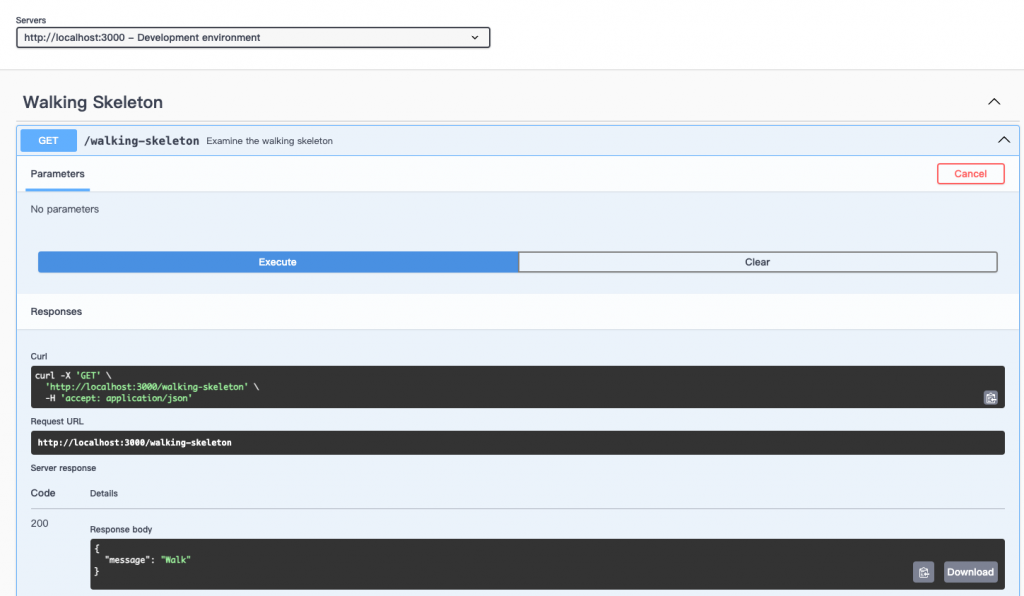
推上線後發現,送出請求時會遇到 CORS 錯誤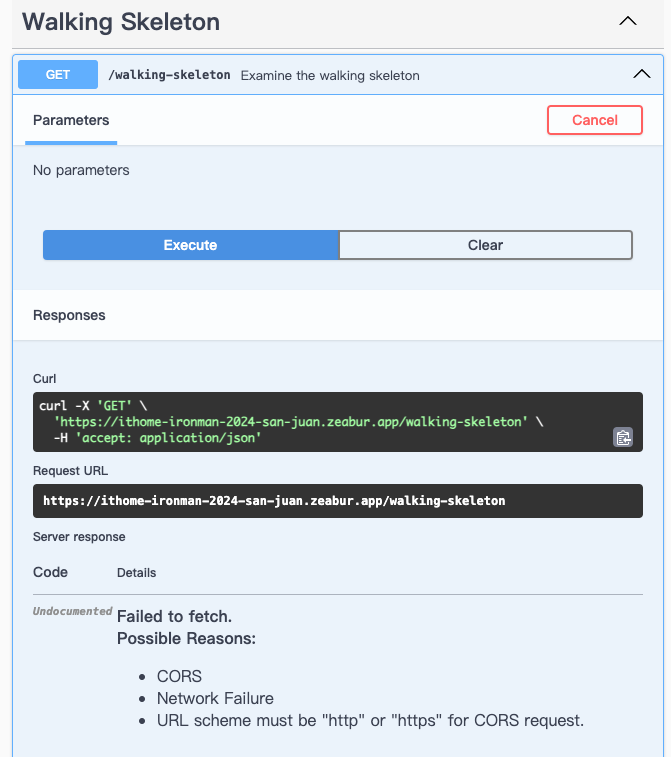
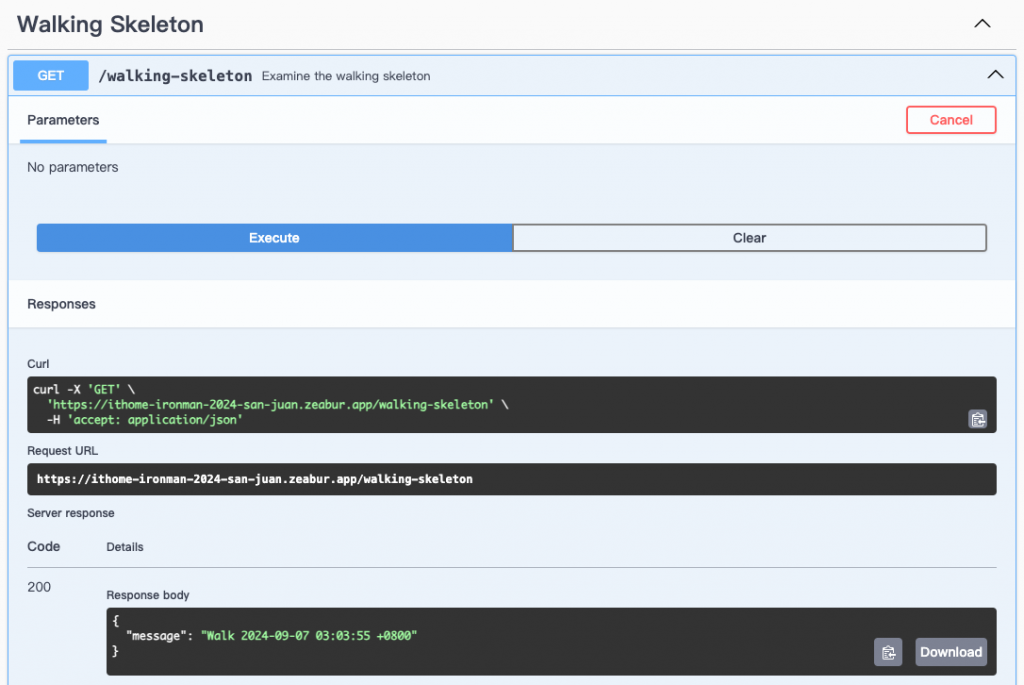
gem 註解拿掉,並執行 bundle install
# Gemfile:27

- # gem "rack-cors"
+ gem "rack-cors"
編輯 config/initializers/cors.rb
Rails.application.config.middleware.insert_before 0, Rack::Cors do
  allow do
    origins "*"

    resource [ "/api/v1/*", "walking-skeleton" ],
      headers: :any,
      methods: [ :get, :post, :put, :patch, :delete, :options, :head ]
  end
end
推送更新
完成啦
假日多存幾篇 XD
以上不代表明天會做,如有雷同純屬巧合
SPT (Side Project Taiwan) 的宗旨是藉由Side Project開發來成就自我,透過持續學習和合作,共同推動技術和專業的發展。我們相信每一個參與者,無論是什麼專業,都能在這個社群中找到屬於自己的成長空間。
歡迎所有對Side Project開發有興趣的人加入我們,可以是有點子來找夥伴,也可以是來尋找有興趣的Side Project加入,邀請大家一同打造一個充滿活力且有意義的技術社群!
Discord頻道連結:https://sideproj.tw/dc