
了解 Network Policy 的基本概念
實作 Network Policy
問題探討:Network Policy 會彼此衝突嗎?
今天是「Services & Networking」章節的最後一篇,前面介紹了 k8s 是如何實作 cluster 的內部網路,讓 cluster 中的 Pod 可以互相通訊。今天來講講該如何透過 Network Policy 來管理這些網路流量。
假如有一個資料庫以 Pod 的形式跑在 cluster 中,裡面存放了一些敏感資料,但是由於預設上 Pod 會對所有網路流量開放,這樣的設計就有可能讓資料庫受到不明來源的請求,或是因為收到太多的存取而導致效能下降。
於是你可能就會想制定一些規則,例如「只有特定的 Pod 才能存取資料庫」、「資料庫只能提供資料給特定的 Pod」等等。
而這就是 Network Policy 的用途:「針對 Pod 連線進行管制」。
Network Policy 可以針對以下三種傳輸協定(Protocol)來設定規則:
而可設定的規則又分為兩大類:
egress:控制 Pod 對外的網路流量 (可以出去連到誰?)
預設上,Pod 可以對外連到任何地方,當 network policy 設定 egress 清單後,Pod 只能連到清單中指定的對象。
ingress:控制外部對 Pod 的網路流量 (誰可以連進來?)
預設上,任何流量都可以連進來,當 network policy 設定 ingress 清單後,只有清單中指定的對象可以連到你的 Pod。
可以這樣理解:egress 與 ingress 就是一個「白名單」的概念,只有在白名單內的對象才可以進行連線。
而這些規則適用的「對象」有:
Pod:使用 podSelector 指定
Namespace:使用 namespaceSelector 指定,意指「對該 namespace 下的所有 Pod 生效」
IP Block:使用 ipBlock 指定,意指「對特定的 IP 範圍(CIDR)生效」。(通常會設定為 cluster 外部的 IP,因為 cluster 內部的 Pod IP 是短暫與隨機的)
最後,要讓 Network Policy 生效,需要在 cluster 中安裝支援 Network Policy 的 CNI。
支援 Network Policy 的CNI有很多,例如 Calico、Cilium、Weave Net 等等。不支援的 CNI 例如 Flannel。
Q:假設我設定了 egress 或 ingress,需要為該流量的回應設定相對應的規則嗎?例如我在「資料庫」中設定 ingress,允許「pod A」連進來,那麼「資料庫」對「pod A」response 的流量是否需要設定 egress?
Ans:不需要。不論是 egress 或 ingress,k8s 會自動幫你處理這些 response 的流量,不需要另外設定規則。
Q:假設「pod A」設定了到「資料庫」的 egress,允許「pod A」對外連到「資料庫」,但是「pod A」不在資料庫的 ingress 白名單中,這樣「pod A」的請求會成功嗎?
Ans:不會成功。Network Policy 是雙向的,如果你設定了 egress,那麼目的地也需要開放你連近來才行。
OK,了解了 Network Policy 的基本概念後,我們來玩玩看第一個實作:設定 Ingress。
白名單:「誰可以連進來?」
在開始範例之前,我們先布置一個簡單的環境:
總共有三個 namespace:default、dev、prod,並在三者之內都各部署一個 Pod,讓這些 Pod 之間互相連線來測試 Network Policy 的效果。
kubectl create ns dev
kubectl label ns dev env=dev
kubectl create ns prod
kubectl label ns prod env=prod
kubectl run dev-user --namespace=dev --image=nginx --labels="role=dev-user" --port=80
kubectl expose pod dev-user --namespace=dev --port=80 --name=dev-user-svc
kubectl run prod-user --namespace=prod --image=nginx --labels="role=prod-user" --port=80
kubectl expose pod prod-user --namespace=prod --port=80 --name=prod-user-svc
echo "Hello, this is dev-user" > index.html
kubectl cp -n dev index.html dev-user:/usr/share/nginx/html/index.html
echo "Hello, this is prod-user" > index.html
kubectl cp -n prod index.html prod-user:/usr/share/nginx/html/index.html
kubectl run web --image=nginx --port=80 --labels="role=web"
kubectl expose pod web --port=80 --name=web-svc
echo "Hello, this is web" > index.html
kubectl cp index.html web:/usr/share/nginx/html/index.html
這樣事前準備就建置好了。我們先測試一下在沒有 Network Policy 的情況下,dev-user 與 prod-user 是否可以連到 web:
kubectl exec -it dev-user -n dev -- curl web-svc.default --max-time 1
kubectl exec -it prod-user -n prod -- curl web-svc.default --max-time 1
兩者都存取的到 web:
Hello, this is web
而 web 也可以連到 dev-user 與 prod-user:
kubectl exec -it web -- curl dev-user-svc.dev --max-time 1
Hello, this is dev-user
kubectl exec -it web -- curl prod-user-svc.prod --max-time 1
Hello, this is prod-user
我們的目標是:只有 dev-user 可以連到 web 的 80/TCP,而 prod-user 不行,如下圖:
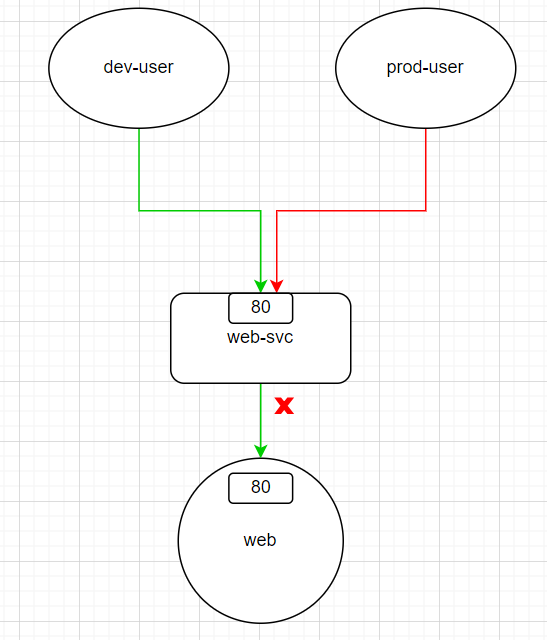
因此我們設計了以下的 Network Policy:
# web-policy.yaml
apiVersion: networking.k8s.io/v1
kind: NetworkPolicy
metadata:
  name: web-policy
  namespace: default
spec:
  podSelector:
    matchLabels:
      role: web
  policyTypes:
  - Ingress
  ingress:
  - from:
    - podSelector:
        matchLabels:
          role: dev-user
      namespaceSelector:
        matchLabels:
          env: dev
    ports:
    - protocol: TCP
      port: 80
重點欄位解釋
metadata
namespace:
設定 Network Policy 生效的 namespace
spec
podSelector:
設定 Network Policy 生效的對象,這裡是 label 為 role=web 的 Pod。
所以結合上面的 metadata.namespace,這個 Network Policy 會對「default namespace之下,所有 label 為 role=web 的 Pod」生效。
policyTypes:
指定 Network Policy 的規則類型,可設定為 Ingress 或 Egress。
ingress:
from:列出「誰可以連進來(白名單)」,這裡是「在 label 為 env=dev 的 namespace 之下,所有 label 為 role=dev-user 的 Pod」可以連進來。
ports:允許「白名單」內的 Pod經由 TCP 的 80 port 連到「default namespace 之下,所有 label 為 role=web 的 Pod」
注意 !
在上面範例中,若
spec.ingress.from設定為:
...
  ingress:
  - from:
    - podSelector:
        matchLabels:
          role: dev-user
    - namespaceSelector:
        matchLabels:
          env: dev
    ports:
    - protocol: TCP
      port: 80
...
這裡的設定與上面的範例看起來很像,但是意義卻截然不同:
範例設定
只有「在 label 為 env=dev 的 namespace 之下,所有 label 為 role=dev-user 的 Pod」可以連進來。(只有一個陣列元素)
這裡的設定
只有「在 default namespace 之下,所有 label 為 role=dev-user 的 Pod」或「在 label 為 env=dev 的 namespace 之下的所有 Pod」可以連進來。(有兩個陣列元素)
設定好 Network Policy 後,我們來測試一下 dev-user 與 prod-user 是否可以連到 web:
kubectl apply -f web-policy.yaml
kubectl describe networkpolicy web-policy
Name:         web-policy
Namespace:    default
Created on:   2024-04-30 08:18:08 +0000 UTC
Labels:       <none>
Annotations:  <none>
Spec:
  PodSelector:     role=web
  Allowing ingress traffic:
    To Port: 80/TCP
    From:
      NamespaceSelector: env=dev
      PodSelector: role=dev-user
  Not affecting egress traffic
  Policy Types: Ingress
用 describe 看 Network Policy 的設定會清楚許多。
kubectl exec -it dev-user --namespace=dev -- curl web-svc.default --max-time 1
輸出:
Hello, this is web
kubectl exec -it prod-user --namespace=prod -- curl web-svc.default --max-time 1
# output
curl: (28) Connection timed out after 1000 milliseconds
command terminated with exit code 28
prod-user 執行 curl 後,卻無法連到 web,符合預期狀況。
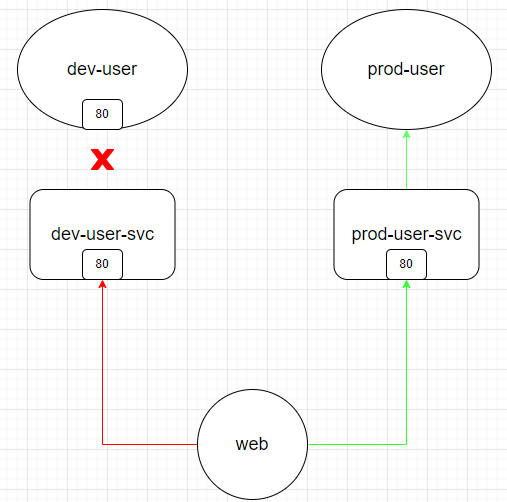
接下來我們來看看 egress 的例子:
保留原本 ingress 的設定,並且讓 web 只能對外連到 prod-user 的 80/TCP,但不能連到 dev-user。egress 的圖示如下:
apiVersion: networking.k8s.io/v1
kind: NetworkPolicy
metadata:
  name: web-policy
  namespace: default
spec:
  podSelector:
    matchLabels:
      role: web
  policyTypes:
  - Ingress
  - Egress
  ingress:
  - from:
    - podSelector:
        matchLabels:
          role: dev-user
      namespaceSelector:
        matchLabels:
          env: dev
    ports:
    - protocol: TCP
      port: 80
  egress:
  - to:
    - podSelector:
        matchLabels:
          role: prod-user
      namespaceSelector:
        matchLabels:
          env: prod
    ports:
    - protocol: TCP
      port: 80
其實設定起來和 Ingress 差不多,不過要把 from 換成 to,同樣在底下設定「白名單」。
kubectl apply -f web-policy.yaml
kubectl describe networkpolicy web-policy
Name:         web-policy
Namespace:    default
Created on:   2024-09-10 08:34:13 +0000 UTC
Labels:       <none>
Annotations:  <none>
Spec:
  PodSelector:     role=web
  Allowing ingress traffic:
    To Port: 80/TCP
    From:
      NamespaceSelector: env=dev
      PodSelector: role=dev-user
  Allowing egress traffic:
    To Port: 80/TCP
    To:
      NamespaceSelector: env=prod
      PodSelector: role=prod-user
  Policy Types: Ingress, Egress
kubectl exec -it web -- curl prod-user-svc.prod --max-time 1
curl: (28) Resolving timed out after 1000 milliseconds
command terminated with exit code 28
竟然行不通!為什麼呢?
原因是,我們在 curl 中用 prod-user-svc 的 domain name 去呼叫服務,要使用 domain name 則需要 cluster 中的 coreDNS 來解析,而 coreDNS 位於 kube-system namespace 下,但我們的 Network Policy 並沒有設定允許 web 連到 kube-system namespace,所以才會測試失敗。
prod_svc_ip=$(kubectl get svc prod-user-svc -o jsonpath="{.spec.clusterIP}" -n prod)
kubectl exec -it web -- curl $prod_svc_ip --max-time 1
Hello, this is prod-user
雖然會成功,不過使用 IP 的確不太理想,所以底下修改一下 Network Policy,來解決 coreDNS 的連線問題:
kubectl get svc kube-dns -n kube-system
NAME       TYPE        CLUSTER-IP   EXTERNAL-IP   PORT(S)                  AGE
kube-dns   ClusterIP   10.96.0.10   <none>        53/UDP,53/TCP,9153/TCP   18d
apiVersion: networking.k8s.io/v1
kind: NetworkPolicy
metadata:
  name: web-policy
  namespace: default
spec:
  podSelector:
    matchLabels:
      role: web
  policyTypes:
  - Ingress
  - Egress
  ingress:
  - from:
    - podSelector:
        matchLabels:
          role: dev-user
      namespaceSelector:
        matchLabels:
          env: dev
    ports:
    - protocol: TCP
      port: 80
  egress:
  - to:
    - podSelector:
        matchLabels:
          role: prod-user
      namespaceSelector:
        matchLabels:
          env: prod
    ports:
    - protocol: TCP
      port: 80

  - ports:  # 新增的部分,允許 web 對外連到任何 Pod 的 53/UDP
    - protocol: UDP
      port: 53
kubectl apply -f web-policy.yaml
kubectl describe networkpolicy web-policy
Name:         web-policy
Namespace:    default
Created on:   2024-09-10 08:34:13 +0000 UTC
Labels:       <none>
Annotations:  <none>
Spec:
  PodSelector:     role=web
  Allowing ingress traffic:
    To Port: 80/TCP
    From:
      NamespaceSelector: env=dev
      PodSelector: role=dev-user
  Allowing egress traffic:
    To Port: 80/TCP
    To:
      NamespaceSelector: env=prod
      PodSelector: role=prod-user
    ----------
    To Port: 53/UDP
    To: <any> (traffic not restricted by destination)
  Policy Types: Ingress, Egress
可以看到有一條「-------」的線,表示設定了兩個不同的 egress 規則。
kubectl exec -it web -- curl prod-user-svc.prod --max-time 1
# 成功!
Hello, this is prod-user
kubectl exec -it web -- curl dev-user-svc.dev --max-time 1
curl: (28) Connection timed out after 1000 milliseconds
command terminated with exit code 2
因為現在 web 可以連到任何 Pod 的 53/UDP,而這就包含了 coreDNS,所以 web 就能使用 domain name 連到 prod-user。
如果今天想讓 web 可以對外連到 prod 與 dev namespace 下所有 Pod 的 80/TCP,在設定規則時可以用「兩個」 namespaceSelector 來達成,不過這樣的設定會讓 Network Policy 變得冗長且沒彈性。
這時候可以使用「matchExpressions」來簡化設定:
apiVersion: networking.k8s.io/v1
kind: NetworkPolicy
metadata:
  name: web-policy
  namespace: default
spec:
  podSelector:
    matchLabels:
      role: web
  policyTypes:
  - Egress
  egress:
  - to:
    - namespaceSelector:
        matchExpressions:
        - key: env
          operator: In
          values: ["dev", "prod"]
    ports:
    - protocol: TCP
      port: 80
  - ports:
    - protocol: UDP
      port: 53
kubectl apply -f web-policy.yaml
kubectl exec -it web -- curl prod-user-svc.prod --max-time 1
Hello, this is prod-user
kubectl exec -it web -- curl dev-user-svc.dev --max-time 1
Hello, this is dev-user
我們可以為某個namespace設定預設的 Network Policy,我們直接看官網的 yaml 範例:
apiVersion: networking.k8s.io/v1
kind: NetworkPolicy
metadata:
  name: default-deny-ingress
spec:
  podSelector: {}
  policyTypes:
  - Ingress
{}表示「所有」
apiVersion: networking.k8s.io/v1
kind: NetworkPolicy
metadata:
  name: allow-all-ingress
spec:
  podSelector: {}
  ingress:
  - {}
  policyTypes:
  - Ingress
apiVersion: networking.k8s.io/v1
kind: NetworkPolicy
metadata:
  name: default-deny-egress
spec:
  podSelector: {}
  policyTypes:
  - Egress
apiVersion: networking.k8s.io/v1
kind: NetworkPolicy
metadata:
  name: allow-all-egress
spec:
  podSelector: {}
  egress:
  - {}
  policyTypes:
  - Egress
先說結論:Network Policy 並不會彼此衝突,而是會將所有的「白名單」相加形成「白名單聯集」,我們來實驗看看。
apiVersion: networking.k8s.io/v1
kind: NetworkPolicy
metadata:
  name: allow-all-ingress
  namespace: default
spec:
  podSelector: {}
  ingress:
  - {}
  policyTypes:
  - Ingress
apiVersion: networking.k8s.io/v1
kind: NetworkPolicy
metadata:
  name: default-deny-ingress
  namespace: default
spec:
  podSelector: {}
  policyTypes:
  - Ingress
apiVersion: networking.k8s.io/v1
kind: NetworkPolicy
metadata:
  name: web-policy
  namespace: default
spec:
  podSelector:
    matchLabels:
      role: web
  policyTypes:
  - Ingress
  ingress:
  - from:
    - podSelector:
        matchLabels:
          role: dev-user
      namespaceSelector:
        matchLabels:
          env: dev
    ports:
    - protocol: TCP
      port: 80
kubectl apply -f allow-all-ingress.yaml
kubectl apply -f default-deny-ingress.yaml
kubectl apply -f web-policy.yaml
這三個 network policy 的「白名單」如下:
allow-all-ingress 白名單:所有流量
default-deny-ingress 白名單:無
web-policy 白名單:dev-user
而真正的 Ingress 效果是這三個的聯集,也就是:
「白名單聯集」效果:允許所有流量進到 default namespace下的所有 Pod
來驗證一下:
kubectl exec -it dev-user --namespace=dev -- curl web-svc.default --max-time 1
Hello, this is web
kubectl exec -it prod-user --namespace=prod -- curl web-svc.default --max-time 1
Hello, this is web
然後,我們移除 allow-all-ingress 的 Network Policy:
kubectl delete networkpolicy allow-all-ingress
此時的「白名單」就變成了:
default-deny-ingres`s 白名單:無
web-policy 白名單:dev-user
「白名單聯集」效果:只有 dev-user 可以走 TCP 的 80 port 連到 web
驗證一下:
kubectl exec -it dev-user --namespace=dev -- curl web-svc.default --max-time 1
Hello, this is web
kubectl exec -it prod-user --namespace=prod -- curl web-svc.default --max-time 1
curl: (28) Connection timed out after 1001 milliseconds
command terminated with exit code 28
這就是 Network Policy 的「白名單聯集」效果,所以不用擔心 Network Policy 會彼此衝突。
假如我想要開放讓所有從 80/TCP 進到 web 的流量,可以這樣設定:
apiVersion: networking.k8s.io/v1
kind: NetworkPolicy
metadata:
  name: web-policy
  namespace: default
spec:
  podSelector:
    matchLabels:
      role: web
  policyTypes:
  - Ingress
  ingress:
  - ports:  # 只需設定 spec.ingress.ports,不用設定 from
    - protocol: TCP
      port: 80
今天介紹了 Network Policy 的基本概念,其實 Network Policy 就是一個「白名單」的概念,是 Pod 對內或對外連線的守門員,通常用 describe 來查看就會對 Network Policy 一目瞭然。
明天我們進入下一個章節:「Cluster Architecture, Installation & Configuration」,來看如何升級 cluster。
參考資料
[Kubernetes] Network Policy Overview

 iThome鐵人賽