
到昨天,整個環境才算是設定好了,水了 12 天了,接下來該認認真真的寫一點程式了,那我們今天來水點 Vite 的 plugin 吧 (被拖去打)
等等聽我解釋, VitePress 的其中一個很大的優勢就是建立在 Vite 上面,我們要善用他的優勢!!
我們在 docs/ 下面建立 components、data、hooks 幾個資料夾,並分別設定他們的別名:
import path from 'node:path';

export default defineConfig({
    vite: {
        resolve: {
            alias: { // 設定別名
                '@': path.resolve(__dirname, '../'), // docs 當根目錄
                '@vitepress': path.resolve(__dirname), // .vitepress 目錄
                '@components': path.resolve(__dirname, '../', 'components'),
                '@data': path.resolve(__dirname, '../', 'data'),
                '@hooks': path.resolve(__dirname, '../', 'hooks'),
                '@pages': path.resolve(__dirname, '../', 'pages')
            }
        }
    }
});
稍微大點的專案,通常會用很多 import,Anthony Fu大,根據 unplugin 做了幾個自動 import 的套件:
自動 import 常用的API,像是 vue 的 ref、computed、onMounted,第三方的 axios、vueUse 的 API 等等。
yarn add unplugin-auto-import -D
import AutoImport from 'unplugin-auto-import/vite';

export default defineConfig({
    vite: {
        plugins: [
            AutoImport({
                include: [
                    /\.[tj]sx?$/, // .ts, .tsx, .js, .jsx
                    /\.vue$/,
                    /\.vue\?vue/, // .vue
                    /\.md$/ // .md
                ],
                // global imports to register
                imports: [ // presets
                    'vue',
                    { // custom
                        '@vueuse/core': [
                            // named imports
                            'useMouse', // import { useMouse } from '@vueuse/core',
                            // alias
                            ['useFetch', 'useMyFetch']
                        ],
                        'axios': [
                            // default imports
                            ['default', 'axios']
                        ],
                        'vue': ['PropType', 'defineProps', 'InjectionKey', 'Ref']
                    }
                ],
                dirs: [],
                dts: './types/auto-imports.d.ts', // typescript 宣告檔案位置
                vueTemplate: false,
                eslintrc: {
                    enabled: false, // Default `false`
                    filepath: './.eslintrc-auto-import.json',
                    globalsPropValue: true
                }
            })
        ]
    }
});
可以看到設定裡面有個
dts: './types/auto-imports.d.ts',所以我們要記得在docs/目錄下建立types目錄。
而
eslintrc.enabled這個設定可以true一次,然後執行yarn docs:dev
可以讓她生成eslintrc-auto-import.json,
生成後改為false,除非有改動再重新生,不關掉的話每次都會重新生成,
有時候會導致ESLint抓不到文件。
自動 import component
yarn add unplugin-vue-components -D
import Components from 'unplugin-vue-components/vite';

export default defineConfig({
    vite: {
        plugins: [
            Components({
                dirs: ['./components'], // 指定components位置 預設是'src/components'
                dts: './types/components.d.ts', // .d.ts生成位置
                extensions: ['vue'],
                directoryAsNamespace: true, // 允許子目錄作為命名空間
                resolvers: [] // 解析規則
            })
        ]
    })
    }
});
會看到 Opshell 把 directoryAsNamespace 這個參數設為 true,而 components 的目錄結構長這樣:
docs/components/
├─ el
│  ├─ btn.vue
│  ├─ input.vue
│  ├─ skill.vue
│  └─ svgIcon.vue
├─ mole
├─ orga
└─ template
所以他生成之後,要使用 skil.vue 好了,就會像這樣,<ElSkill></ElSkill>。
Opshell 為了偷懶,自己寫了很多 SCSS 的 @mixin,為了讓他可以全域使用,我們在 vite 裡面設定一下:
import Components from 'unplugin-vue-components/vite';

export default defineConfig({
    vite: {
        css: { // 共用全域 SCSS
            devSourcemap: true, // scss sourcemap
            preprocessorOptions: {
                scss: {
                    additionalData: `@import "@vitepress/theme/scss/mixin.scss";`,
                    charset: false
                }
            }
        }
    }
});
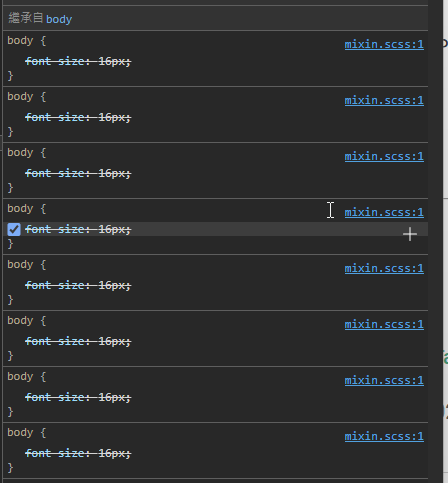
mixin.scss只建議放@mixin$scss-var這類的 scss 宣告項,不要在裡面放入實體的 css 宣告:
body {
  font-size: 16px;
}
因為會重複打包,你會發現他包出來的 body 有好幾個。
原理是你每 import 一個component(組件),他就會 import 一次mixin.scss,當你有實體的CSS(階層式樣式表)他就會重複的一直疊上去,而@mixin$scss-var等 SCSS 變數的宣告則不會有這個問題。
好了,環境的東西都處理完了,這次是真的啦,相信我!!
明天一定進入 stage 3,正式的來寫程式!


 iThome鐵人賽