

當我們的應用程式關閉時,WebSocket 連接會被中斷,因此推播通知無法通過 WebSocket 直接推送。為了解決這個問題,常見做法是結合 Firebase Cloud Messaging (FCM) 或 Apple Push Notification Service (APNS) 等推送服務。
在 Flutter 中,常見會使用 firebase_messaging 這個套件來實作。我們可以參考文件:https://firebase.google.com/docs/cloud-messaging/flutter/client?hl=zh-tw
本次的參考程式碼:https://github.com/ksw2000/ironman-2024/tree/master/flutter-practice/push_notification
開啟 cloud messaging 控制台 https://console.firebase.google.com/u/0/project/_/settings/cloudmessaging
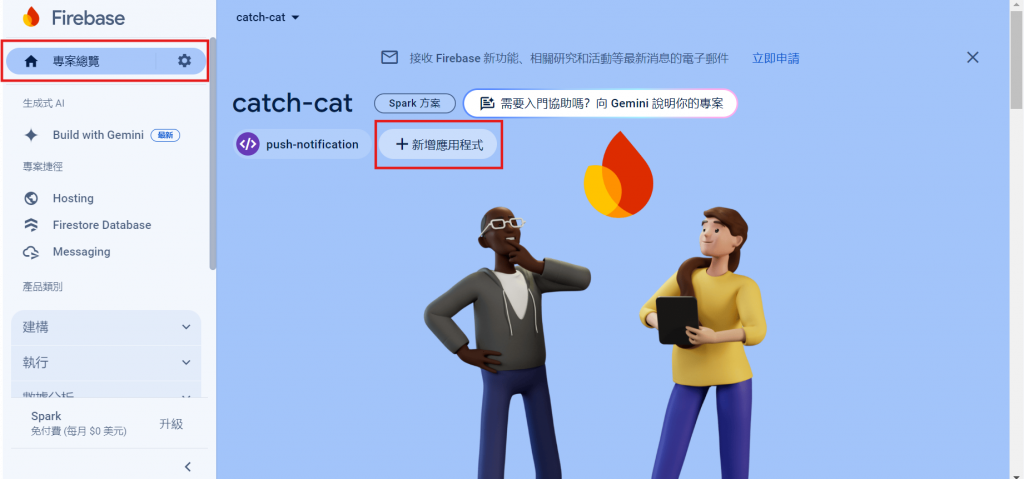
進入專案總覽 > 點選新增應用程式,並選擇 Flutter
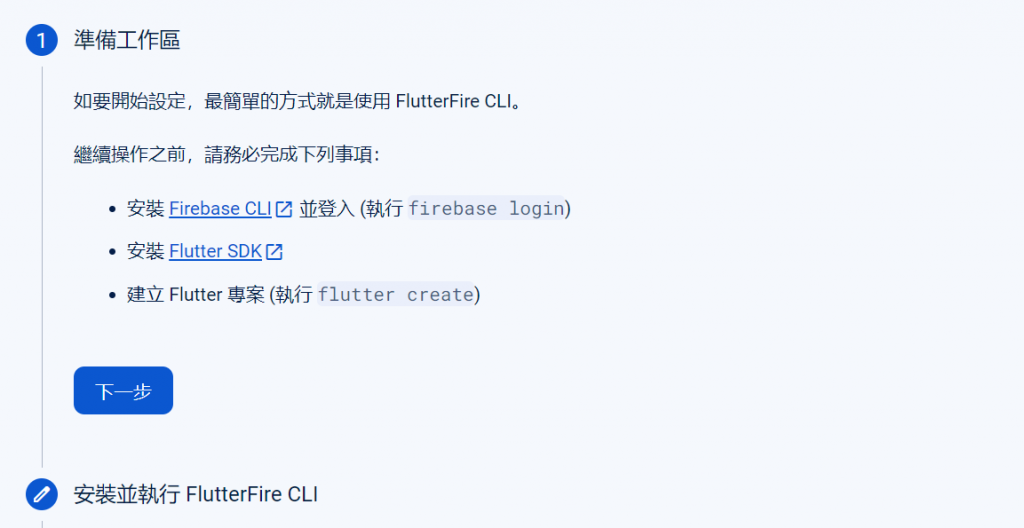
按照指示安裝 Firebase CLI ,如果各位有安裝 npm ,那可以直接以 npm 安裝相當方便 (感覺還是挺麻煩的)
npm install -g firebase-tools
安裝完後執行
firebase login
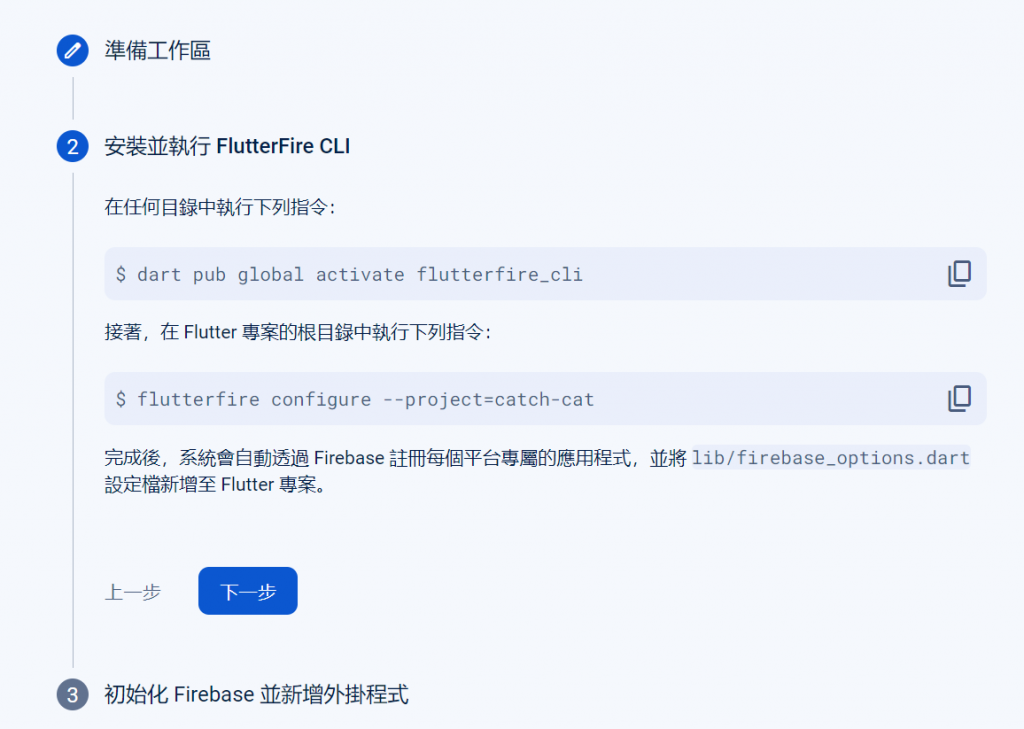
接著我們按照步驟,再用 dart 安裝一個 flutterfire_cli
安裝完後,發現當時裝 dart 可能亂裝,像我就噴了個訊息😩
Warning: Pub installs executables into C:\Users\kashiwa\AppData\Local\Pub\Cache\bin, which is not on your path.
所以我執行時就用全路徑🫠
順便提醒一下,在初始化時,他會問 Which Android application id (or package name) do you want to use
此時要填 com.example.[專案名稱],在
/android/app/build.gradle可以找到。不然在 build Android 專案時,就會噴錯,這個時候再重跑一次flutterfire也可以,他會問你要不要 overwite
FAILURE: Build failed with an exception.

* What went wrong:
Execution failed for task ':app:processDebugGoogleServices'.
> No matching client found for package name 'com.example.push_notification'
接著將 main 函式修改一下,使程式能初始化 firebase
void main() async {
  await Firebase.initializeApp(
    options: DefaultFirebaseOptions.currentPlatform,
  );
  runApp(const MyApp());
}
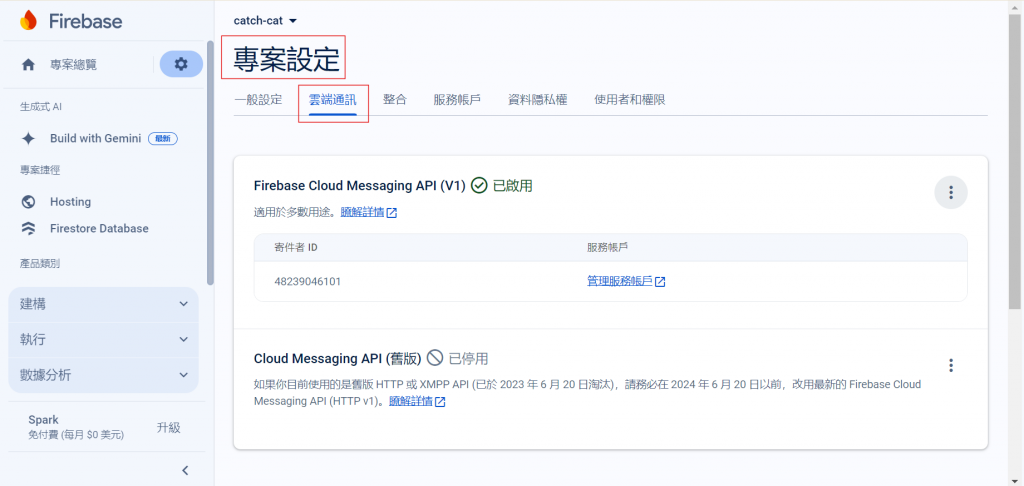
點擊建立專案或選擇已建立的專案,進入專案後,專案設定 > 雲端通訊
然後往下滑,在頁面底下的「網路推播憑證」欄位點擊「Generate key pair」用來產生金鑰
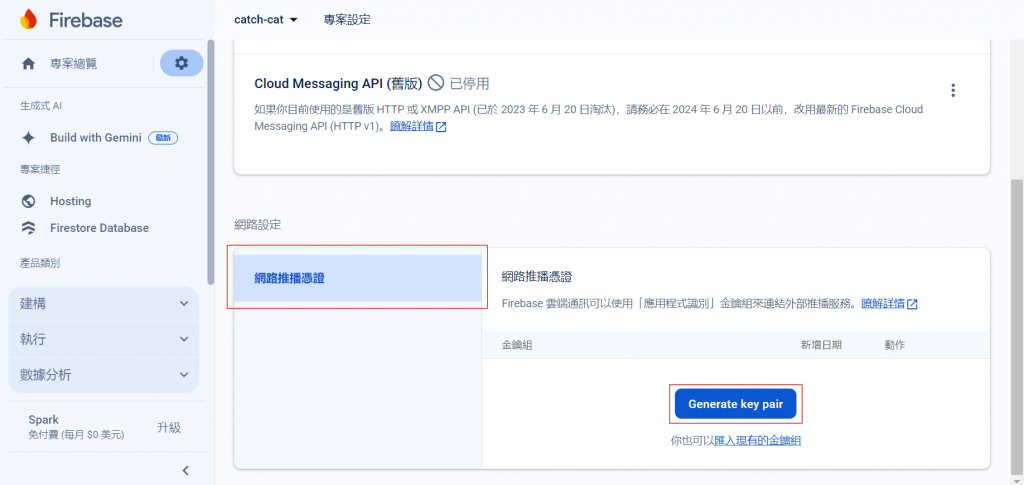
此金鑰用於讓 web 版能正常運作,生成後的金鑰稱為 Voluntary Application Server Identification (VAPID) Key
本次範例會將 VAPID key 另存 lib/vapid.dart 中
const vapidkey = "BMz...cDE";
首先,先安裝套件
flutter pub add firebase_messaging
另外如果沒有安裝到 firebase_core 也要記得安裝
flutter pub add firebase_core
為了傳送訊息到特定裝置,我們需要知道裝置的 registration token (註冊權杖)。為了啟用推播通知,我們必需向使用者索取權限。
我們可以將權限請求設置為「provisional (臨時)」,這樣當用戶收到通知時,他們可以選擇希望接收的通知類型。
final notificationSettings = await FirebaseMessaging.instance.requestPermission(provisional: true);
notificationSettings 為一個 NotificationSettings 物件,其中 authorizationStatus 屬性代表使用權授予的權限:
authorized:使用者授予權限。denied:使用者拒絕權限。notDetermined:使用者尚未選擇是否授予權限。provisional:使用者授予臨時權限在 iOS 中還需要確定 APNS token
由於小弟沒有 macOS,無法演示該功能
// For apple platforms, ensure the APNS token is available before making any FCM plugin API calls
final apnsToken = await FirebaseMessaging.instance.getAPNSToken();
if (apnsToken != null) {
 // APNS token is available, make FCM plugin API requests...
}
在 web 中我們可以透過 vapidKey 取得註冊權杖
final fcmToken = await FirebaseMessaging.instance.getToken(vapidKey: vapidKey);
我們可以透過監聽的方式,監聽註冊權杖是否有更動
FirebaseMessaging.instance.onTokenRefresh
  .listen((fcmToken) {
    // TODO: If necessary send token to application server.

    // Note: This callback is fired at each app startup and whenever a new
    // token is generated.
  })
  .onError((err) {
    // Error getting token.
  });
當應用程式在前景運行時,我們可以利用 onMessage 來監聽串流
FirebaseMessaging.onMessage.listen((RemoteMessage message) {
  print('Got a message whilst in the foreground!');
  print('Message data: ${message.data}');

  if (message.notification != null) {
    print('Message also contained a notification: ${message.notification}');
  }
});
針對背景訊息,在 Mobile 和 Web 有不同的處理方式。
在 Mobile 中,我們可以註冊 onBackgroundMessage 這個 handler。當接收到訊息時,即使我們的 app 不在執行中仍會有一個 isolate 被建立出來已處理這些訊息 (僅 Android, iOS不會)。
@pragma('vm:entry-point')
Future<void> _firebaseMessagingBackgroundHandler(RemoteMessage message) async {
  // If you're going to use other Firebase services in the background, such as Firestore,
  // make sure you call `initializeApp` before using other Firebase services.
  await Firebase.initializeApp();

  print("Handling a background message: ${message.messageId}");
}

void main() {
  FirebaseMessaging.onBackgroundMessage(_firebaseMessagingBackgroundHandler);
  runApp(MyApp());
}
至於 Web,我們可以寫一個可在背景執行的 Service Worker 。利用這個 service worker 來處理背景訊息。
這個時候我們要寫一點點的 javascript,web/firebase-messaging-sw.js
// Please see this file for the latest firebase-js-sdk version:
// https://github.com/firebase/flutterfire/blob/master/packages/firebase_core/firebase_core_web/lib/src/firebase_sdk_version.dart
importScripts("https://www.gstatic.com/firebasejs/10.7.0/firebase-app-compat.js");
importScripts("https://www.gstatic.com/firebasejs/10.7.0/firebase-messaging-compat.js");

// 這裡面的內容可以抄自 lib/firebase_options.dart
firebase.initializeApp({
	apiKey: '...',
    appId: '...',
    messagingSenderId: '...',
    projectId: '...',
    authDomain: '...',
    storageBucket: '...',
    measurementId: '...',
});

const messaging = firebase.messaging();

// Optional:
messaging.onBackgroundMessage((message) => {
  console.log("onBackgroundMessage", message);
});
完成這個 js 檔後,我們還需要在 web/index.html 中載入該檔案
<script src="flutter_bootstrap.js" async>
  if ('serviceWorker' in navigator) {
    window.addEventListener('load', function () {
      navigator.serviceWorker.register('firebase-messaging-sw.js', {
        scope: '/firebase-cloud-messaging-push-scope',
      });
    });
  }
</script>
開始測試前還是先來確定一下我們的 UI,因為程式碼有點長,所以分幾個 Block 呈現
@pragma('vm:entry-point')
Future<void> _firebaseMessagingBackgroundHandler(RemoteMessage message) async {
  print(message);
  print("Handling a background message: ${message.messageId}");
}

void main() async {
  WidgetsFlutterBinding.ensureInitialized();
  await Firebase.initializeApp(
    options: DefaultFirebaseOptions.currentPlatform,
  );
  // 處理背景通知
  FirebaseMessaging.onBackgroundMessage(_firebaseMessagingBackgroundHandler);
  runApp(const MyApp());
}
class MyApp extends StatelessWidget {
  const MyApp({super.key});

  // This widget is the root of your application.
  @override
  Widget build(BuildContext context) {
    return MaterialApp(
      title: 'Flutter Demo',
      theme: ThemeData(
        colorScheme: ColorScheme.fromSeed(seedColor: Colors.deepPurple),
        useMaterial3: true,
      ),
      home: const MyHomePage(),
    );
  }
}
class MyHomePage extends StatefulWidget {
  const MyHomePage({super.key});

  @override
  State<MyHomePage> createState() => _MyHomePageState();
}

class _MyHomePageState extends State<MyHomePage> {
  String? _message;

  @override
  void initState() {
    FirebaseMessaging.onMessage.listen((RemoteMessage message) {
      // 處理前景通知
      StringBuffer stringBuffer = StringBuffer();
      stringBuffer.write("Got a message whilst in the onMessage! \n");
      print("data: ${message.data}");
      message.data.forEach((key, value) {
        stringBuffer.write("key: $key, value: $value\n");
      });
      stringBuffer.write("message id: ${message.messageId}\n");
      stringBuffer.write("title: ${message.notification?.title}\n");
      stringBuffer.write("body: ${message.notification?.body}\n");

      setState(() {
        _message = stringBuffer.toString();
      });
    });
    super.initState();
  }

  @override
  Widget build(BuildContext context) {
    return Scaffold(
        appBar: AppBar(
          backgroundColor: Theme.of(context).colorScheme.inversePrimary,
          title: const Text('推播通知演示'),
        ),
        body: Center(
          child: Column(
            mainAxisAlignment: MainAxisAlignment.center,
            children: <Widget>[
              // Android 裝置要用 requestPermission 請求開啟
              // Web 可以直接用 getToken 如果沒開權限會要求開
              OutlinedButton(
                  onPressed: () async {
                    final notificationSettings = await FirebaseMessaging
                        .instance
                        .requestPermission(provisional: true);
                    print(notificationSettings.authorizationStatus);
                    switch (notificationSettings.authorizationStatus) {
                      case AuthorizationStatus.authorized:
                      case AuthorizationStatus.provisional:
                        final fcmToken = await FirebaseMessaging.instance
                            .getToken(vapidKey: vapidKey);
                        print(fcmToken);
                      default:
                        print("使用者未開啟權限");
                    }
                  },
                  child: const Text('Android 註冊推播通知')),
              const SizedBox(
                height: 20,
              ),
              OutlinedButton(
                  onPressed: () async {
                    final fcmToken = await FirebaseMessaging.instance
                        .getToken(vapidKey: vapidKey);
                    print(fcmToken);
                  },
                  child: const Text('Web 註冊推播通知')),
              const SizedBox(
                height: 20,
              ),
              _message != null ? Text(_message!) : const SizedBox()
            ],
          ),
        ));
  }
}
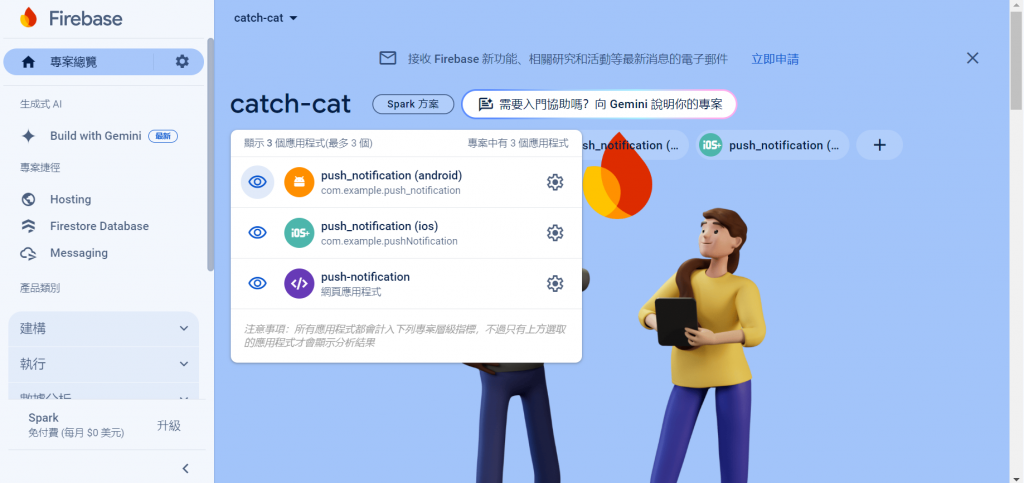
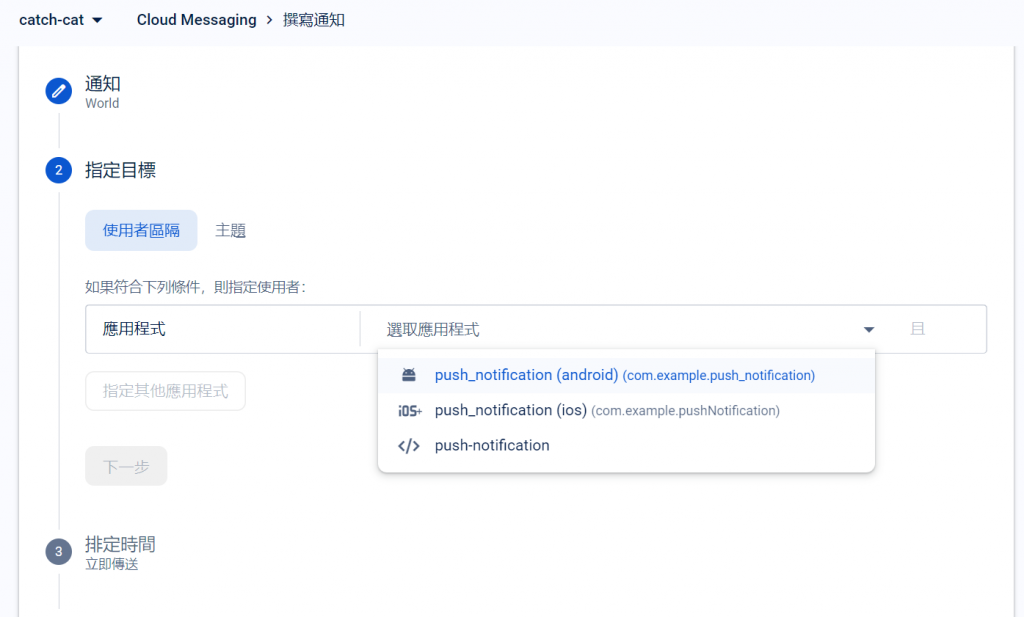
首先,我們先進入專案總覽。根據前面使用 flutterfire 我們選擇建立三個平台,因此網頁版也對應三個應用程式,如果沒有出現記得要重新整理
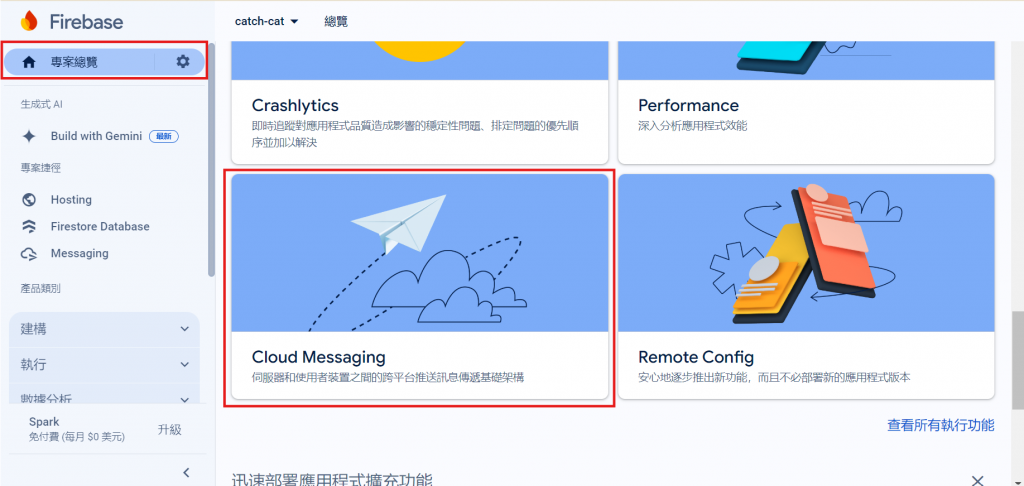
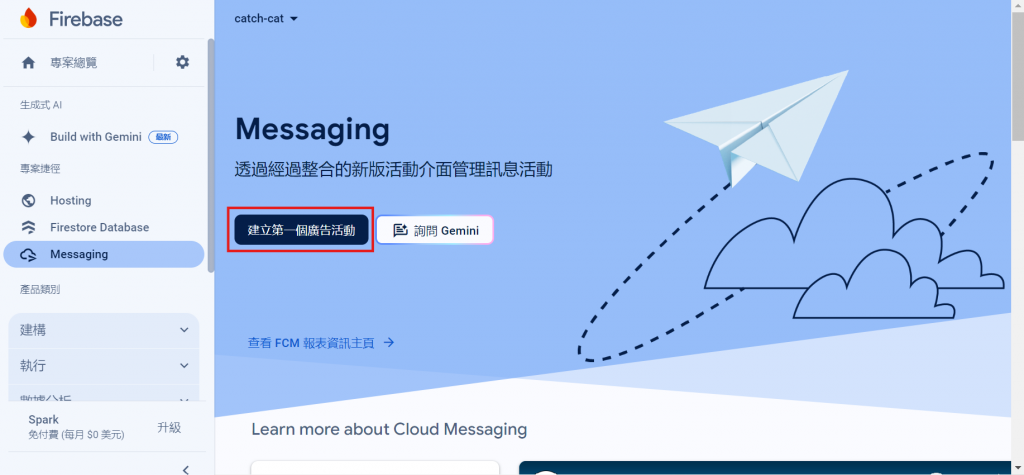
專案總覽中想辦法開始「Cloud Messaging」
然後選擇建立活動
建立時,按照網頁的步驟進行即可,這邊會有選取應用程式,如果沒有記得重新整理 (因為我忘記重新整理)
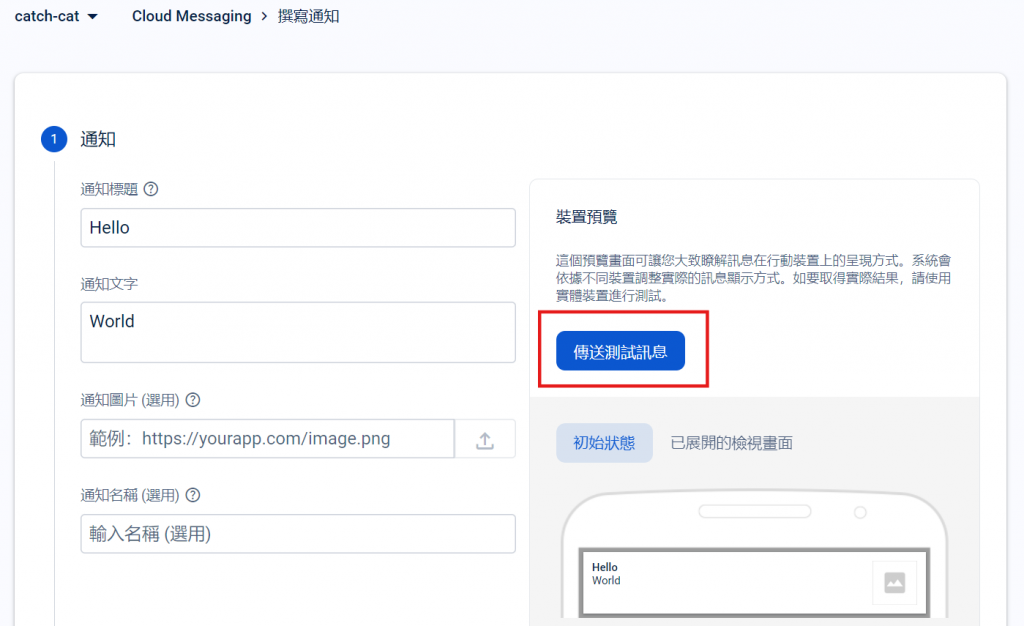
另外也可以使用 「傳送測試訊息」,只要使用我們 print 出來的「註冊權杖」就可以直接針對某個裝置發送推播通知
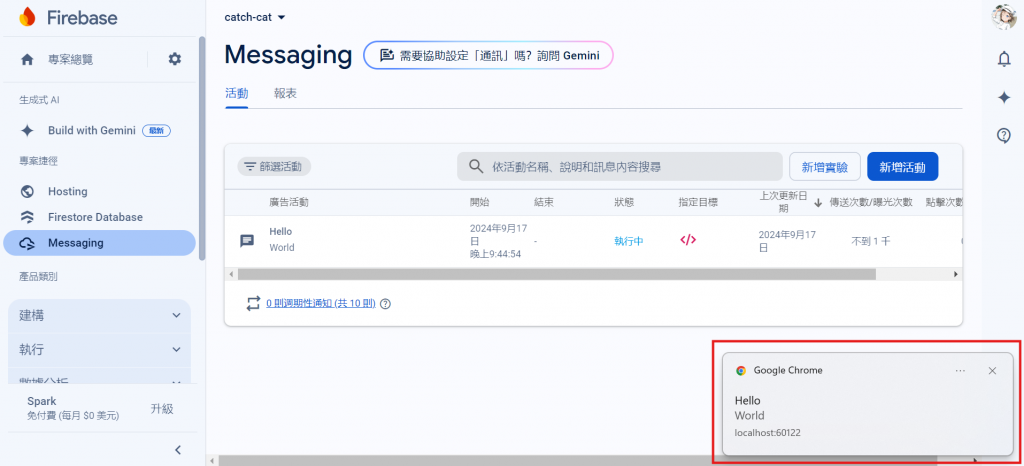
建立後就可以測試效果啦:這是網頁版的效果
這是手機版的效果: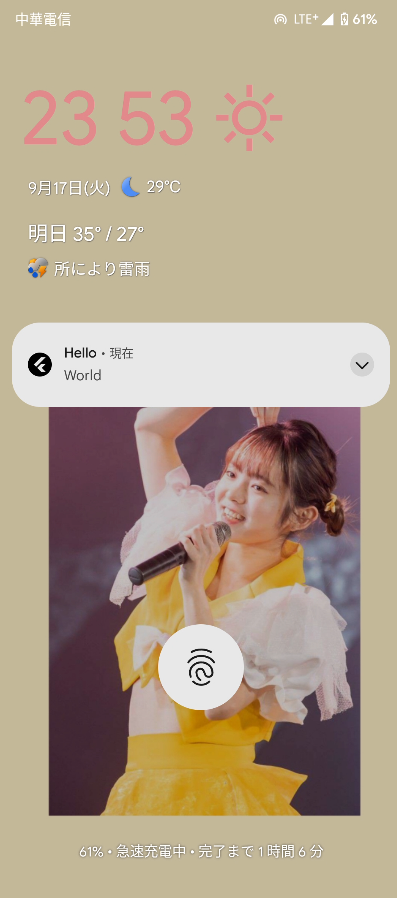
後記:Day 17 會使用 Go 語言建立推播通知伺服器,會需要用到今天所提及的 registration token
