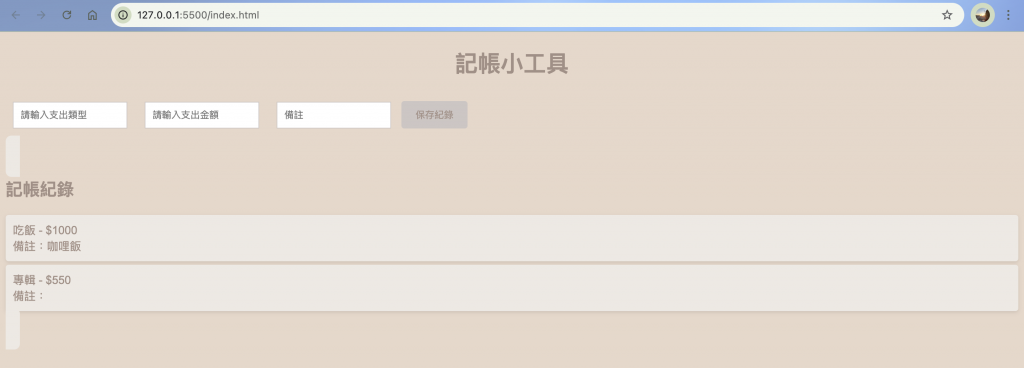
運用之前學到的HTML、CSS及JavaScript,設計一個簡單直觀的UI(使用者介面設計),構建記帳應用的基本使用者介面。今天的目標只是構建一個基本框架,還不用完成最終完整的UI設計,這次先將功能和界面結合起來,未來的幾天再一步一步優化和改進,添加更多功能和美化介面。
<!DOCTYPE html>
<html lang="zh-Hant">
    <head>
        <meta charset="UTF-8">
        <meta name="viewport" content="width=device-width,initial-scal=1.0">
        <title>記帳小工具</title>
        <link rel="stylesheet" href="style.css">
    </head>
    <body>
        <h1>記帳小工具</h1>

        <!--記帳輸入區域-->
        <div class="input-section">
            <input type="text" id="description" placeholder="請輸入支出類型">
            <input type="number" id="amount" placeholder="請輸入支出金額">
            <input type="text" id="note" placeholder="備註">
            <button onclick="addExpense()">保存紀錄</button>
        </div>

        <!--記帳輸出區域-->
        <dic class="output-section">
            <h2>記帳紀錄</h2>
            <ul id="expense-list"></ul>
        </dic>

        <script src="app.js"></script>
    </body>
</html>
<input>:此元素用於讓使用者輸入。<ul id=”expense-list”>:一個空的無序列表,會用JavaScript動態添加項目到清單中。<!— —>:這部分不會執行,可以用來做標示和備註。body{
background-color: #E7D7C9;
font-family: Arial, Helvetica, sans-serif;
color: #A38F85;
}
h1{
text-align:center;
color: #A38F85;
}
.input-section{
text-align: left;
margin: 20px 0;
}
input{
margin: 10px;
padding: 10px;
border: 1px solid #cdc6c3;
}
button{
padding: 10px 20px;
background-color: #cdc6c3;
color: #A38F85;
border: none;
border-radius: 4px;
cursor: pointer;
}
button:hover{
background-color: #d4b2a7;
}
.output-section{
width:80%;
margin:0 auto;
background-color: #ede9e3;
padding: 20px;
border-radius: 8px;
}
ul{
list-style-type: none;
padding: 0;
}
ul li{
background-color: #ede9e3;
padding: 10px;
margin: 5px 0;
border-radius: 4px;
box-shadow: 0 2px 5px rgba(0,0,0,0.1);
}
多出了很多之前CSS基本概念裡沒講到的功能TT,之後優化到設計基本介面的部分再介紹會使用到的功能!
function addExpense(){
    let description = document.getElementById("description").value;
    let amount = document.getElementById("amount").value;
    let note = document.getElementById("note").value;

    //驗證輸入
    if(description==""||amount==""){
        alert("請輸入完整支出類別與金額!");
        return;
    }

    //紀錄顯示在清單
    let expenseList = document.getElementById("expense-list");
    let listItem = document.createElement("li");

    //顯示格式
    listItem.innerHTML = `${description} - $${amount} <br> 備註:${note}`;
    expenseList.appendChild(listItem);

    //清空輸入
    document.getElementById("description").value="";
    document.getElementById("amount").value="";
    document.getElementById("note").value="";
}
getElementById(”description”).value:取用輸入id”description”的值來宣告變數。getElementById(”expense-list”):選取一個現有的列表。creatElement(”li”):創建一個新的列表項目。
簡單的支出類型、價錢輸入和備註都能正常輸出,整體排版也和預想的差不多,就是不知道邊邊為什麼會有那兩塊😖
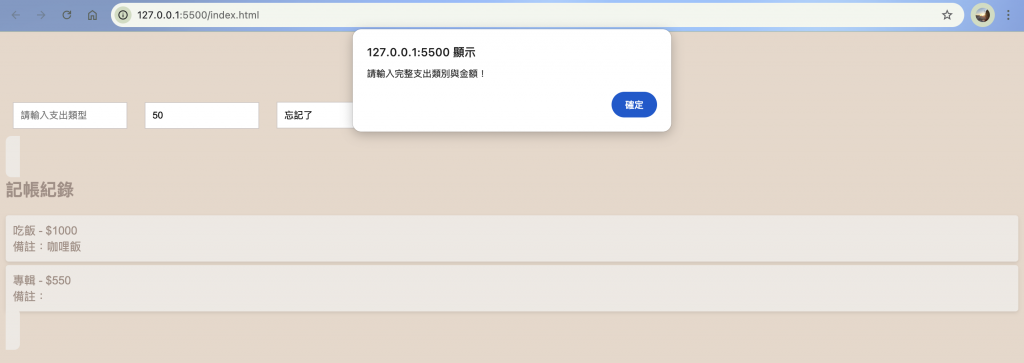
從JavaScript中可以看到,我有加入偵錯提醒,若沒有正確輸入支出類型或金額,會跳出通知提醒「請輸入完整支出類別與金額」。
後來發現是因為CSS .output-section的部分,目前還沒去了解這個的作用,所以我先把他刪掉,果然整個版面乾淨多了!!之後幾天,若發現他有存在的必要性,再把他加回來。
雖然是跟著ChatGPT的腳步與範例完成今天的進度,不過因為之前有簡單了解HTML、CSS和JavaScript的寫法,所以有先嘗試自己完成,忘記再看ChatGPT提供的內容。雖然還有很多功能、元素我還不熟悉,但之前有學習到的部分大部分都能很順利寫出來,有感覺到自己的進步和成長,比第一次做簡單實踐還要更熟悉。
