今天要介紹的是 Facade 模式,這也是 GoF 提出的模式之一。
在軟體開發中,隨著時間推移系統會變得越來越複雜,系統內會包含多層次的模組或子系統/模組,這些子系統有各自專門的任務和操作,任務如:後端資料請求、使用者介面互動和複雜業務邏輯處理等,當子系統持續發展時,它們之間的互動也變得更繁雜,尤其是這些子系統可能是由不同開發者維護和擴展時,要管理和維護這些子系統的互動和功能會變得困難。
在子系統複雜的情況下,如何和複雜的子系統互動或使用子系統功能?
Facade 模式中文又翻為門面模式或外觀模式,它會隱藏底層邏輯的複雜性,為使用者提供高階的使用介面,就像一個「門面」一樣,我們只會看到「門面」這抽象化的介面並與之互動,而不會直接和幕後的子系統互動,因此不管內部邏輯有多複雜、擴展演化到多進階厲害的功能,我們身為使用者都只要透過有公開的介面來呼叫和使用 API 即可,不需關心內部實作細節。
在前端應用中,我們經常會用到會員帳號與資料管理的功能,一個會員管理的功能可能包含註冊、登入、修改密碼、修改個人資料等功能,這些功能可能會各自獨自撰寫成一個模組,但為了方便使用,我們可將其包裝成一個 AccountManager 的 class,將相關功能都彙整進去。首先我們會先定義各獨立功能(各子系統)的邏輯:
// 先定義各子系統(各獨立功能)
class RegistrationSystem {
    register(email, password) {
        console.log(`Registering user with email: ${email}`);
        // 加入註冊邏輯...
        return true;
    }
}

class LoginSystem {
    login(email, password) {
        console.log(`User logged in with email: ${email}`);
        // 加入登入邏輯...
        return true;
    }
}

class PasswordManager {
    changePassword(email, oldPassword, newPassword) {
        console.log(`Password changed for user: ${email}`);
        // 加入修改密碼邏輯...
        return true;
    }

}

class ProfileManager {
    constructor() {
        this.profiles = {}; // 以物件儲存使用者資料
    }


    updateProfile(email, newProfile) {
        if (!this.profiles[email]) {
            console.log("No existing profile found. Please register or check the email address.");
            return false;
        }

        // 更新使用者名稱和大頭照
        const currentProfile = this.profiles[email];
        const updatedProfile = {
            ...currentProfile,
            name: newProfile.name || currentProfile.name, // 更新名稱,如果未提供則保持原樣
            photo: newProfile.photo || currentProfile.photo // 更新大頭照,如果未提供則保持原樣
        };

        this.profiles[email] = updatedProfile;
        console.log(`Profile updated for user: ${email}, New data: ${JSON.stringify(updatedProfile)}`);
        return true;
    }

    getProfile(email) {
        const profile = this.profiles[email] || {};
        console.log(`Profile retrieved for user: ${email}, Data: ${JSON.stringify(profile)}`);
        return profile;
    }
}
定義子系統功能後,再用 AccountManager 將功能彙整起來:
class AccountManager {
    constructor() {
        this.registrationSystem = new RegistrationSystem();
        this.loginSystem = new LoginSystem();
        this.passwordManager = new PasswordManager();
        this.profileManager = new ProfileManager();
    }

    register(email, password) {
        if (this.profileManager.profiles[email]) {
            console.log("User already exists. Please log in or reset your password.");
            return false;
        }
        this.profileManager.profiles[email] = { email, name: '', photo: '' }; // 初始化空的個人資料
        return this.registrationSystem.register(email, password);
    }

    login(email, password) {
        return this.loginSystem.login(email, password);
    }

    changePassword(email, oldPassword, newPassword) {
        return this.passwordManager.changePassword(email, oldPassword, newPassword);
    }

    updateProfile(email, profile) {
        return this.profileManager.updateProfile(email, profile);
    }

    getProfile(email) {
        return this.profileManager.getProfile(email);
    }
}
在客戶端(應用端)要使用時,可這樣呼叫使用:
const accountManager = new AccountManager();
accountManager.register('user@example.com', 'password123'); // Registering user with email: user@example.com
accountManager.login('user@example.com', 'password123'); // User logged in with email: user@example.com
accountManager.changePassword('user@example.com', 'password123', 'newPassword321'); // Password changed for user: user@example.com
accountManager.updateProfile('user@example.com', { name: 'John Doe', photo: 'johnDoe.jpg' }); // Profile updated for user: user@example.com, New data: {"email":"user@example.com","name":"John Doe","photo":"johnDoe.jpg"}

console.log(accountManager.getProfile('user@example.com')); // Profile retrieved for user: user@example.com, Data: {"email":"user@example.com","name":"John Doe","photo":"johnDoe.jpg"}
// 印出的資料
// {email: 'user@example.com', name: 'John Doe', photo: 'johnDoe.jpg'}
從上述範例可看出 AccountManager 結合了註冊、登入、密碼管理和個人資料管理的各功能,提供一個統一且簡化的介面以供外部操作使用,它其實就是將許多小型模組聚合起來,像個遙控器一樣,使用者只要在遙控器上指定我要什麼功能,遙控器就會幫你找到並呼叫對應的子系統功能,這種設計方式可幫助開發者更容易的進行使用者管理的相關功能。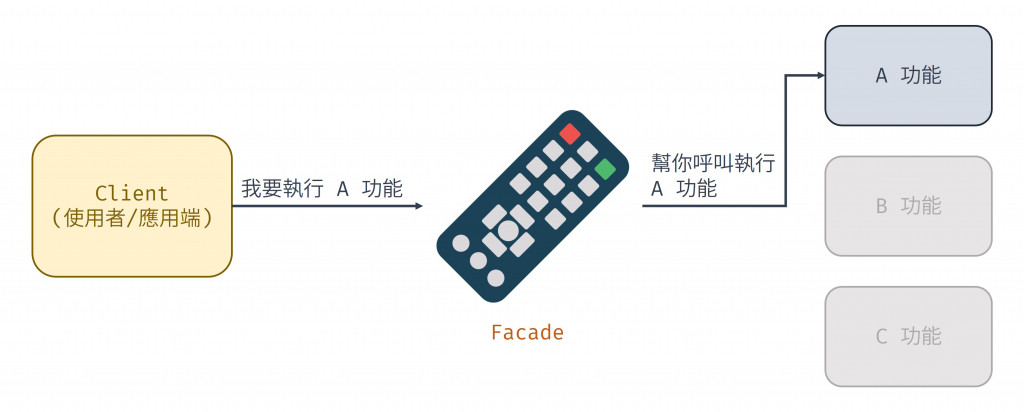
圖 1 Facade 示意圖(資料來源:自行繪製)
另外補充,Facade 模式可搭配 Module 模式使用,可在模組內定義私有方法,再透過模組匯出的公有方法來觸發模組內的私有行為。
以 Facade 作為解決方案優點如下:
以 Facade 作為解決方案缺點如下:
簡單敘述在 React 中會如何使用 Facade 模式,延續上面的使用者管理情境,我們可將註冊、登入、使用者資料更新分為 custom hook,例如:useRegistration、useLogin 和 useUserProfile,並在登入與註冊的 AuthForm 元件引入 useRegistration、useLogin;在使用者個人資料的 UserProfile 元件引入 useUserProfile,其他要使用相關功能的人就可以直接匯入 AuthForm 或 UserProfile 元件就好,而不需顧及註冊或登入的實作邏輯。
更多 React 應用範例也可參考網路文章如:JavaScript design patterns #3. The Facade pattern and applying it to React Hooks。