前言
Firebase Cloud Storage 是一個強大的工具,能夠幫助開發者儲存和管理大型文件,並且提供穩定、安全的文件訪問方式。除了基本的文件上傳與下載功能,Cloud Storage 還可以與 Firebase Authentication 結合來實現用戶權限管理,並通過自動化處理來優化存儲和傳輸性能。在這篇文章中,我們將解釋如何使用 Firebase Cloud Storage 來管理大型文件和用戶生成內容 (UGC),以及如何實現圖片和影片的自動壓縮與轉碼,以達到優化存儲成本與下載速度的效果。
1. 使用 Cloud Storage 與 Firebase Authentication 結合
Firebase Cloud Storage 支持與 Firebase Authentication 結合,讓文件上傳與下載可以根據用戶身份進行權限控制。這可以確保文件只有經過授權的用戶才能訪問,以提高安全性。
1.1 設置存儲規則
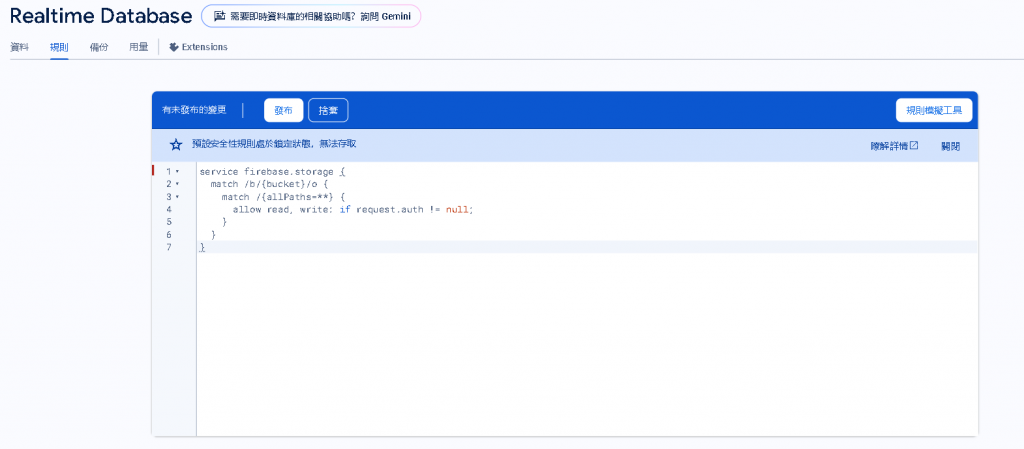
要限制不同用戶的文件訪問權限,首先,需要配置 Cloud Storage 的安全規則。這些規則決定了誰能夠上傳、下載、讀取和寫入存儲中的文件。常見的設置包括僅允許登錄的用戶上傳或下載文件,或者根據用戶的 UID 為不同的文件夾設置專屬的訪問權限。
範例:允許已登錄的用戶讀寫文件
service firebase.storage {
  match /b/{bucket}/o {
    match /{allPaths=**} {
      allow read, write: if request.auth != null;
    }
  }
}

這條規則表示,只有已通過 Firebase Authentication 登錄的用戶才能讀取和寫入 Cloud Storage 中的文件。
1.2 設置基於用戶的文件夾存取規則
如果你希望不同的用戶只能訪問他們自己的文件,可以將每個用戶的文件存儲在以其 UID 命名的文件夾中,並且僅允許用戶訪問自己對應的文件夾。
範例:限制用戶只能訪問自己的文件
service firebase.storage {
  match /b/{bucket}/o {
    match /users/{userId}/{allPaths=**} {
      allow read, write: if request.auth != null && request.auth.uid == userId;
    }
  }
}
這條規則確保只有用戶能夠讀取和寫入位於 /users/{userId}/ 目錄下的文件。
1.3 與 Firebase Authentication 的集成
在應用程式中,可以使用 Firebase Authentication 進行用戶身份驗證,並根據驗證結果控制文件的上傳與下載。
範例:使用 JavaScript 進行文件上傳
var storageRef = firebase.storage().ref();
var user = firebase.auth().currentUser;

if (user) {
  var userFolderRef = storageRef.child('users/' + user.uid + '/profilePicture.jpg');

  // 假設有一個檔案 input 元素供用戶上傳文件
  var file = document.getElementById('fileInput').files[0];

  userFolderRef.put(file).then(function(snapshot) {
    console.log('File uploaded successfully');
  });
}
2. 自動化圖片壓縮與轉碼
當處理用戶生成內容 (UGC) 尤其是圖片和影片時,直接存儲原始文件可能會浪費大量的存儲空間並影響下載速度。因此,對圖片和影片進行壓縮和轉碼是一個常見的優化策略。Firebase 提供了與 Cloud Functions 的結合,可以自動化處理文件的壓縮和轉碼,以減少存儲需求和提升性能。
2.1 使用 Cloud Functions 處理圖片壓縮
Cloud Functions 可以監聽 Cloud Storage 上的文件上傳事件,並在文件上傳後觸發自動壓縮或轉碼操作。這樣可以確保每次上傳的圖片都會被壓縮成適合的格式與大小,以節省存儲空間。
步驟:
1.安裝必要的庫 首先,需要在 Cloud Functions 中安裝 sharp 這個圖像處理庫來進行圖片壓縮與格式轉換。npm install sharp
2.編寫 Cloud Function 當有新圖片上傳時,該 Cloud Function 會自動壓縮圖片並將結果存回 Cloud Storage。
const functions = require('firebase-functions');
const admin = require('firebase-admin');
const sharp = require('sharp');
const path = require('path');
const os = require('os');
const fs = require('fs');

admin.initializeApp();

exports.compressImage = functions.storage.object().onFinalize(async (object) => {
  const bucket = admin.storage().bucket(object.bucket);
  const filePath = object.name;
  const fileName = path.basename(filePath);
  const tempFilePath = path.join(os.tmpdir(), fileName);
  const compressedFilePath = path.join(os.tmpdir(), `compressed-${fileName}`);

  // 下載文件到臨時目錄
  await bucket.file(filePath).download({destination: tempFilePath});

  // 壓縮圖片
  await sharp(tempFilePath)
    .resize(800) // 調整圖片大小
    .toFile(compressedFilePath);

  // 上傳壓縮後的圖片
  await bucket.upload(compressedFilePath, {
    destination: `compressed/${fileName}`
  });

  // 刪除臨時文件
  fs.unlinkSync(tempFilePath);
  fs.unlinkSync(compressedFilePath);

  console.log('Image compressed and uploaded successfully');
});
2.2 影片轉碼處理
影片的轉碼處理與圖片的壓縮類似,不過處理影片時,我們可以使用 FFmpeg 這類工具來轉換影片格式和降低分辨率。FFmpeg 可以被安裝在 Cloud Functions 中,並在每次上傳影片後自動觸發轉碼操作。
步驟:
1.安裝 FFmpeg 你可以使用預編譯的 FFmpeg 套件或者手動安裝 FFmpeg,並在 Cloud Function 中調用該工具進行影片轉碼。
2.使用 Cloud Functions 進行影片轉碼
const { exec } = require('child_process');
const ffmpegPath = '/path/to/ffmpeg'; // 確保 FFmpeg 安裝在可訪問的位置

exports.transcodeVideo = functions.storage.object().onFinalize(async (object) => {
  const filePath = object.name;
  const fileName = path.basename(filePath);
  const tempFilePath = path.join(os.tmpdir(), fileName);
  const outputFilePath = path.join(os.tmpdir(), `transcoded-${fileName}.mp4`);

  // 下載原始影片
  await bucket.file(filePath).download({destination: tempFilePath});

  // 使用 FFmpeg 進行轉碼
  await new Promise((resolve, reject) => {
    exec(`${ffmpegPath} -i ${tempFilePath} -vcodec libx264 ${outputFilePath}`, (error, stdout, stderr) => {
      if (error) {
        reject(error);
      } else {
        resolve(stdout);
      }
    });
  });

  // 上傳轉碼後的影片
  await bucket.upload(outputFilePath, {
    destination: `transcoded/${fileName}.mp4`
  });

  // 刪除臨時文件
  fs.unlinkSync(tempFilePath);
  fs.unlinkSync(outputFilePath);

  console.log('Video transcoded and uploaded successfully');
});
3. 優化存儲成本與下載速度
3.1 設置存儲類別
Firebase Cloud Storage 提供了不同的存儲類型,包括標準存儲、近線存儲 (Nearline Storage) 和冷存儲 (Coldline Storage)。這些存儲類型的成本和存取速度不同,適用於不同的數據存儲需求。
3.2 使用 CDN 提升下載速度
通過將 Cloud Storage 與 CDN (內容分發網絡) 結合,能夠提高文件的下載速度。Firebase Hosting 內建支援 Google 的 CDN 網路,將文件快取到全球的節點,減少用戶下載文件的延遲。
設置範例:啟用 Firebase Hosting 的 CDN
總結
Firebase Cloud Storage 提供了強大的文件管理功能。透過與 Firebase Authentication 的結合,我們可以根據用戶權限控制文件的上傳與訪問。另外,如果透過 Cloud Functions,自動化處理圖片壓縮與影片轉碼不僅能節省存儲成本,還能提高用戶體驗。最後,利用不同的存儲類別和 CDN 來進一步優化存儲和傳輸性能,讓應用在處理用戶生成內容 (UGC) 時更加高效。
如果有任何疑問,歡迎在留言區討論!
