在前一篇文章中,我們實現了前端的聯絡表單,並展示了如何使用表單來捕獲用戶的輸入資料。今天,我們將進一步深入,展示如何使用 EmailJS 將表單資料發送到後端,並將其通過電子郵件傳遞給負責人員。EmailJS 是一個可以無需後端服務器,即可從前端直接發送電子郵件的解決方案,非常適合小型應用或簡單的聯絡表單。
EmailJS 允許開發者直接從應用的前端向特定電子郵件地址發送郵件,無需搭建自己的郵件伺服器。開發者可以使用 EmailJS 提供的 API,並通過預設的模板來處理表單提交後的郵件傳送工作。這樣的方案讓我們能夠快速地實現聯絡表單功能,並將表單內容以郵件的形式發送出去。
.env 來保護敏感信息,如服務 ID、模板 ID 及公開密鑰。首先,通過 NPM 安裝 EmailJS SDK:
npm install --save @emailjs/browser
{from_name}、{message} 等佔位符來動態填充郵件內容。可以參考以下的模板設置: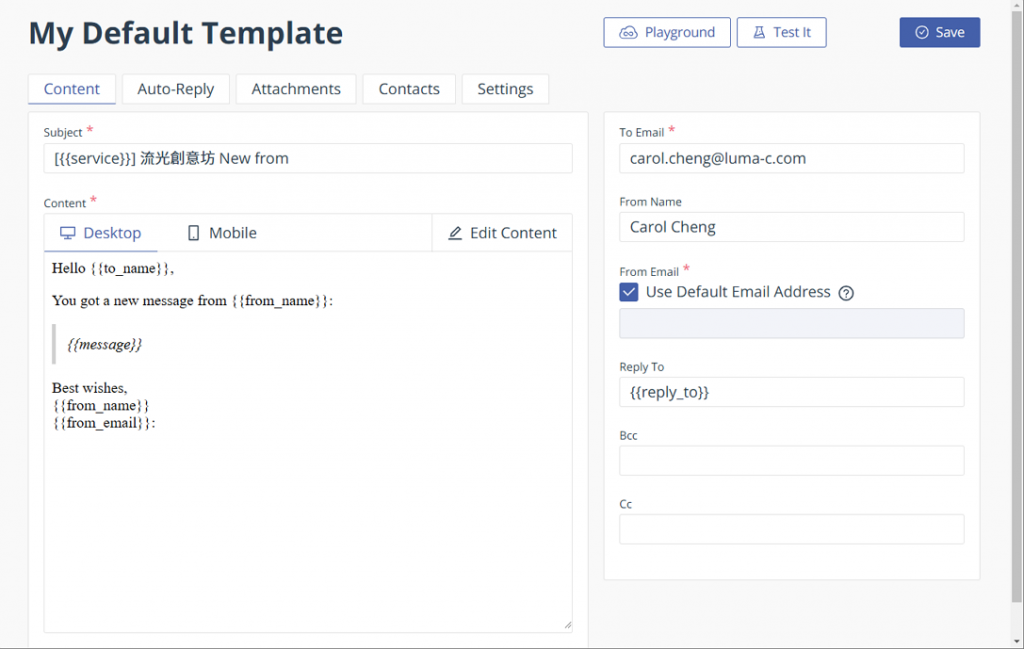
接下來,在專案根目錄中,更新 .env 文件並定義 EmailJS 的環境變數。
EMAILJS_Public_Key=your_service_id
EMAILJS_SERVICE_ID=your_service_id
EMAILJS_TEMPLATE_ID=your_template_id
您可以在 onSubmit 函數中添加 EmailJS 的郵件發送邏輯。這裡我們會將 emailjs.send 的邏輯整合到表單提交過程中。
import React, { useState } from 'react';
import { useForm } from 'react-hook-form';
import * as styles from '@/components/Form/ContactForm.module.scss';
import emailjs from '@emailjs/browser';

const ContactForm = () => {
    // 使用 useForm hook 來管理表單
    const [isSending, setIsSending] = useState(false); // 用於追蹤是否正在發送郵件
    const { register, handleSubmit, formState: { errors } } = useForm();

    // 表單提交處理
    const onSubmit = (data) => {
        setIsSending(true); // 開始發送,設置 loading 狀態

        // EmailJS 發送邏輯
        const templateParams = {
            from_name: data.name,
            from_email: data.email,
            service: data.serviceItem,
            message: data.projectDetails,
        };

        emailjs
            .send(
                process.env.EMAILJS_SERVICE_ID,  // 使用環境變數中的 Service ID
                process.env.EMAILJS_TEMPLATE_ID,  // 使用環境變數中的 Template ID
                templateParams,
                process.env.EMAILJS_PUBLIC_KEY  // 使用環境變數中的 Public Key
            )
            .then(
                (response) => {
                    console.log('Email sent successfully!', response.status, response.text);
                    alert('Your message was sent successfully!');
                    setIsSending(false); // 發送完成,重置 loading 狀態
                },
                (error) => {
                    console.log('Failed to send email...', error);
                    alert('There was an error sending your message.');
                    setIsSending(false); // 發送失敗,重置 loading 狀態
                }
            );
    };

    return (
        <form className={styles.contactForm} onSubmit={handleSubmit(onSubmit)}>
            <div className={styles.formGroup}>
                <label htmlFor="name">Name</label>
                <input
                    type="text"
                    {...register('name', { required: 'Name is required' })}
                    placeholder="Your Name"
                />
                {errors.name && <p className={styles.errorText}>{errors.name.message}</p>}
            </div>
            <div className={styles.formGroup}>
                <label htmlFor="email">Email</label>
                <input
                    type="email"
                    {...register('email', {
                        required: 'Email is required',
                        pattern: {
                            value: /\S+@\S+\.\S+/,
                            message: 'Enter a valid email',
                        },
                    })}
                    placeholder="Your Email"
                />
                {errors.email && <p className={styles.errorText}>{errors.email.message}</p>}
            </div>
            <div className={styles.formGroup}>
                <label htmlFor="serviceItem">Service Items</label>
                <select
                    {...register('serviceItem', { required: 'Please select a service item' })}
                >
                    <option value="">Select a service</option>
                    <option value="design">Design</option>
                    <option value="development">Development</option>
                    <option value="consultation">Consultation</option>
                </select>
                {errors.serviceItem && <p className={styles.errorText}>{errors.serviceItem.message}</p>}
            </div>
            <div className={styles.formGroup}>
                <label htmlFor="projectDetails">Project Details</label>
                <textarea
                    {...register('projectDetails', { required: 'Project details are required' })}
                    placeholder="Describe your project"
                ></textarea>
                {errors.projectDetails && <p className={styles.errorText}>{errors.projectDetails.message}</p>}
            </div>
            <button type="submit" className={styles.submitButton}>
                {isSending ? 'Sending...' : 'Submit'}
                <img src={require(`@/assets/icons/Submit.svg`)} alt="Submit" className={styles.submitIcon} />
            </button>
        </form>
    );
};

export default ContactForm;
useState:我們使用了 isSending 狀態來追蹤郵件發送過程,並在按鈕上顯示發送中的狀態。emailjs.send:將用戶的表單數據(name、email、serviceItem、projectDetails)打包為 templateParams,並透過 EmailJS 發送。Service ID、Template ID 和 Public Key 都被存放在 .env 文件中,避免暴露敏感信息。完成 EmailJS 表單集成後,依照以下步驟進行本地測試,確保表單提交與郵件發送功能正常運作:
Email sent successfully! 或錯誤訊息 Failed to send email...。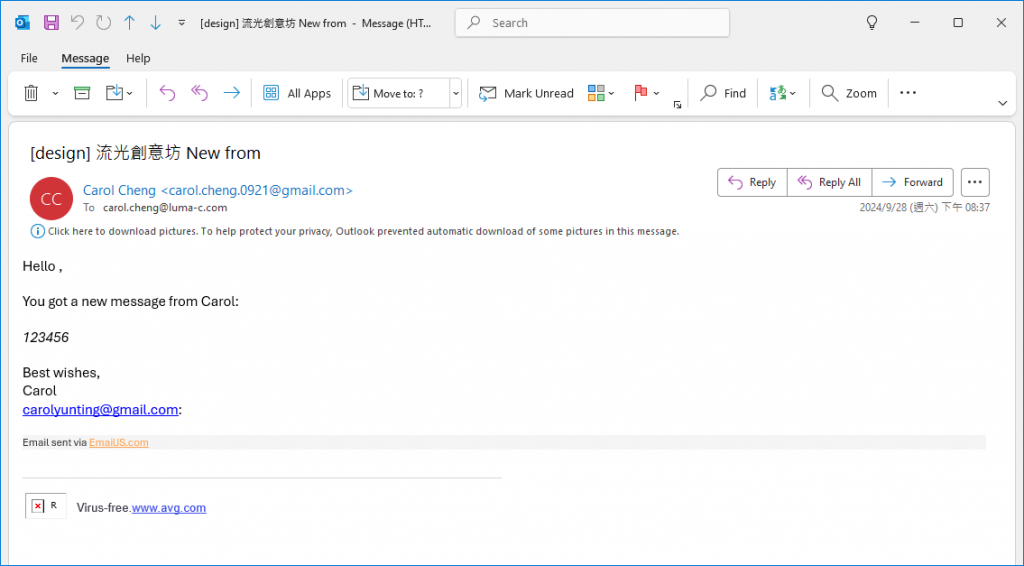
透過 EmailJS,我們可以輕鬆地實現從前端表單提交到郵件傳送的功能,並且無需後端支援。這種實作方式適合簡單應用或 MVP 階段的聯絡表單開發。在未來的文章中,我們將進一步探討如何優化表單體驗,例如進階的表單驗證、錯誤處理以及更多後端整合。
✨ 流光館Luma<∕> ✨ 期待與你繼續探索更多技術知識!