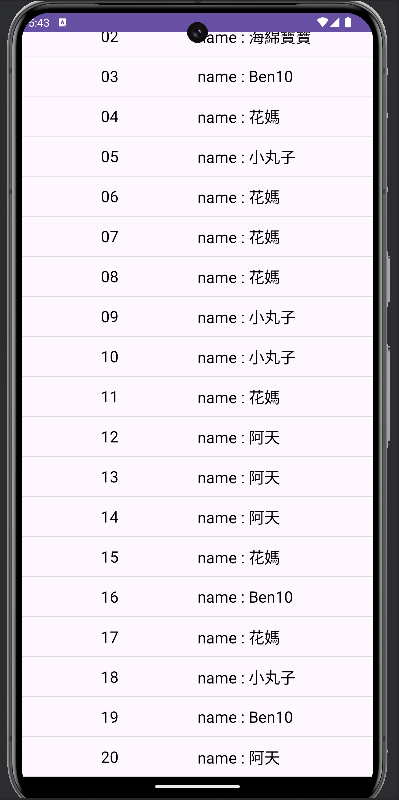
RecyclerView 可捲動的清單,這次我們來教如何使用recyclerView將假資料做成現,也配合之前交的MVP架構做使用。
這次我們需要新增2個class和一個interface,對著自己的com.example 右鍵>New>Java Class ,進行新增命名
(Model在這單元不需要所以沒有新增,新增也沒關係,之後若有需要使用少一個動作)
還要新增一個在layout的.xml,在layoutu右鍵>New>Layout Resource File,進行新增命名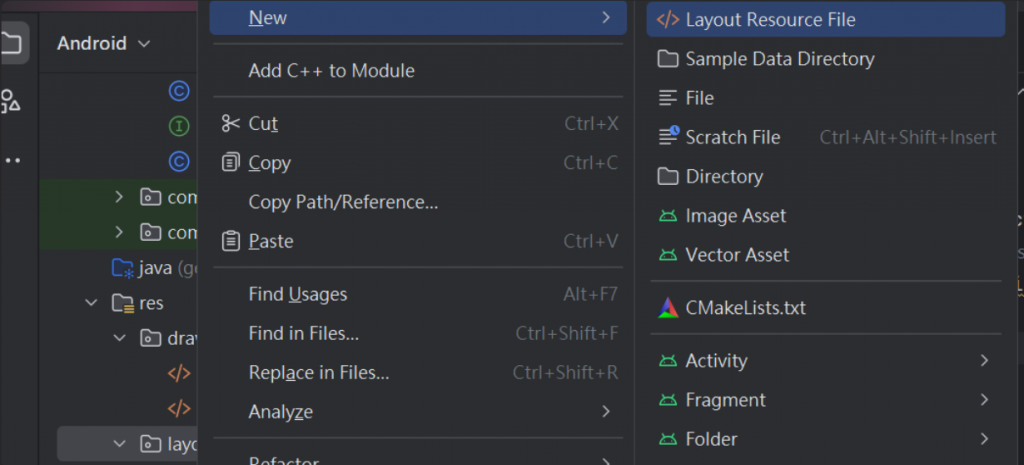
完成新增畫面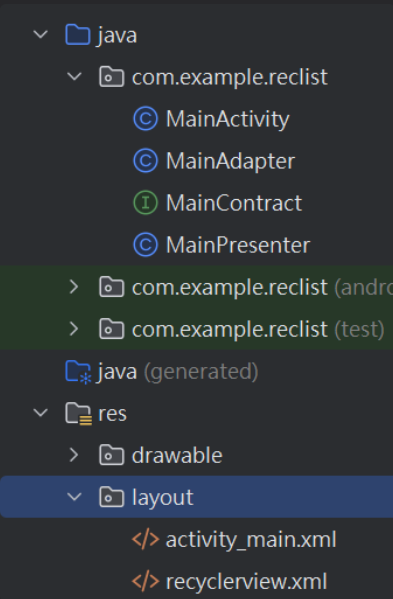
於Palette 拖移一個recyclerView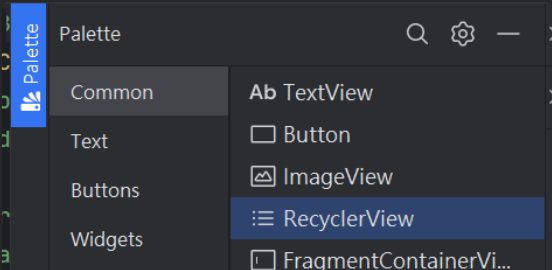
將其占全版面 (.xml 介面)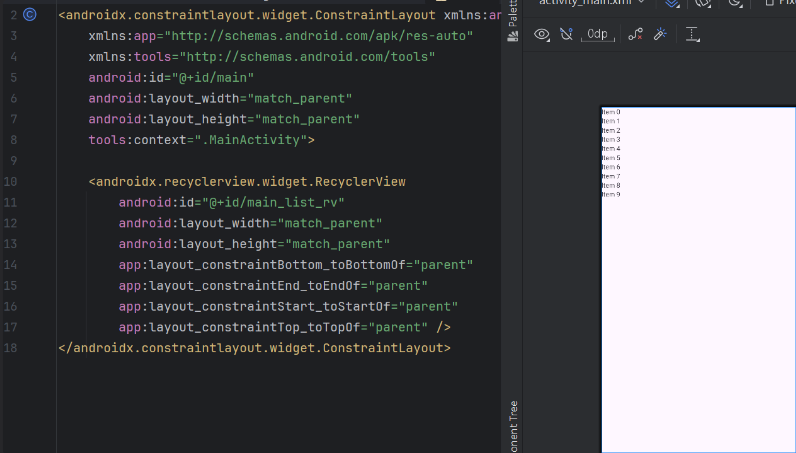
<?xml version="1.0" encoding="utf-8"?>
<androidx.constraintlayout.widget.ConstraintLayout xmlns:android="http://schemas.android.com/apk/res/android"
    xmlns:app="http://schemas.android.com/apk/res-auto"
    xmlns:tools="http://schemas.android.com/tools"
    android:id="@+id/main"
    android:layout_width="match_parent"
    android:layout_height="match_parent"
    tools:context=".MainActivity">

    <androidx.recyclerview.widget.RecyclerView
        android:id="@+id/main_list_rv"
        android:layout_width="match_parent"
        android:layout_height="match_parent"
        app:layout_constraintBottom_toBottomOf="parent"
        app:layout_constraintEnd_toEndOf="parent"
        app:layout_constraintStart_toStartOf="parent"
        app:layout_constraintTop_toTopOf="parent" />
</androidx.constraintlayout.widget.ConstraintLayout>
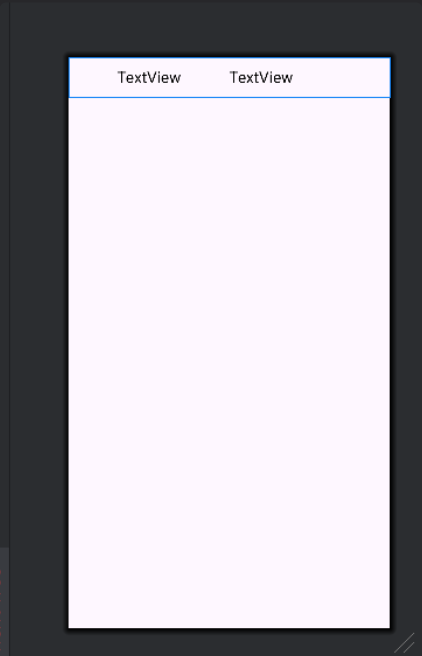
<?xml version="1.0" encoding="utf-8"?>
<androidx.constraintlayout.widget.ConstraintLayout xmlns:android="http://schemas.android.com/apk/res/android"
    xmlns:app="http://schemas.android.com/apk/res-auto"
    xmlns:tools="http://schemas.android.com/tools"
    android:layout_width="match_parent"
    android:layout_height="50dp">

    <LinearLayout
        android:layout_width="match_parent"
        android:layout_height="50dp"
        android:orientation="vertical"
        app:layout_constraintEnd_toEndOf="parent"
        app:layout_constraintStart_toStartOf="parent"
        app:layout_constraintTop_toTopOf="parent">

        <LinearLayout
            android:layout_width="match_parent"
            android:layout_height="match_parent"
            android:orientation="horizontal">

            <TextView
                android:id="@+id/main_recnumber_tv"
                android:layout_width="match_parent"
                android:layout_height="match_parent"
                android:layout_weight="1"
                android:gravity="center"
                android:text="TextView"
                android:textColor="@color/black"
                android:textSize="20dp" />

            <TextView
                android:id="@+id/main_recdata_tw"
                android:layout_width="match_parent"
                android:layout_height="match_parent"
                android:layout_weight="1"
                android:gravity="center_vertical"
                android:text="TextView"
                android:textColor="@color/black"
                android:textSize="20dp" />
        </LinearLayout>

    </LinearLayout>
</androidx.constraintlayout.widget.ConstraintLayout>
public class MainActivity extends AppCompatActivity implements MainContract.view{

    //設定RecycleView類別的變數名稱recycleView
    private RecyclerView recyclerView;
    MainAdapter mainAdapter;
    private MainPresenter mainPresenter;

    //新增一個HashMap存放每筆資料
    ArrayList<HashMap<String, String>> marrayList = new ArrayList<>();

    @Override
    protected void onCreate(Bundle savedInstanceState) {
        super.onCreate(savedInstanceState);
        setContentView(R.layout.activity_main);

        mainPresenter = new MainPresenter(this);
        mainPresenter.Data();

        //設置RecycleView
        recyclerView = findViewById(R.id.main_list_rv);
        recyclerView.setLayoutManager(new LinearLayoutManager(this));
        recyclerView.addItemDecoration(new DividerItemDecoration(this, DividerItemDecoration.VERTICAL));
        mainAdapter = new MainAdapter(marrayList);
        recyclerView.setAdapter(mainAdapter);
    }

    @Override
    public void getData(ArrayList arrayList) {
        marrayList = arrayList;
    }
}
public class MainPresenter implements MainContract.mainPresenter{
    private MainContract.view callback;

    ArrayList<HashMap<String, String>> arrayList = new ArrayList<>();
    final static String[] name = {"小丸子", "花媽", "Ben10", "海綿寶寶", "阿天"};

    public MainPresenter(MainContract.view view){
        this.callback = view;
    }

    @Override
    public void Data(){
        //利用迴圈呼叫20次將20筆不同資料放入HashMap中
        for (int i = 0; i < 20; i++) {
            HashMap<String, String> hashMap = new HashMap<>();
            hashMap.put("number",String.format("%02d", i + 1));
            hashMap.put("data","name : "+String.valueOf(name[new Random().nextInt(5)]));

            arrayList.add(hashMap);
        }

        callback.getData(arrayList);
    }
}
第一步,打完下方圖片這一行
之後使用快捷鍵Alt + Enter ,選擇Implement methods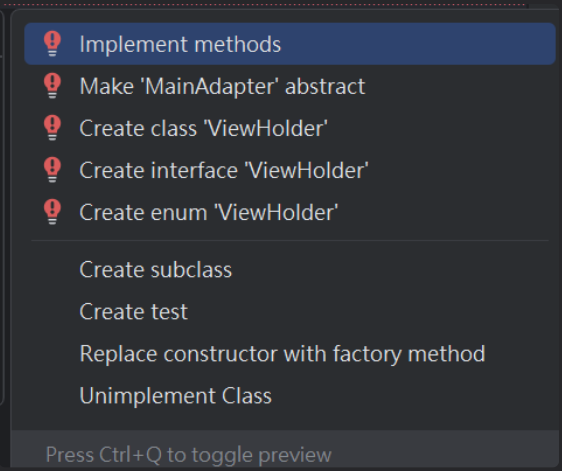
點選OK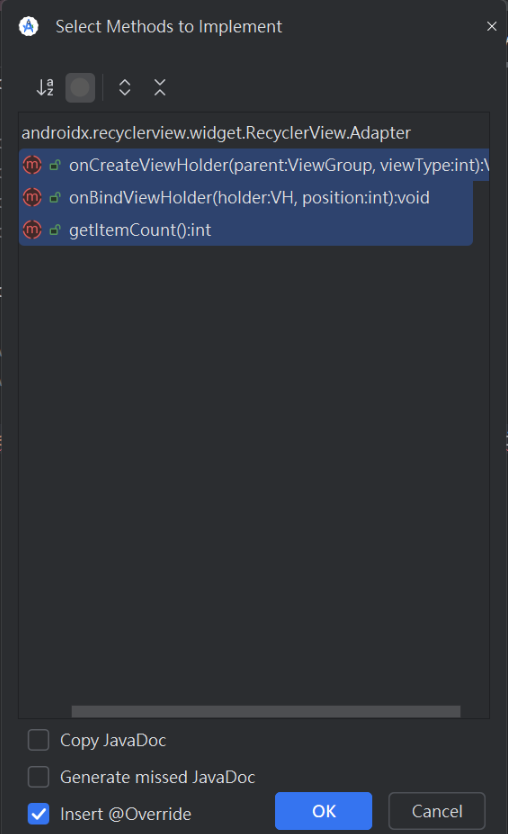
再一次使用快捷鍵Alt + Enter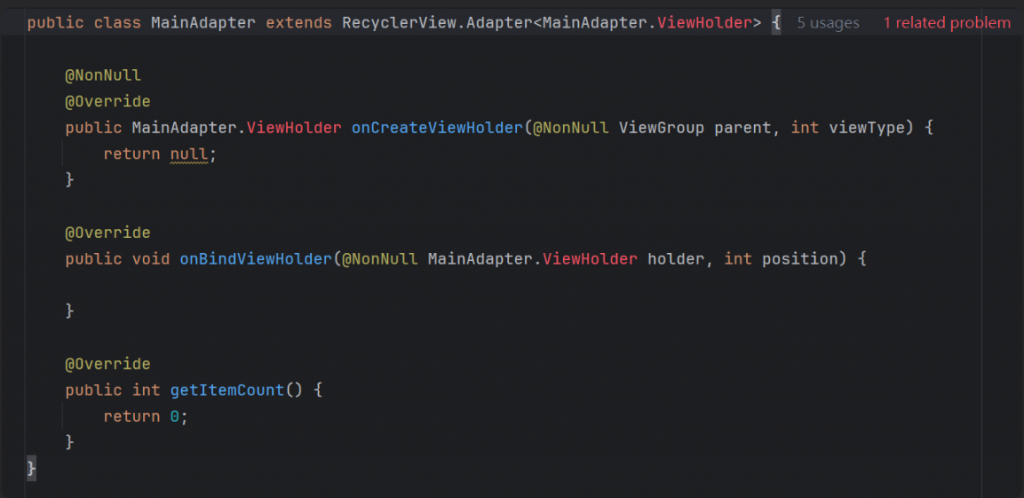
選擇 第一個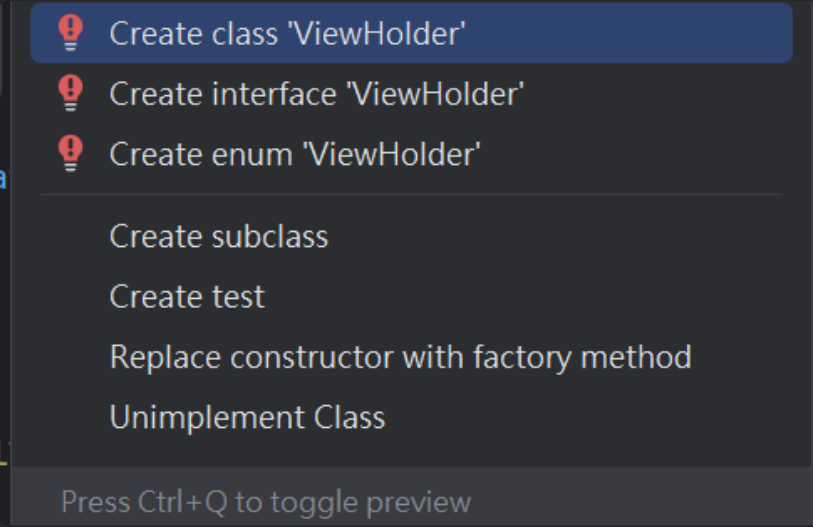
紅色底線使用快捷鍵Alt + Enter,選擇第一個
最後一次使用快捷鍵Alt + Enter,選擇第一個
這樣就完成了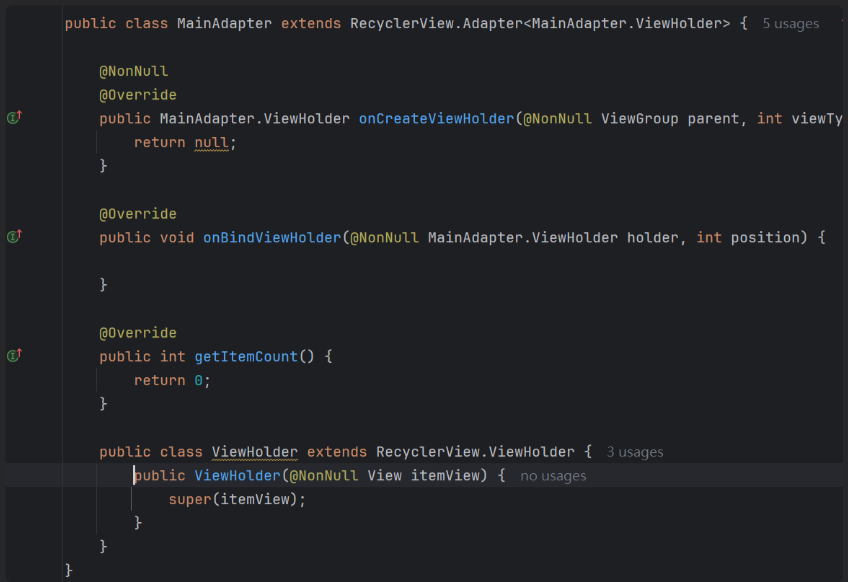
完成程式碼
記得layout要綁正確喔
public class MainAdapter extends RecyclerView.Adapter<MainAdapter.ViewHolder> {
    ArrayList<HashMap<String,String>> arrayList = new ArrayList<>();

    class ViewHolder extends RecyclerView.ViewHolder {
        private TextView tx1,tx2;

        public ViewHolder(View itemView) {
            super(itemView);
            tx1 = itemView.findViewById(R.id.main_recnumber_tv);
            tx2 = itemView.findViewById(R.id.main_recdata_tw);
        }
    }

    public MainAdapter(ArrayList<HashMap<String,String>> arrayList){
        this.arrayList = arrayList;
    }

    @Override
    public MainAdapter.ViewHolder onCreateViewHolder(ViewGroup parent, int viewType) {
        View view = LayoutInflater.from(parent.getContext())
                .inflate(R.layout.recyclerview, parent, false);
        return new MainAdapter.ViewHolder(view);
    }

    //從HashMap中抓取資料並將其印出
    @Override
    public void onBindViewHolder(MainAdapter.ViewHolder holder, int position) {
        holder.tx1.setText(arrayList.get(position).get("number"));
        holder.tx2.setText(arrayList.get(position).get("data"));

    }

    //回傳arrayList的大小
    @Override
    public int getItemCount() {
        return arrayList.size();
    }
}
package com.example.reclist;

import java.util.ArrayList;

public interface MainContract {
    interface view {
        void getData(ArrayList arrayList);
    }

    interface mainPresenter {
        void Data();
    }
}
跟著上面做完,我們就成功獲得一個最簡單使用RecyclerView做出的可捲動的清單啦~
執行大概是這樣,按住可上下滑動。
我們是將左邊的TextView放數字排序,右邊的TextView放隨機名字。
(剛開始)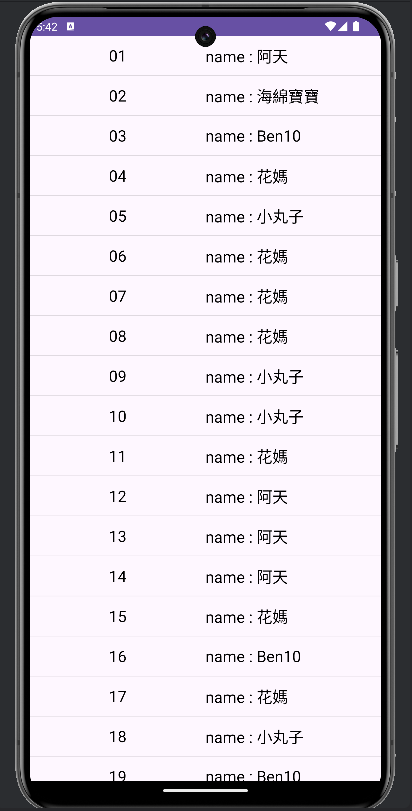
(下滑)