今天我們正式進入 API 開發的實作部分,這篇文章專為對 .NET Core Web API 完全沒有經驗的初學者準備。對於有經驗的開發者來說,建議可以從明後天開始閱讀,屆時將會提供更詳細、進階的範例。
在本文中,我將手把手帶你建立一個簡單的 API 專案,並介紹基本的 CRUD(新增、查詢、更新、刪除)功能。
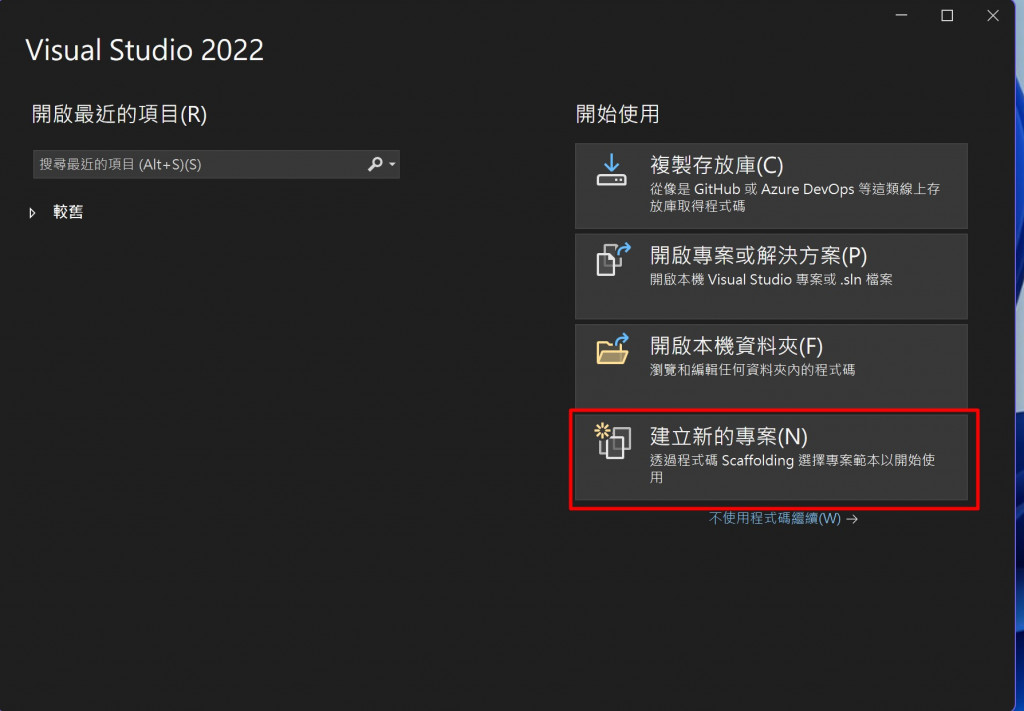
首先,開啟你的 Visual Studio (簡稱 VS),點選「建立專案」,選擇 **ASP.NET Core Web API** 作為專案模板。
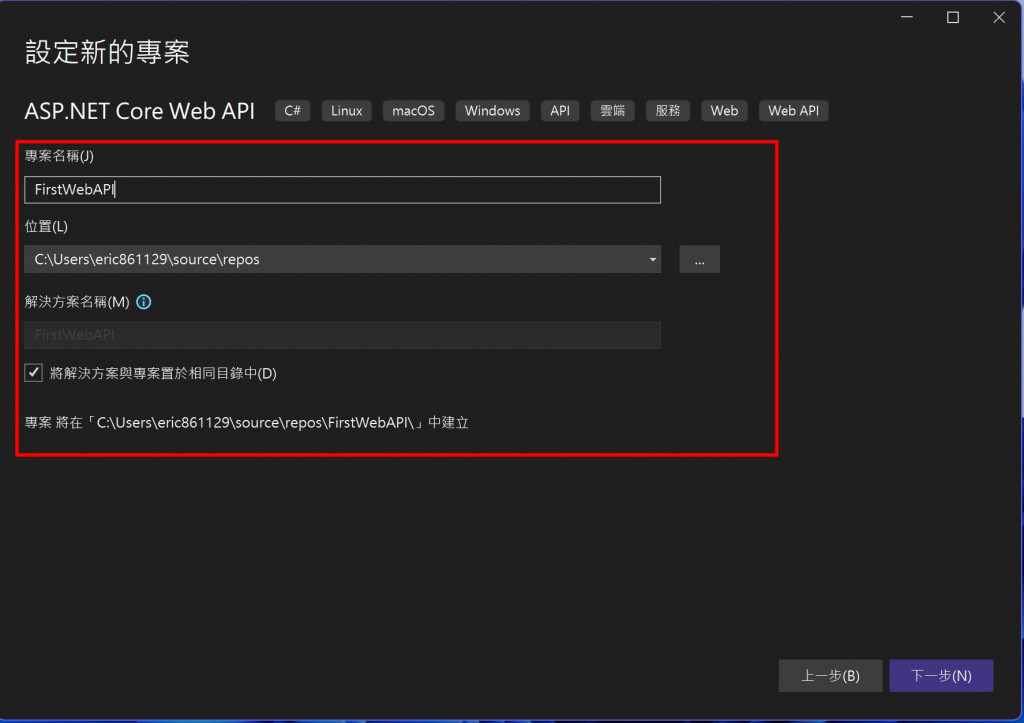
接著選擇專案名稱、儲存路徑等基本資訊。架構(Framework) 選擇 .NET 8.0 (長期支援), 驗證類型(Authentication Type) 選擇「無」,因為這篇文章主要針對初學者,因此我們暫不討論身份驗證。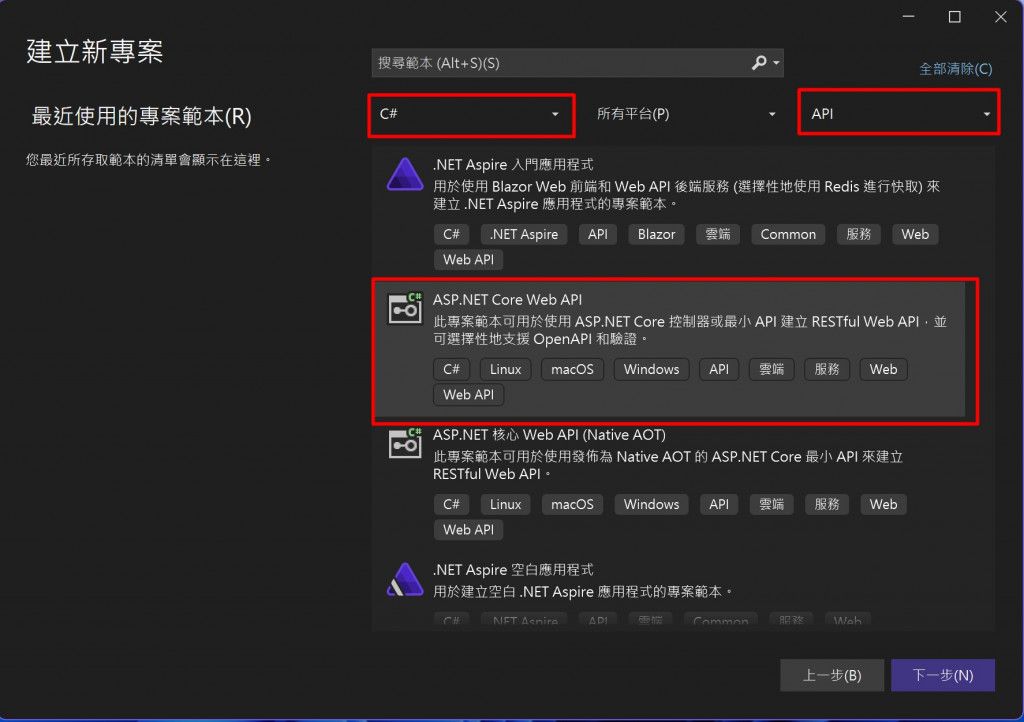
當設定好專案後,會看到解決方案和專案結構,如下圖所示:
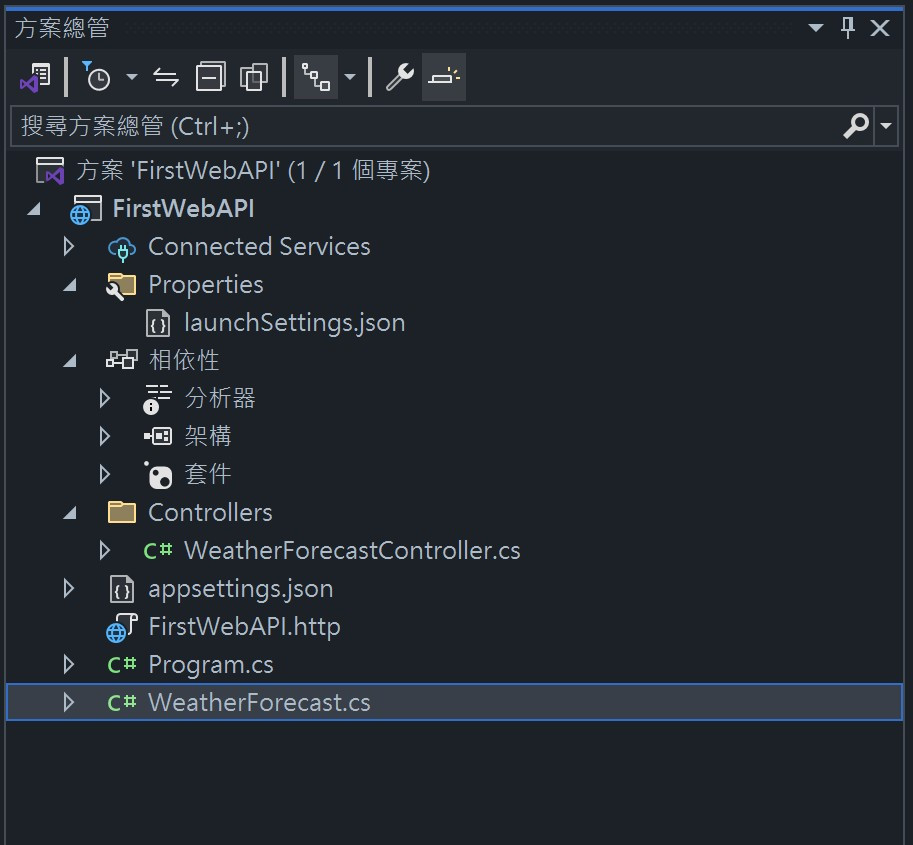
其中最關鍵的檔案是 Program.cs,這是 API 應用程式的進入點,包含應用的組態與中介軟體的配置。
namespace FirstWebAPI
{
    public class Program
    {
        public static void Main(string[] args)
        {
            var builder = WebApplication.CreateBuilder(args);

            // 將服務添加到容器中
            builder.Services.AddControllers(); // 添加控制器服務
            builder.Services.AddEndpointsApiExplorer(); // 添加端點 API 探索服務
            builder.Services.AddSwaggerGen(); // 添加 Swagger 生成服務

            var app = builder.Build();

            // 配置 HTTP 請求管道
            if (app.Environment.IsDevelopment())
            {
                app.UseSwagger(); // 在開發環境中使用 Swagger
                app.UseSwaggerUI(); // 在開發環境中使用 Swagger UI
            }

            app.UseHttpsRedirection(); // 使用 HTTPS 重定向
            app.UseAuthorization(); // 使用授權中介軟體
            app.MapControllers(); // 映射控制器路由

            app.Run(); // 運行應用程式
        }
    }
}
這段程式碼幫助我們啟動應用程式並設定了基礎服務,例如:控制器、Swagger 文件化支援(用於測試 API 的工具),以及 HTTPS 支援。
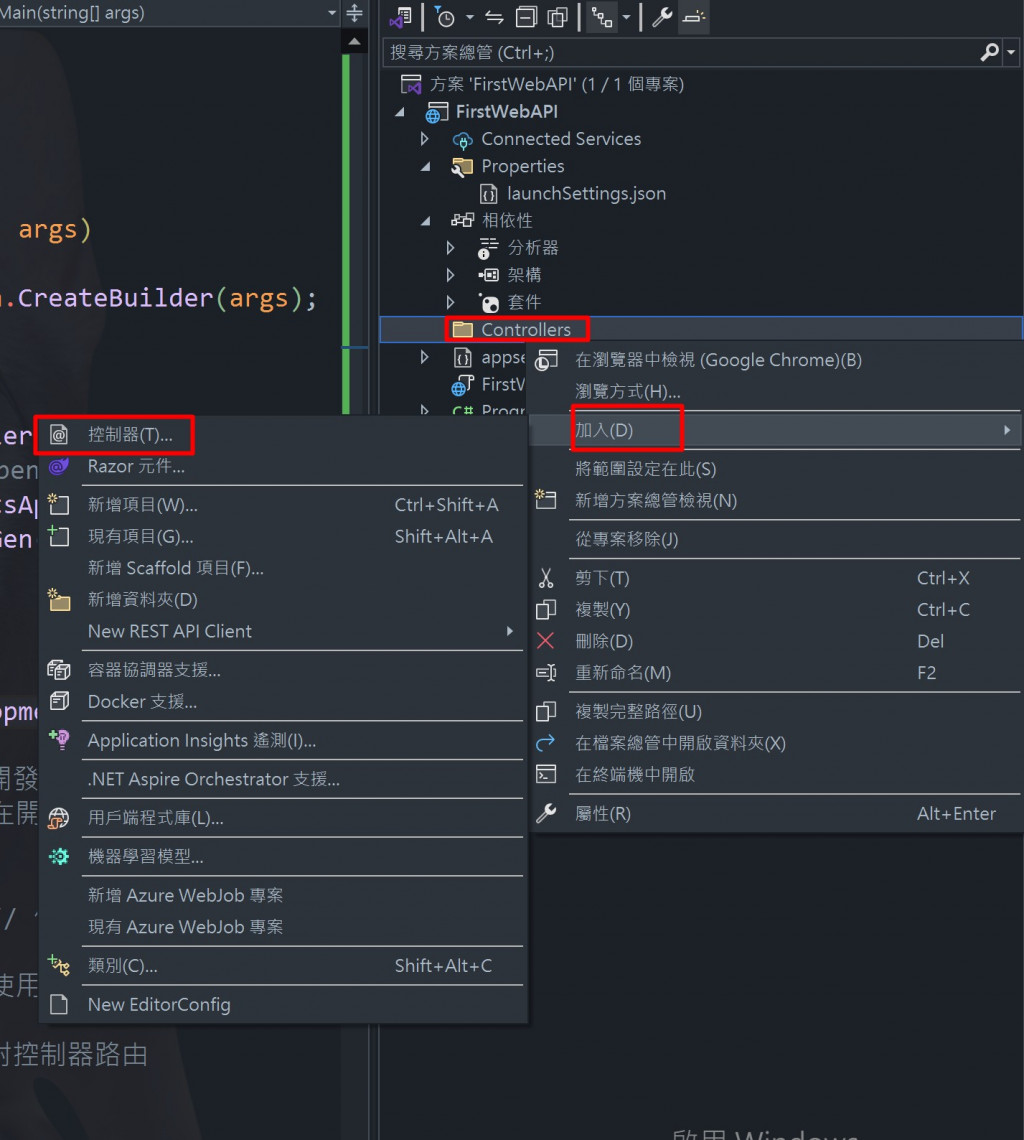
我們接下來要建立一個 ProductController 來處理產品相關的 API 功能,首先,右鍵「控制器」資料夾並選擇「新增控制器」。
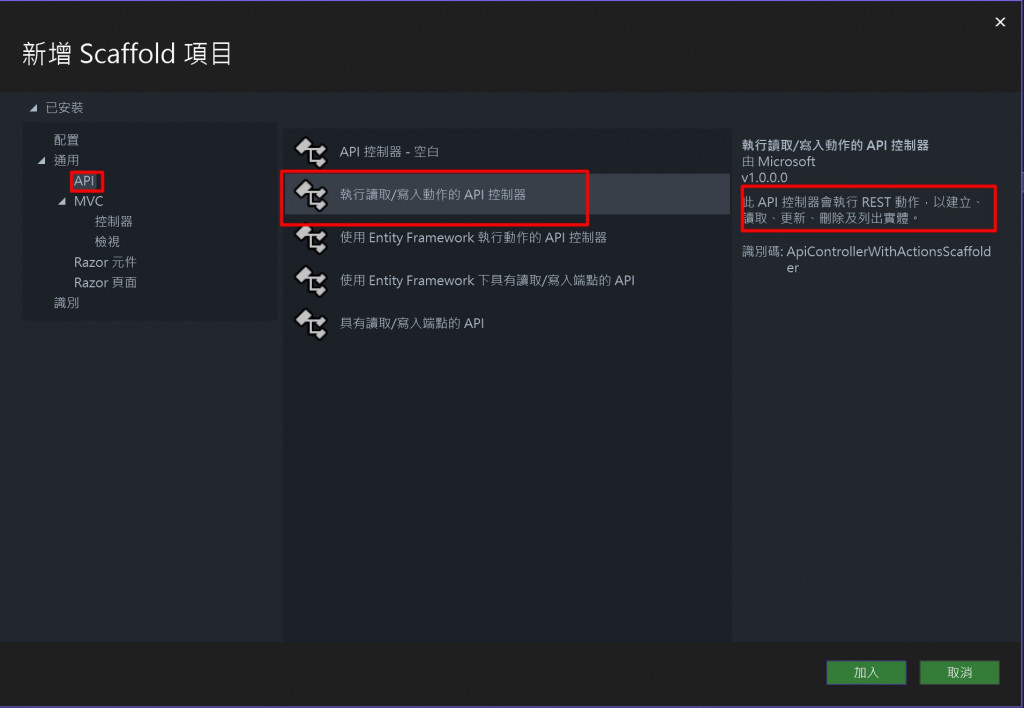
在範例中,我們選擇「使用讀取/寫入動作的 API 控制器(API Controller with read/write actions)」,這會自動生成包含 CRUD 動作的控制器。這個控制器將會幫助我們快速建立查詢、新增、更新、刪除產品的 API 端點。
在開始處理 API 邏輯前,首先定義一個簡單的產品模型,用來表示每個產品的屬性。
 /// <summary>
 /// 產品
 /// </summary>
 public class Product
 {
     /// <summary>
     /// 產品編號
     /// </summary>
     public int Id { get; set; }
     /// <summary>
     /// 產品名稱
     /// </summary>
     public string Name { get; set; }
     /// <summary>
     /// 產品價格
     /// </summary>
     public decimal Price { get; set; }
     /// <summary>
     /// 產品描述
     /// </summary>
     public string Description { get; set; }
     /// <summary>
     /// 產品分類
     /// </summary>
     public string Category { get; set; }
 }
這是一個基礎的產品類別,包含 Id、Name、Price、Description 和 Category 等屬性。
(可以養成習慣,使用///的XML註解來說明程式碼)
接下來,我們來完善控制器,建立 CRUD 操作。程式碼如下:
using FirstWebAPI.Model;
using Microsoft.AspNetCore.Mvc;

namespace FirstWebAPI.Controllers
{
    [Route("api/[controller]")]
    [ApiController]
    public class ProductController : ControllerBase
    {
        // 模擬的產品資料庫
        private static List<Product> products =
        [
            new Product { Id=1, Name = "Laptop", Price = 1000m, Description = "High-performance laptop", Category = "Electronics" },
            new Product { Id=2, Name = "Smartphone", Price = 600m, Description = "Latest model smartphone", Category = "Electronics" },
            new Product { Id=3, Name = "Coffee Maker", Price = 150m, Description = "Automatic coffee maker", Category = "Home Appliances" }
        ];

        /// <summary>
        /// Get all products
        /// </summary>
        /// <returns></returns>
        [HttpGet("GetProduct")]
        public ActionResult<IEnumerable<Product>> GetProduct()
        {
            return Ok(products);
        }
        /// <summary>
        /// Get a product by id
        /// </summary>
        /// <param name="id"></param>
        /// <returns></returns>
        [HttpGet("GetProduct{id}")]
        public ActionResult<Product> GetProduct(int id)
        {
            var product = products.Where(p => p.Id == id).FirstOrDefault();
            if (product == null)
            {
                return NotFound("Product not found");
            }
            return Ok(product);
        }

        /// <summary>
        /// Insert a new product
        /// </summary>
        /// <param name="product"></param>
        /// <returns></returns>
        [HttpPost("CreateProduct")]
        public ActionResult CreateProduct([FromBody] Product product)
        {
            if (product == null)
            {
                return BadRequest("Invalid product data");
            }
            products.Add(product);
            return CreatedAtAction(nameof(GetProduct), new { id = products.Count - 1 }, product);
        }
        /// <summary>
        /// Update a product
        /// </summary>
        /// <param name="id"></param>
        /// <param name="updatedProduct"></param>
        /// <returns></returns>
        [HttpPut("UpdateProduct{id}")]
        public ActionResult UpdateProduct(int id, [FromBody] Product updatedProduct)
        {
            var product = products.Where(p => p.Id == id).FirstOrDefault();
            if (product == null)
            {
                return NotFound("Product not found");
            }
            if (updatedProduct == null)
            {
                return BadRequest("Invalid product data");
            }

            product.Name = updatedProduct.Name;
            product.Price = updatedProduct.Price;
            product.Description = updatedProduct.Description;
            product.Category = updatedProduct.Category;

            return NoContent(); // 成功但無回應
        }

        /// <summary>
        /// Delete a product
        /// </summary>
        /// <param name="id"></param>
        /// <returns></returns>
        [HttpDelete("DeleteProduct{id}")]
        public ActionResult DeleteProduct(int id)
        {
            var product = products.Where(p => p.Id == id).FirstOrDefault();
            if (product == null)
            {
                return NotFound("Product not found");
            }

            products.Remove(product);
            return NoContent();
        }
    }
}
我完成了一組假資料Product,並且完成各別API的命名,我自己習慣上會去更改命名,讓執行的名稱可以更加明確與直關,這邊就很見仁見智,有些人會以HTTP方法做命名就好,讓路由與控制器的名稱去顯示意圖與物件資源。
GET api/products)
Get():用於查詢所有產品,返回 200 OK 和產品列表。Get(int id):根據產品 ID 查詢單個產品,若找不到則返回 404 Not Found。POST api/products)
Post(Product product):用來新增新產品,檢查產品資料的合法性,新增成功後返回 201 Created 並附上新產品的 URI。PUT api/products/{id})
Put(int id, Product updatedProduct):更新指定產品的屬性,若找不到產品則返回 404 Not Found,若成功則返回 204 No Content。DELETE api/products/{id})
Delete(int id):刪除指定產品,若找不到產品則返回 404 Not Found,成功則返回 204 No Content。[HttpGet]、[HttpPost]、[HttpPut] 和 [HttpDelete] 分別對應於 HTTP 協議中的四種方法,用來處理不同的 API 請求。[HttpGet("GetProduct")] ()裡面的””指的是,執行這支API的名稱,可以與控制器上的方法名稱不同。Ok():返回 200 OK,表示成功。CreatedAtAction():返回 201 Created,表示資源已成功創建。NotFound():返回 404 Not Found,表示找不到請求的資源。BadRequest():返回 400 Bad Request,表示請求資料無效。NoContent():返回 204 No Content,表示成功但不返回內容。{id}:表示路由中的 ID 參數。[FromBody]:表示從 HTTP 請求的 Body 中獲取資料。當我們完成上面這些後,就可以來執行專案測試API的功能了!
我們可以直接執行專案,就會看到這個畫面~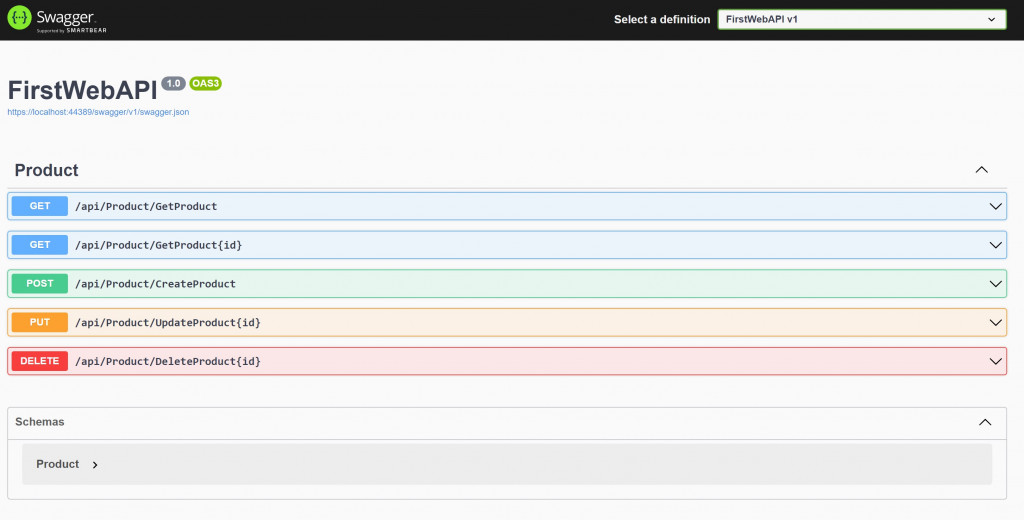
首先映入眼簾,這個站台是Swagger幫你生成的一個簡易的API測試站台。
Swagger是一個API測試的套件。他會自動依據你API站台裡的控制器與各API方法,生成各個可以透過UI就能簡易測試API的地方,可以看到我們五個API都顯示出來,並且依據HTTP方法有不同的顏色區分。
現在先讓我們點擊最基礎的GetProduct 這支取的全部產品的API,可以先看到下面會有一組預設假的Response,讓你能看到如果你的API正常會大概回傳什麼樣的資料。
那我們可以Click右上角的Try It out.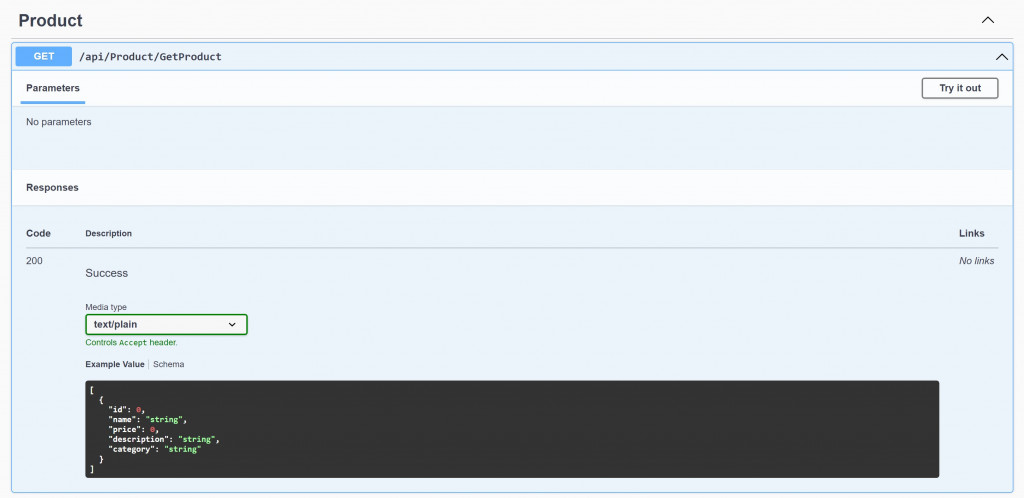
接著點擊 Excute 就可以執行了。
那這邊就可以看到下面這個畫面~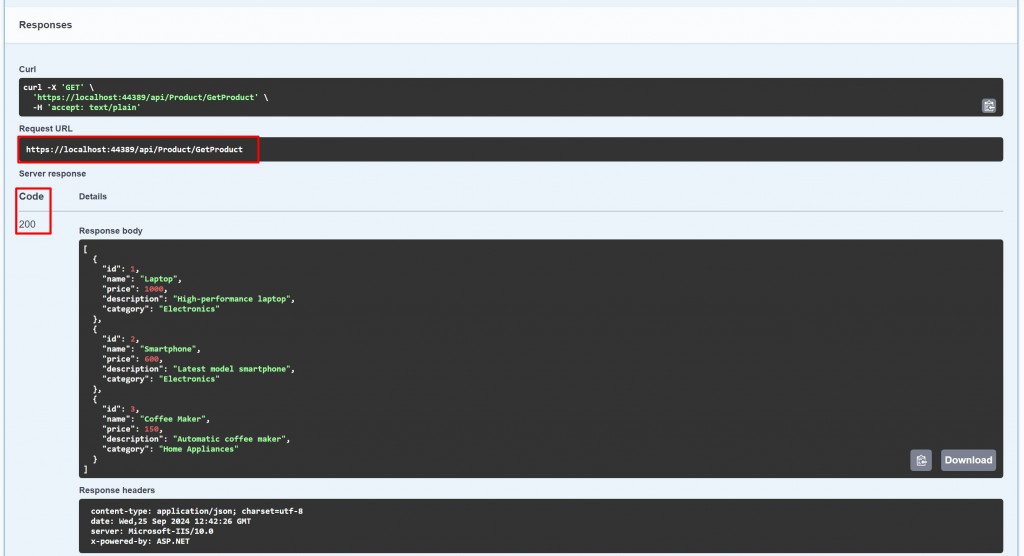
Request URL 就是 執行API的正式網址,如果我們直接拿這個網址使用就會出現:
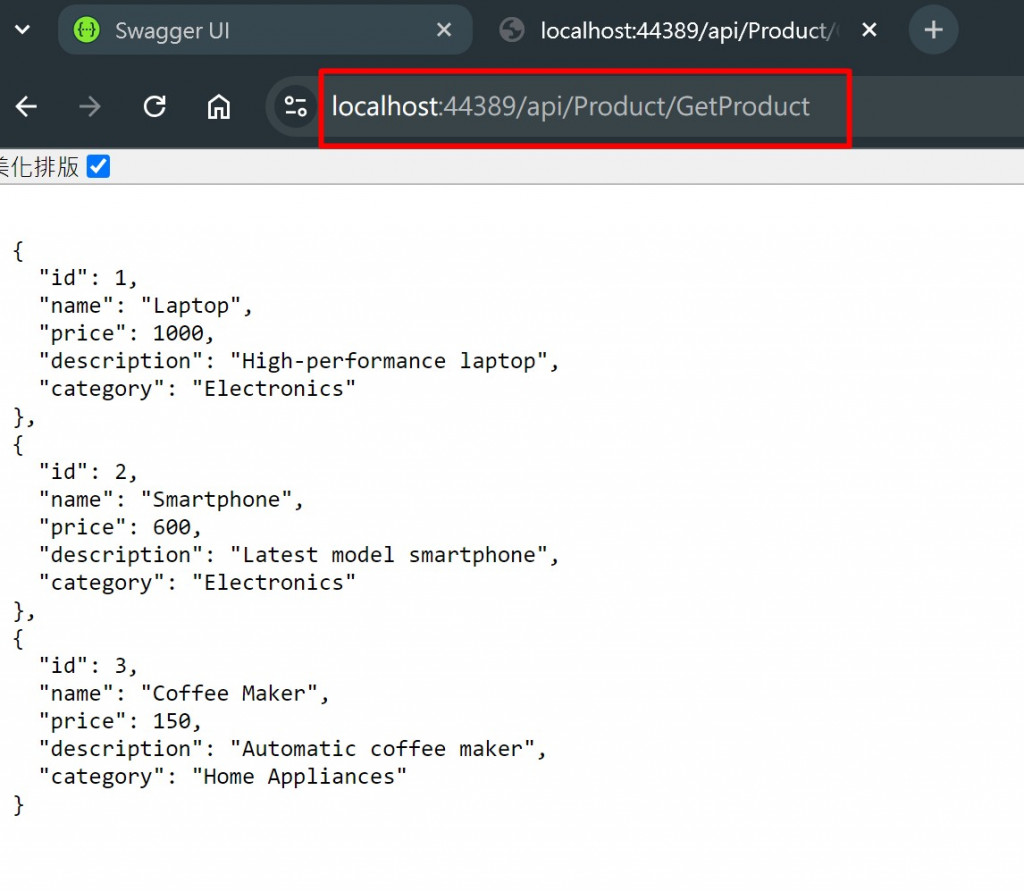
這才是 正式的API網址與回傳的JSON格式,現在看到的畫面是Swagger這個元件幫我們生成的。
Server response 就是伺服器正式給我們的回應,左邊的一樣是執行的Http狀態,右邊的ResponseBody就是我們要的結果啦!
那如果要參數的API,或是回應錯誤的API呢?
可以看看下面的範例,一樣先按下 Try It out. ,接著就會跳出參數的Input,這邊可以看到我要執行GetProduct(Id)的參數有哪些,那我故意傳一個沒有的Id去做查詢,下方執行的結果就出現了404 NotFound的狀態。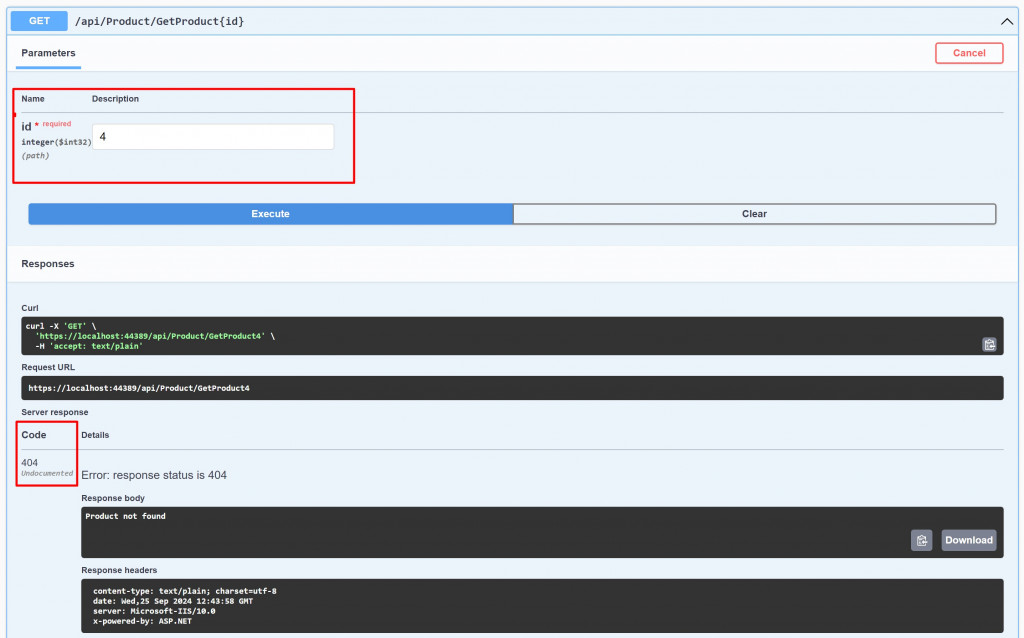
這樣基礎的API開法實做與執行就完成了!其他功能的話可以自己嘗試一下,只是因為假資料的緣故,重新執行後假資料即便經過新增或刪除資料還是那三筆~
今天我們學會了如何建立一個基礎的 Web API 專案,並實現了產品的查詢、新增、更新和刪除(CRUD)功能。雖然今天的內容針對初學者,但理解了這些基礎後,你將能夠在後續文章中進一步擴展 API 的功能,並加入更複雜的邏輯與技術。
明天我們將進一步探討 API 測試和效能優化,並深入學習如何在真實場景中應用這些技術。
