提問:專案需要加入一個 NavBar,依據不同頁面顯示切換樣式。
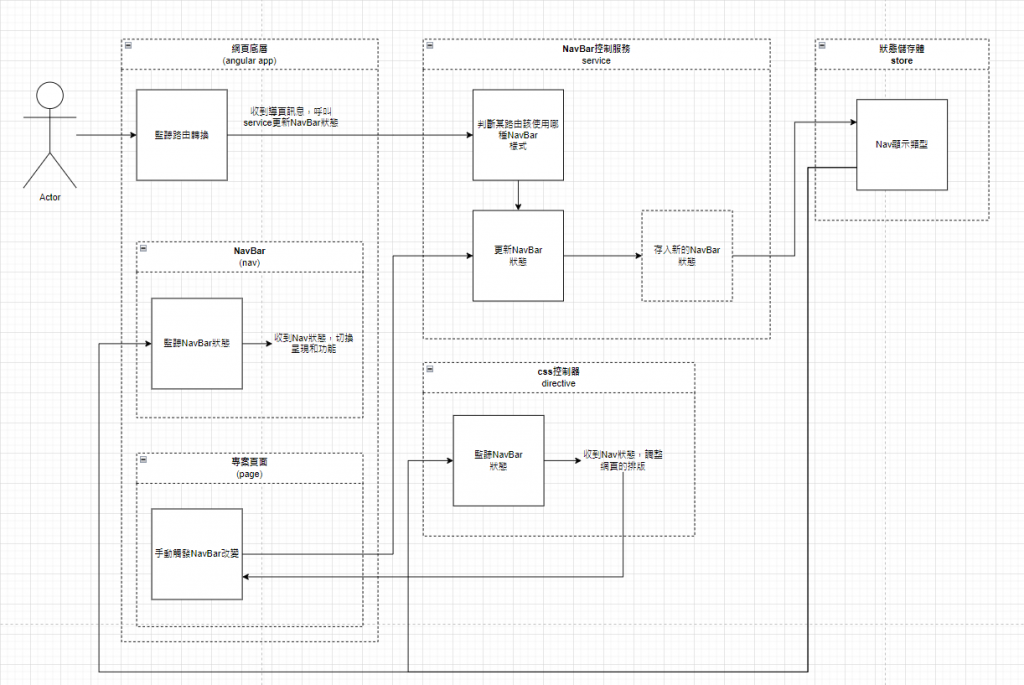
這次的架構針對 NavBar 的部分總共會有四個角色:NavBar 本體、控制 NavBar 的 service、管理 NavBar 狀態的 Store,以及處理 NavBar 與外部排版關係的自訂 directive。
設計理念如下:
首先在進入 Angular 應用時,訂閱路由導引;在路由改變時,呼叫 NavBar Service 的 method 判斷該路由應使用的樣式,並將狀態更新到 store 中。會使用 NavBar 狀態的對象有兩個:一是 NavBar 本身,二是自定義 directive。directive 會依據狀態回傳 css 的 class name,讓外部元件可以透過 class name 來搭配 NavBar 進行 UI 調整,有點類似 side effect 的處理方式。
我們來看看程式碼。
首先是 NavBar 本身,其實非常簡單,唯二要做的就是訂閱狀態以及依據狀態切換 UI 呈現。Html 的部分就不特別討論了,ng-if 就可以解決。
@Component({
  selector: 'app-self-control-nav',
  standalone: true,
  imports: [CommonModule],
  templateUrl: './self-control-nav.component.html',
  styleUrls: ['./self-control-nav.component.scss'],
})
export class SelfControlNavComponent implements OnDestroy {
  private store = inject(Store);
  private destroy$ = new Subject<void>();

  protected navControl$ = this.store
    .select(selectLayoutNavControl)
    .pipe(takeUntil(this.destroy$));

  ngOnDestroy(): void {
    this.destroy$.next();
    this.destroy$.complete();
  }
}
接著我們將 NavBar import 到 AppComponent。因為我希望 NavBar 的生命週期與應用相同,並且是在 DOM 的最外層。
<app-self-control-nav></app-self-control-nav>
<router-outlet />
再來,AppComponent 要負責的是訂閱路由,以實作依據路由切換 NavBar 樣式的功能。
@Component({
  selector: 'app-root',
  standalone: true,
  imports: [RouterOutlet, SelfControlNavComponent],
  templateUrl: './app.component.html',
  styleUrls: ['./app.component.scss'],
})
export class AppComponent implements OnInit {
  private router = inject(Router);
  private controlNavService = inject(ControlNavService);

  ngOnInit(): void {
    this.router.events
      .pipe(
        filter(
          (event): event is NavigationEnd => event instanceof NavigationEnd
        )
      )
      .subscribe((res) => {
        const _url = res.url.split('?')[0];
        this.controlNavService.routerSetNavBar(_url);
      });
  }
}
因為我們把路由和 NavBar 樣式的關聯封裝在 NavBarService 中,所以呼叫 Service 的方法,把 url 傳入即可。
下一步前往 NavBar Service,它提供兩個方法:一是剛剛提到的透過路由切換的方法,二是提供直接傳入要切換的樣式的方法。
@Injectable({
  providedIn: 'root',
})
export class ControlNavService {
  private store = inject(Store);

  routerSetNavBar(url: string): void {
    switch (url) {
      case 'route/a':
        this.manualSetNavBar(SelfControlNavType.None, '');
        break; // 加上 break 避免 fall-through
      default:
        this.manualSetNavBar(SelfControlNavType.Sample, 'Sample');
        break;
    }
  }

  manualSetNavBar(selfNavType: SelfControlNavType, selfNavTitle: string): void {
    this.store.dispatch(
      LayoutActions.uPDATE_NAV_CONTROL({
        navControl: { selfControlNavType: selfNavType, title: selfNavTitle },
      })
    );
  }
}
最後是另一個會用到 NavBar 狀態的 directive。
@Directive({
  selector: '[appSelfControlNavCss]',
  standalone: true,
})
export class SelfControlNavCssDirective implements OnInit, OnDestroy {
  private renderer = inject(Renderer2);
  private elementRef = inject(ElementRef);
  private store = inject(Store);``
  private destroy$ = new Subject<void>();

  ngOnInit(): void {
    this.store
      .select(selectLayoutNavControl)
      .pipe(takeUntil(this.destroy$))
      .subscribe((res) => {
        // Your Own Logic
        if (res.selfControlNavType === SelfControlNavType.None) {
          this.renderer.removeClass(
            this.elementRef.nativeElement,
            'self-control-header-shift'
          );
        } else {
          this.renderer.addClass(
            this.elementRef.nativeElement,
            'self-control-header-shift'
          );
        }
      });
  }

  ngOnDestroy(): void {
    this.destroy$.next();
    this.destroy$.complete();
  }
}
範例中的 directive 會判斷 NavBar 狀態中的 Type 來決定要回傳的 class name,讓與 NavBar 相依的 DOM 能透過 class name 來處理各自的樣式或邏輯。
用法也很簡單,只要在需要配合 NavBar 改動樣式的 DOM 上直接加上定義好的html tag appSelfControlNavCss,並記得在 ts 檔中匯入 directive,就可以掛上 class name 了。用這個方式最棒的地方是我們節省了 ngClass 還有到處訂閱 NavBar 狀態這兩件事,將邏輯收束。
<div appSelfControlNavCss>
</div>
@Component({
  ...
  imports: [SelfControlNavCssDirective],
  ...
})
到這邊我們的 NavBar 就完成了,下面我們來科普一下什麼是Angular 的自定義 directive。
簡單來說,Angular 的自定義 directive 就是一段可以用來控制 DOM 的程式碼,可以讓我們創建新的標籤或改變現有元素的行為,並且是可以被複用的。
為什麼要用自定義 directive 呢?
- 提高可重用性:
自定義directive讓你能夠將常用的功能和邏輯封裝在一起,然後在不同的組件中重複使用,而不需要重複編寫代碼。- 增強可維護性:
將特定功能封裝在指令中,可以讓程式碼結構更清晰,便於日後的維護和更新。當需求改變時,只需要修改指令中的代碼,使用該指令的所有地方都會自動更新。- 擴展
HTML語義:
自定義directive可以讓你創建新的HTML標籤或屬性,增加應用的語義性,讓其他開發者更容易理解其用途。例如,可以創建一個<my-custom-button>標籤,來表示一個特定的按鈕功能。- 封裝複雜邏輯:
將複雜的DOM操作或業務邏輯封裝到指令中,使得HTML結構更簡潔。這樣可以減少在模板中直接操作DOM的需要,遵循Angular的數據綁定和組件化的設計理念。
下一篇文章我們來實作 httpInterceptor!
