最後一天了,經歷過前面29天的練習,相信大家對於前端、後端的開發方式,以及前後端整合的方式都已經有經驗了。在前面也已經教大家前端跟後端更進階的用法,最後就是來跟大家做最後的練習,再一次的前後端整合,來完成這次30天的挑戰
那就讓我們開始吧
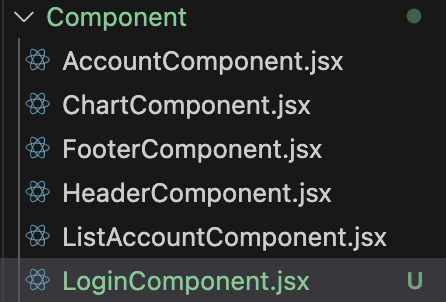
我們先到Component這個資料夾中創建LoginComponent.jsx
再來,我們要再Servic這個資料夾中心曾AuthService
我們要來新增登入的方法,程式碼如下
import axios from "axios";
const AUTH_REST_API_BASE_URL = "http://localhost:8080/api/auth";
export const LoginAPICall = (username,password)=>axios.post(AUTH_REST_API_BASE_URL+'/login',{username, password});
export const storeToken = (token) => localStorage.setItem("token", token);
export const getToken = () => localStorage.getItem("token");
export const saveLoggedInUser =(username) =>  sessionStorage.setItem("authenticatedUser",username)
export const isUserLoggedIn = () =>{
    const username = sessionStorage.getItem("authenticatedUser")
    if(username == null)
    {
        return false;
    }
    else{
        return true;
    }
}
export const getLoggedInUser = () =>{
    const username = sessionStorage.getItem("authenticatedUser")
    return username
}
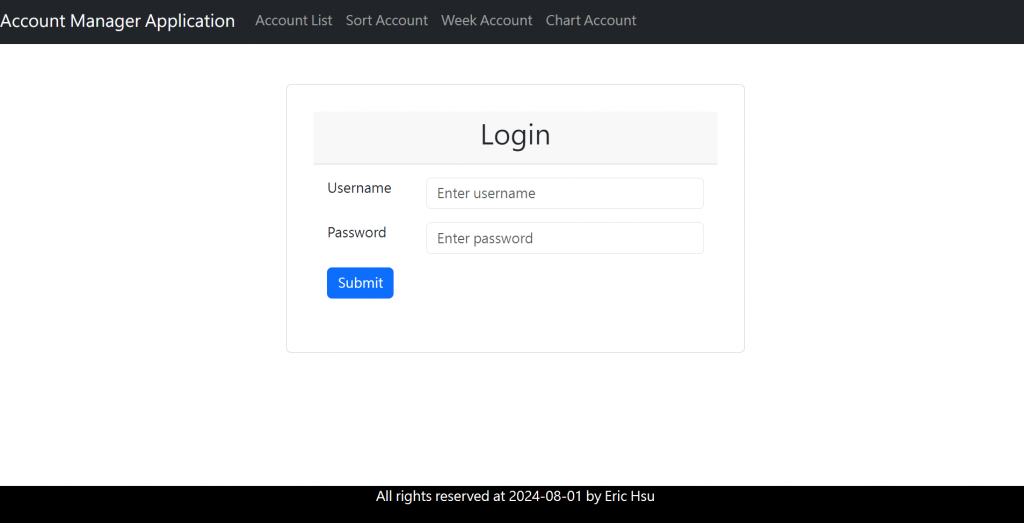
完成之後,會到Login頁面,我們這次要使用到的是帳號密碼,當我們成功得到資料的時候,就會把網址轉到List清單中,這邊可以說是,我們把帳號密碼船過去的方式並不是直接傳送帳號密碼的資料,這樣子當被攔截的時候很不安全,所以我們會進行加密,把資料變成token的形式,而這個功能就會是這個程式碼
const token = 'Basic ' + window.btoa(username + ':' + password);
完整的登入頁面如下
/* eslint-disable no-unused-vars */
import React, { useState } from 'react';
import { LoginAPICall, saveLoggedInUser, storeToken } from '../Service/AuthService';
import { useNavigate } from 'react-router-dom';

const LoginComponent = () => {
  const [username, setUsername] = useState('');
  const [password, setPassword] = useState('');

  const navigate = useNavigate();

  async function handleLoginForm(e) {
    e.preventDefault();

    LoginAPICall(username, password)
      .then((response) => {
        const token = 'Basic ' + window.btoa(username + ':' + password);
        console.log('token:' + token);
        storeToken(token);
        saveLoggedInUser(username);
        navigate('/list-account');
        window.location.reload(false); // 成功後重載頁面
      })
      .catch((error) => {
        console.log(error);
        // 如果登入失敗,顯示彈跳視窗
        window.alert('Login failed. Please check your username and password.');
      });
  }

  return (
    <div className='container'>
      <br />
      <br />
      <div className='row'>
        <div className='col-md-6 offset-md-3'>
          <div className='card'>
            <div className='card-header'>
              <h2 className='text-center'>Login</h2>
            </div>
            <div className='card-body'>
              <form>
                <div className='row mb-3'>
                  <label className='col-md-3 control-label'>Username</label>
                  <div className='col-md-9'>
                    <input
                      type='text'
                      name='username'
                      className='form-control'
                      placeholder='Enter username'
                      value={username}
                      onChange={(e) => setUsername(e.target.value)}
                    ></input>
                  </div>
                </div>
                <div className='row mb-3'>
                  <label className='col-md-3 control-label'>Password</label>
                  <div className='col-md-9'>
                    <input
                      type='password'
                      name='password'
                      className='form-control'
                      placeholder='Enter password'
                      value={password}
                      onChange={(e) => setPassword(e.target.value)}
                    ></input>
                  </div>
                </div>

                <div className='form-group mb-3'>
                  <button className='btn btn-primary' onClick={(e) => handleLoginForm(e)}>
                    Submit
                  </button>
                </div>
              </form>
            </div>
          </div>
        </div>
      </div>
    </div>
  );
};

export default LoginComponent;
我們現在設置了登入的資料,但我們每調轉一次頁面,就要登入一次告訴後端我的權限,那這個樣子就會造成很大的困擾。我們在Service的時候有設置一個功能,是把登入的token存放在自己的網頁瀏覽器中,在我們每次跳轉頁面,後端要求我們提供登入帳號密碼的時候,只要從瀏覽器中再取得這個帳號密碼,提供給後端,這樣就不用使用者一直重複登入了。而這個由網頁提供帳密的方法,我們需要寫在每一個Service裡面,在開始執行登入前,就要進行這個動作
程式碼如下
axios.interceptors.request.use(function(config){
    config.headers['Authorization'] = getToken()
    //console.log("I'm here:"+getToken.toString)
    return config;
},function (error){
    return Promise.reject(error);
})
完整的程式碼會長這樣
import axios from "axios";
import { getToken } from "./AuthService";

const BASE_REST_API_URL = "http://localhost:8080/api/accounts"

axios.interceptors.request.use(function(config){
    config.headers['Authorization'] = getToken()
    //console.log("I'm here:"+getToken.toString)
    return config;
},function (error){
    return Promise.reject(error);
})

export const getAllAccounts = () => axios.get(BASE_REST_API_URL);

export const getAllCategories = ()=>axios.get(BASE_REST_API_URL+'/categories')

export const getAccountsByCategory = (category)=>axios.get(BASE_REST_API_URL+'/category/'+category)

export const getAccountsByWeek = (year,week)=>axios.get(BASE_REST_API_URL+'/weekly/'+year+"/"+week)

export const addAccount = (account) => axios.post(BASE_REST_API_URL,account);

export const getAccount = (id) => axios.get(BASE_REST_API_URL+'/'+id);

export const updateAccount = (id,todo) => axios.put(BASE_REST_API_URL+'/'+id,todo);

export const deleteAccount = (id)=>axios.delete(BASE_REST_API_URL+'/'+id);
寫完之後,我們回到App.jsx,把首頁改成LoginCompnent
import { useState } from 'react'
import reactLogo from './assets/react.svg'
import viteLogo from '/vite.svg'
import './App.css'
import HelloWorld from './Helloworld'
import HeaderComponent from './Component/HeaderComponent'
import FooterComponent from './Component/FooterComponent'
import AccountComponent from './Component/AccountComponent'
import ListAccountComponent from './Component/ListAccountComponent'
import { BrowserRouter, Routes,Route} from 'react-router-dom'
import SortAccountComponent from './Component/SortAccountComponent'
import WeeklyAccountComponent from './Component/WeeklyAccountComponent'
import ChartComponent from './Component/ChartComponent'
import LoginComponent from './Component/LoginComponent'


function App() {


  return (
    <>
    <BrowserRouter>
        <HeaderComponent />
        <Routes>
        {/* http://localhost:5173/ */}
        <Route path='/' element={<LoginComponent />}></Route>
          {/* http://localhost:5173/chart-account */}
          <Route path='/chart-account' element={<ChartComponent />}></Route>
          {/* http://localhost:5173/weekly-account' */}
          <Route path='/week-account' element={<WeeklyAccountComponent />}></Route>
          {/* http://localhost:5173/list-account */}
          <Route path='/list-account' element={<ListAccountComponent />}></Route>
          {/* http://localhost:5173/add-account */}
          <Route path='/add-account' element={<AccountComponent />}></Route>
          {/* http://localhost:5173/add-account/1 */}
          <Route path='/update-account/:id' element={<AccountComponent />}></Route>
          {/* http://localhost:5173/sort-account/ */}
          <Route path='/sort-account' element={<SortAccountComponent />}></Route>
        </Routes>
        <FooterComponent />
    </BrowserRouter>
    </>
  )
}

export default App
完成後再進入主頁,會看到這個畫面
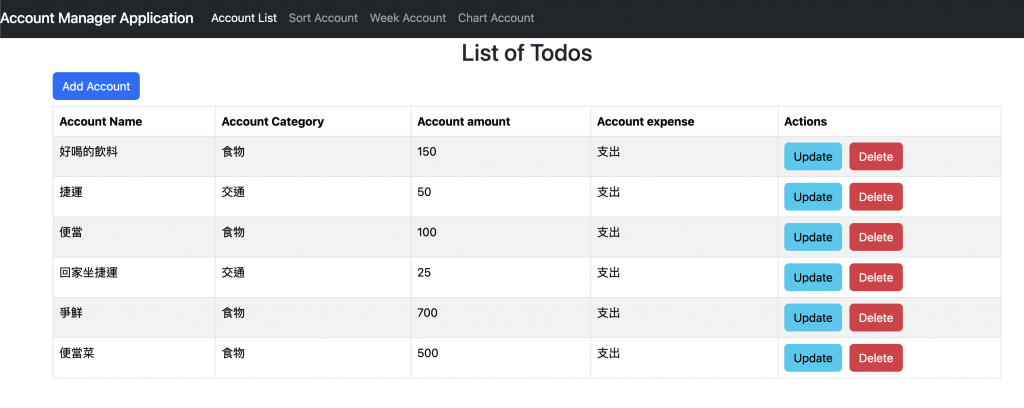
接下來輸入Admin的帳號密碼,就會出現所有清單
如果輸入的是User的帳號密碼,就會出現空白的清單
到這裡,恭喜大家挑戰成功,完成從後端的Spring boot到前端的React開發,再加上設置了Spring boot Security跟React的登入畫面,完整的把前端跟後端的東西都學習透徹了!
30天說長不長,說短不短,在開賽的時候每到11點的PO文都是一個挑戰,每天都在擔心自己會不會沒有PO到文,而這三十天每天都在跟文章奮戰的日子,讓我覺得好像在跑一個長跑,需要持續而且用力的持續跑下去。
對於程式有興趣的我,藉由這三十天的練習,感覺自己更加了解前端與後端的概念,還有我覺得最難的Spring boot Security,在教學的過程中也明白了到底整個Security到底在做甚麼,當然我學習到的也只是皮毛,但比起三十天前的懵懂無知,感覺現在已經更加了解了一點。
感謝這三十天的挑戰,也感謝每年的比賽,讓我總能學習新東西,並且能夠讓自己變得更好一點!
期待我們明年見
