在上一章中,我們認識了 Docker 對 iptables 的修改,成功讓容器之間以及容器與外網的流量順利傳輸。然而,還有一個重要的情境需要解決:外部網路如何存取容器。
經常使用 Docker 的朋友可能已經知道答案了 - Docker Container 可以透過 Port Forwarding 來實現此功能。雖然它看起來像是一項新技術,但本質上也是 Network Address Translation (NAT) 的一種實現方式。
在深入討論之前,讓我們先來了解 NAT 的類型。在 iptables 中,可以靈活地進行各種 Network Address Translation (NAT) 操作,主要分為兩種:Source NAT (SNAT) 與 Destination NAT (DNAT)。
SNAT 會改寫封包的來源 IP 位址,讓外部看到的「Source IP」已被替換。舉個例子,當多台 PC 透過一台 ADSL Router 共享上網時,每台 PC 都配置了 Private IP。當這些 PC 連線至外部網路時,Router 會將 packet header 裡的 Source IP 改成 Router 本身的 Public IP。如此一來,外部網站(例如 Web Server)所記錄到的 Source IP 就是 Router 的 IP,而非 PC 的 Private IP。
SNAT 常用於以下場景:
Internet Sharing
一個公司或家庭網路內的多台設備分享同一個 Public IP 上網時,Router 使用 SNAT 技術把內部 Source IP(如 192.168.x.x)改為 Public IP,以便外網 Server 能正確回應。
Container Network 和 Hairpin NAT
如 Docker 中,當 Container 需要通過映射的 Port 訪問自己或其他 Container 時,SNAT(或 MASQUERADE,它是一種特殊形式的 SNAT)用來改寫 Source Address,使得回應路由可以正確返回。
DNAT(Destination Network Address Translation)則改寫封包的目的地 IP 位址,典型的應用場景是把位於內網的 Web 伺服器透過防火牆的公網 IP 對外發布。例如,一台 Web 伺服器只擁有內網 IP,卻希望讓網際網路使用者能直接使用公網 IP 來存取。當外部客戶端發送封包時,目的地為該防火牆的公網 IP,而防火牆會將封包的目的地址動態改寫成 Web 伺服器的內網 IP,並把封包轉發至內網。最終,外部訪問就能穿透防火牆,抵達實際的內網伺服器,達成 DNAT 所謂的「目標地址」轉換。
DNAT 常用於以下場景:
Port Forwarding(連接埠轉發)
在家庭或企業網路中,外部訪問某個公共 IP 和埠號的流量可以經過 NAT 設備轉發到內部網路的特定伺服器。例如:外部訪問公網 IP 的 8080 埠流量會被轉發到內部 192.168.1.100 的 80 埠上。這裡就使用了 DNAT 改寫封包的目的地址與埠號。
Load Balancing(負載平衡)
DNAT 可用於將到達某個入口點的流量分配到多個後端伺服器,以平衡負載。
MASQUERADE 其實是 SNAT 的一種特例,能夠自動完成 SNAT。雖然在 iptables 中可以使用與 SNAT 類似的方式來實現轉換,但仍存在一些差異。最主要的不同點在於,使用 SNAT 時必須明確指定要轉換成的 IP,這個 IP 可以是一個或多個範圍。但如果系統採用 ADSL 這類動態撥號方式,每次撥號後出口 IP 都可能改變,便無法使用事先寫死的 SNAT 規則,因為規則裡的 IP 不會隨著撥號取得的新 IP 自動變更,導致我們必須頻繁手動修改 iptables,非常不方便。
正因如此,MASQUERADE 便應運而生。它會自動偵測網卡(例如 eth0)的當前動態 IP,無論 IP 變動多頻繁,都能在出站時自動將封包的來源 IP 改為網卡的最新 IP,如此就能大幅簡化維運工作。
SNAT(單一 IP)
iptables -t nat -A POSTROUTING -s 10.8.0.0/255.255.255.0 -o eth0 -j SNAT --to-source 192.168.5.3
此命令表示:將所有來源為 10.8.0.0/24 的封包,在透過 eth0 介面傳送出去時,將其來源 IP 改為 192.168.5.3。
SNAT(多個 IP 範圍)
iptables -t nat -A POSTROUTING -s 10.8.0.0/255.255.255.0 -o eth0 -j SNAT --to-source 192.168.5.3-192.168.5.5
此規則表示:將 10.8.0.0/24 網段的流量,根據特定演算法或機制,改寫為 192.168.5.3、192.168.5.4 或 192.168.5.5 等多個 IP 之一。
MASQUERADE(自動抓取動態 IP)
iptables -t nat -A POSTROUTING -s 10.8.0.0/255.255.255.0 -o eth0 -j MASQUERADE
使用此命令,無需指定來源 IP,MASQUERADE 會自動取得 eth0 的當前 IP,讓封包傳送出去時統一使用該 IP 作為來源 IP。
總結:
掌握必要的知識後,讓我們實際分析 iptables 和 NAT 的變化。首先,查看 Docker Network:
docker network ls
# output
NETWORK ID     NAME      DRIVER    SCOPE
469fd7ab0fbd   bridge    bridge    local
a2b456636301   host      host      local
e5238737e4cb   none      null      local
這三個是 Docker 的預設網路。接著,使用以下指令建立一個 nginx container:
docker container run --name my-nginx-container -d -p 8080:80 nginx
讓我們觀察 iptables 和 nat 的變化。首先看 filter table:
iptables -t filter -nvL --line-number
# output
Chain INPUT (policy ACCEPT 0 packets, 0 bytes)
num   pkts bytes target     prot opt in     out     source               destination

Chain FORWARD (policy DROP 0 packets, 0 bytes)
num   pkts bytes target     prot opt in     out     source               destination
1        0     0 DOCKER-USER  all  --  *      *       0.0.0.0/0            0.0.0.0/0
2        0     0 DOCKER-ISOLATION-STAGE-1  all  --  *      *       0.0.0.0/0            0.0.0.0/0
3        0     0 ACCEPT     all  --  *      docker0  0.0.0.0/0            0.0.0.0/0            ctstate RELATED,ESTABLISHED
4        0     0 DOCKER     all  --  *      docker0  0.0.0.0/0            0.0.0.0/0
5        0     0 ACCEPT     all  --  docker0 !docker0  0.0.0.0/0            0.0.0.0/0
6        0     0 ACCEPT     all  --  docker0 docker0  0.0.0.0/0            0.0.0.0/0

Chain OUTPUT (policy ACCEPT 0 packets, 0 bytes)
num   pkts bytes target     prot opt in     out     source               destination

Chain DOCKER (1 references)
num   pkts bytes target     prot opt in     out     source               destination
+1        0     0 ACCEPT     tcp  --  !docker0 docker0  0.0.0.0/0            172.17.0.2           tcp dpt:80

Chain DOCKER-ISOLATION-STAGE-1 (1 references)
num   pkts bytes target     prot opt in     out     source               destination
1        0     0 DOCKER-ISOLATION-STAGE-2  all  --  docker0 !docker0  0.0.0.0/0            0.0.0.0/0
2        0     0 RETURN     all  --  *      *       0.0.0.0/0            0.0.0.0/0

Chain DOCKER-ISOLATION-STAGE-2 (1 references)
num   pkts bytes target     prot opt in     out     source               destination
1        0     0 DROP       all  --  *      docker0  0.0.0.0/0            0.0.0.0/0
2        0     0 RETURN     all  --  *      *       0.0.0.0/0            0.0.0.0/0

Chain DOCKER-USER (1 references)
num   pkts bytes target     prot opt in     out     source               destination
1        0     0 RETURN     all  --  *      *       0.0.0.0/0            0.0.0.0/0

###

iptables -t nat -nvL --line-number
# output
Chain PREROUTING (policy ACCEPT 0 packets, 0 bytes)
num   pkts bytes target     prot opt in     out     source               destination
1        0     0 DOCKER     all  --  *      *       0.0.0.0/0            0.0.0.0/0            ADDRTYPE match dst-type LOCAL

Chain INPUT (policy ACCEPT 0 packets, 0 bytes)
num   pkts bytes target     prot opt in     out     source               destination

Chain OUTPUT (policy ACCEPT 0 packets, 0 bytes)
num   pkts bytes target     prot opt in     out     source               destination
-1       69  5003 DOCKER     all  --  *      *       0.0.0.0/0           !127.0.0.0/8          ADDRTYPE match dst-type LOCAL
+1      218 16475 DOCKER     all  --  *      *       0.0.0.0/0           !127.0.0.0/8          ADDRTYPE match dst-type LOCAL

Chain POSTROUTING (policy ACCEPT 0 packets, 0 bytes)
num   pkts bytes target     prot opt in     out     source               destination
1        0     0 MASQUERADE  all  --  *      !docker0  172.17.0.0/16        0.0.0.0/0
+2        0     0 MASQUERADE  tcp  --  *      *       172.17.0.2           172.17.0.2           tcp dpt:80

Chain DOCKER (2 references)
num   pkts bytes target     prot opt in     out     source               destination
1        0     0 RETURN     all  --  docker0 *       0.0.0.0/0            0.0.0.0/0
+2        0     0 DNAT       tcp  --  !docker0 *       0.0.0.0/0            0.0.0.0/0            tcp dpt:8080 to:172.17.0.2:80
整理一下,只留下新增的規則:
*filter
Chain DOCKER (1 references)
num   pkts bytes target     prot opt in     out     source               destination
1        0     0 ACCEPT     tcp  --  !docker0 docker0  0.0.0.0/0            172.17.0.2           tcp dpt:80

*nat
Chain POSTROUTING (policy ACCEPT 0 packets, 0 bytes)
num   pkts bytes target     prot opt in     out     source               destination
2        0     0 MASQUERADE  tcp  --  *      *       172.17.0.2           172.17.0.2           tcp dpt:80

Chain DOCKER (2 references)
num   pkts bytes target     prot opt in     out     source               destination
2        0     0 DNAT       tcp  --  !docker0 *       0.0.0.0/0            0.0.0.0/0            tcp dpt:8080 to:172.17.0.2:80
使用 iptables-save 找到對應的項目:
*filter
-A DOCKER -d 172.17.0.2/32 ! -i docker0 -o docker0 -p tcp -m tcp --dport 80 -j ACCEPT

*nat
-A POSTROUTING -s 172.17.0.2/32 -d 172.17.0.2/32 -p tcp -m tcp --dport 80 -j MASQUERADE

-A DOCKER ! -i docker0 -p tcp -m tcp --dport 8080 -j DNAT --to-destination 172.17.0.2:80
-A DOCKER -d 172.17.0.2/32 ! -i docker0 -o docker0 -p tcp -m tcp --dport 80 -j ACCEPT
解讀:
-A DOCKER:在 filter 表的自訂 Chain DOCKER 中新增一條規則。-d 172.17.0.2/32:目的 IP 為 172.17.0.2(容器在 docker0 bridge 上的虛擬網卡 IP)。! -i docker0:封包的輸入介面不是 docker0,表示該封包來自外部。-o docker0:封包的輸出介面是 docker0,表示封包要傳送到 docker0 介面。-p tcp -m tcp --dport 80:協定為 TCP,目的埠為 80。-j ACCEPT:允許符合條件的封包通過。目的:
此規則允許外部流量傳送到容器的 80 埠。
開始之前,我們先備份 iptables:
sudo iptables-save > /tmp/iptables-backup.txt
接著使用 iptables -D 刪除規則,此時該條規則暫時失效
# iptables -D <CHAIN> <行號>
sudo iptables -D DOCKER 1
測試從 Host 外連線到 nginx 容器對應的 HOST_IP:PORT。你應該會看到連線失敗的訊息。
最後,記得恢復 iptables:
sudo iptables-restore < /tmp/iptables-backup.txt
-A POSTROUTING -s 172.17.0.2/32 -d 172.17.0.2/32 -p tcp -m tcp --dport 80 -j MASQUERADE
解讀:
-A POSTROUTING:在 nat 表的 POSTROUTING Chain 中新增規則。-s 172.17.0.2/32 -d 172.17.0.2/32:來源 IP 和目的 IP 同樣是 172.17.0.2,表示同一個容器自己連到自己(loopback/hairpin)的情境。-p tcp -m tcp --dport 80:協定為 TCP,目的埠為 80。-j MASQUERADE:對此流量進行 NAT 轉換(MASQUERADE 會動態改寫來源 IP/Port),使其能正常「環迴」回到同一個容器。目的:
這是 Docker 用來處理「容器透過主機映射的 Port 存取自己」的情境(俗稱 Hairpin NAT)。舉例來說,當容器嘗試連到 host_ip:8080 時,最終需要轉回自己的 80 Port,此時就需要 MASQUERADE 來實現「自我存取」的連線。若沒有這個機制,封包在傳輸過程中可能會出現路由或 ARP 的錯亂。
-A DOCKER ! -i docker0 -p tcp -m tcp --dport 8080 -j DNAT --to-destination 172.17.0.2:80
解讀:
-A DOCKER:在 nat 表裡的自訂 Chain DOCKER 新增規則。! -i docker0:封包的輸入介面不是 docker0(意即從外部或主機進來)。-p tcp -m tcp --dport 8080:協定為 TCP,目的埠為 8080。-j DNAT --to-destination 172.17.0.2:80:進行目地位址轉換 (Destination NAT),將目的 IP/Port 改寫成 172.17.0.2:80。目的:
這正是 Port Mapping 的關鍵規則:
172.17.0.2:80。host:8080,最後轉到容器 IP:80(nginx)上,使你可以從外部直接以 http://HOST_IP:8080 連到容器裡面的服務。
NAT 轉跳到 DOCKER 的條件有以下兩個:
-A PREROUTING -m addrtype --dst-type LOCAL -j DOCKER
-A OUTPUT ! -d 127.0.0.0/8 -m addrtype --dst-type LOCAL -j DOCKER
我們來看看簡單版 iptables 流程圖:
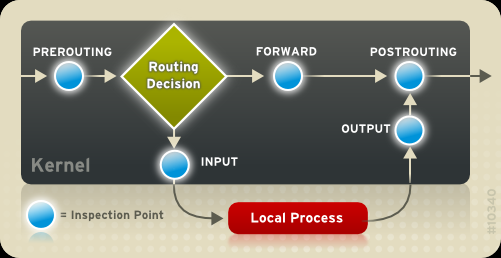
簡單解釋一下兩個 Chain 的差別:
PREROUTING:
OUTPUT:
localhost:9091),則必須在 OUTPUT Chain中設置其中規則的 --dst-type LOCAL 中的 LOCAL 代表"本地主機",是指運行 iptables 的那台機器(例如 EC2 實例)的網路接口地址。相同的 network namespace 都算是 LOCAL 的範疇。
而使用 Docker Bridge 時,由於本質上是建立了另一個 network namespace,所以從容器 IP 對於 Host 的 iptables 來說屬於外網,會走 PREROUTING chain。
使用 Docker,使用 bridge network 建立容器,並且指定 port forwarding 從容器 80 port 到 host 主機 8080 port (-p 8080:80)。會對 iptables 建立以下規則:
172.17.0.2:80。至於"允許容器對外部發起連線" 的規則,在第五章時已經做過了,規則如下:
# 允許: 所有預設 bridge 網段對外部連線
-A FORWARD -i docker0 ! -o docker0 -j ACCEPT
# 所有預設 bridge 網段連線到外部,做 SNAT 轉換
-A POSTROUTING -s 172.17.0.0/16 ! -o docker0 -j MASQUERADE
# 允許: 所有預設 bridge 網段,連線建立後返回的封包或與該連線相關的封包
-A FORWARD -o docker0 -m conntrack --ctstate RELATED,ESTABLISHED -j ACCEPT
大家可以用上面學習到的知識,試著解讀這些規則。
接下來我們要實作自己的 Container port forwarding,目標如下:
0.0.0.0:8081(等於在容器內啟動)首先建立 Golang 專案,添加以下程式碼:
package main

import (
	"fmt"
	"net/http"
	"os"
	"strconv"

	"github.com/go-chi/chi/v5"
	"github.com/go-chi/cors"
)

type Config struct{}

func main() {
	app := Config{}

	port := ":8080" // Default port
	if len(os.Args) > 1 {
		p, err := strconv.Atoi(os.Args[1])
		if err != nil {
			fmt.Println("Invalid port number:", err)
			return
		}
		port = fmt.Sprintf(":%d", p)
	}
	srv := http.Server{
		Addr:    port,
		Handler: app.routes(),
	}
	fmt.Printf("Server is listening on %s\n", port)
	if err := srv.ListenAndServe(); err != nil && err != http.ErrServerClosed {
		fmt.Println("Error starting server:", err)
	}
}

func (app *Config) routes() http.Handler {
	mux := chi.NewRouter()

	mux.Use(cors.Handler(cors.Options{
		AllowedOrigins:   []string{"https://*", "http://*"},
		AllowedMethods:   []string{"GET", "POST", "PUT", "DELETE", "OPTIONS"},
		AllowedHeaders:   []string{"Accept", "Authorization", "Content-Type", "X-CSRF-Token"},
		ExposedHeaders:   []string{"Link"},
		AllowCredentials: true,
		MaxAge:           300,
	}))

	mux.Get("/", app.HelloWorld)

	return mux
}

func (app *Config) HelloWorld(w http.ResponseWriter, r *http.Request) {
	_, err := w.Write([]byte("Hello World!"))
	if err != nil {
		http.Error(w, err.Error(), http.StatusInternalServerError)
	}
}
編譯執行檔:
$env:GOOS = "linux"
$env:GOARCH = "amd64"
go build -o simpleServer cmd/api/main.go
執行 simpleServer,指定 8081 port,就可以啟動一個簡單的 Server:
./simpleServer 8081
# output
Server is listening on :8081
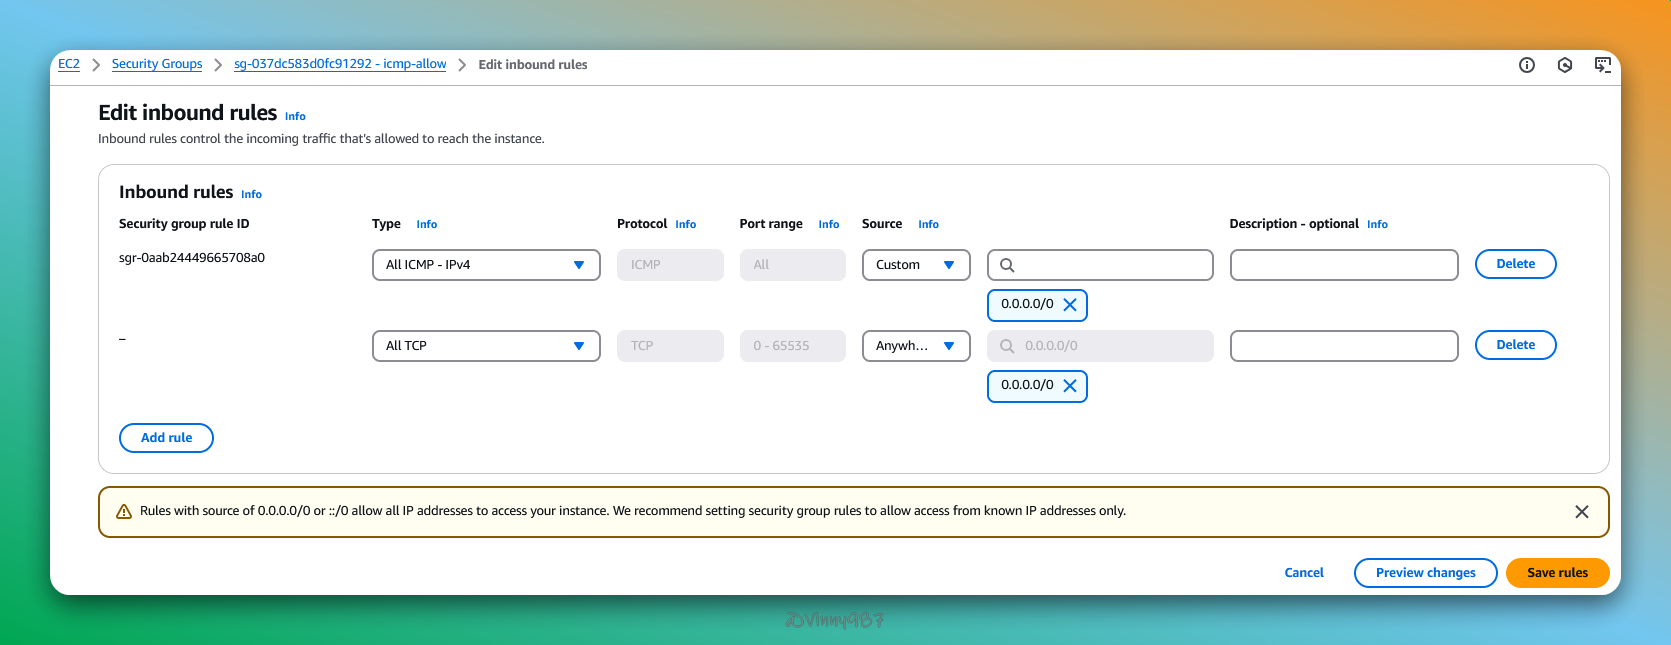
為了方便施作,在既有的 Security Group 允許 TCP inbound:
把 simpleServer 執行檔上傳到 Host1 EC2:
scp -i </path/to/your-key.pem> </path/to/local-file> ec2-user@<EC2_IP或DNS>:</path/to/remote/directory>
測試連線:
curl localhost:8081
# output
Hello World!
在 ns1 開一個新的 bash shell:
sudo ip netns exec ns1 bash
使用 simpleServer 啟動 HTTP server:
# in ns1
./simpleServer 8081
# output
Server is listening on :8081
在 ns1 再開一個新的 bash shell,檢查 8081 Port 有沒有被佔用:
# in ns1
netstat -ano | grep 8081
# output
tcp        0      0 0.0.0.0:8081            0.0.0.0:*               LISTEN      off (0.00/0/0)
回到 root ns 的 bash shell,檢查 8081 Port 有沒有被佔用:
netstat -ano | grep 8081
# output
$
在 root ns 測試 HTTP server 連線:
curl 172.18.0.3:8081
# output
Hello World!
在 root ns 啟動 ns1 的 lo:
ip netns exec net1 ip link set lo up
在 ns1 的 bash shell,重新啟動 HTTP server,測試訪問自己:
# in ns1
curl localhost:8081
# output
Hello World!
首先,我們將 Terminal 視窗切分,並準備好四個 Session,對應如下:
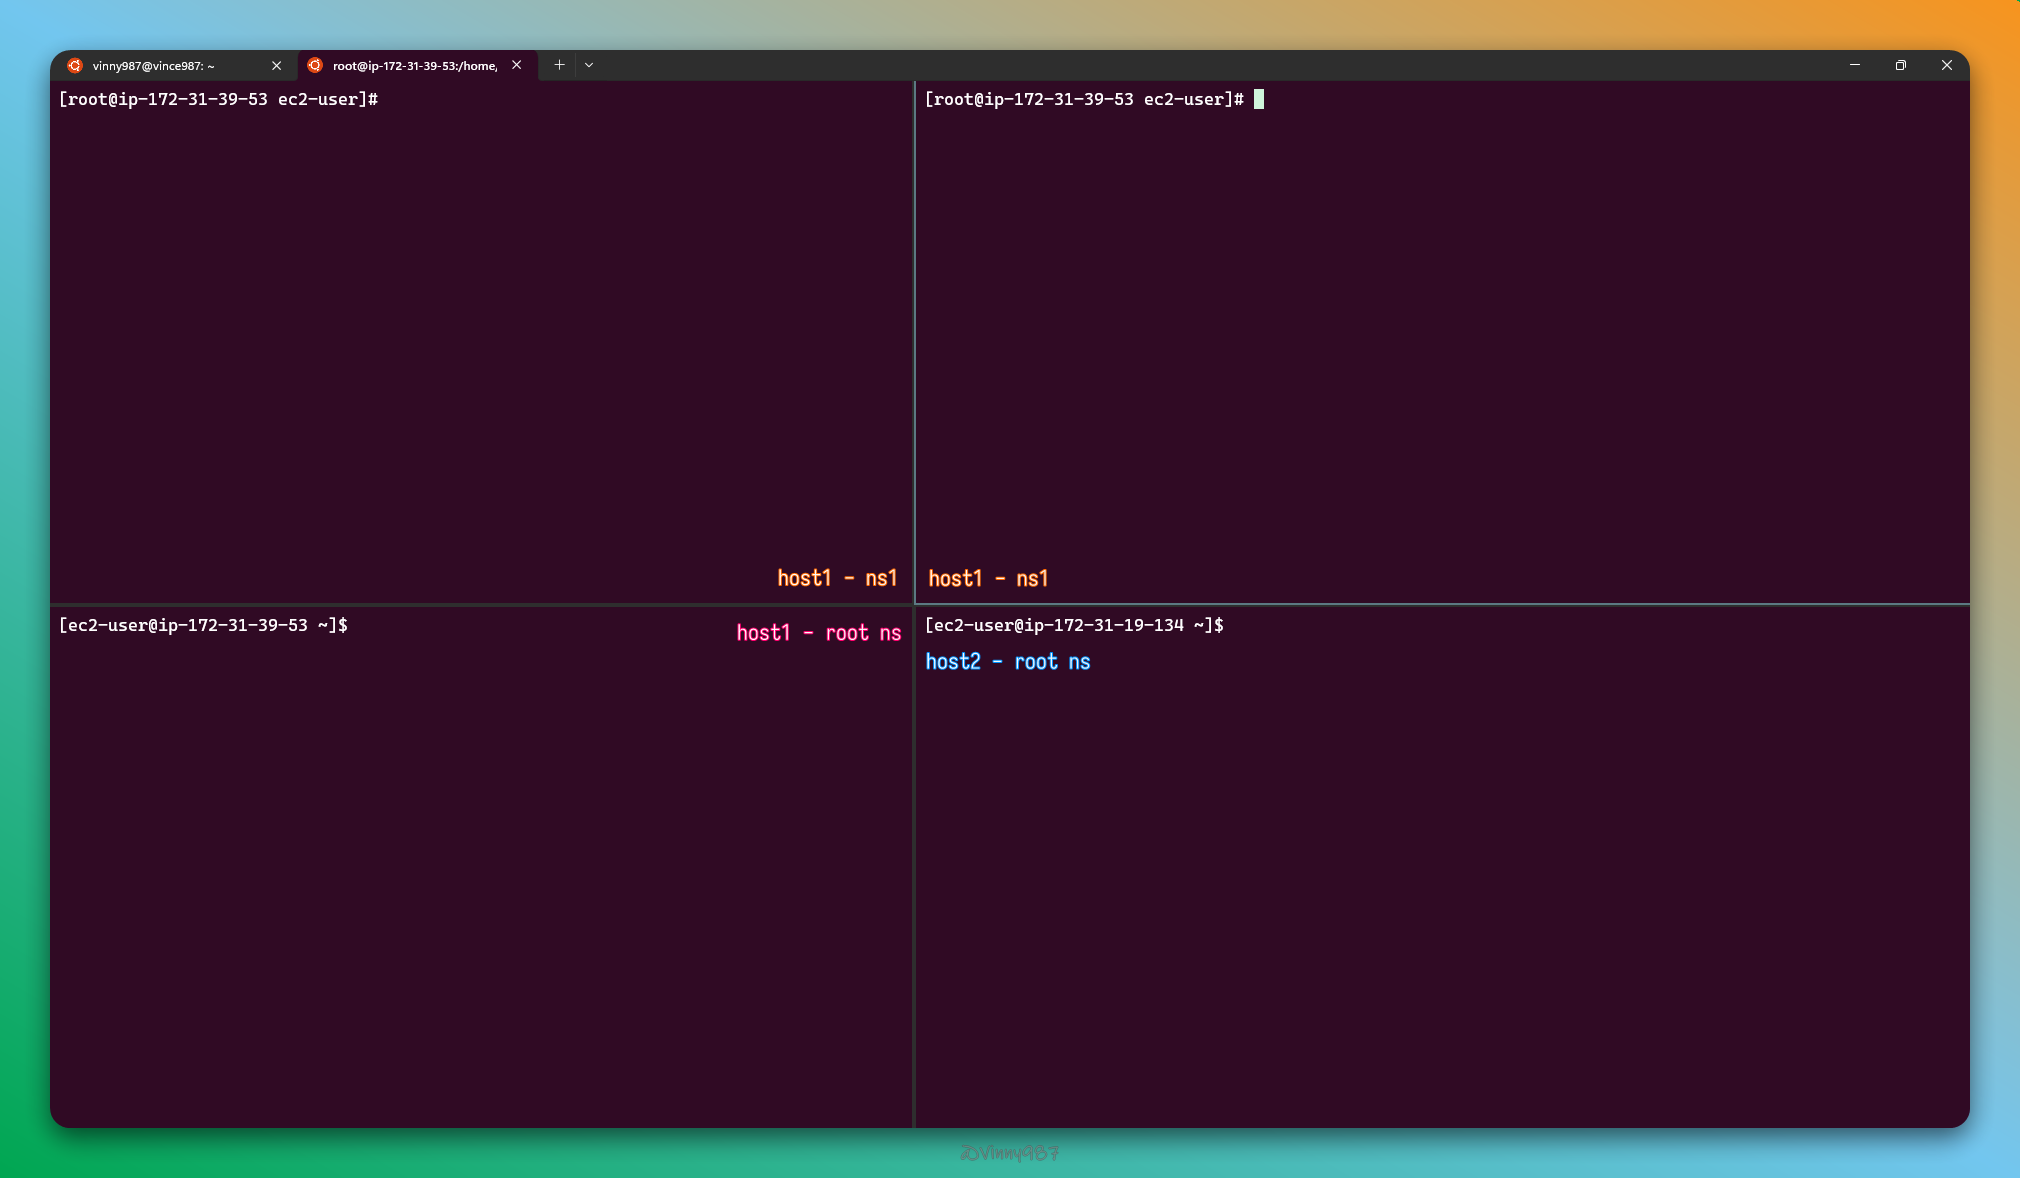
接著,測試 root ns -> ns1 以及 host2 -> host1 的連線是否暢通:

確認連線正常後,我們就可以開始添加規則了。
OUTPUT DNAT 規則
將本地主機到達本地主機 9091 Port 的 TCP 流量轉發到容器的 8081 Port。
完整的 DNAT 規則如下:
-A OUTPUT ! -d 127.0.0.0/8 -m addrtype --dst-type LOCAL -j DOCKER
-A DOCKER ! -i docker0 -p tcp -m tcp --dport 8080 -j DNAT --to-destination 172.17.0.2:80
不透過 Docker Chain 處理,我們可以進一步簡化規則:
-A OUTPUT \
  ! -d 127.0.0.0/8 -m addrtype --dst-type LOCAL \
  -p tcp --dport 8080 \
  -j DNAT --to-destination 172.17.0.2:80
再將規則中的 bridge, dport 和 dnat 修改成我們的案例:
sudo iptables -t nat -A OUTPUT ! -d 127.0.0.0/8 -m addrtype --dst-type LOCAL \
  -p tcp -m tcp --dport 9091 -j DNAT --to-destination 172.18.0.3:8081
操作結果如下:
我們需要同時設置 SNAT, DNAT 才能形成完整的 Port Forwarding
PREROUTING DNAT 規則
將外部到達本地主機 9091 Port 的 TCP 流量轉發到容器的 8081 Port。
完整的 DNAT 規則如下:
-A PREROUTING -m addrtype --dst-type LOCAL -j DOCKER
-A DOCKER ! -i docker0 -p tcp -m tcp --dport 8080 -j DNAT --to-destination 172.17.0.2:80
不透過 Docker Chain 處理,我們可以進一步簡化規則:
-A PREROUTING \
  -m addrtype --dst-type LOCAL \
  ! -i docker0 \
  -p tcp --dport 8080 \
  -j DNAT --to-destination 172.17.0.2:80
再將規則中的 bridge, dport 和 dnat 修改成我們的案例:
sudo iptables -t nat -A PREROUTING -m addrtype --dst-type LOCAL \
  ! -i docker1 -p tcp -m tcp --dport 9091 -j DNAT --to-destination 172.18.0.3:8081
Filter 規則
允許外網封包轉送到 HTTP Server
sudo iptables -t filter -A FORWARD -d 172.18.0.3/32 ! -i docker1 -o docker1 -p tcp -m tcp --dport 8081 -j ACCEPT
操作結果如下:
在本章中,我們深入探討了 Docker 容器的 Port Forwarding 機制,並實際動手實作。主要學習到以下幾點:
NAT 的基本概念與應用
Docker Port Forwarding 的實現原理
到這篇為止,我們差不多了解了 Docker Bridge 網路的全貌。之後可能會出個補充篇,再寫一篇這個系列的總整理篇做個結尾。
 vincentlin2447

 iThome鐵人賽