接續上一篇,測試orb-slam3在大腸鏡影像.colonoscopy來源:REAL-colon的001-001_frames.tar.gz,解壓縮到./datasets/REAL-colon-001/mav0/cam0/data
cd ~/orb-slam3/datasets
mkdir -p REAL-colon-001/mav0/cam0/data

tar -zxvf ~./Downloads/001-001_frames.tar.gz. -C ~/orb-slam3/datasets/REAL-colon-001/mav0/cam0/data
#for i in $(seq 10000 45465); do rm -f "$i.png"; done #太多檔,刪除部份
原檔名去除001-001,但補齊到6位數,像001-001_4068.jpg變成004068.jpg,下面程式存成rename.py,跟jpg檔放一起
import os

def rename_files(directory):
    #修改指定目錄下的檔名,將"001-001_"移除,並將後面的數字補齊到五位數
    print(f"正在處理目錄: {directory}")

    #檢查目錄是否存在
    if not os.path.isdir(directory):
        print(f"錯誤: 目錄 '{directory}' 不存在。請確認路徑是否正確。")
        return

    for filename in os.listdir(directory):
        #檢查檔名是否符合模式
        if filename.startswith("001-001_") and filename.endswith(".jpg"):
            try:
                #提取數字部分
                parts = filename.split('_')
                #確保分割後至少有兩部分 (前綴和數字部分)
                if len(parts) < 2:
                    print(f"警告: 檔名格式不符合預期 (無下劃線分隔): {filename},跳過。")
                    continue

                number_part_with_ext = parts[1] # 獲取 "4068.jpg"
                number_str = number_part_with_ext.split('.')[0] # 獲取 "4068"

                #將數字補齊到五位數
                padded_number_str = number_str.zfill(6) # '4068' -> '004068'

                #構建新的檔名
                new_filename = f"{padded_number_str}.jpg"

                old_filepath = os.path.join(directory, filename)
                new_filepath = os.path.join(directory, new_filename)

                #檢查新檔名是否已經存在,避免覆蓋
                if os.path.exists(new_filepath):
                    print(f"警告: 新檔名 '{new_filename}' 已存在,跳過 '{filename}' 以避免覆蓋。")
                    continue

                #執行檔名修改
                os.rename(old_filepath, new_filepath)
                print(f"已將 '{filename}' 重命名為 '{new_filename}'")

            except Exception as e:
                print(f"處理檔名 '{filename}' 時發生錯誤: {e}")
        #如果檔名是 .jpg 但不符合前綴模式,則打印資訊並跳過
        elif filename.endswith(".jpg"):
            print(f"資訊: 檔名 '{filename}' 不符合 '001-001_' 前綴模式,跳過。")
        #如果不是 .jpg 檔案,也打印資訊並跳過
        else:
            print(f"資訊: 檔名 '{filename}' 不是 .jpg 檔案或不符合指定模式,跳過。")

    print("所有符合條件的檔名修改完成。")

#--- 使用範例 ---
if __name__ == "__main__":

    image_directory = "."

    rename_files(image_directory)
mogrify -format png *.jpg
rm *.jpg
另外拷貝./Examples/Monocular/TUM1.yaml相機參數設定檔到 ./datasets/REAL-colon-001/TUM1.yaml並修改這些參數
ORBextractor.nFeatures: 3000 # 原本 1000
ORBextractor.iniThFAST: 12 # 原本 20
ORBextractor.minThFAST: 3 # 原本 7Camera.width: 1352
Camera.height: 1080
Camera.newWidth: 1000 #原本 600
Camera.newHeight: 799 #原本 350
Camera.fps: 60 #原本 30
另外要自己建立時間戳記檔time_stamp.txt,存到./datasets/01目錄下
cd ./datasets/REAL-colon-001/mav0/cam1/data
ls *.png | sort | sed 's/.png$//' > ../../../time_stamp.txt
執行
cd ~/orb-slam3
./Examples/Monocular/mono_euroc ./Vocabulary/ORBvoc.txt ./datasets/REAL-colon-001/TUM1.yaml ./datasets/REAL-colon-001 ./datasets/REAL-colon-001/time_stamp.txt
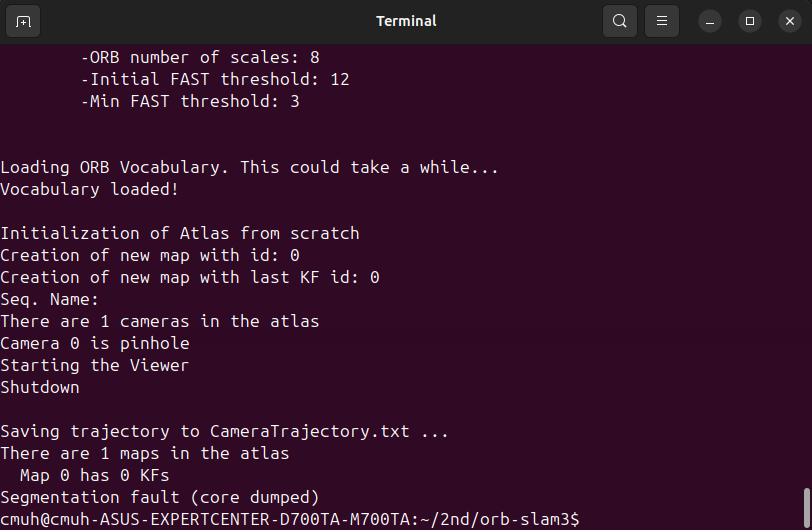
沒有辦法追蹤影像,左下角視窗一直停留在waiting for image,右上camera路徑沒追蹤,中間下面視窗是我用ffmpeg轉原本jpg檔成mp4檔播放視窗,最後orb-slam3只給你segmentation fault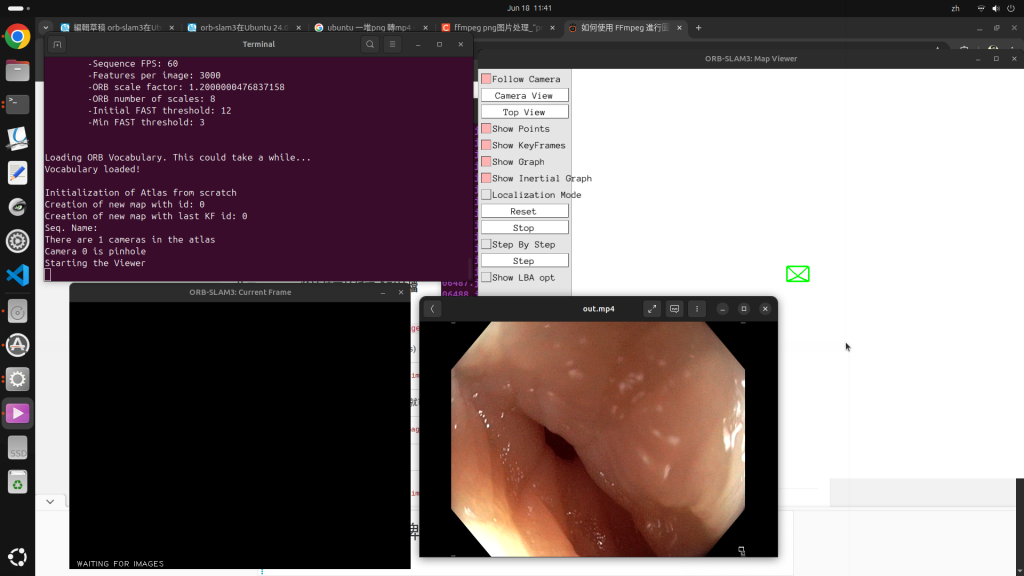
所以我用Claude得一段orb擷取的python程式
import cv2
import numpy as np
import matplotlib.pyplot as plt

def orb_feature_matching(img1, img2, img3):
    """
    使用ORB演算法進行相鄰影像的特徵比對,在三張並列影像上直接劃線
    """
    # 初始化ORB檢測器
    orb = cv2.ORB_create(nfeatures=1000)

    # 檢測關鍵點和描述子
    kp1, des1 = orb.detectAndCompute(img1, None)
    kp2, des2 = orb.detectAndCompute(img2, None)
    kp3, des3 = orb.detectAndCompute(img3, None)

    # 創建BF匹配器
    bf = cv2.BFMatcher(cv2.NORM_HAMMING, crossCheck=True)

    # 只進行相鄰影像的特徵匹配
    matches12 = bf.match(des1, des2)  # 第1張 vs 第2張
    matches23 = bf.match(des2, des3)  # 第2張 vs 第3張

    # 根據距離排序匹配結果
    matches12 = sorted(matches12, key=lambda x: x.distance)
    matches23 = sorted(matches23, key=lambda x: x.distance)

    # 取前20個最佳匹配
    good_matches12 = matches12[:20]
    good_matches23 = matches23[:20]

    # 確保三張影像高度一致
    h1, w1 = img1.shape
    h2, w2 = img2.shape
    h3, w3 = img3.shape
    max_height = max(h1, h2, h3)

    # 調整影像高度
    img1_resized = cv2.resize(img1, (w1, max_height))
    img2_resized = cv2.resize(img2, (w2, max_height))
    img3_resized = cv2.resize(img3, (w3, max_height))

    # 轉換為彩色並水平拼接三張影像
    img1_color = cv2.cvtColor(img1_resized, cv2.COLOR_GRAY2RGB)
    img2_color = cv2.cvtColor(img2_resized, cv2.COLOR_GRAY2RGB)
    img3_color = cv2.cvtColor(img3_resized, cv2.COLOR_GRAY2RGB)

    # 水平拼接三張影像
    combined_img = np.hstack([img1_color, img2_color, img3_color])

    # 重新調整關鍵點座標以適應拼接後的影像
    # 影像2的關鍵點需要偏移img1的寬度
    # 影像3的關鍵點需要偏移img1和img2的寬度
    kp2_adjusted = []
    for kp in kp2:
        new_kp = cv2.KeyPoint(kp.pt[0] + w1, kp.pt[1] * max_height / h2, kp.size)
        kp2_adjusted.append(new_kp)

    kp3_adjusted = []
    for kp in kp3:
        new_kp = cv2.KeyPoint(kp.pt[0] + w1 + w2, kp.pt[1] * max_height / h3, kp.size)
        kp3_adjusted.append(new_kp)

    kp1_adjusted = []
    for kp in kp1:
        new_kp = cv2.KeyPoint(kp.pt[0], kp.pt[1] * max_height / h1, kp.size)
        kp1_adjusted.append(new_kp)

    # 在拼接影像上劃線連接匹配點
    # 第1張 vs 第2張的匹配線(紅色)
    for match in good_matches12:
        pt1 = tuple(map(int, kp1_adjusted[match.queryIdx].pt))
        pt2 = tuple(map(int, kp2_adjusted[match.trainIdx].pt))
        cv2.line(combined_img, pt1, pt2, (255, 0, 0), 1)  # 紅色線
        cv2.circle(combined_img, pt1, 3, (255, 0, 0), 2)  # 紅色圓點
        cv2.circle(combined_img, pt2, 3, (255, 0, 0), 2)

    # 第2張 vs 第3張的匹配線(綠色)
    for match in good_matches23:
        pt2 = tuple(map(int, kp2_adjusted[match.queryIdx].pt))
        pt3 = tuple(map(int, kp3_adjusted[match.trainIdx].pt))
        cv2.line(combined_img, pt2, pt3, (0, 255, 0), 1)  # 綠色線
        cv2.circle(combined_img, pt2, 3, (0, 255, 0), 2)  # 綠色圓點
        cv2.circle(combined_img, pt3, 3, (0, 255, 0), 2)

    return combined_img, len(good_matches12), len(good_matches23)

def main():
    # 輸入三張影像的檔名
    print("請輸入三張PNG影像的檔名:")
    img1_path = input("第一張影像檔名 (例如: image1.png): ").strip()
    img2_path = input("第二張影像檔名 (例如: image2.png): ").strip()
    img3_path = input("第三張影像檔名 (例如: image3.png): ").strip()

    try:
        # 讀取三張影像
        img1 = cv2.imread(img1_path, cv2.IMREAD_GRAYSCALE)
        img2 = cv2.imread(img2_path, cv2.IMREAD_GRAYSCALE)
        img3 = cv2.imread(img3_path, cv2.IMREAD_GRAYSCALE)

        # 檢查影像是否成功載入
        if img1 is None:
            print(f"錯誤:無法載入影像 {img1_path},請檢查檔案路徑和格式")
            return
        if img2 is None:
            print(f"錯誤:無法載入影像 {img2_path},請檢查檔案路徑和格式")
            return
        if img3 is None:
            print(f"錯誤:無法載入影像 {img3_path},請檢查檔案路徑和格式")
            return

        print(f"成功載入三張影像:{img1_path}, {img2_path}, {img3_path}")
        print("正在進行ORB特徵匹配...")

        # 執行ORB特徵匹配
        combined_result, n12, n23 = orb_feature_matching(img1, img2, img3)

        # 顯示結果 - 三張影像並列,直接劃線連接匹配點
        plt.figure(figsize=(20, 8))

        plt.imshow(combined_result)
        plt.title(f'{img1_path} | {img2_path} | {img3_path}\n紅線: {img1_path}↔{img2_path} ({n12}匹配) | 綠線: {img2_path}↔{img3_path} ({n23}匹配)')
        plt.axis('off')

        plt.tight_layout()
        plt.show()

        print(f"匹配結果:")
        print(f"{img1_path} vs {img2_path}: {n12} 個匹配點")
        print(f"{img2_path} vs {img3_path}: {n23} 個匹配點")

    except Exception as e:
        print(f"發生錯誤: {e}")

def create_sample_image(img_num):
    """創建範例影像用於示範"""
    img = np.zeros((400, 400), dtype=np.uint8)

    if img_num == 1:
        # 繪製一些幾何圖形
        cv2.rectangle(img, (50, 50), (150, 150), 255, -1)
        cv2.circle(img, (300, 100), 50, 128, -1)
        cv2.rectangle(img, (200, 250), (350, 350), 200, 3)
    elif img_num == 2:
        # 稍微不同的圖形
        cv2.rectangle(img, (60, 60), (160, 160), 255, -1)
        cv2.circle(img, (310, 110), 50, 128, -1)
        cv2.rectangle(img, (210, 260), (360, 360), 200, 3)
    else:
        # 第三張影像
        cv2.rectangle(img, (40, 40), (140, 140), 255, -1)
        cv2.circle(img, (290, 90), 50, 128, -1)
        cv2.rectangle(img, (190, 240), (340, 340), 200, 3)
        cv2.line(img, (0, 200), (400, 200), 150, 2)

    return img

if __name__ == "__main__":
    main()
雖然有抓到orb特徵,但可以看到相連3張影像的特徵並不是完全正確,可是orb-slam3得不到結果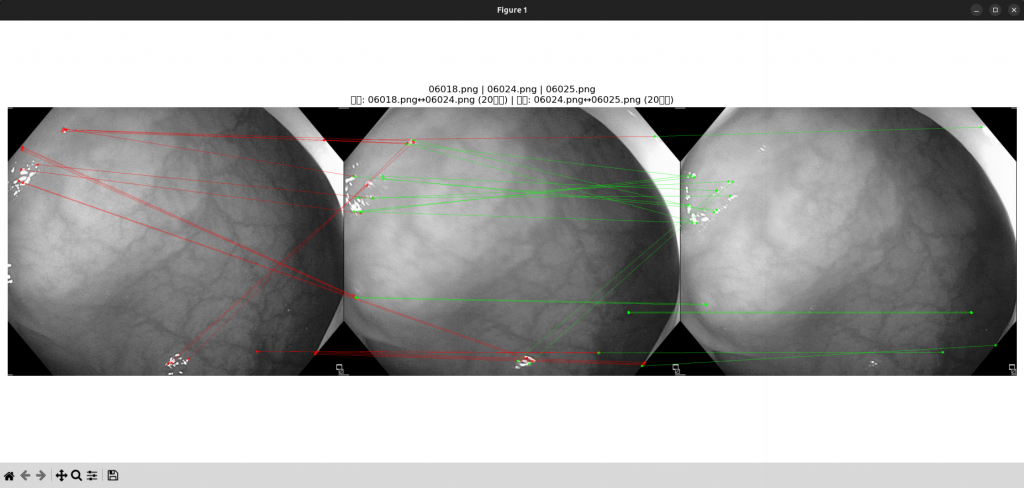
 jaujie

 iThome鐵人賽