今天我們來做每日發信系統,讓我可以每天收到通知
首先我們先來介紹程式碼
function sendDailyWeatherEmail() {
  const sheet = SpreadsheetApp.getActiveSpreadsheet().getSheetByName("MailList");
  var lastRow = sheet.getLastRow();
 for (var i = 2; i <= lastRow; i++) {
    var email = sheet.getRange(i, 1).getValue();
我們從試算表擷取我們的gmail去寄信
// 取得台北天氣 (Open-Meteo)
const url = "https://api.open-meteo.com/v1/forecast?latitude=25.0478&longitude=121.5319¤t_weather=true";
const response = UrlFetchApp.fetch(url);
const data = JSON.parse(response.getContentText());
const weather = data.current_weather;
這裡使用 Open-Meteo API 抓台北市(經緯度 25.0478, 121.5319)的即時天氣。
UrlFetchApp.fetch(url) → 向 API 發送請求
JSON.parse(...) → 把 API 回傳的 JSON 轉換成 JavaScript 物件
data.current_weather → 只拿即時天氣的部分
結果會包含:
weather.weathercode → 天氣代碼
weather.temperature → 氣溫
weather.windspeed → 風速
  // 天氣代碼轉中文
  const weatherMap = {
    0: "☀️ 晴朗",
    1: "🌤️ 少雲",
    2: "☁️ 多雲",
    3: "🌥️ 陰天",
    45: "🌫️ 有霧",
    48: "🌫️ 霧凇",
    51: "🌦️ 毛毛雨",
    61: "🌧️ 小雨",
    63: "🌧️ 中雨",
    65: "⛈️ 大雨",
    71: "❄️ 小雪",
    73: "❄️ 中雪",
    75: "❄️ 大雪",
    95: "⛈️ 雷雨"
  };
  const weatherDesc = weatherMap[weather.weathercode] || "🌈 天氣良好";

  // 不同天氣的提醒
  const adviceMap = {
    "☀️ 晴朗": "今天陽光普照,記得防曬",
    "🌤️ 少雲": "好天氣,適合出門走走",
    "☁️ 多雲": "天氣舒適,但可能有點悶",
    "🌥️ 陰天": "心情也要亮起來哦",
    "🌧️ 小雨": "出門記得帶傘 ",
    "🌧️ 中雨": "路滑小心,建議穿防水鞋 ",
    "⛈️ 大雨": "外出請注意安全 ",
    "❄️ 小雪": "記得多穿點衣服 ",
    "❄️ 中雪": "天氣寒冷,建議熱飲暖身 ",
    "❄️ 大雪": "避免長時間外出 ",
    "⛈️ 雷雨": "雷雨天,避免戶外活動 ",
    "🌫️ 有霧": "開車請小心慢行"
  };
  const advice = adviceMap[weatherDesc] || "保持好心情,今天也加油 💪";
API 回傳的是 數字代碼,這裡用一個 weatherMap 對照表,轉換成文字 + emoji,讓信件內容更直觀。
例如:
0 → ☀️ 晴朗
61 → 🌧️ 小雨
// HTML 美化
const htmlBody = `
<div style="font-family: Arial, sans-serif; color:#333; max-width:600px; margin:auto; padding:20px; border:1px solid #eee; border-radius:10px; background:#f9fbfd;">
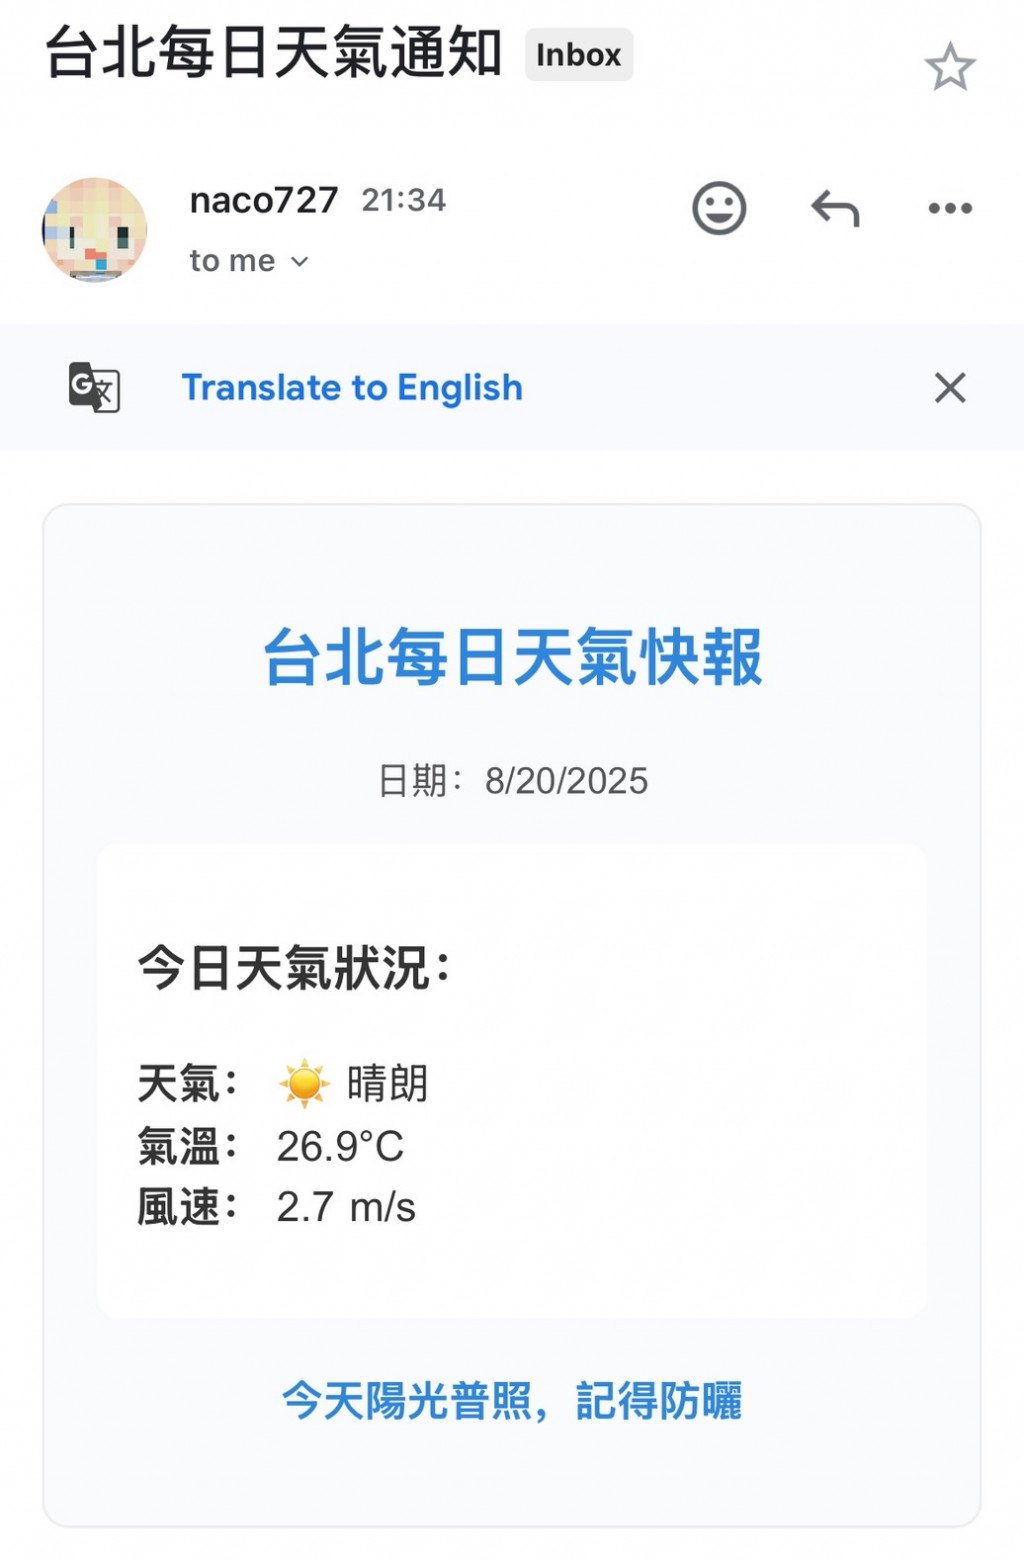
<h2 style="color:#2e86de; text-align:center;">台北每日天氣快報</h2>
<p style="text-align:center; font-size:14px; color:#555;">日期:${new Date().toLocaleDateString()}</p>
<div style="background:#fff; padding:15px; border-radius:8px; box-shadow:0 2px 5px rgba(0,0,0,0.05);">
<h3 style="margin-bottom:10px;">今日天氣狀況:</h3>
<ul style="list-style:none; padding:0; font-size:16px;">
<li><b>天氣:</b> ${weatherDesc}</li>
<li><b>氣溫:</b> ${weather.temperature}°C</li>
<li><b>風速:</b> ${weather.windspeed} m/s</li>
</ul>
</div>
<p style="margin-top:20px; text-align:center; font-size:16px; color:#2e86de;"><b>${advice}</b></p>
</div>
`;
GmailApp.sendEmail(email, "台北每日天氣通知", "", { htmlBody });
}}
上面有標題「台北每日天氣快報」
中間用表格/清單排版天氣資料
最後一行是個人化提醒文字
使用 Google 內建的 GmailApp.sendEmail 寄信
email → 收件人
"台北每日天氣通知" → 信件標題
"" → 純文字內容(這裡留空,因為我們用 HTML)
{ htmlBody } → 美化後的信件內容。
接著就可以設定觸發器在每天的任一時間發出。
點選觸發條件並且設置一個依時間驅動的觸發器。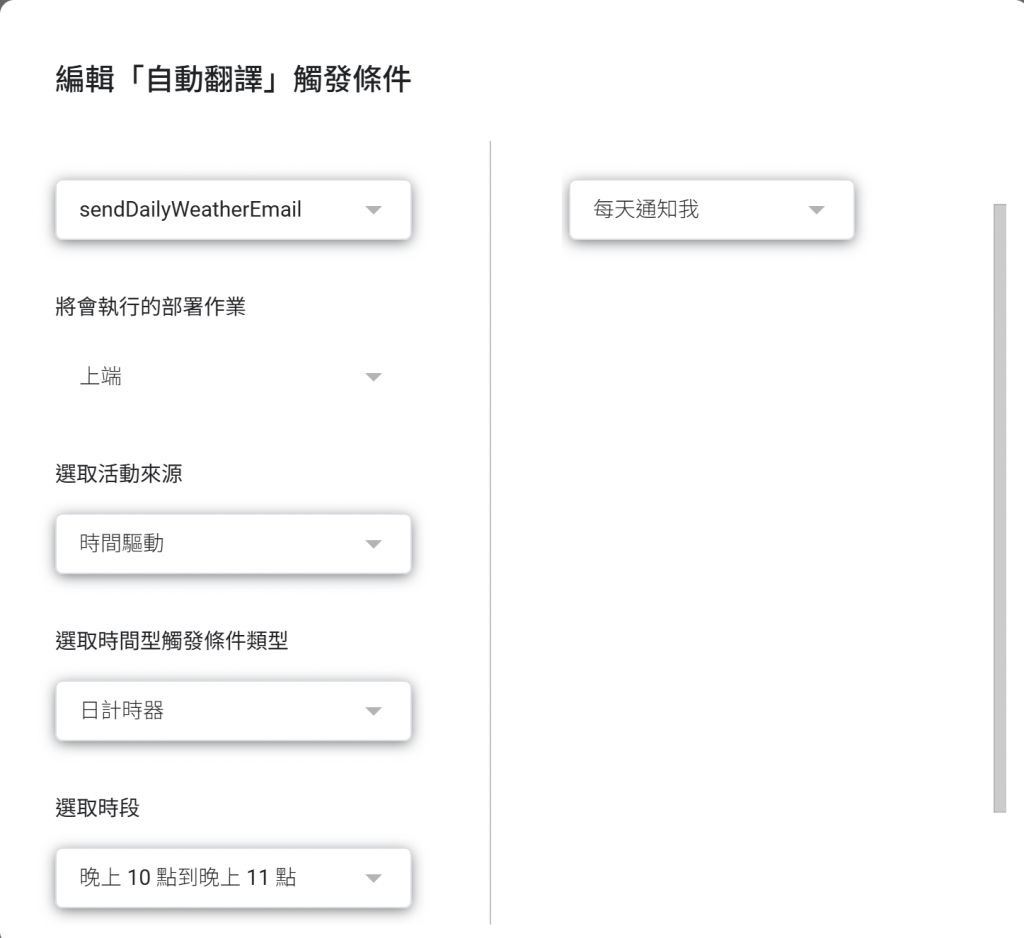


 iThome鐵人賽