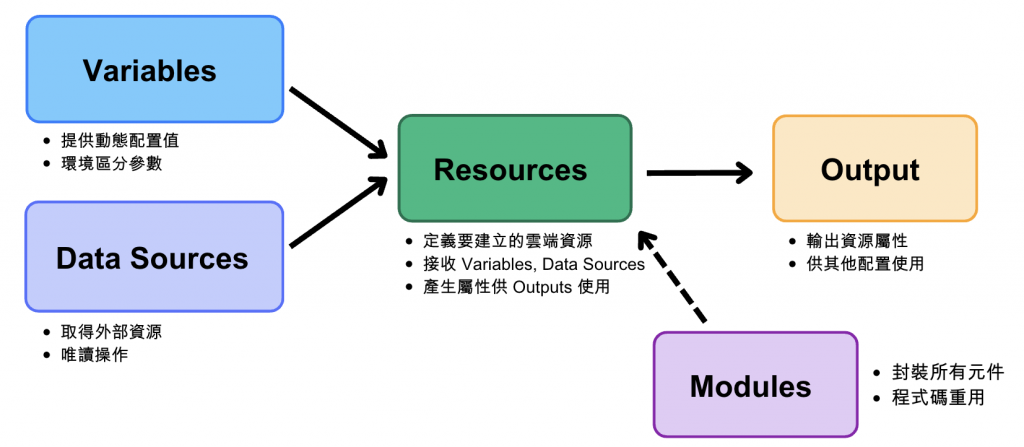
在上一篇分享了 Terraform 如何運作,這篇來看看它的組成架構🤓
提供動態參數,讓配置檔案變得更加靈活且可以重用。想像一下,如果你要在不同環境(開發、測試、正式)部署相同架構的內容,如果沒有 Variables 你就得寫三份幾乎相同的配置檔案!舉個例子比較一下差別~
沒有使用 Variables,你就需要寫幾乎相同的三份配置檔案:
# dev.tf - 開發環境
resource "google_compute_instance" "web_server" {
  name         = "dev-web-server"
  machine_type = "e2-micro"
  project      = "my-dev-project"
}

# test.tf - 測試環境
resource "google_compute_instance" "web_server" {
  name         = "test-web-server"
  machine_type = "e2-small"
  project      = "my-test-project"
}

# prod.tf - 正式環境
resource "google_compute_instance" "web_server" {
  name         = "prod-web-server"
  machine_type = "e2-standard-2"
  project      = "my-prod-project"
}
使用 Variables:
# 定義變數
variable "project_id" {
  description = "GCP 專案 ID"
  type        = string
}

variable "machine_type" {
  description = "VM 規格"
  type        = string
  default     = "e2-micro"
}

variable "environment" {
  description = "環境名稱"
  type        = string
}

# 一份配置適用所有環境
resource "google_compute_instance" "web_server" {
  name         = "${var.environment}-web-server"
  machine_type = var.machine_type
  project      = var.project_id
}
然後只需要用不同變數檔案來區分環境:
# 開發環境
terraform apply -var-file="dev.tfvars"

# 測試環境
terraform apply -var-file="test.tfvars"

# 正式環境
terraform apply -var-file="prod.tfvars"
登愣!這就是 Variables 的優勢,它就像是一個「控制面板」,一份配置只要搭配不同變數值就能適應各種需求!
很多時候會需要在「已存在的資源」基礎上建立新的資源,比如說在現有的 VPC 中建立 VM,這時候 Data Sources 就是用來協助查詢現在有哪些雲端資源!
舉個簡單的例子:
# 查詢現有的 VPC 網路
data "google_compute_network" "existing_vpc" {
  name = "my-existing-vpc"
}

# 查詢可用區域
data "google_compute_zones" "available" {
  region = "asia-east1"
}
Data Sources 就像是「探測器」,幫助你取得外部資源的即時資訊,讓 Terraform 能夠整合既有的基礎設施!
用來定義你想在雲端建立的具體資源。可以藉由 Resources 來告訴 Terraform 「我要一台 VM」或「我要一個資料庫」。 它會接收 Variables 和 Data Sources 的資料,並且整合起來。
現在我們把前面的 Variables 和 Data Sources 結合起來,看看完整的 Resource 配置:
resource "google_compute_instance" "web_server" {
  name         = "${var.environment}-web-server"  # 使用變數
  machine_type = var.machine_type                 # 使用變數
  project      = var.project_id                   # 使用變數
  zone         = data.google_compute_zones.available.names[0] # 使用查詢結果

  boot_disk {
    initialize_params {
      image = "ubuntu-2204-lts"
    }
  }

  network_interface {
    network = data.google_compute_network.existing_vpc.self_link # 使用查詢到的 VPC
    access_config {}
  }
從這個例子可以看出,Resources 在整體流程中扮演著資料中心樞紐的角色:
簡單來說,其他元件都是為了讓 Resources 更靈活、更實用而存在的!
用來取得並顯示資源建立後的重要資訊。在資源建立以後,你需要知道它的 IP 位址、資料庫連線字串等等資訊,這時候就能從 Outputs 中得到這些資訊。
舉個簡單的例子:
output "vm_external_ip" {
  description = "VM 的外部 IP 位址"
  value       = google_compute_instance.web_server.network_interface[0].access_config[0].nat_ip
}

output "vm_name" {
  description = "VM 的名稱"
  value       = google_compute_instance.web_server.name
}
執行 terraform apply 後會顯示:
Outputs:
vm_external_ip = "34.80.123.45"
vm_name = "production-web-server"
Outputs 就像是資訊的出口,讓你知道部署完成後的重要資訊,也可以將這些資訊傳遞給其他配置使用~
將多個相關的資源和配置打包成可重用的單元。當你的基礎設施變複雜時,所有配置寫在一個檔案裡會變得很亂,而且遇到相同的架構模式會重複寫很多遍。Modules 幫你解決「程式碼重用和組織化」的問題。
想像一下,如果你要為不同團隊建立相同架構的環境,沒有 Modules 你就得一直複製貼上程式碼。有了 Modules,你可以把經過驗證的配置封裝起來,需要時直接調用就好。舉個例子:
建立一個完整的 web-server 模組 (modules/web-app/main.tf):
# === 模組內部包含多個相關資源 ===

# 1. VM 實例
resource "google_compute_instance" "app_server" {
  name         = "${var.environment}-app-server"
  machine_type = var.machine_type
  zone         = var.zone

  boot_disk {
    initialize_params {
      image = "ubuntu-2204-lts"
    }
  }

  network_interface {
    network = google_compute_network.app_vpc.self_link
    access_config {}
  }
}

# 2. VPC 網路
resource "google_compute_network" "app_vpc" {
  name = "${var.environment}-vpc"
  auto_create_subnetworks = false
}

# 3. 子網路
resource "google_compute_subnetwork" "app_subnet" {
  name          = "${var.environment}-subnet"
  network       = google_compute_network.app_vpc.self_link
  ip_cidr_range = "10.0.1.0/24"
  region        = var.region
}

# 4. 防火牆規則
resource "google_compute_firewall" "allow_http" {
  name    = "${var.environment}-allow-http"
  network = google_compute_network.app_vpc.name

  allow {
    protocol = "tcp"
    ports    = ["80", "443"]
  }

  source_ranges = ["0.0.0.0/0"]
}

# 5. 資料庫
resource "google_sql_database_instance" "app_db" {
  name             = "${var.environment}-db"
  database_version = "POSTGRES_13"

  settings {
    tier = var.db_tier
  }
}
在主配置中使用這個模組:
# 一次調用就建立完整的 web 應用架構
module "production_web_app" {
  source       = "./modules/web-app"
  environment  = "prod"
  machine_type = "e2-standard-2"
  db_tier      = "db-custom-2-4096"
  region       = "asia-east1"
  zone         = "asia-east1-a"
}
Modules 就像是架構的「積木」,可以將經過驗證的配置重複使用,既保持程式碼的整潔性,也確保基礎設施的一致性!
從以上的範例可以看到,Terraform 的元件們其實像是一套分工明確的系統:
經過這三天,我們已經大概掌握了 Terraform 的核心架構了!接下來我們將要更深入探索 Terraform 並練習實作~

