
摘要
承接 Day 22 的「資料主權」,今天把資料送到「你自己的小後端」:
- 用 Express 在本機開一個 POST /backup API;
- 用 ngrok 把本機 3000 連到一個公開 HTTPS;
- 前端把 localStorage 的紀錄 POST 到後端,寫入 backup.json,模擬雲端備份。
這是你第一次走完整流程:前端 → 後端 → 硬碟存檔。就算重啟伺服器,資料也仍在 backup.json。
假設已具備(前端既有):
A. 後端
npm init -y
npm i express cors
// server.js  (Day23-NEW)
const express = require('express');
const cors = require('cors');
const fs = require('fs');
const path = require('path');

const app = express();
const PORT = process.env.PORT || 3000;
const BACKUP_PATH = path.join(__dirname, 'backup.json');

app.use(cors());                 // 允許跨域(方便前端直接呼叫)
app.use(express.json({ limit: '2mb' })); // 解析 JSON 請求

// 健康檢查
app.get('/health', (_req, res) => {
  res.json({ ok: true, time: new Date().toISOString() });
});

// 寫檔小工具:把陣列資料保存在 backup.json 中
function writeBackupFile(payloadArray) {
  fs.writeFileSync(BACKUP_PATH, JSON.stringify(payloadArray, null, 2), 'utf-8');
}

function readBackupFile() {
  if (!fs.existsSync(BACKUP_PATH)) return [];
  try {
    const raw = fs.readFileSync(BACKUP_PATH, 'utf-8');
    const data = JSON.parse(raw);
    return Array.isArray(data) ? data : [];
  } catch {
    // 檔案壞掉或非 JSON → 先備份原檔,再重建
    const corrupted = BACKUP_PATH.replace(/\.json$/, `.corrupted-${Date.now()}.json`);
    fs.copyFileSync(BACKUP_PATH, corrupted);
    return [];
  }
}

// 備份 API:接受前端 POST 的 JSON
app.post('/backup', (req, res) => {
  const body = req.body;

  // 最少要有 records 陣列
  if (!body || !Array.isArray(body.records)) {
    return res.status(400).json({ ok: false, error: 'INVALID_PAYLOAD', message: 'payload 必須包含 records 陣列' });
  }

  // 讀舊 -> push 新 -> 寫回
  const current = readBackupFile();
  const entry = {
    id: Date.now().toString(),
    receivedAt: new Date().toISOString(),
    clientId: String(body.clientId || 'unknown'),
    count: body.records.length,
    records: body.records
  };
  current.push(entry);

  try {
    writeBackupFile(current);
    return res.json({ ok: true, id: entry.id, saved: entry.count });
  } catch (err) {
    console.error('寫入 backup.json 失敗:', err);
    return res.status(500).json({ ok: false, error: 'WRITE_FAILED' });
  }
});

app.listen(PORT, () => {
  console.log(`✔ server listening on http://localhost:${PORT}`);
});
註:Day 23 的 server.js 不包含 GET,因此無法透過 ngrok 開啟你的網頁。
{
  "scripts": {
    "server": "node server.js"
  }
}
backup.json
node_modules/
啟動後端:
npm run server
看到 "server listening on http://localhost:3000" 表示 OK
B. ngrok(把本機 3000 暴露為公開 HTTPS)
註冊 ngrok:https://ngrok.com/
登入後選擇 Set up & Installation,可選 HomeBrew 安裝(若有 HomeBrew)或 Download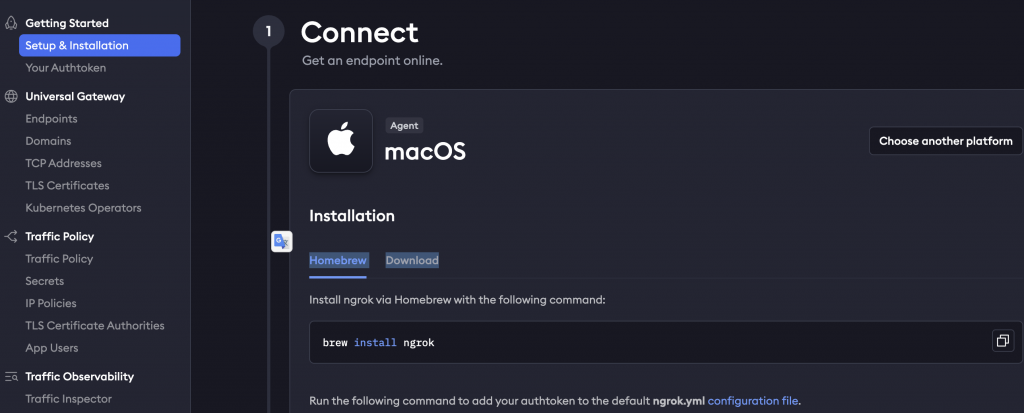
在終端機運行
ngrok http 3000
成功會出現以下畫面: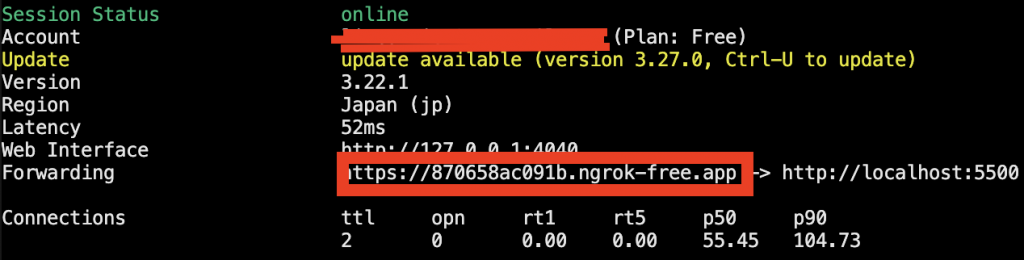
複製這個紅色底線的 HTTPS 網址,下一步要貼進前端。
C. 前端
<!-- [Day23-NEW] 簡易雲端備份(ngrok) -->
<div id="cloudBackupSection" style="margin-top:.75rem;">
  <button id="btnBackupNow" type="button">備份到雲端(ngrok)</button>
  <p id="backupFeedback" class="muted" aria-live="polite" style="margin:.25rem 0 0;"></p>
</div>
// [Day23-NEW] 固定備份 API URL
const BACKUP_ENDPOINT = "https://你的ngrok網址.ngrok-free.app/backup";
const btnBackupNow = document.getElementById('btnBackupNow');
const backupFeedback = document.getElementById('backupFeedback');

// [Day23-NEW] fetch POST(含逾時控制)
async function postJSONWithTimeout(url, payload, timeoutMs = 10000) {
  const ctrl = new AbortController();
  const id = setTimeout(() => ctrl.abort('TIMEOUT'), timeoutMs);

  try {
    const res = await fetch(url, {
      method: 'POST',
      headers: { 'Content-Type':'application/json' },
      body: JSON.stringify(payload),
      signal: ctrl.signal
    });
    clearTimeout(id);

    const data = await res.json().catch(()=> ({}));
    if (!res.ok) {
      const msg = data?.message || `HTTP ${res.status}`;
      throw new Error(msg);
    }
    return data;
  } catch (err) {
    clearTimeout(id);
    throw err;
  }
}

// [Day23-NEW] 備份動作:把 localStorage 的紀錄送到後端
btnBackupNow?.addEventListener('click', async () => {
  const records = readRecords();
  if (!Array.isArray(records) || records.length === 0) {
    backupFeedback.textContent = '目前沒有可備份的紀錄。';
    return;
  }

  const payload = {
    clientId: 'fixed-demo', // 或用 randomUUID() 產生
    exportedAt: new Date().toISOString(),
    records
  };

  backupFeedback.textContent = '上傳中…';
  btnBackupNow.disabled = true;

  try {
    const json = await postJSONWithTimeout(BACKUP_ENDPOINT, payload, 10000);
    backupFeedback.textContent = json?.ok
      ? `備份成功:已保存 ${json.saved ?? records.length} 筆(編號 #${json.id || 'N/A'})。`
      : '備份完成,但回應格式非預期。';
  } catch (err) {
    backupFeedback.textContent = `備份失敗:${String(err.message || err)}`;
  } finally {
    btnBackupNow.disabled = false;
  }
});
backup.corrupted-*.json,並重建新檔;