昨天我們帶入了最簡單的 Vue Router 安裝並使用。
那今天我們將要進入稍稍進階的使用方法,
運用得當可以讓你省去很多程式碼,同時還有保有原本的效果甚至更好。
以及會提到一些我遇過的坑,希望有遇到相同問題的朋友可以看到這篇文章。
<router-link>快速回顧一下昨天的程式碼
<script setup>
import { useRouter } from "vue-router";

const router = useRouter();

function goToAbout() {
  router.push("/about");
}
</script>

<template>
  <h2>HomeView</h2>
  <button @click="goToAbout">去 About</button>
</template>
▲手動引入 router 的方法
如果你想要更簡單一點的寫法,你可以嘗試使用 <router-link>
-<script setup>
-import { useRouter } from "vue-router";
-
-const router = useRouter();
-
-function goToAbout() {
-  router.push("/about");
-}
-</script>
-
<template>
  <h2>HomeView</h2>
-  <button @click="goToAbout">去 About</button>
+  <router-link to="/about">去 About</router-link>
</template>
▲使用 <router-link> 的方法
11 行變 3 行,
<script setup> 不用寫任何東西,你也不用 @click,整個效果還是一樣的。

▲*route切換示意圖*
RouterLink 運作原理
// node_modules > vue-router > dist > vue-router.esm-browser.js
const RouterLinkImpl = /*#__PURE__*/ defineComponent({
    name: 'RouterLink',
    /* 略 */
        return () => {
            const children = slots.default && preferSingleVNode(slots.default(link));
            return props.custom
                ? children
                : h('a', { /* 渲染出 <a> */
                    'aria-current': link.isExactActive
                        ? props.ariaCurrentValue
                        : null,
                    href: link.href,
                    onClick: link.navigate,
                    class: elClass.value,
                }, children);
    //略...
▲ RouterLink 原始碼
如果你前面渲染篇章有理解的話,這邊是透過 h() 去渲染出一個 <a>,
所以其實 <router-link> 就是經過處理包裝的 <a>
怎麼證實呢? 我們打開檢查看一下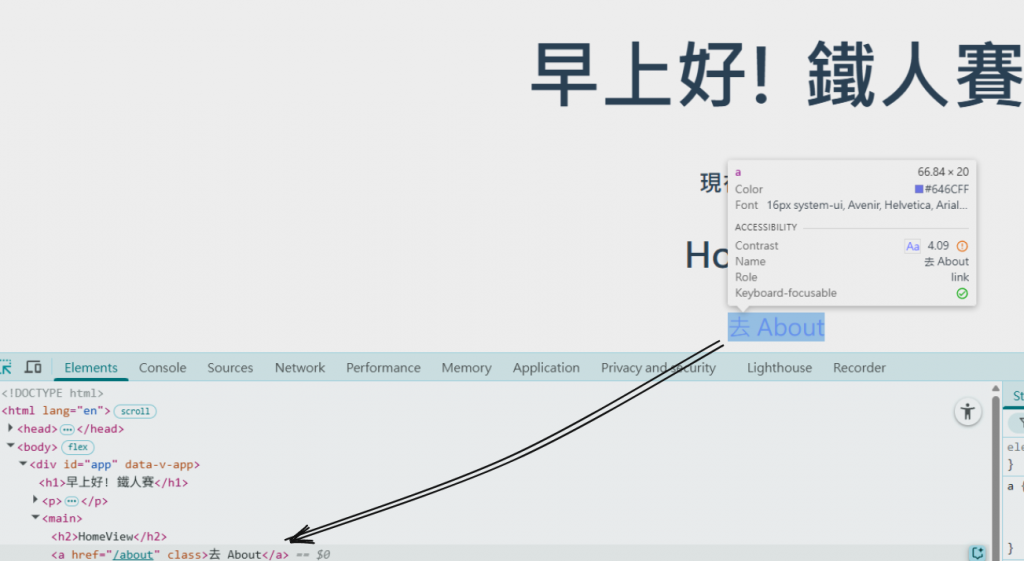
▲透過 google dev tools 檢查實際渲染 DOM

有時候你會想將相似的功能或資訊放在同一個路由底下統一管理,
或是有頁面會共用到相似的元件,那你就可能會需要這個用法。
<!-- src/router/user.js -->
const userRoutes = [
 {
  path: '/user',
  component: () => import('@/views/user/Main.vue'),
  // children 屬性裡面將會放入子路由路徑
  children: [
   { path: '', name: 'UserInfo', component: () => import('@/views/user/Info.vue') },
   { path: ':id', name: 'UserDetail', component: () => import('@/views/user/Detail.vue') },
  ],
 },
];

export default userRoutes;
<!-- src/routes/index.js -->
import { createMemoryHistory, createRouter } from 'vue-router'
import HomeView from './HomeView.vue'
import AboutView from './AboutView.vue'
import userRoutes from './user'

const routes = [
  { path: '/', component: HomeView },
  { path: '/about', component: AboutView },
  ...userRoutes,
]

const router = createRouter({
  history: createMemoryHistory(),
  routes,
})

export default router
在我們的 routes 裡面會根據不同的 path 引入不同的 component,
那你可能在查資料時發現不同的寫法,如下 :
import About from '@/views/about/Main.vue' /* 靜態引入 */

const routes = [                        /* 動態引入 */
  { path: '', name: 'Home', component: () => import('@/views/home/Main.vue') },
  { path: '/about', name: 'About', component: About,
];
第一種是靜態引入
第二種是動態引入
差異在於,
如果全部 routes 都用動態引入,當你的專案足夠大,
初次進入某個頁面時會需要等它載入,有可能會卡一下。
但如果都是靜態引入,由於已經先引入,
除了第一次加載全部,後續都會快一點。
所以這邊會建議說,
首頁這種頻繁訪問的頁面或是整體不大的小專案可以用靜態引入,
而較大的專案或是較複雜的頁面可以考慮用動態引入,
減少其他頁面載入無用的資源。
這種動態引入方式又被稱為 Lazy Loading Routes

在開發專案時總會遇到一些要先顯示出來的 Nav 或 Menu item,
但其實還沒開發到的頁面,但如果沒時間切個 404 畫面,
我通常會讓他導向首頁,例如說這樣:
const routes = [
  { path: '/',name:'Home', component: HomeView },
  { path: '/about',name:'About', component: AboutView },
  { path: "/:pathMatch(.*)*", name: "NotFound", component: HomeView },
]
:pathMatch(.*)*
這邊我們定義了一個正則,用來匹配所有路徑,
常見於未配對的路由,如 NotFound 。
看起來都蠻好的,
但如果現在多一個功能是希望在當前頁面 NavBar 要 active 那個選項,
然後你又剛好不只設定一個 NotFound,

▲錯誤示範,同時 active 兩個不應該 active 的選項
好啦 出事啦
這時候我就想說 那我使用 redirect 把它導過去 name:'Home' 不就好了
const routes = [
  { path: '/', component: HomeView },
  { path: '/about', component: AboutView },
- { path: '/:pathMatch(.*)*', name: 'NotFound', redirect: '/'},
+ { path: "/:pathMatch(.*)*", name: "NotFound", component: HomeView },
]

▲成功重導向首頁
就在我讚嘆於自己的機智的時後,terminal 直接給我一個大逼兜 :Discarded invalid param(s) “pathMatch” when navigating.
最後我找到了 issue #1617 上有人也遇到同樣的問題。
Vue 的核心團隊成員 posva :
This is due to the implicit parameter being passed during a redirection.
在重導向期間會傳遞隱式的參數
而我們所設定的 {name:'Home'} 並不接受參數,
以名稱為重導向的 router 卻帶了參數過去,這導致了錯誤,
所以解法就是在名稱後面加上空的參數像這樣 :
const routes = [
  { path: '/', component: HomeView },
  { path: '/about', component: AboutView },
- { path: '/:pathMatch(.*)*', name: 'NotFound', redirect: { name:'Home' },
+ {
+ path: "/:pathMatch(.*)*",
+ name: "NotFound",
+ redirect: { name:'Home', params:{}
+ },
]
這樣就不會報錯啦 ⁽⁽٩( ´͈ ᗨ `͈ )۶⁾⁾
或是在 issue #1497 中
posva :
Using abeforeEnter()guard
使用beforeEnter()阻擋
就 issue #1617 來看這是一個已知還沒解決的 enhancement ,
不過並不會讓頁面掛掉,就只是看到 terminal 報錯很不爽而已。
此篇章中我們快速帶過 <router-link> 的實際流程,
嵌套子路由的架構,靜態動態引入路由的差異,
及方法及命名路由重導向問題的解決方法
Router 的觀念應該是現代前端框架的標配,因此這邊的觀念不侷限在 Vue,
我相信會有類似觀念,只要有經驗,那換框架查找資料起來也會有效率許多。
那 Vue Router 我們就到此為止,明天將會進入 UI 框架環節,
如果你喜歡這個系列或是想看我發瘋,歡迎按下 訂閱 一起走完這三十天吧。
route 加上 name , 讓你的 route 可讀性更高router 改成使用 <router-link>,並加上 :active-class 來偵測當前路徑useRouter() 什麼時候適合用 <router-link> 嗎?

