🎯 系列目標:用 30 天時間,從零開始打造一個專屬輔大學生的課表生成 Chrome 擴充功能
👨💻 作者:輔大智慧資安 412580084
📅 Day 13:Chrome Extension 實作篇 - Content Script 基礎介紹
前面我們學會了 popup 和 background 的溝通,今天我們要學習 Chrome Extension 的第三個重要組件:Content Script。它能讓我們的擴充功能直接操作網頁內容!
今天我們要完成:
Content Script 是注入到網頁中的 JavaScript 檔案,簡單來說就是讓我們的擴充功能可以讀取和操作網頁內容。
可以抓取網頁上的任何文字資訊
// 讀取網頁的標題
const title = document.querySelector('h1').textContent;
可以知道用戶對網頁元素進行的交互
// 監聽用戶在網頁上的點擊
document.addEventListener('click', (event) => {
  console.log('用戶點擊了:', event.target);
});
把網頁上抓到的資料傳給背景腳本處理
// 把抓到的資料發送給 background script
chrome.runtime.sendMessage({
  action: 'pageData',
  data: { title: title }
});
用法說明:
chrome.runtime.sendMessage:發送訊息給 background scriptaction: 'pageData':告訴 background 這是什麼類型的訊息data: { title: title }:實際要傳送的資料Content Script 有一些重要限制,但對我們的課表生成器來說已經足夠了!
// ❌ 不能直接取得網頁的變數
// 例如:網頁有 var userName = "小明",我們拿不到

// ❌ 不能呼叫網頁的函數
// 例如:網頁有 function showAlert(),我們不能直接呼叫
// ✅ 可以讀取 HTML 元素
const studentName = document.querySelector('#studentName').textContent;

// ✅ 可以修改網頁內容
document.querySelector('h1').textContent = '新標題';

// ✅ 可以與 background script 溝通
chrome.runtime.sendMessage({ data: studentName });
想像 Content Script 就像是戴著手套操作網頁:
我們需要在 manifest.json 中告訴 Chrome:「在哪些網站執行我們的 content.js」
只需要在現有的 manifest.json 中新增這一段:
"content_scripts": [
  {
    "matches": [
      "https://portal.fju.edu.tw/*",
      "http://estu.fju.edu.tw/*"
    ],
    "js": ["content.js"]
  }
]
用法說明:
"content_scripts":告訴 Chrome 我們要使用 Content Script"matches":指定在哪些網站執行(只在輔大網站執行)"js": ["content.js"]:指定要執行的檔案名稱讓我們一步一步建立 content.js,每個部分都詳細解釋:
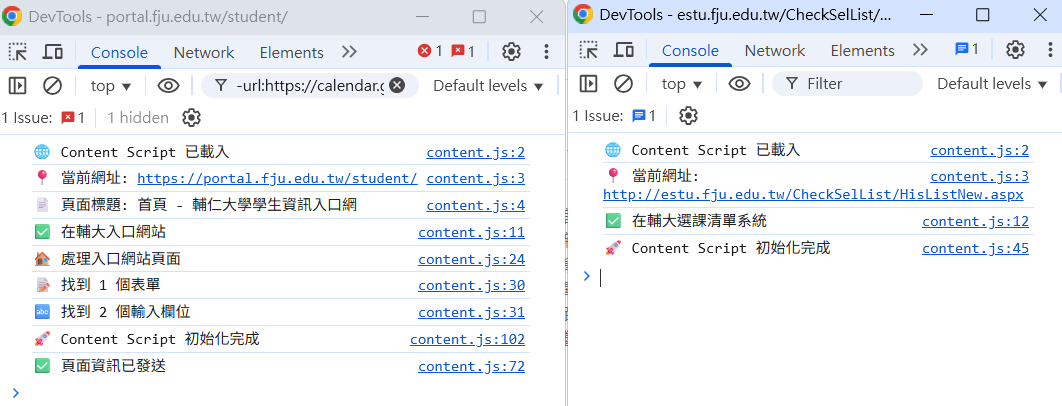
確認 Content Script 有正確載入,並知道在哪個網頁
// content.js - 輔大課表生成器內容腳本
console.log('🌐 Content Script 已載入');
console.log('📍 當前網址:', window.location.href);
識別用戶在輔大的哪個系統,以便執行對應的功能
// 檢查是否在正確的頁面
function checkCurrentPage() {
  const url = window.location.href;

  if (url.includes('portal.fju.edu.tw')) {
    console.log('✅ 在輔大學生入口網站');
  } else if (url.includes('estu.fju.edu.tw')) {
    console.log('✅ 在輔大選課清單系統');
  } else {
    console.log('❓ 不在輔大網站');
  }
}
// 發送頁面資訊給 background script
function sendPageInfo() {
  chrome.runtime.sendMessage({
    action: 'pageInfo',
    data: {
      url: window.location.href,
      title: document.title
    }
  });
}
用法說明:
chrome.runtime.sendMessage():發送訊息給 background scriptaction: 'pageInfo':告訴 background 這是頁面資訊data: {...}:實際要傳送的資料// 監聽來自 background 的訊息
chrome.runtime.onMessage.addListener((request, sender, sendResponse) => {
console.log('📨 收到訊息:', request);
if (request.action === 'getPageData') {
sendResponse({
success: true,
data: { title: document.title }
});
}
return true; // 保持訊息通道開放
});
用法說明:
chrome.runtime.onMessage.addListener():監聽來自其他組件的訊息request:收到的訊息內容sendResponse():回應訊息return true:保持訊息通道開放(重要!)將上面的程式碼保存為 content.js
確認 manifest.json 包含 content_scripts 設定
在 Chrome 擴充功能管理頁面點擊重新載入
📁 fju-schedule-extension/
├── 📄 manifest.json     ← 擴充功能設定(今天新增 content_scripts)
├── 📄 background.js     ← 背景腳本
├── 📄 popup.html        ← 使用者介面
├── 📄 popup.js          ← 彈出視窗邏輯
└── 📄 content.js        ← 內容腳本(今天新增)
🔗 知識銜接:今天我們建立了 Content Script 的基礎,明天將學習如何實際操作網頁元素和抓取課表資料。
🎯 下集預告:Day 14 - Chrome Extension 實作篇 - Content Script DOM 操作基礎
 alan_1024

 iThome鐵人賽