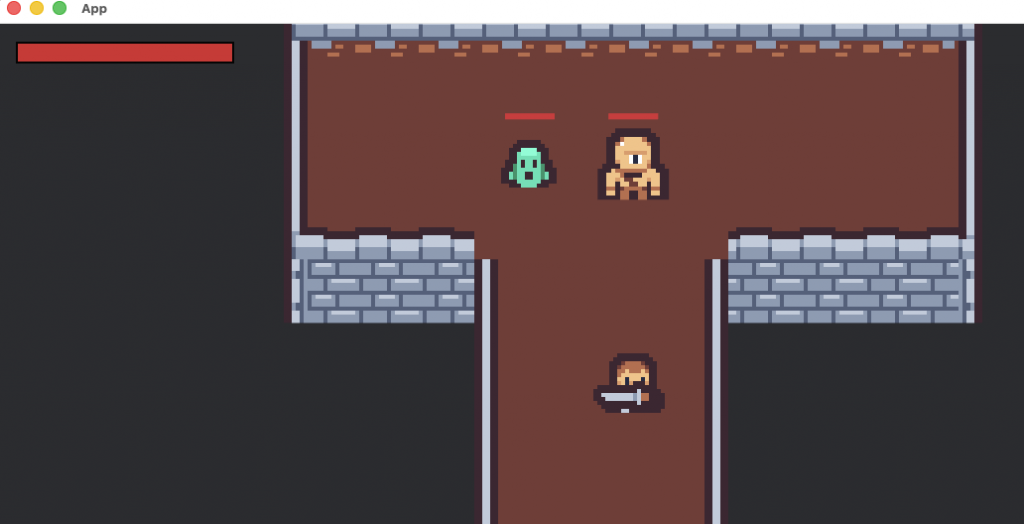
上一篇把敵人攻擊系統打通後,今天的重點放在畫面呈現上,為玩家與敵人顯示血量條。這次拆成兩個面向處理 —— 玩家 HUD 掛在 UI 系統上,敵人血條則是場景中的懸浮元件,兩者都共享 Health 元件資料,確保數值更新不會彼此脫節。
先在 constants.rs 裡整理所有血量條相關的數據。
這些資料都集中在常數檔案中,方便後續調整:
// src/constants.rs
pub const PLAYER_HEALTH_BAR_WIDTH: f32 = 220.0;
pub const PLAYER_HEALTH_BAR_HEIGHT: f32 = 22.0;
pub const PLAYER_HEALTH_BAR_MARGIN: f32 = 18.0;

pub const SLIME_HEALTH: i32 = 35;
pub const CYCLOPS_HEALTH: i32 = 80;

pub const ENEMY_HEALTH_BAR_WIDTH: f32 = 50.0;
pub const ENEMY_HEALTH_BAR_HEIGHT: f32 = 6.0;
pub const ENEMY_HEALTH_BAR_OFFSET_Y: f32 = 48.0;
同時把敵人產生流程補上 Health::new(...),等於讓敵人也正式進入共用的血量管理:
// src/systems/enemy.rs
commands.spawn((
    Enemy,
    Slime,
    Sprite::from_image(asset_server.load("characters/enemies/slime.png")),
    Transform::from_translation(spawn_position).with_scale(Vec3::splat(SLIME_SCALE)),
    Health::new(SLIME_HEALTH),
    EnemyAIState { state: EnemyBehaviorState::Patrolling },
    // ...省略巡邏/警戒/攻擊設定
));
玩家角色的血條放在畫面左上角,採用 Bevy 的 Node 介面,利用父節點當外框、子節點填滿百分比,並透過 PlayerHealthUiFill 元件快速取得實例:
// src/systems/ui.rs
pub fn setup_player_health_ui(mut commands: Commands) {
    commands
        .spawn((
            PlayerHealthUiRoot,
            Node {
                width: Val::Px(PLAYER_HEALTH_BAR_WIDTH),
                height: Val::Px(PLAYER_HEALTH_BAR_HEIGHT),
                position_type: PositionType::Absolute,
                top: Val::Px(PLAYER_HEALTH_BAR_MARGIN),
                left: Val::Px(PLAYER_HEALTH_BAR_MARGIN),
                border: UiRect::all(Val::Px(2.0)),
                ..Default::default()
            },
            BackgroundColor(Color::srgba(0.08, 0.08, 0.1, 0.9)),
            BorderColor(Color::srgba(0.02, 0.02, 0.02, 1.0)),
        ))
        .with_children(|parent| {
            parent.spawn((
                PlayerHealthUiFill,
                Node {
                    width: Val::Percent(100.0),
                    height: Val::Percent(100.0),
                    ..Default::default()
                },
                BackgroundColor(Color::srgba(0.84, 0.16, 0.18, 1.0)),
            ));
        });
}

pub fn update_player_health_ui(
    player_query: Query<&Health, With<Player>>,
    mut fill_query: Query<&mut Node, With<PlayerHealthUiFill>>,
) {
    let Some(health) = player_query.iter().next() else { return; };
    let Some(mut node) = fill_query.iter_mut().next() else { return; };

    if health.max <= 0 {
        node.width = Val::Percent(0.0);
        return;
    }

    let ratio = (health.current as f32).clamp(0.0, health.max as f32) / health.max as f32;
    node.width = Val::Percent((ratio * 100.0).clamp(0.0, 100.0));
}
這套邏輯很單純,先找玩家的 Health,再把子節點的寬度調成百分比。UI 事件和遊戲邏輯依舊完全解耦,update_player_health_ui 只依賴查詢,不必直接碰玩家的 Sprite 或 Transform。
敵人的血條是場景中的實體。為了避免複用太多泛型,另外定義了幾個標記元件:
// src/components/ui.rs
#[derive(Component)]
pub struct HealthBarTarget {
    pub target: Entity,
}

#[derive(Component)]
pub struct HealthBarFollow {
    pub target: Entity,
    pub offset: Vec3,
}

#[derive(Component)]
pub struct EnemyHealthBarRoot;

#[derive(Component)]
pub struct EnemyHealthBarFill;
spawn_enemy_health_bars 會在敵人第一次出現時產生血條,並將 HealthBarFollow/HealthBarTarget 綁回原先的敵人實體:
// src/systems/ui.rs
pub fn spawn_enemy_health_bars(
    mut commands: Commands,
    query: Query<(Entity, &Transform, &Health), (With<Enemy>, Added<Enemy>)>,
) {
    for (enemy_entity, transform, health) in &query {
        if health.max <= 0 {
            continue;
        }

        let offset = Vec3::new(0.0, ENEMY_HEALTH_BAR_OFFSET_Y, 6.0);
        let base_translation = transform.translation + offset;

        commands
            .spawn((
                EnemyHealthBarRoot,
                HealthBarFollow::new(enemy_entity, offset),
                Transform::from_translation(base_translation),
            ))
            .with_children(|parent| {
                parent.spawn(Sprite::from_color(
                    Color::srgba(0.08, 0.08, 0.08, 0.85),
                    Vec2::new(ENEMY_HEALTH_BAR_WIDTH, ENEMY_HEALTH_BAR_HEIGHT),
                ));

        let mut fill_sprite = Sprite::from_color(
            Color::srgba(0.86, 0.18, 0.22, 0.95),
            Vec2::new(ENEMY_HEALTH_BAR_WIDTH, ENEMY_HEALTH_BAR_HEIGHT),
        );
        fill_sprite.anchor = Anchor::CenterLeft;

        parent.spawn((
            EnemyHealthBarFill,
            HealthBarTarget::new(enemy_entity),
            fill_sprite,
            Transform::from_translation(Vec3::new(-ENEMY_HEALTH_BAR_WIDTH / 2.0, 0.0, 1.0)),
        ));
            });
    }
}
後續兩個系統分別處理位置同步與比例縮放:
pub fn update_enemy_health_bar_positions(
    mut commands: Commands,
    owner_query: Query<&GlobalTransform>,
    mut bar_query: Query<(Entity, &HealthBarFollow, &mut Transform), With<EnemyHealthBarRoot>>,
) {
    for (entity, follow, mut transform) in &mut bar_query {
        match owner_query.get(follow.target) {
            Ok(owner_transform) => {
                let mut translation = owner_transform.translation();
                translation += follow.offset;
                transform.translation = translation;
            }
            Err(_) => {
                commands.entity(entity).despawn();
            }
        }
    }
}

pub fn update_enemy_health_bar_fill(
    health_query: Query<&Health>,
    mut fill_query: Query<(&HealthBarTarget, &mut Transform), With<EnemyHealthBarFill>>,
) {
    for (target, mut transform) in &mut fill_query {
        let Ok(health) = health_query.get(target.target) else {
            continue;
        };

        if health.max <= 0 {
            transform.scale.x = 0.0;
            continue;
        }

        let ratio = (health.current as f32).clamp(0.0, health.max as f32) / health.max as f32;
        transform.scale.x = ratio.clamp(0.0, 1.0);
    }
}
這樣血條就能跟著敵人移動,也能隨著 Health 數據同步變化。若敵人被移除,找不到 GlobalTransform 的分支會直接把血條清掉,避免場景殘留節點。
我還為血量條專門開了一個 UiPlugin,集中注入所有 UI 相關的系統,並把它加到 main.rs 的插件列表中:
// src/plugins/ui.rs
impl Plugin for UiPlugin {
    fn build(&self, app: &mut App) {
        app.add_systems(Startup, setup_player_health_ui)
            .add_systems(Update, (spawn_enemy_health_bars, update_player_health_ui))
            .add_systems(
                PostUpdate,
                (
                    update_enemy_health_bar_positions,
                    update_enemy_health_bar_fill,
                ),
            );
    }
}
排程順序是刻意安排的:
Startup 建立 HUD 節點,避免讀入場景時看到空白畫面。Update 每幀偵測新敵人與玩家血量變化。PostUpdate 再推一次敵人血條的位置與比例,確保所有 Transform 更新都已完成。UiPlugin 被加進 App::add_plugins(...) 的 tuple 中後,整體邏輯就與玩家/敵人系統平行運作,維持模組化的架構整潔度。

這次抽象出 HealthBarTarget、HealthBarFollow、EnemyHealthBarFill 等標記元件後,未來要做 BOSS 指令角色或特殊單位的血量呈現時可以直接重複使用。也因為玩家與敵人共用 Health,不論是扣血、加血還是加護盾,只要更新數值就能自動反映在 UI 上。
下一步計畫是把敵人受到攻擊的流程補上,並讓這套血量條系統立刻顯示出敵人的受傷狀態,完成雙向戰鬥的視覺回饋。
今天的程式碼分享在 repo


 iThome鐵人賽