
昨天大致上已經知道要怎麼處理,今天就來逐步調整吧!
改寫 background.js 儲存預設專案管理的格式,將 string 改為 object
chrome.runtime.onInstalled.addListener(async () => {
     const {
         reviewTemplates
     } = await chrome.storage.sync.get(['reviewTemplates']);

     if (!reviewTemplates) {
         chrome.storage.sync.set({
             reviewTemplates: {
                 default: defaultReviewTemplate
             }
         });
     }
 });
因為必須判斷目前是載哪一個 url,所以要在 ontent_script.js 加上從 url 取得專案的相關程式
 function getProjectKey() {
     const url = window.location.href;
     const beforeDash = url.split('/-/')[0];
     const parts = beforeDash.split('/');
     return parts.pop() || 'default';
 }
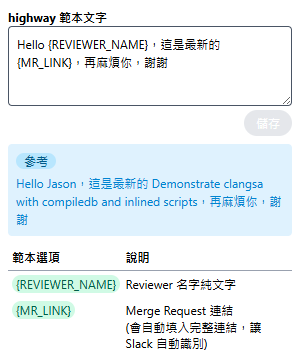
改寫 content_script.js 將 chrome.storage.sync 取得的範本從原本的 string 改寫為 object,主要調整的部分為 generateReviewContent
async function generateReviewContent(title, reviewer) {
const {
reviewTemplates
} = await chrome.storage.sync.get(['reviewTemplates']);
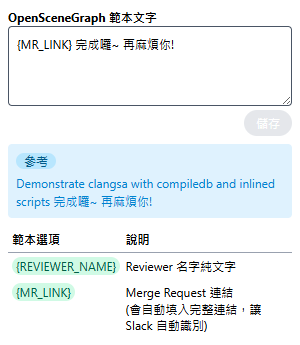
const reviewerNameSymbol = "{REVIEWER_NAME}";
const mrLinkSymbol = "{MR_LINK}";
const textContent = (reviewTemplates[getProjectKey()] ?? reviewTemplates.default)
.replace(reviewerNameSymbol, reviewer)
.replace(mrLinkSymbol, title)
// 準備 HTML 內容(包含格式化連結)
const mrUrl = window.location.href;
const htmlContent = (reviewTemplates[getProjectKey()] ?? reviewTemplates.default)
.replace(reviewerNameSymbol, reviewer)
.replace(mrLinkSymbol, `<a href="${mrUrl}">${title}</a>`)
console.log(htmlContent);
// 使用 ClipboardItem 建立可複製的內容,使用 .replace 方法替換要複製的內容
const clipboardItem = new ClipboardItem({
"text/plain": new Blob(
[
textContent
],
{ type: "text/plain" }
),
"text/html": new Blob(
[
htmlContent
],
{ type: "text/html" }
),
});
return clipboardItem
}
因為 Content Script 和 popup 頁面沒有直接相連,要透過 message passing,通常會用 background.js 當中繼
流程概念
content_script.js
const projectKey = getProjectKey();
// 傳給 background
chrome.runtime.sendMessage({
action: "setProjectKey",
projectKey,
});
- background.js
```javascript
// 用物件存放每個 tab 的 projectKey
const projectKeysByTab = {};

// 收到 content_script 的訊息
chrome.runtime.onMessage.addListener((message, sender, sendResponse) => {
   if (message.action === "setProjectKey" && sender.tab) {
       projectKeysByTab[sender.tab.id] = message.projectKey;
   }

   if (message.action === "getProjectKey" && message.tabId) {
       sendResponse({ projectKey: projectKeysByTab[message.tabId] });
   }
});
chrome.runtime.sendMessage(
 { action: "getProjectKey", tabId: activeTab.id },
 (response) => {
   if (response && response.projectKey) {
     console.log("拿到 projectKey:", response.projectKey);
     projectKey.value = response.projectKey;
   } else {
     console.log("這個 tab 還沒 projectKey");
   }
 }
);
專注來調整 popup 頁面吧!
<div class="font-bold">{{ projectKey }} 範本文字</div>

<script setup>
const projectKey = ref('default')
</script>
const templates = ref({})

async function fetchData() {
  let { reviewTemplates } = await chrome.storage.sync.get(['reviewTemplates']);
  templates.value = reviewTemplates || {};
}
onMounted(async () => {
  await fetchData()

  // 先取得當前作用中的 tab
  chrome.tabs.query({ active: true, currentWindow: true }, (tabs) => {
    const activeTab = tabs[0];

    chrome.runtime.sendMessage(
      { action: "getProjectKey", tabId: activeTab.id },
      (response) => {
        if (response && response.projectKey) {
          console.log("拿到 projectKey:", response.projectKey);
          projectKey.value = response.projectKey;
        } else {
          console.log("這個 tab 還沒 projectKey");
        }
      }
    );
  });
})
watch(projectKey, () => {
  const reviewTemplate =
    templates.value?.[projectKey.value] ??
    templates.value?.default ??
    '';

  templateContent.value = reviewTemplate
  initialTemplateContent.value = reviewTemplate
}, { immediate: true })
async function saveTemplate() {
  const template = templateContent.value.trimEnd()
  if (template.length > LIMIT_TEXT_LENGTH) {
    error.value = '文字太長,請縮短一點~'
    return
  };
  const unknownKey = extractPlaceholders(template).filter(k => !availableKey.includes(k));

  if (unknownKey.length) {
    error.value = `發現未知變數:${unknownKey.join(', ')}`
    return
  };
  const { reviewTemplates = {} } = await chrome.storage.sync.get(['reviewTemplates']);
  await chrome.storage.sync.set({
    reviewTemplates: { ...reviewTemplates, [projectKey.value]: template }
  });
  templateContent.value = template
  initialTemplateContent.value = template
  error.value = ''
}
function applyTemplate(template = '', data) {...}

 iThome鐵人賽