🎯 系列目標:用 30 天時間,從零開始打造一個專屬輔大學生的課表生成 Chrome 擴充功能
👨💻 作者:輔大智慧資安 412580084
📅 Day 16:Chrome Extension 進階篇 - 在輔大網頁中注入「我的課表」按鈕
經過前 15 天的學習,我們已經建立了基本的 Chrome Extension 架構。今天我們要學習一個重要技能:在目標網頁中注入按鈕,讓使用者可以直接在輔大系統中使用我們的功能!
今天我們要完成:
首先分析輔大學生入口網頁結構,選擇自己想要的位置放置「我的課表」按鈕,我選擇的是 課程 ‧ 學習 的區域放入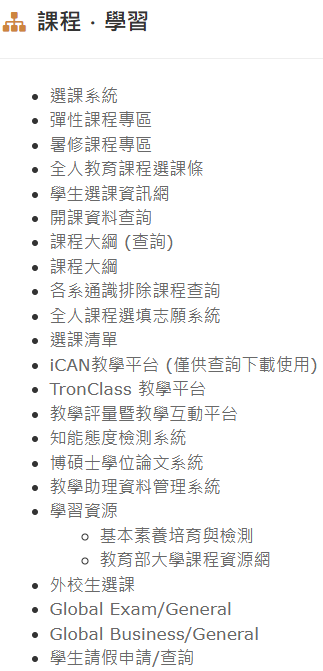
我們會發現想要新增的區域定位是 #menuSelect ul',因此我們等等會在此區域插入元素按鈕
這裡我們先簡單建立按鈕樣式:
// 建立「我的課表」按鈕
function createScheduleButton() {
  console.log('🔧 建立「我的課表」按鈕');

  // 建立 li 元素(選單項目)
  const listItem = document.createElement('li');

  // 建立 a 元素(按鈕)
  const button = document.createElement('a');
  button.href = '#';
  button.id = 'fjuScheduleButton';
  button.textContent = '我的課表';

  // 設定按鈕樣式
  button.style.cssText = `
    color: #007bff;
    text-decoration: none;
    cursor: pointer;
    padding: 5px 0px;
    border-radius: 3px;
    transition: background-color 0.2s;
  `;

  // 滑鼠懸停效果
  button.addEventListener('mouseenter', () => {
    button.style.backgroundColor = '#f0f8ff';
  });

  button.addEventListener('mouseleave', () => {
    button.style.backgroundColor = 'transparent';
  });

  // 將按鈕加入 li 元素
  listItem.appendChild(button);

  console.log('✅ 按鈕元素建立完成');
  return { listItem, button };
}
有時候網頁載入較慢,我們需要等待特定元素出現才能進行操作:
// 等待特定元素載入
function waitForElement(selector, timeout = 5000) {
  return new Promise((resolve, reject) => {
    // 先檢查元素是否已經存在
    const element = document.querySelector(selector);
    if (element) {
      resolve(element);
      return;
    }

    // 如果元素不存在,就監聽頁面變化
    const observer = new MutationObserver(() => {
      const element = document.querySelector(selector);
      if (element) {
        observer.disconnect(); // 停止監聽
        resolve(element);
      }
    });

    // 開始監聽頁面變化
    observer.observe(document.body, {
      childList: true,   // 監聽子元素的新增/刪除
      subtree: true      // 監聽所有後代元素
    });

    // 設定超時時間,避免無限等待
    setTimeout(() => {
      observer.disconnect();
      reject(new Error(`等待元素超時: ${selector}`));
    }, timeout);
  });
}

// 使用範例
waitForElement('#menuSelect ul')
  .then(menu => {
    console.log('✅ 選單載入完成');
    // 可以安全地操作選單了
  })
  .catch(error => {
    console.log('❌ 選單載入失敗:', error);
  });
說明:
MutationObserver:監聽 DOM 變化的工具childList: true:監聽元素的新增或刪除subtree: true:監聽所有子元素的變化timeout:設定最長等待時間,避免程式卡住// 建立「我的課表」按鈕
function createScheduleButton() {
console.log('🔧 建立「我的課表」按鈕');
// 建立 li 元素(選單項目)
const listItem = document.createElement('li');
// 建立 a 元素(按鈕)
const button = document.createElement('a');
button.href = '#';
button.id = 'fjuScheduleButton';
button.textContent = '📊 我的課表';
// 設定按鈕樣式
button.style.cssText = `
color: #007bff;
text-decoration: none;
cursor: pointer;
padding: 5px 10px;
border-radius: 3px;
transition: background-color 0.2s;
`;
// 滑鼠懸停效果
button.addEventListener('mouseenter', () => {
button.style.backgroundColor = '#f0f8ff';
});
button.addEventListener('mouseleave', () => {
button.style.backgroundColor = 'transparent';
});
// 將按鈕加入 li 元素
listItem.appendChild(button);
console.log('✅ 按鈕元素建立完成');
return { listItem, button };
}
// 將按鈕注入到網頁選單中
async function injectScheduleButton() {
  try {
    console.log('🚀 開始注入「我的課表」按鈕');

    // 檢查是否在輔大學生系統
    if (!window.location.href.includes('portal.fju.edu.tw')) {
      console.log('❌ 不在輔大學生系統,跳過注入');
      return;
    }

    // 等待選單容器載入
    const menuContainer = await waitForElement('#menuSelect ul', 5000);

    // 檢查是否已經注入過
    if (document.getElementById('fjuScheduleButton')) {
      console.log('⚠️ 按鈕已存在,跳過注入');
      return;
    }

    // 建立並注入按鈕
    const { listItem, button } = createScheduleButton();
    menuContainer.appendChild(listItem);

    // 綁定點擊事件
    button.addEventListener('click', handleScheduleButtonClick);

    console.log('✅ 「我的課表」按鈕注入成功');

  } catch (error) {
    console.error('❌ 按鈕注入失敗:', error);
  }
}
這裡處理與之前popup.js的概念一樣,在點擊後會與backgrond.js通信,
通信成功則恢復按鈕狀態:
// 處理「我的課表」按鈕點擊事件
function handleScheduleButtonClick(event) {
  event.preventDefault();
  console.log('📊 「我的課表」按鈕被點擊');

  // 更新按鈕狀態
  const button = event.target;
  const originalText = button.textContent;
  button.textContent = '⏳ 處理中...';
  button.style.pointerEvents = 'none';

  // 發送消息給 background script(與 popup 相同的邏輯)
  chrome.runtime.sendMessage({
    action: 'generateSchedule',
    source: 'webpage',  // 標示來源是網頁按鈕
    data: {
      url: window.location.href,
      timestamp: new Date().toISOString()
    }
  }, (response) => {
    // 恢復按鈕狀態
    button.textContent = originalText;
    button.style.pointerEvents = 'auto';

    if (response && response.success) {
      console.log('✅ 課表生成成功');
      // 可以在這裡顯示成功提示
      showNotification('課表生成成功!', 'success');
    } else {
      console.error('❌ 課表生成失敗:', response?.error);
      showNotification('課表生成失敗:' + (response?.error || '未知錯誤'), 'error');
    }
  });
}

// 顯示通知訊息
function showNotification(message, type = 'info') {
  // 建立通知元素
  const notification = document.createElement('div');
  notification.textContent = message;
  notification.style.cssText = `
    position: fixed;
    top: 20px;
    right: 20px;
    padding: 12px 20px;
    border-radius: 5px;
    color: white;
    font-weight: bold;
    z-index: 10000;
    transition: opacity 0.3s;
    ${
      type === 'success' ? 'background-color: #28a745;' :
      type === 'error' ? 'background-color: #dc3545;' :
      'background-color: #007bff;'
    }
  `;

  // 添加到頁面
  document.body.appendChild(notification);

  // 3秒後自動移除
  setTimeout(() => {
    notification.style.opacity = '0';
    setTimeout(() => {
      document.body.removeChild(notification);
    }, 300);
  }, 3000);
}
將上面的程式碼保存為新的 content.js
在 Chrome 擴充功能管理頁面重新載入
登入輔大學生入口網:https://portal.fju.edu.tw/student/
檢查選單:確認選單中出現「我的課表」按鈕
測試點擊:點擊按鈕確認會顯示處理中狀態
🔗 知識銜接:今天我們學會了在網頁中注入按鈕並建立基本通訊,明天將學習如何讓 Content Script 與 Background Script 協同工作,建立完整的自動化流程。
🎯 下集預告:Day 17 - 組件協作與基礎消息傳遞 🔄
 alan_1024
