
昨天我們深入實戰了 RBAC (Role-Based Access Control),看到了 Kubernetes 權限管理的核心概念。我們先從系統內建的 kube-proxy Role/RoleBinding 開始,了解如何查看物件資源的權限;接著建立了新的使用者 sean,這個帳號在一開始什麼都做不了,直到透過 Role 與 RoleBinding 賦予權限,才得以在 Namespace sean 內查看 Pods。最後,我們建立了 ClusterRole 與 ClusterRoleBinding,讓 sean 能跨越 Namespace,查看整個叢集的 Nodes。
然而,僅僅有了角色與權限,還不代表使用者可以順利進入 Clusters。實際上,我們還需要一份 KubeConfig 來定義使用者該如何連線到 API Server、使用哪一組憑證,以及當前該用哪個 Context。簡單來說,KubeConfig 是讓 API Server 、kubectl 知道 「我是誰、我要去哪裡、我要用什麼身份」 的關鍵設定檔。今天我們來看看 Kube Config 如果管理 Clusters、Users、Contexts!
如果沒有 KubeConfig,每次要查詢 Kubernetes 資源時,都得把憑證與金鑰通通帶上,指令會變得很冗長,例如:
kubectl get pods
  --server=https://172.18.0.3:6443 \
  --client-certificate=/etc/kubernetes/pki/admin.crt \
  --client-key=/etc/kubernetes/pki/admin.key \
  --certificate-authority=/etc/kubernetes/pki/ca.crt \
KubeConfig 正是為了解決這種麻煩,它是一個 YAML 設定檔,描述了如何連線到 Kubernetes 叢集:包含 API Server 的位址、使用者憑證,以及多個環境的切換方式。
預設路徑是 ~/.kube/config,kubectl 會自動讀取這個檔案,因此下指令時不需要再額外輸入憑證參數。
當 kubectl 載入設定檔時,會依照以下優先序決定使用哪一份:
--kubeconfig 參數:顯式指定的檔案,優先級最高。$KUBECONFIG 環境變數:如果有設定,會讀取該變數指向的檔案。~/.kube/config:當以上兩者皆未指定時,才會使用。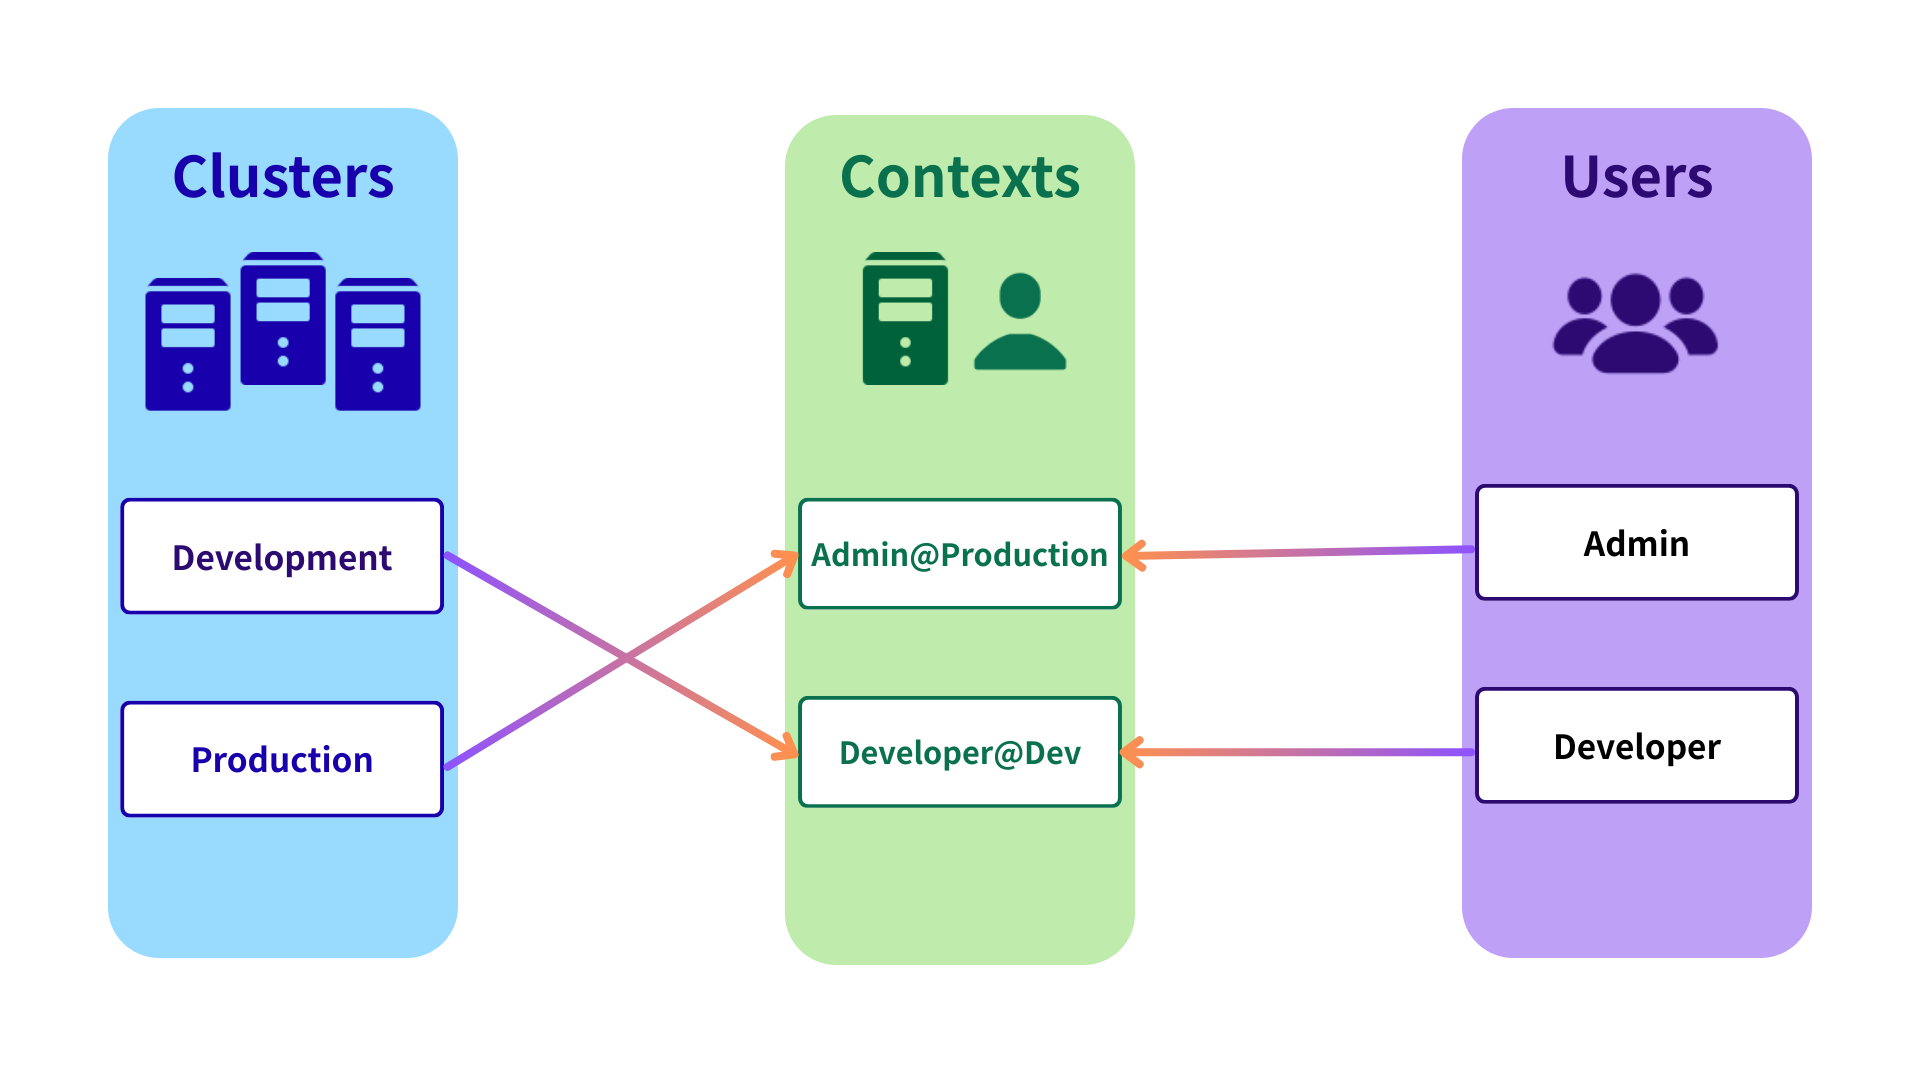
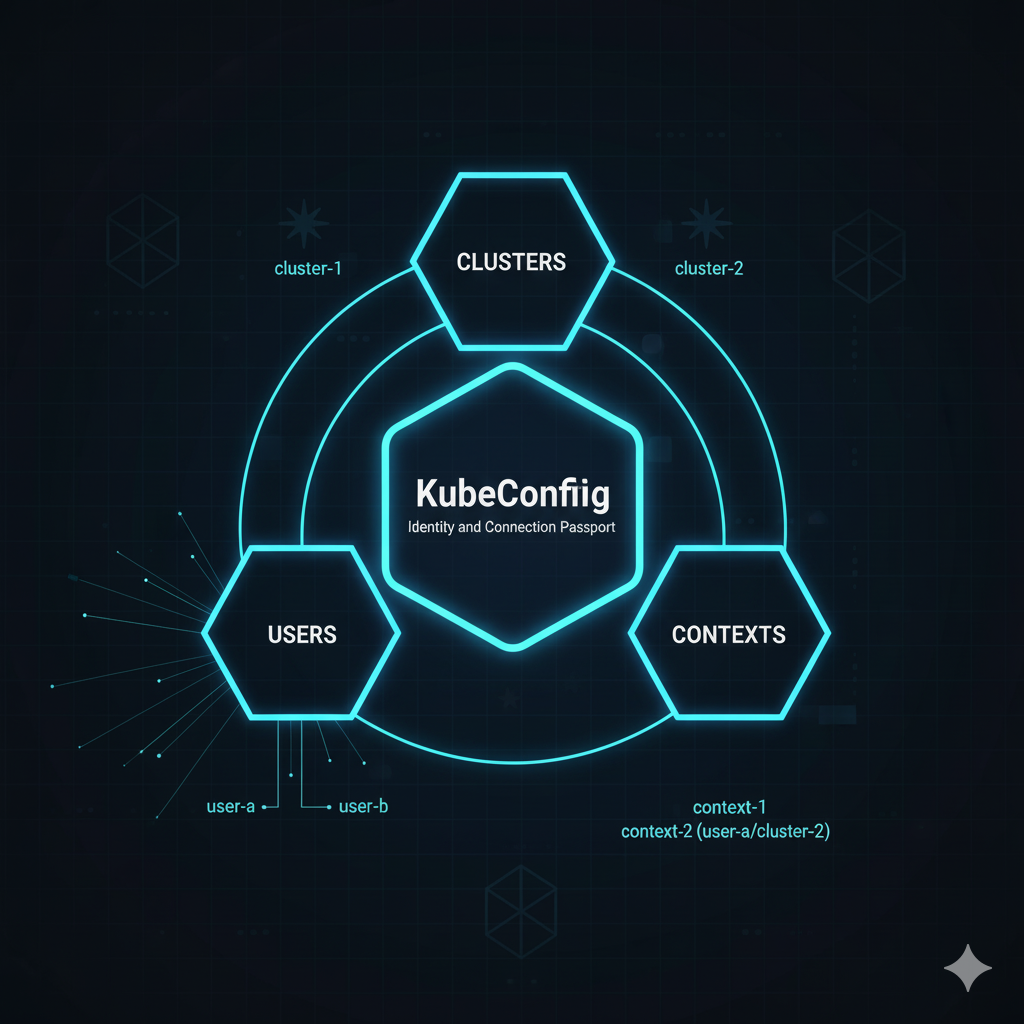
一份 kubeconfig 檔案主要包含三個核心部分,如上圖:
root 使用者以外,還會有其他 User。在實務上會最常見的是分成 Admin 和 Develop 的角色,但詳細還是會根據專案背景與需求調整。KubeConfig 並不會「創建新用戶」或「賦予新權限」,它只是 告訴 kubectl 要用哪個身份去連線哪個叢集。真正的授權還是透過 RBAC 管控。
以下面我自己的 Kube Config 為例:
kubectl config view
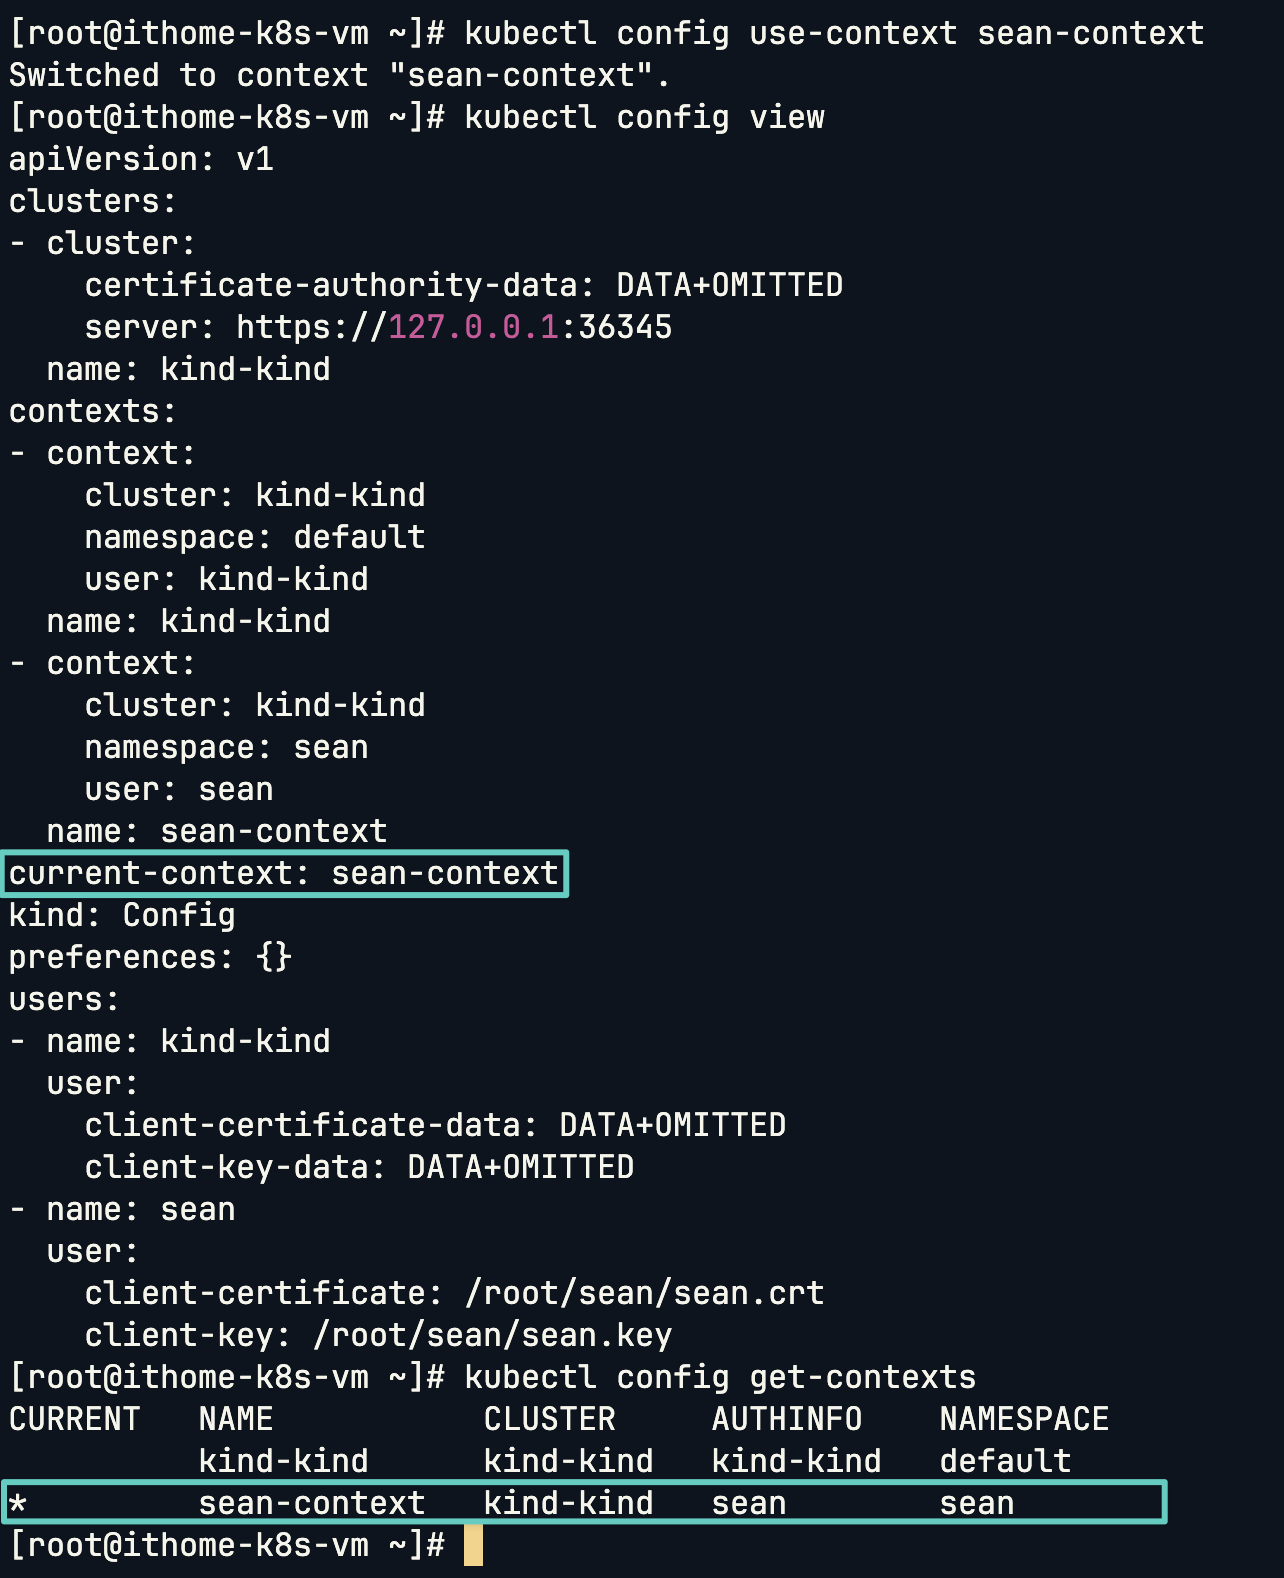
可以看到這個 yaml 檔除了基本的 apiVersion 和 kind 之外,剩下的三個部分就是前面提及的 Cluster、Contexts、Users。可以看到我是一個 Cluster 和兩個 Users,然後 Contexts 會將 Cluster 和 Users 綁在一起。current-context 就代表 kubectl 在不指定任何額外參數時,會用哪個 cluster、哪個 user、哪個 namespace 都在這邊設定好了。
Namespace 的部分是切換到指定 Contexts 後,預設不指定的話就會在指定的 Namespace 進行操作。
apiVersion: v1
kind: Config
clusters:
- cluster:
    certificate-authority-data: DATA+OMITTED
    server: https://127.0.0.1:36345
  name: kind-kind
contexts:
- context:
    cluster: kind-kind
    namespace: default
    user: kind-kind
  name: kind-kind
- context:
    cluster: kind-kind
    namespace: sean
    user: sean
  name: sean-context
current-context: kind-kind
preferences: {}
users:
- name: kind-kind
  user:
    client-certificate-data: DATA+OMITTED
    client-key-data: DATA+OMITTED
- name: sean
  user:
    client-certificate: /root/sean/sean.crt
    client-key: /root/sean/sean.key
切換 Context 只需要:
kubectl config use-context sean-context
可以看到 Kube Config 會跟著更新,切換後 kubectl 就會以 sean 這個使用者、連線到 kind-kind Cluster、並在 sean namespace 下操作:
這裡整理常見操作,並透過圖片和指令實際驗證。
在開始實戰 Kube Config 之前,要先知道 Kubernetes 把設定檔放在哪。
進入 Master Node:
docker exec -it kind-control-plane bash
可以看到有 admin.conf,這就是叢集初始化時產生的預設 KubeConfig,裡面就是 Super User 的憑證與設定。
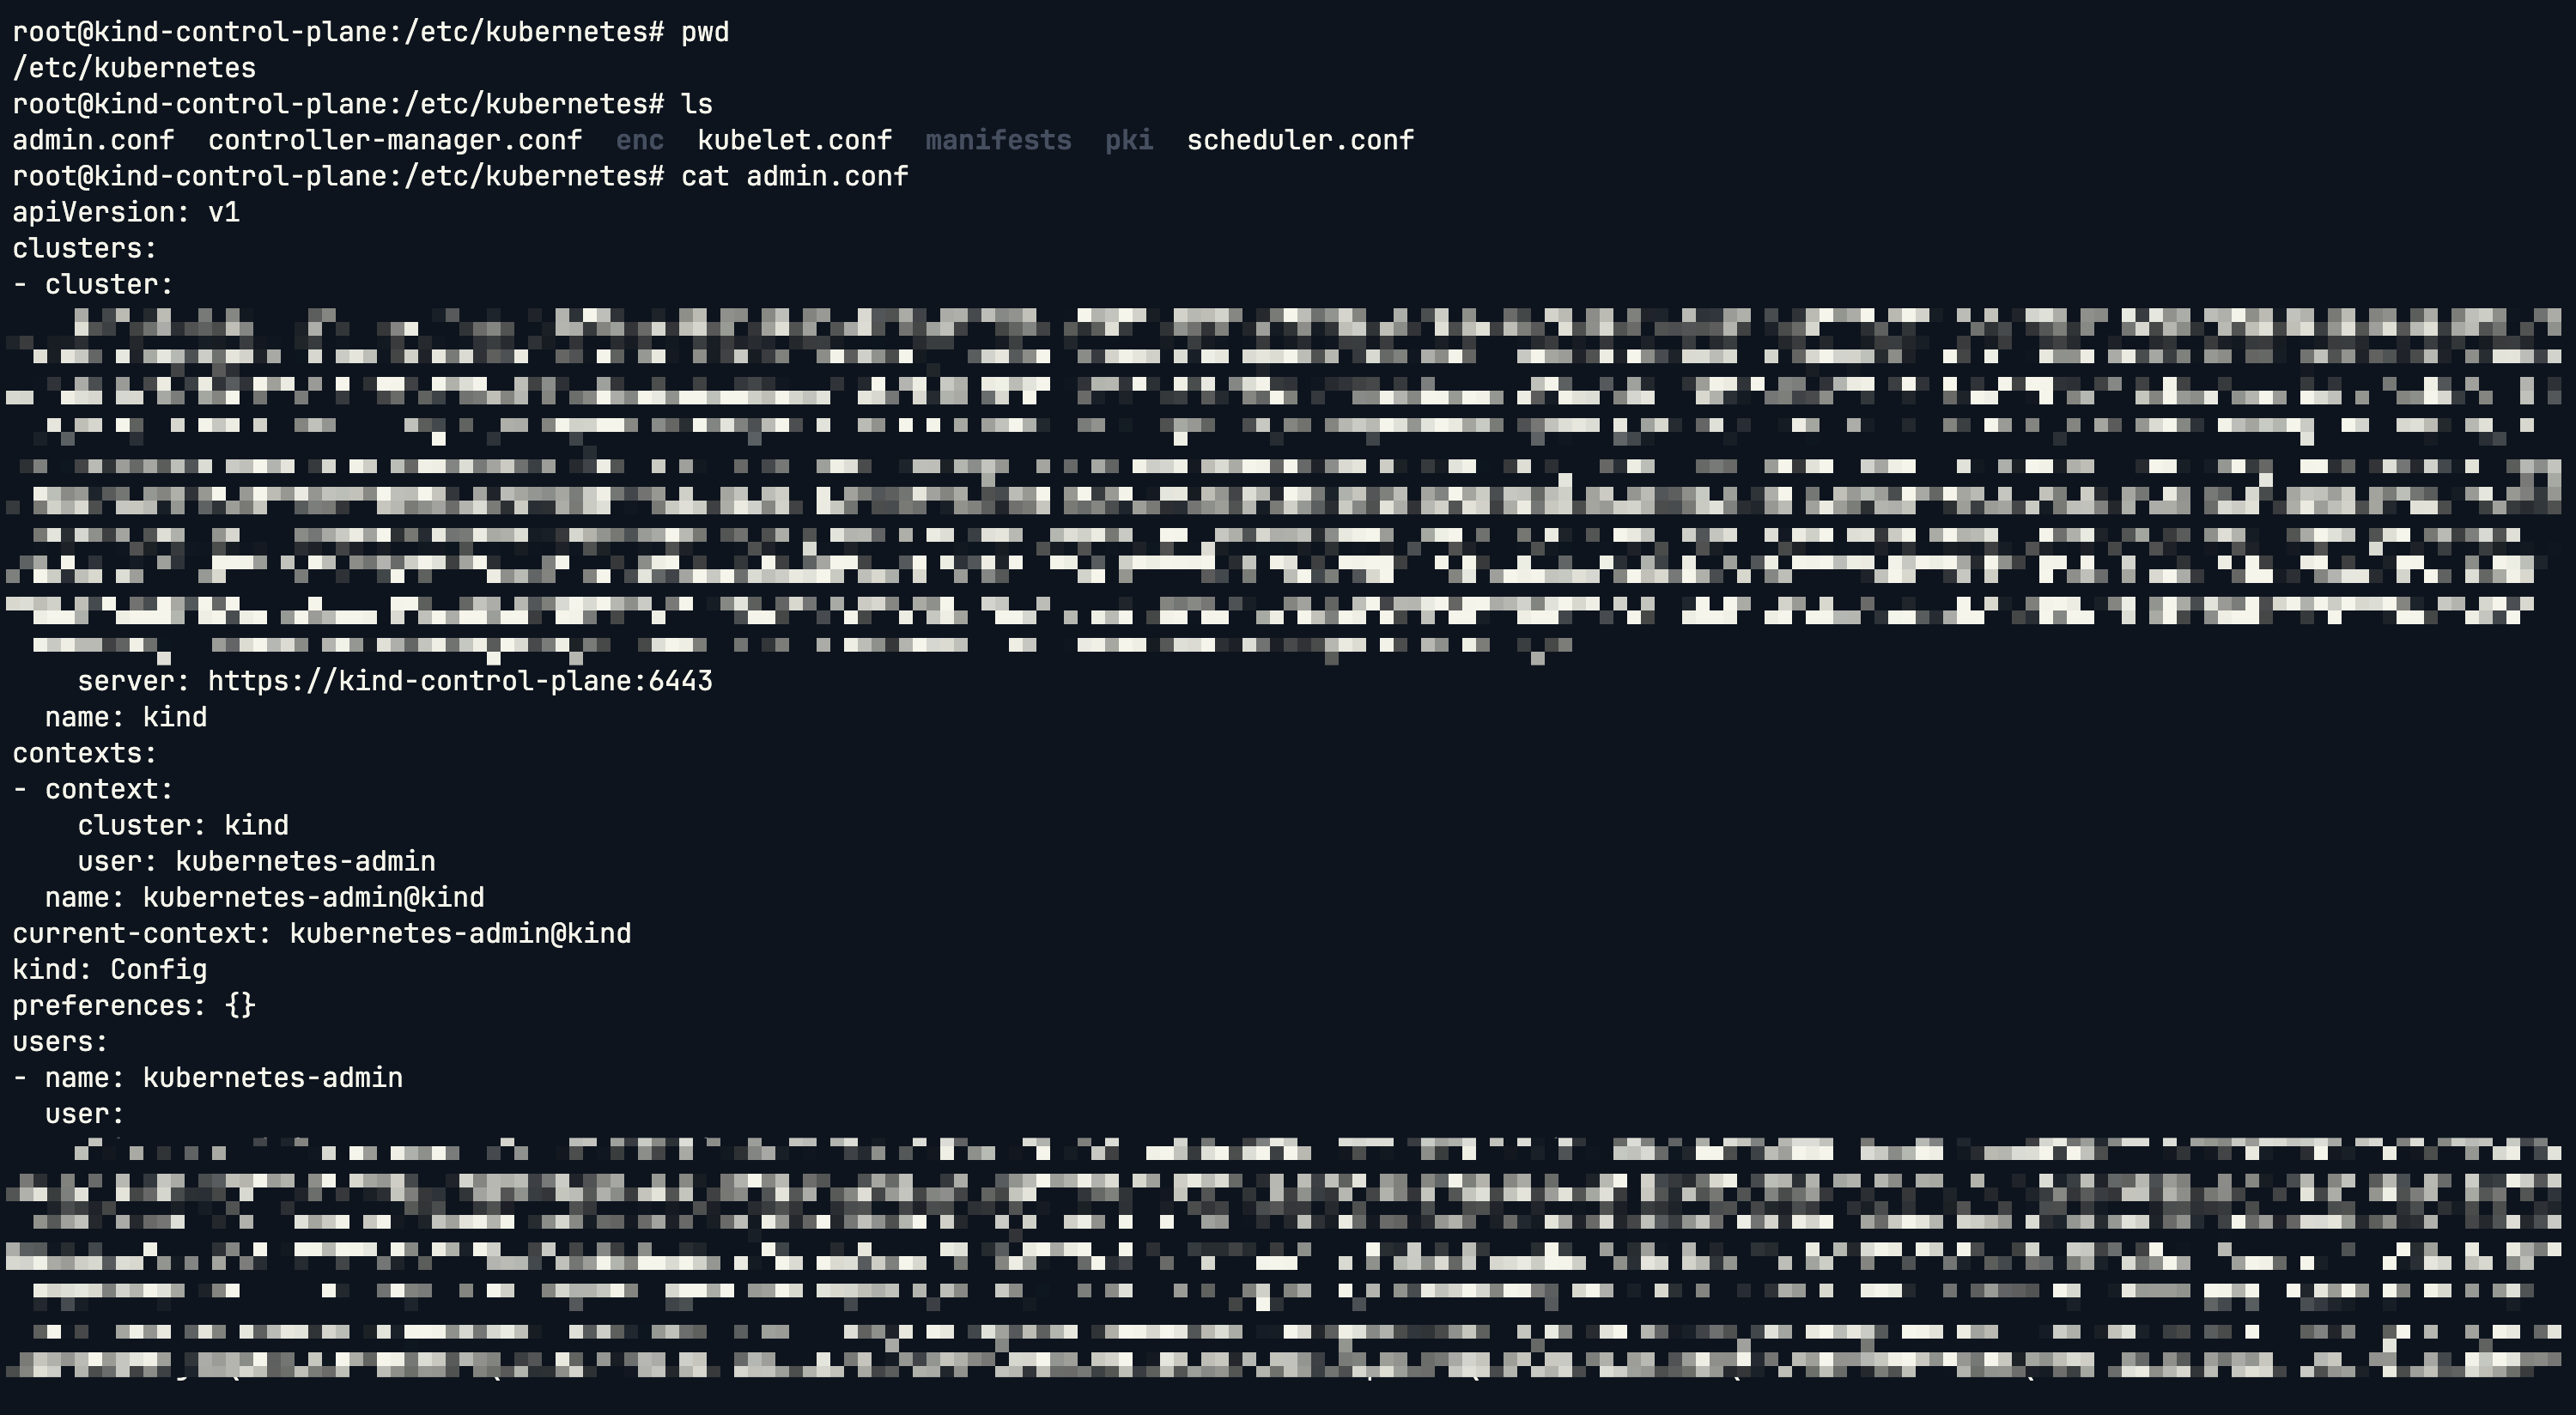
解碼檔案中的憑證可以看到內容確實是 base64 編碼的:
echo "your-certificate" | base64 -d
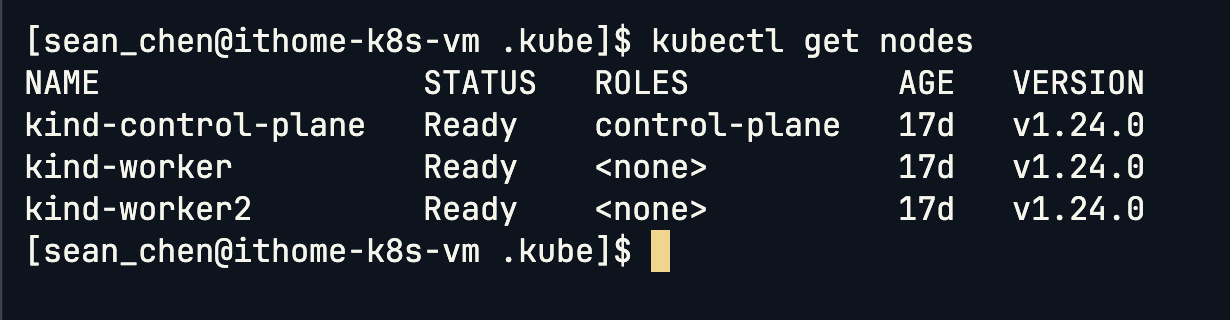
我們之前實戰操作都是使用 root 使用者進行操作,例如切換成 Local 使用者 sean_chen::
# 切換 User
su - sean_chen

# 使用 User sean_chen 查看 Node
kubectl get nodes

此時會因為缺少 ~/.kube/config 而無法操作。解法是複製一份設定檔給該使用者並修改擁有權限:
mkdir - /home/sean_chen/.kube ; docker cp kind-control-plane:/etc/kubernetes/admin.conf /home/sean_chen/.kube/config; chown -R sean_chen:sean_chen /home/sean_chen/.kube/config
接下來到對應資料夾看看檔案權限,確定 User 有權限可以使用:
ls -atlhr
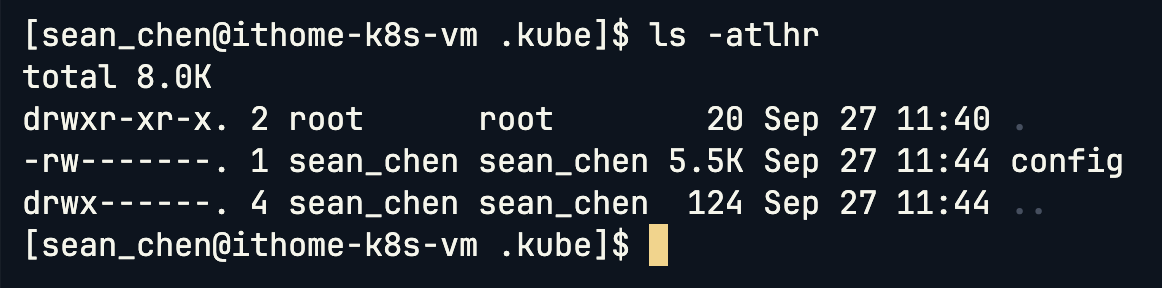
確認擁有者之後,再次查看 Node:
kubectl get nodes
就能看到 Cluster Nodes,證明不同使用者也能正確存取。
首先因為我是 Kind,我需要先把 ca.crt 從 Master Node 拿出來:
docker cp kind-control-plane:/etc/kubernetes/pki/ca.crt ./kind-config
再來我們連線的 Server 要變成 Master Node 的 Docker Container IP,因此要先查看:
docker inspect -f '{{range .NetworkSettings.Networks}}{{.IPAddress}}{{end}}' kind-control-plane
該拿的資訊都拿到之後,就建立一個 Cluster:
kubectl config set-cluster myk8s --server=https://172.18.0.3:6443 --certificate-authority=ca.crt --embed-certs --kubeconfig=newconfig

建立完成後,可以比較有無指定 --kubeconfig 的差別,也呼應了前面提到的載入順序。
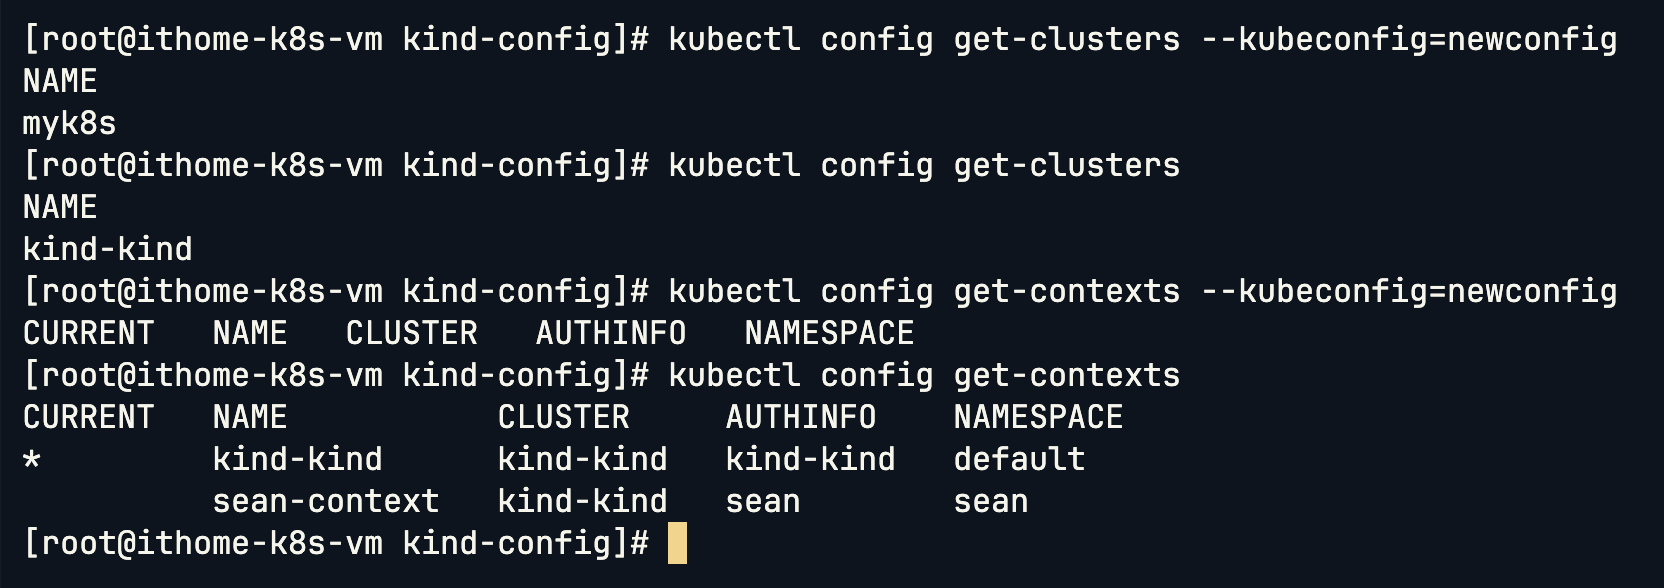
kubectl config delete-cluster myk8s --kubeconfig=newconfig
三種方式:
kubectl config set-credentials sean --client-certificate=/root/sean/sean.crt --client-key=/root/sean/sean.key --kubeconfig=newconfig
kubectl config set-credentials sa-sean --token=$TOKEN --kubeconfig=newconfig
kubectl config set-credentials http-sean --username=admin --password=uXFGweU9l35qcif --kubeconfig=newconfig
# 查詢第一個 Users:
kubectl config view -o jsonpath='{.users[].name}'

# 查詢所有 Users:
kubectl config view -o jsonpath='{.users[*].name}'

習慣
jq的也可以直接用jq取得想要的資訊。
kubectl unset users.sean
指定 Cluster、User、Namespace
# 可以不要指定 Kube Config 就會套用預設的 Config
kubectl config set-context sean-context --cluster=kind-kind --namespace=sean --user=sean --kubeconfig=newconfig
# 可以不要指定 Kube Config 就會套用預設的 Config
# 查詢所有 Contexts
kubectl config get-contexts --kubeconfig=newconfig
# 查詢當前 Contexts
kubectl config current-context --kubeconfig=newconfig
# 可以不要指定 Kube Config 就會套用預設的 Config
# 切換 Contexts
kubectl config use-context sean-context --kubeconfig=newconfig

# 重新命名 Contexts
kubectl config rename-context sean-context context-sean --kubeconfig=newconfig
# 可以不要指定 Kube Config 就會套用預設的 Config
# 刪除 Contexts
kubectl config delete-context sean-context --kubeconfig=newconfig
kubectl config提供了完整的 CRUD 操作,但實務上若已熟悉結構,直接編輯 YAML 會更快。
接下來用 Service Account 實戰一個完整流程。
我們先拿前面練習的 Cluster 來用:
kubectl config set-cluster myk8s --server=https://172.18.0.3:6443 --certificate-authority=ca.crt --embed-certs --kubeconfig=newconfig
建立一個 Namespace:
kubectl create ns sa-ithome
建立 Service Account:
kubectl -n sa-ithome create serviceaccount sa-ithome

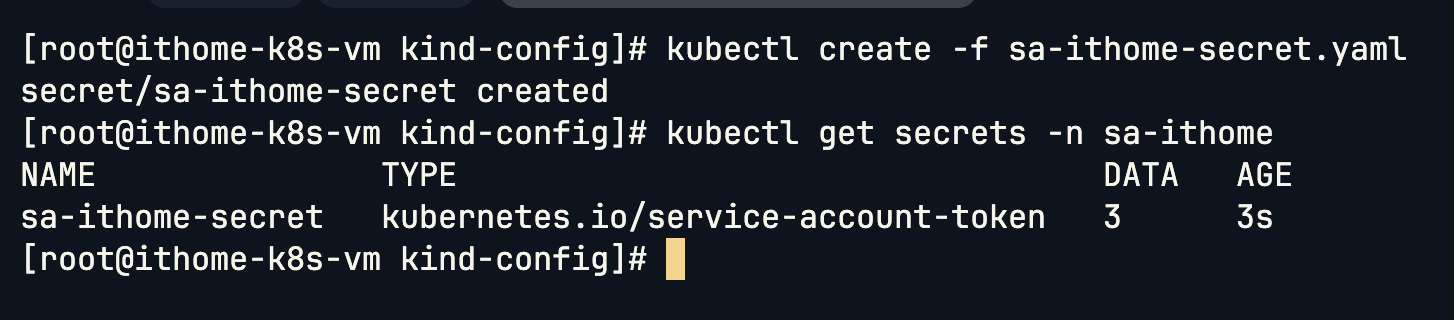
建立與該 SA 對應的 Secret:
apiVersion: v1
kind: Secret
type: kubernetes.io/service-account-token
metadata:
  name: sa-ithome-secret
  namespace: sa-ithome
  annotations:
    kubernetes.io/service-account.name: "sa-ithome"
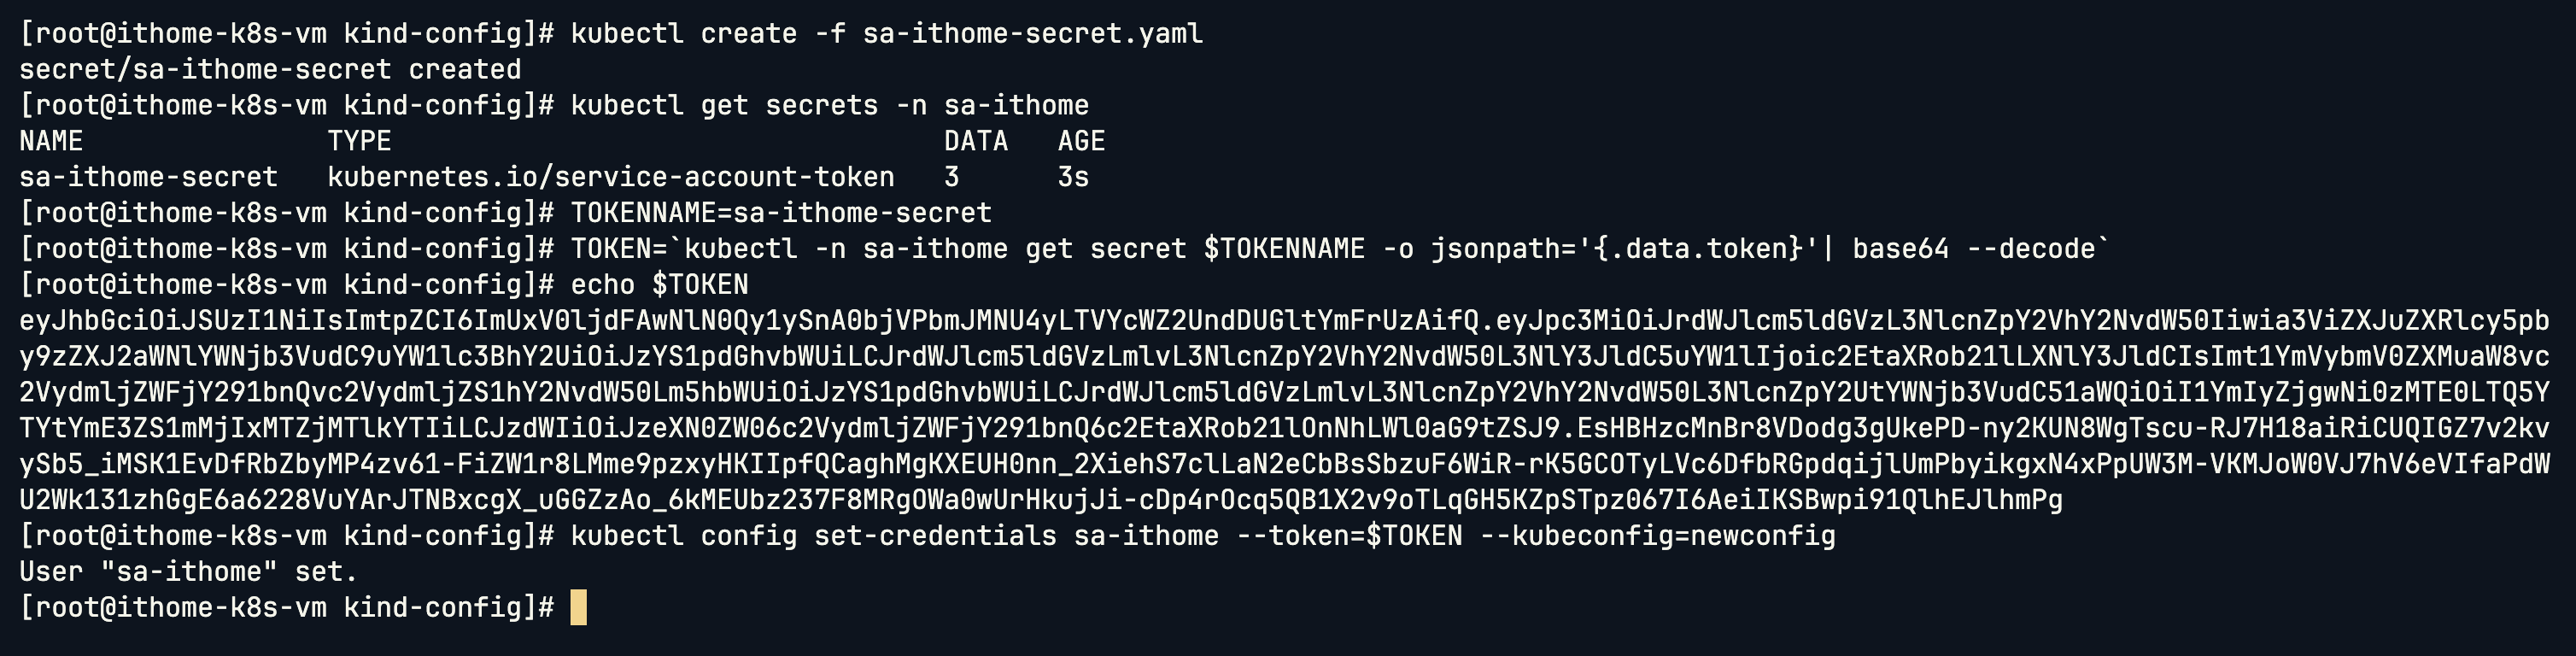
設定環境變數 TOKENNAME:
TOKENNAME=sa-ithome-secret
將 Secrets 內容解碼之後存放到 TOKEN 環境變數 (Secrets 儲存只會使用 base64 編碼)
TOKEN=`kubectl -n sa-ithome get secret $TOKENNAME -o jsonpath='{.data.token}'| base64 --decode`
把這個 Token 加入 Service Account,目的是要讓 kubectl 在執行時就能帶著這個 Token 去跟 API Server 做 Authentication 身分驗證,讓 API Server 知道「這是 sa-ithome 這個 ServiceAccount」。
kubectl config set-credentials sa-ithome --token=$TOKEN --kubeconfig=newconfig
查看我們剛剛建立的 SA Users:
kubectl config get-users --kubeconfig newconfig

Clusters 和 Users 都建立好了,現在建立 Contexts 將他們組合起來:
# 建立 Contexts
kubectl config set-context sa-ithome@myk8s --cluster=myk8s --user=sa-ithome --namespace=sa-ithome --kubeconfig=newconfig

# 查詢 Contexts
kubectl config get-contexts --kubeconfig=newconfig

但可以看到我們建立的 Service Account 還不是預設的 Contexts,因此我們將其指定為預設的 Contexts:
kubectl config use-context sa-ithome@myk8s --kubeconfig=newconfig
這樣就成功將預設 Context 設定過來了,看到 * 在 Current Context:

驗證權限:
kubectl auth can-i list pod --kubeconfig=newconfig

kubectl get pods --kubeconfig=newconfig
結果顯示無法操作,因為 SA 尚未綁定任何 Role。這呼應了昨天 RBAC 的重點:身份認證 (Authentication) 只證明「你是誰」,真正能不能做事,還是得靠 RBAC 授權 (Authorization)。

今天我們把重點放在 KubeConfig,理解了它的三大組成元素:Clusters、Users 與 Contexts,並透過實戰驗證它在 Authentication 中的角色。
需要特別注意的是,KubeConfig 本身 不會創建用戶或賦權,它只是存放身份與連線資訊的設定檔。當 API Server 收到請求,會先依據 KubeConfig 驗證憑證 (Authentication),確認你是誰;接著才會進入 RBAC (Authorization),判斷這個身份是否有足夠的權限執行操作。
透過實戰,我們學會了如何新增 Cluster、User、Context,並且利用 Service Account 的 Token 測試 Context 切換與權限驗證,實際感受到「身份」與「權限」是分開處理的。
而這個流程還沒結束。在 Authentication → Authorization 之後,還會再經過 Admission Controllers。它們負責在物件進入叢集前進行最後的檢查與處理,例如補上必要的欄位、套用預設策略,或是直接拒絕不符合規範的資源。換句話說,Admission Controllers 是 Kubernetes 確保環境一致性與安全性的最後一環。明天要來更深入探討 Admission Controllers 的角色,以及如何透過 Validating / Mutating Webhook 來實現自訂規則。
