讓通知「一眼就懂、三秒決策」:標題、重點、座位圖、CTA 一條龍 🚀
今天我們把「資料」變成「好讀的訊息」。重點有三:
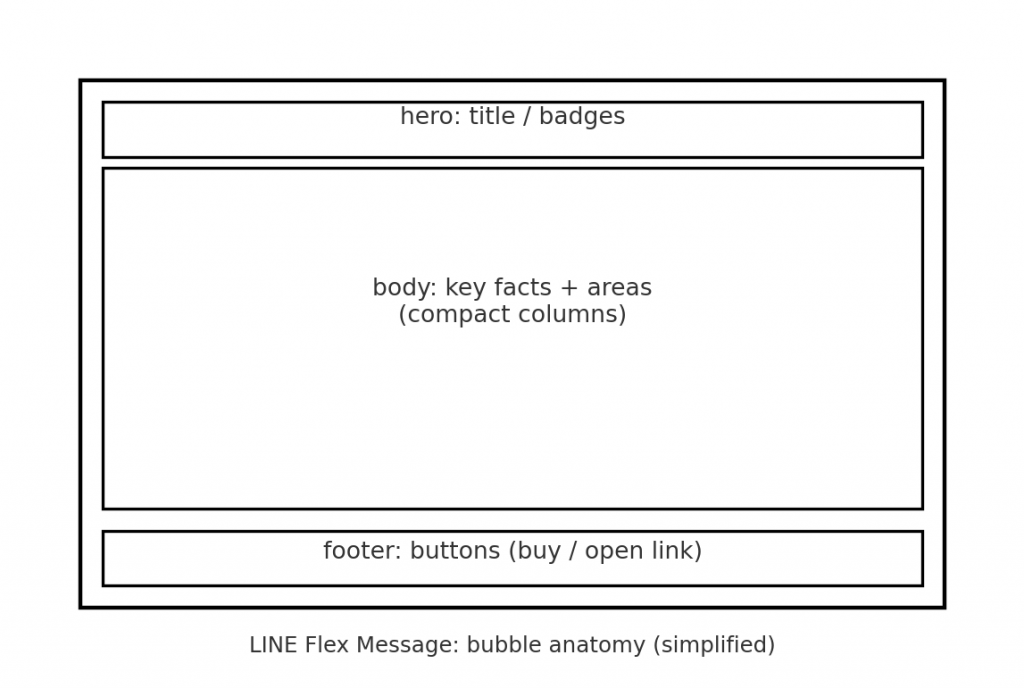
[Message layout blueprint]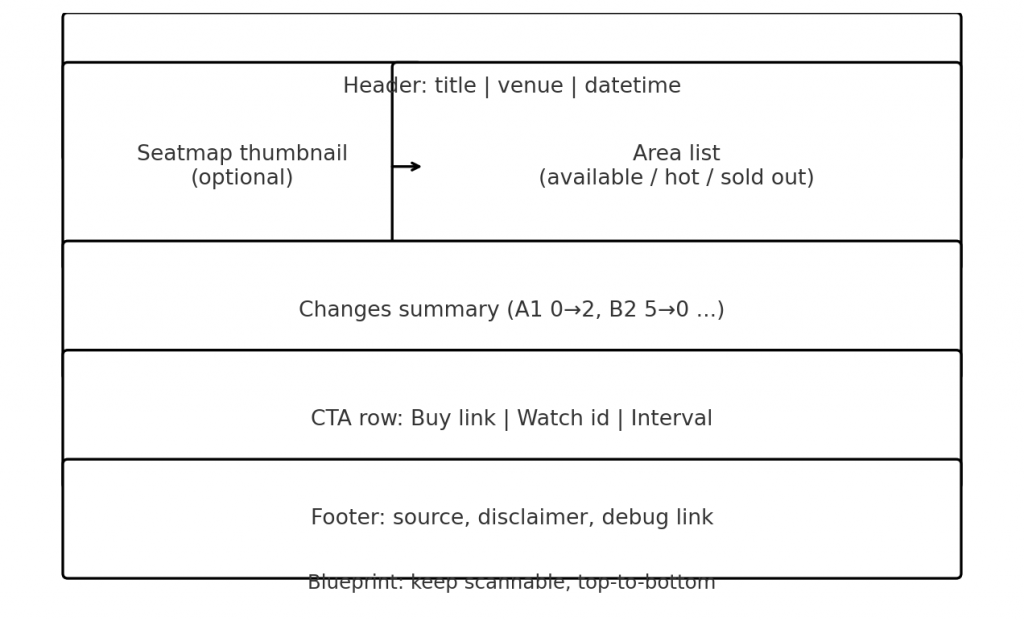
從上到下:標題(場地/時間)→ 座位圖縮圖 → 票區區塊 → 這次的變化摘要 → CTA(購票連結/任務代碼/間隔)
排版原則:
A1 0→2、B2 3→0)def bucketize(areas):
avail = [a for a in areas if a["status"].isdigit()]
hot = [a for a in areas if a["status"] in ("熱賣中", "Hot", "hot")]
sold = [a for a in areas if a["status"] in ("已售完", "SoldOut", "sold")]
return avail, hot, sold
def format_change_lines(change, limit_changed=5, limit_added=3, limit_removed=3):
lines = []
for c in change.get("changed", [])[:limit_changed]:
lines.append(f" - {c['to']['name']}: {c['from']['status']} → {c['to']['status']}")
for a in change.get("added", [])[:limit_added]:
lines.append(f" + 新增:{a['name']}({a['status']})")
for r in change.get("removed", [])[:limit_removed]:
lines.append(f" - 移除:{r['name']}")
if len(lines) == 0:
lines.append("(本次無顯著變化)")
return lines
def format_text_message(info, change=None, watch_id="W123456", interval=60, src_url="https://ibon..."):
ev = info["event"]
avail, hot, sold = bucketize(info["areas"])
out = [
f"🎫 {ev['title']}",
f"📍 {ev['venue']} 🗓 {ev['datetime']}",
""
]
if avail:
head = "✅ 可售:"
items = " ".join(f"{a['name']} {a['status']}" for a in avail[:8])
more = f" …(+{len(avail)-8})" if len(avail) > 8 else ""
out.append(head + items + more)
if hot:
head = "🟢 熱賣中:"
items = "、".join(a["name"] for a in hot[:10])
more = f" …(+{len(hot)-10})" if len(hot) > 10 else ""
out.append(head + items + more)
if sold:
head = "🔴 售完:"
items = "、".join(a["name"] for a in sold[:10])
more = f" …(+{len(sold)-10})" if len(sold) > 10 else ""
out.append(head + items + more)
if change is not None:
out += ["", "🔔 變化摘要:"]
out += format_change_lines(change)
out += [
"",
f"來源:ibon | 任務代碼:{watch_id} | 間隔:{interval} 秒",
f"→ 立即前往:{src_url}"
]
return "\n".join(out)
Flex 的好處是可以做成卡片排版:標題區、重點欄位、兩欄列表、底部按鈕。
下面提供最小可用的 Bubble JSON(直接丟 FlexSendMessage):
# pip install line-bot-sdk
from linebot.models import FlexSendMessage

def build_flex_bubble(info, src_url):
    ev = info["event"]
    # 只示範重點欄位;areas 可把可售/熱賣中/售完各轉成 columns 的 text
    bubble = {
      "type": "bubble",
      "hero": {
        "type": "box",
        "layout": "vertical",
        "contents": [
          {"type": "text", "text": ev["title"], "weight": "bold", "size": "lg"},
          {"type": "text", "text": f"{ev['venue']}  {ev['datetime']}", "size": "sm"}
        ]
      },
      "body": {
        "type": "box",
        "layout": "vertical",
        "spacing": "sm",
        "contents": [
          {"type": "text", "text": "可售 / 熱賣中 / 售完(精簡列表)", "size":"sm"},
        ]
      },
      "footer": {
        "type": "box",
        "layout": "horizontal",
        "contents": [
          {"type":"button", "action":{"type":"uri","label":"前往購票","uri":src_url}, "height":"sm"},
          {"type":"button", "action":{"type":"uri","label":"檢視活動","uri":src_url}, "height":"sm"}
        ]
      }
    }
    return FlexSendMessage(alt_text=ev["title"], contents=bubble)
小提醒:Flex 有尺寸限制(字數、層級深度、components 數量),長列表要截斷。
想只看「2800、A區」或「1樓的任何座位」?加一層條件過濾就能超貼心。
import re

def apply_preferences(areas, price_whitelist=None, zone_keywords=None, name_regex=None):
    """
    price_whitelist: 例 ["2800","3800"](在區名包含這些價格就保留)
    zone_keywords:   例 ["A區","B區","紅2C"]
    name_regex:      例 r"(1樓|A\d+|特區)"
    回傳被過濾後的 areas
    """
    def keep(a):
        nm = a["name"]
        ok = True
        if price_whitelist:
            ok &= any(p in nm for p in price_whitelist)
        if zone_keywords:
            ok &= any(k in nm for k in zone_keywords)
        if name_regex:
            ok &= re.search(name_regex, nm) is not None
        return ok
    return [a for a in areas if keep(a)]
把它串起來就變成:
def render_with_prefs(info, change=None, prefs=None):
    prefs = prefs or {}
    filtered = apply_preferences(
        info["areas"],
        price_whitelist=prefs.get("prices"),
        zone_keywords=prefs.get("zones"),
        name_regex=prefs.get("regex")
    )
    info2 = {"event": info["event"], "areas": filtered}
    return format_text_message(info2, change=change, watch_id=prefs.get("watch_id","W123456"),
                               interval=prefs.get("interval",60),
                               src_url=prefs.get("src_url","https://ibon..."))
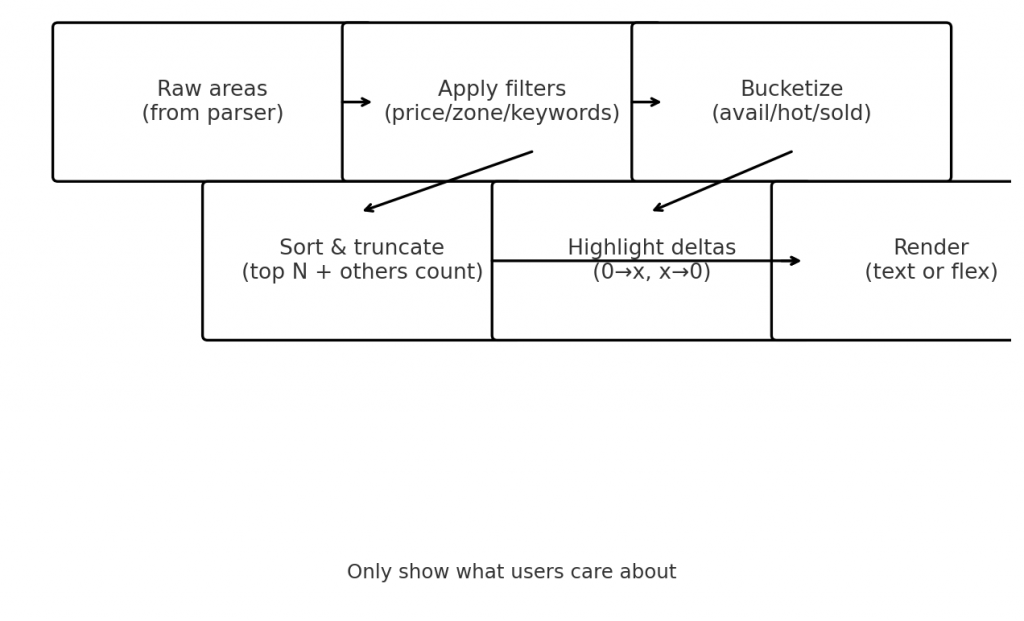
極速派(只要重點):文字版 + 變化摘要,最少字秒懂
圖像派(怕記錯區名):Flex 卡片 + 座位圖縮圖,視覺優先
目標派(只看 2800/1樓):加入偏好過濾,顯示在乎的就好
仍建議合理頻率(例如 60 秒)
此工具用途為提醒與資訊整理;購票仍需你親自完成
收尾大補帖:Roadmap & 部署清單(含環境變數、排程建議、最佳化方向),一次打包給你! 

