在前一篇文章中,我們學習了 Effect 重試機制的概念與實作。然而,重試機制並非萬能,當所有重試都失敗時,我們需要一個降級策略來確保系統的可用性。這篇文章將深入探討 Effect 的降級策略,讓您的應用在面對持續性錯誤時仍能優雅地提供基本功能。
降級策略(Fallback Strategy)是系統設計中的最後防線,當主要功能完全失敗時,提供一個可接受的替代方案。這不是失敗,而是一種優雅的降級。
在真實的生產環境中,我們會遇到各種無法預期的情況:
沒有降級策略的系統在遇到這些問題時會:
有了降級策略的系統則能:
retryOrElseEffect 提供了 retryOrElse 方法來實現降級策略,它結合了重試機制和降級策略:
const retryWithFallback = Effect.retryOrElse(
  originalEffect,    // 要重試的 Effect
  retrySchedule,     // 重試策略
  fallbackEffect     // 降級策略
)
| 降級類型 | 核心概念 | 實際應用 | 用戶體驗 |
|---|---|---|---|
| 功能降級 | 提供基本功能替代完整功能 | 用戶資料 → 預設頭像 | 避免功能完全失效 |
| 資料降級 | 使用快取或預設資料 | 即時資料 → 快取資料 | 保持內容可見性 |
| 服務降級 | 切換到備用服務 | 支付服務 → 備用支付 | 確保業務流程不中斷 |
讓我們通過一個完整的實戰範例來學習降級策略的實作。這個範例模擬了一個真實的用戶資料獲取場景,展示如何在 API 失敗時優雅地降級到基本功能。
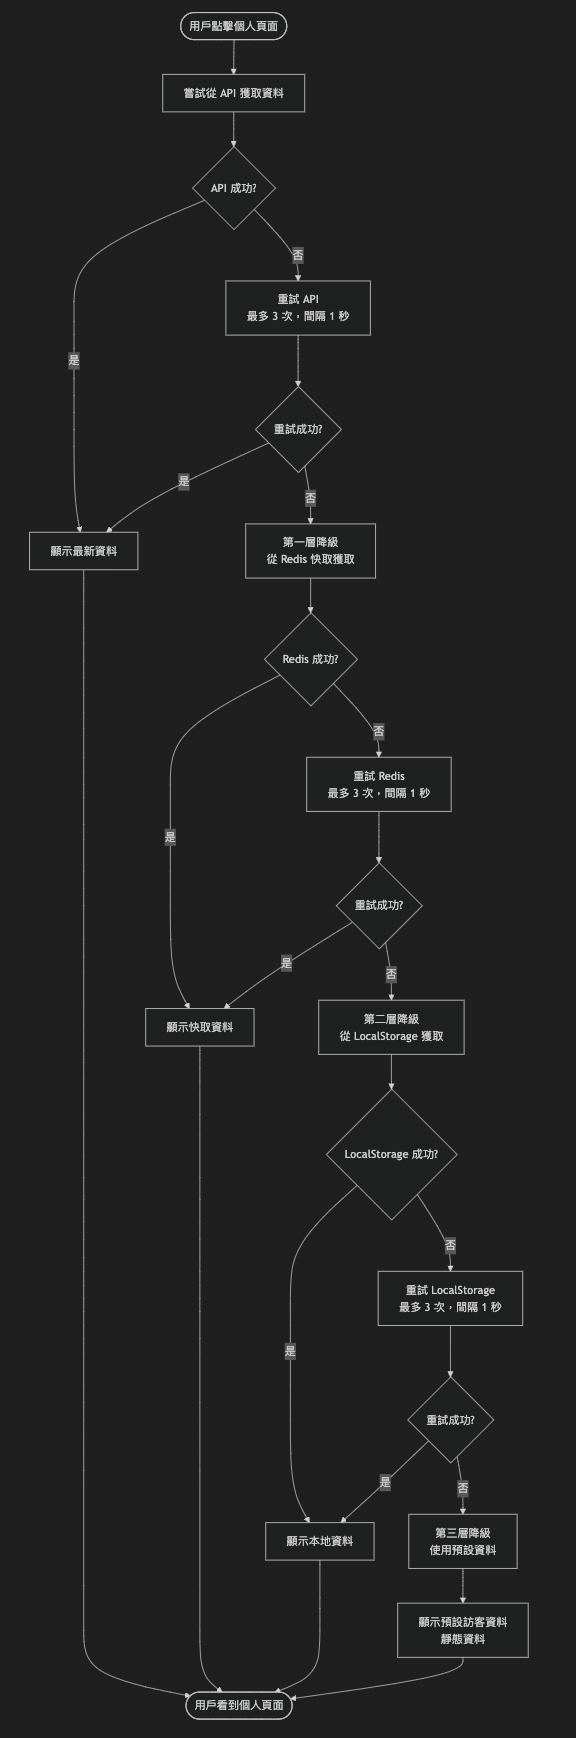
假設我們正在開發一個電商網站的用戶個人頁面,需要獲取用戶的詳細資料來顯示畫面。在正常情況下,可以從 API 獲取完整的用戶資料,但當 API 回應失敗時,我們需要提供一個降級方案,以維持用戶基本體驗。目標是無論如何都要讓用戶看到個人頁面,不能出現白屏或資料空白的情況。
降級策略設計如下:

這部分沒興趣可以直接跳過沒關係,我們的重點是理解 Effect 中的降級策略如何實踐
為了測試降級策略,我們需要創建可以精準控制第幾次才會得到成功的 API 模擬函數,分別是 getFromAPI、getFromRedis、getFromLocalStorage,程式碼如下:
import { Effect, Schedule } from "effect"

// 通用模擬函數配置類型
type MockConfig = {
  name: string
  icon: string
  failureThreshold: number
  delay: number
  successMessage: string
  failureMessage: string
  dataGenerator: (userId: string) => any
}

// 通用模擬函數工廠
const createMockFunction = (config: MockConfig) => {
  let attemptCount = 0

  return (userId: string) => {
    return Effect.tryPromise({
      try: () => {
        attemptCount++
        console.log(`${config.icon} 嘗試從 ${config.name} 獲取用戶 ${userId} 的資料 (嘗試 ${attemptCount})`)

        return new Promise((resolve, reject) => {
          setTimeout(() => {
            if (attemptCount <= config.failureThreshold) {
              console.log(`❌ ${config.name} 第 ${attemptCount} 次嘗試失敗`)
              reject(new Error(`${config.failureMessage} - 嘗試 ${attemptCount}`))
            } else {
              console.log(`✅ ${config.successMessage}`)
              resolve(config.dataGenerator(userId))
            }
          }, config.delay)
        })
      },
      catch: (error) => new Error(`${config.name} 錯誤: ${error}`)
    })
  }
}

// 模擬函數配置
const mockConfigs = {
  api: {
    name: "API",
    icon: "🔄",
    failureThreshold: 2,
    delay: 1000,
    successMessage: "API 調用成功",
    failureMessage: "API 調用失敗",
    dataGenerator: (userId: string) => ({
      id: userId,
      name: `User ${userId}`,
      email: `user${userId}@example.com`,
      avatar: `https://i.pravatar.cc/150?img=${userId}`,
      phone: `+1-555-${userId.padStart(4, "0")}`,
      website: `https://user${userId}.example.com`,
      company: `Company ${userId}`,
      source: "API"
    })
  },
  redis: {
    name: "Redis",
    icon: "🔍",
    failureThreshold: 2,
    delay: 500,
    successMessage: "Redis 連接成功,返回快取資料",
    failureMessage: "Redis 連接失敗",
    dataGenerator: (userId: string) => ({
      id: userId,
      name: `Cached User ${userId}`,
      email: `cached${userId}@example.com`,
      avatar: `https://i.pravatar.cc/150?img=${userId}`,
      phone: `+1-555-${userId.padStart(4, "0")}`,
      website: `https://cached${userId}.example.com`,
      company: `Cached Company ${userId}`,
      source: "Redis Cache"
    })
  },
  localStorage: {
    name: "LocalStorage",
    icon: "💾",
    failureThreshold: 1,
    delay: 300,
    successMessage: "LocalStorage 讀取成功,返回本地資料",
    failureMessage: "LocalStorage 讀取失敗",
    dataGenerator: (userId: string) => ({
      id: userId,
      name: `Local User ${userId}`,
      email: `local${userId}@example.com`,
      avatar: `https://i.pravatar.cc/150?img=${userId}`,
      phone: `+1-555-${userId.padStart(4, "0")}`,
      website: `https://local${userId}.example.com`,
      company: `Local Company ${userId}`,
      source: "LocalStorage"
    })
  }
}

// 創建模擬函數實例
const getFromAPI = createMockFunction(mockConfigs.api)
const getFromRedis = createMockFunction(mockConfigs.redis)
const getFromLocalStorage = createMockFunction(mockConfigs.localStorage)
這個模擬器核心功能如下:
createMockFunction 創建可配置的模擬函數failureThreshold 設定失敗次數delay 參數模擬網路延遲情境// 重試策略配置
// 最多重試 3 次,每次間隔 1 秒 => 也就是總共最多會嘗試 1(初次)+ 3(重試)= 4 次。
const retryPolicy = Schedule.compose(
Schedule.recurs(3),
Schedule.fixed("1 seconds")
)
export const fetchUserFromAPI = (userId: string) =>
  Effect.retryOrElse(
    getFromAPI(userId),
    retryPolicy,
    () => getCachedUserData(userId) // 降級到快取
  )
const getCachedUserData = (userId: string) =>
  Effect.retryOrElse(
    getFromRedis(userId),
    retryPolicy,
    () => getLocalStorageData(userId) // 降級到本地儲存
  )
const getLocalStorageData = (userId: string) =>
  Effect.retryOrElse(
    getFromLocalStorage(userId),
    retryPolicy,
    () => getDefaultUserData(userId) // 降級到預設資料
  )
const getDefaultUserData = (userId: string) =>
  Effect.succeed({
    id: userId,
    name: "訪客用戶",
    avatar: "/assets/default-avatar.png"
    // ... 其他預設資料
  })
從上面程式碼可以發現,我們透過 Effect.retryOrElse 將各層的 API 調用組合起來,讓每層資料獲取失敗後,自動切換到下一層的降級策略。
大家可以跑跑看,是真的可以跑起來的,我覺得滿有成就感的。雖然大部分程式都是 AI 寫的🤣。
// 創建測試場景的降級函數
const createTestScenario = (apiConfig: MockConfig, redisConfig: MockConfig, localStorageConfig: MockConfig) => {
  const testApiCall = createMockFunction(apiConfig)
  const testGetFromRedis = createMockFunction(redisConfig)
  const testGetFromLocalStorage = createMockFunction(localStorageConfig)

  const testFetchUserFromAPI = (userId: string) =>
    Effect.retryOrElse(
      Effect.tryPromise({
        try: () => testApiCall(userId).pipe(Effect.runPromise),
        catch: (error) => new Error(`Failed to fetch user profile: ${error}`)
      }),
      retryPolicy,
      () => testGetCachedUserData(userId)
    )

  const testGetCachedUserData = (userId: string) =>
    Effect.retryOrElse(
      testGetFromRedis(userId),
      retryPolicy,
      () => testGetLocalStorageData(userId)
    )

  const testGetLocalStorageData = (userId: string) =>
    Effect.retryOrElse(
      testGetFromLocalStorage(userId),
      retryPolicy,
      () => getDefaultUserData(userId)
    )

  return testFetchUserFromAPI
}

// 測試程序
const program = Effect.gen(function*() {
  console.log("🚀 開始測試多層降級策略...")
  console.log("📝 降級策略:API → Redis → LocalStorage → 預設資料")
  console.log("⏱️  每層都有重試機制,最多重試 3 次")
  console.log("🛡️  完整降級流程測試")
  console.log("=".repeat(60))

  // 測試場景 1:API 成功(第 3 次重試成功)
  console.log("📋 測試場景 1:API 重試成功")
  const scenario1 = createTestScenario(
    mockConfigs.api, // API 正常
    { ...mockConfigs.redis, failureThreshold: 10 }, // Redis 永遠失敗
    { ...mockConfigs.localStorage, failureThreshold: 10 } // LocalStorage 永遠失敗
  )
  const userProfile1 = yield* scenario1("1")
  console.log("✅ 場景 1 結果:", userProfile1)
  console.log("=".repeat(40))

  // 測試場景 2:API 失敗,Redis 成功
  console.log("📋 測試場景 2:API 失敗,Redis 重試成功")
  const scenario2 = createTestScenario(
    { ...mockConfigs.api, failureThreshold: 10 }, // API 永遠失敗
    mockConfigs.redis, // Redis 正常
    { ...mockConfigs.localStorage, failureThreshold: 10 } // LocalStorage 永遠失敗
  )
  const userProfile2 = yield* scenario2("2")
  console.log("✅ 場景 2 結果:", userProfile2)
  console.log("=".repeat(40))

  // 測試場景 3:API 和 Redis 都失敗,LocalStorage 成功
  console.log("📋 測試場景 3:API 和 Redis 都失敗,LocalStorage 重試成功")
  const scenario3 = createTestScenario(
    { ...mockConfigs.api, failureThreshold: 10 }, // API 永遠失敗
    { ...mockConfigs.redis, failureThreshold: 10 }, // Redis 永遠失敗
    mockConfigs.localStorage // LocalStorage 正常
  )
  const userProfile3 = yield* scenario3("3")
  console.log("✅ 場景 3 結果:", userProfile3)
  console.log("=".repeat(40))

  // 測試場景 4:所有層級都失敗,降級到預設資料
  console.log("📋 測試場景 4:所有層級都失敗,降級到預設資料")
  const scenario4 = createTestScenario(
    { ...mockConfigs.api, failureThreshold: 10 }, // API 永遠失敗
    { ...mockConfigs.redis, failureThreshold: 10 }, // Redis 永遠失敗
    { ...mockConfigs.localStorage, failureThreshold: 10 } // LocalStorage 永遠失敗
  )
  const userProfile4 = yield* scenario4("4")
  console.log("✅ 場景 4 結果:", userProfile4)
  console.log("=".repeat(40))

  return {
    scenario1: userProfile1,
    scenario2: userProfile2,
    scenario3: userProfile3,
    scenario4: userProfile4
  }
})

// 執行測試
Effect.runPromise(program).then((res) => {
  console.log("🔍 最終結果:", res)
})
降級策略是 Effect 錯誤管理中的重要組成部分,它確保系統在面對持續性錯誤時仍能提供基本功能。通過 retryOrElse 方法,我們可以:
降級策略讓我們的應用在面對各種不可預期的情況時,仍保持服務的穩定性和可用性。

