在之前的實作中,我們在 Host 端直接用 memcpy 將 boot.bin 放入 Guest 的 0x7C00 並跳過了 BIOS 與硬碟存取的整個流程。
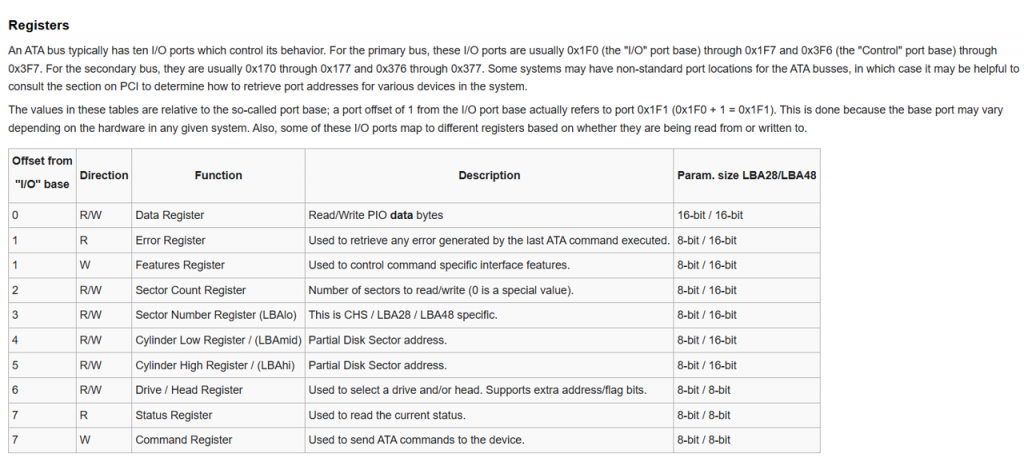
因此,今天我們要實作一個簡易硬碟模型,讓 BIOS 的啟動流程回到真實硬體的路徑,讓 BIOS 使用內建的 ATA 驅動,透過 ATA 的 I/O port (如: 0x1F0–0x1F7, 0x3F6)讀取硬碟的 LBA0,並將 512 bytes 載入到 0x7C00,完成 boot.bin 的加載。此外我們會在 Host 透過攔截 I/O (KVM_EXIT_IO) 來模擬 ATA PIO 行為。
在 PC/AT 架構下,BIOS 的磁碟存取邏輯其實非常直接。
在 KVM 環境下,任何來自 Guest 的 I/O 存取若沒有被內建周邊處理如之前用的 KVM_CREATE_IRQCHIP,就會觸發 VM-exit,並以 KVM_EXIT_IO 回到 Host,這正好給我們很好的切入點,無須在 BIOS 中下任何 hook 就可以很自然的攔截 I/O 事件,舉例來說:
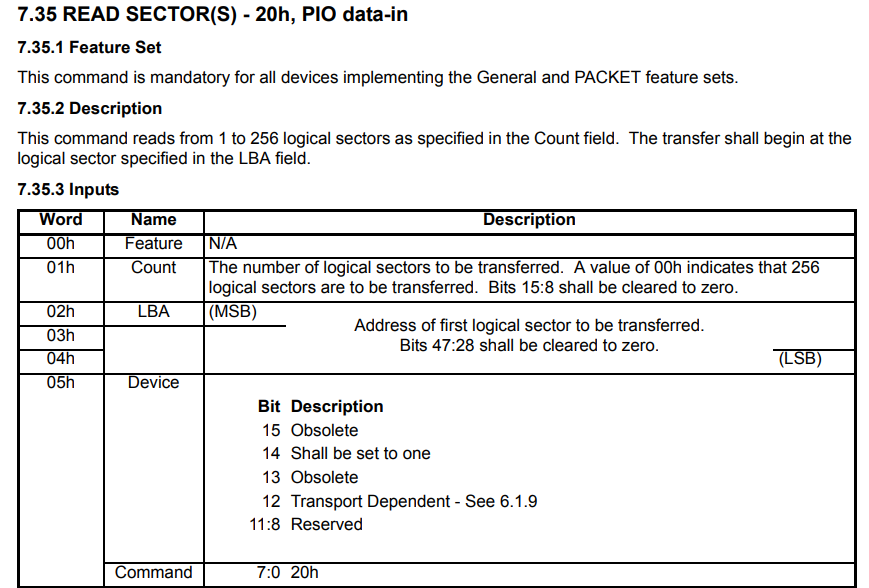
當 Guest 執行 out 0x1F7, 0x20 (READ SECTOR 命令),KVM 會幫我們攔截,在 Host 我們只需要透過
lseek 把 offset 指到 disk.img 的對應扇區即可,接著等待 Guest 執行 insw 把這些資料取回。
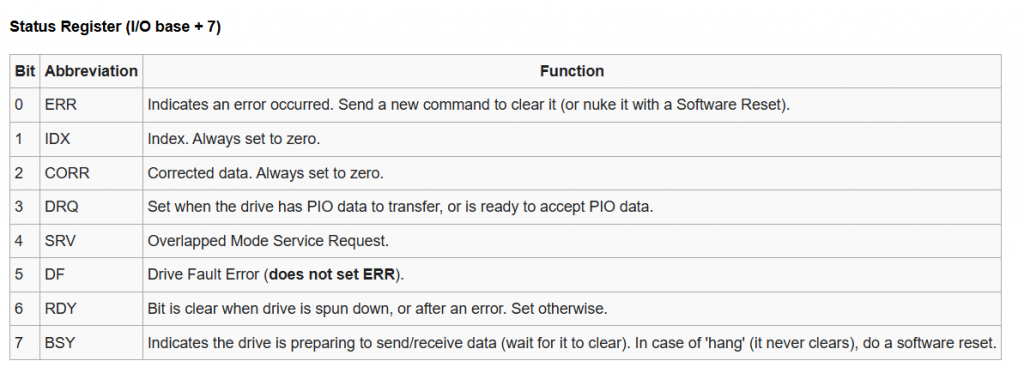
為了讓 BIOS 可順利讀到 MBR 並跳轉到 0x7C00,我們需要根據 ATA 協議實作一些項目:
static void ata_pio_update_identify(struct ata_pio_device *dev)
{
    uint8_t *buf = dev->identify_data;
    memset(buf, 0, ATA_PIO_SECTOR_SIZE);

    buf[0] = 0x40; /* Word 0: legacy fixed-disk signature (0x0040). */

    uint16_t heads = 16;
    uint16_t sectors = 63;
    uint16_t cylinders = 0;
    if (dev->total_sectors > 0) {
        uint64_t total = dev->total_sectors;
        uint64_t sectors_per_cylinder = (uint64_t)heads * sectors;
        if (sectors_per_cylinder)
            cylinders = (uint16_t)(total / sectors_per_cylinder);
    }

    buf[1 * 2] = cylinders;
    buf[1 * 2 + 1] = cylinders >> 8;
    buf[3 * 2] = (uint8_t)heads;
    buf[3 * 2 + 1] = (uint8_t)(heads >> 8);
    buf[6 * 2] = (uint8_t)sectors;
    buf[6 * 2 + 1] = (uint8_t)(sectors >> 8);

    ata_identify_fill_string(buf + 10 * 2, 10, "ATA01"); // serial number
    ata_identify_fill_string(buf + 23 * 2, 4, "1.0"); // firmware number
    ata_identify_fill_string(buf + 27 * 2, 10, "ATA  Disk"); // model number

    uint32_t caps = 1u << 9; /* LBA supported */
    buf[49 * 2] = (uint8_t)caps;
    buf[49 * 2 + 1] = (uint8_t)(caps >> 8);

    uint64_t total_lba28 = dev->total_sectors;
    if (total_lba28 > 0x0FFFFFFFu)
        total_lba28 = 0x0FFFFFFFu; // lba 28
    uint16_t word60 = (uint16_t)total_lba28;
    uint16_t word61 = (uint16_t)((total_lba28 >> 16) & 0xFFFFu);
    buf[60 * 2] = (uint8_t)word60;
    buf[60 * 2 + 1] = (uint8_t)(word60 >> 8);
    buf[61 * 2] = (uint8_t)word61;
    buf[61 * 2 + 1] = (uint8_t)(word61 >> 8);
}
static enum exit_handle_status ata_prepare_pio(struct ata_pio_device *dev,
uint32_t count,
uint32_t lba)
{
if (dev->disk_fd < 0)
return EXIT_HANDLE_ERROR;
if (count == 0)
count = 256u; // 手冊上寫如果填入 count = 0 則相當於讀取 256 個扇區
if (count > ATA_PIO_MAX_SECTORS)
count = ATA_PIO_MAX_SECTORS;
uint64_t total_bytes = (uint64_t)count * dev->sector_size;
if (total_bytes > sizeof(dev->data_buffer))
return EXIT_HANDLE_ERROR;
uint64_t byte_offset = (uint64_t)lba * dev->sector_size;
off_t offset = (off_t)byte_offset;
dev->status = ATA_STATUS_BSY;
dev->error = 0;
ssize_t n;
do {
n = pread(dev->disk_fd, dev->data_buffer, total_bytes, offset);
} while (n < 0 && errno == EINTR);
if (n < 0) {
dev->status = ATA_STATUS_DRDY | ATA_STATUS_ERR;
dev->error = 0x04; /* abort */
return EXIT_HANDLE_ERROR;
}
size_t read_bytes = (size_t)n;
if ((uint64_t)read_bytes < total_bytes)
memset(dev->data_buffer + read_bytes, 0,
(size_t)(total_bytes - (uint64_t)read_bytes));
dev->data_length = (uint32_t)total_bytes;
dev->data_offset = 0;
dev->status = ATA_STATUS_DRDY | ATA_STATUS_DRQ;
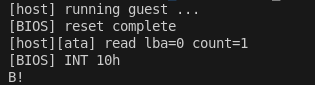
printf("[host][ata] read lba=%" PRIu32 " count=%" PRIu32 "\n", lba, count);
return EXIT_HANDLE_CONTINUE;