昨天,我們為這個系列定下了最終專案的目標——打造一個 Gemini AI 聊天室。今天,我們就正式動工!
萬丈高樓平地起,任何一個複雜的 App 都需要一個清晰的起點。我們將從建立專案的「大門」開始:一個簡潔的主選單頁面。今天,你將學會如何巧妙地運用 UITableView 來作為導覽選單,並實作 iOS App 最核心的功能之一:畫面跳轉。
MainViewController
TableView 打造選單:學習如何利用 UITableView 實現一個簡單、可點擊的選單介面Cell 外觀:掌握如何設定 Cell 的預設文字 (textLabel)、系統圖示 (imageView) 與指示箭頭 (accessoryType)UINavigationController 的 pushViewController 方法,從主選單跳轉到聊天頁面UIViewController,命名為 MainViewController。MainViewController.xib上拖曳一個 UITableView,並建立 IBOutlet:@IBOutlet weak var tbvMenu: UITableView!
這個
TableView會是主頁中的選單,點擊Cell後跳轉至主要聊天頁面。
viewDidLoad 中進行 TableView 基本設定:override func viewDidLoad() {
super.viewDidLoad()
// 註冊系統內建的 UITableViewCell,並給它一個 reuseIdentifier
tbvMenu.register(UITableViewCell.self, forCellReuseIdentifier: "menuCell")
// 設定資料來源與代理
tbvMenu.dataSource = self
tbvMenu.delegate = self
// UI 設定
tbvMenu.layer.cornerRadius = 8.0 // TableView 圓角
tbvMenu.isScrollEnabled = false // 禁止滑動
tbvMenu.separatorStyle = .none // 隱藏分隔線
}
dataSource 與 delegate:TableView 必須設定資料來源與代理,才能顯示內容並處理事件。資料來源負責提供 TableView 要顯示的行數和每一行的內容:
extension MainViewController: UITableViewDataSource {

    // 設定 TableView 的行數
    func tableView(_ tableView: UITableView, numberOfRowsInSection section: Int) -> Int {
        return 1 // 目前只有一個選項
    }

    // 設計每一個 cell 的外觀
    func tableView(_ tableView: UITableView, cellForRowAt indexPath: IndexPath) -> UITableViewCell {

        let cell = tableView.dequeueReusableCell(withIdentifier: "menuCell", for: indexPath)

        // 設定文字
        cell.textLabel?.text = "Chat"

        // 設定系統圖示與顏色
        cell.imageView?.image = UIImage(systemName: "ellipsis.message.fill")
        cell.imageView?.tintColor = .systemBlue

        // 設定右側箭頭
        cell.accessoryType = .disclosureIndicator

        return cell
    }
}
dequeueReusableCell:重複使用 cell,提高效能。accessoryType = .disclosureIndicator:右側灰色箭頭,提示使用者可以點擊進入下一頁。在實作之前,請務必先新增 ChatViewCpntroller 新頁面。
接著設計 Delegate 程式,它處理使用者與 TableView 的互動,例如點擊事件:
extension MainViewController: UITableViewDelegate {

    func tableView(_ tableView: UITableView, didSelectRowAt indexPath: IndexPath) {

        // 取消選取效果
        tableView.deselectRow(at: indexPath, animated: true)

        // 跳轉到 ChatViewController
        let chatVC = ChatViewController()
        chatVC.navigationItem.hidesBackButton = true
        self.navigationController?.pushViewController(chatVC, animated: true)
    }
}
deselectRow(at:animated:):避免 cell 點擊後一直保持選取狀態。pushViewController:使用 NavigationController 進行頁面跳轉。主選單頁面將顯示一個 cell,文字為「Chat」,右側帶灰色箭頭。點擊後會跳轉到 ChatViewController。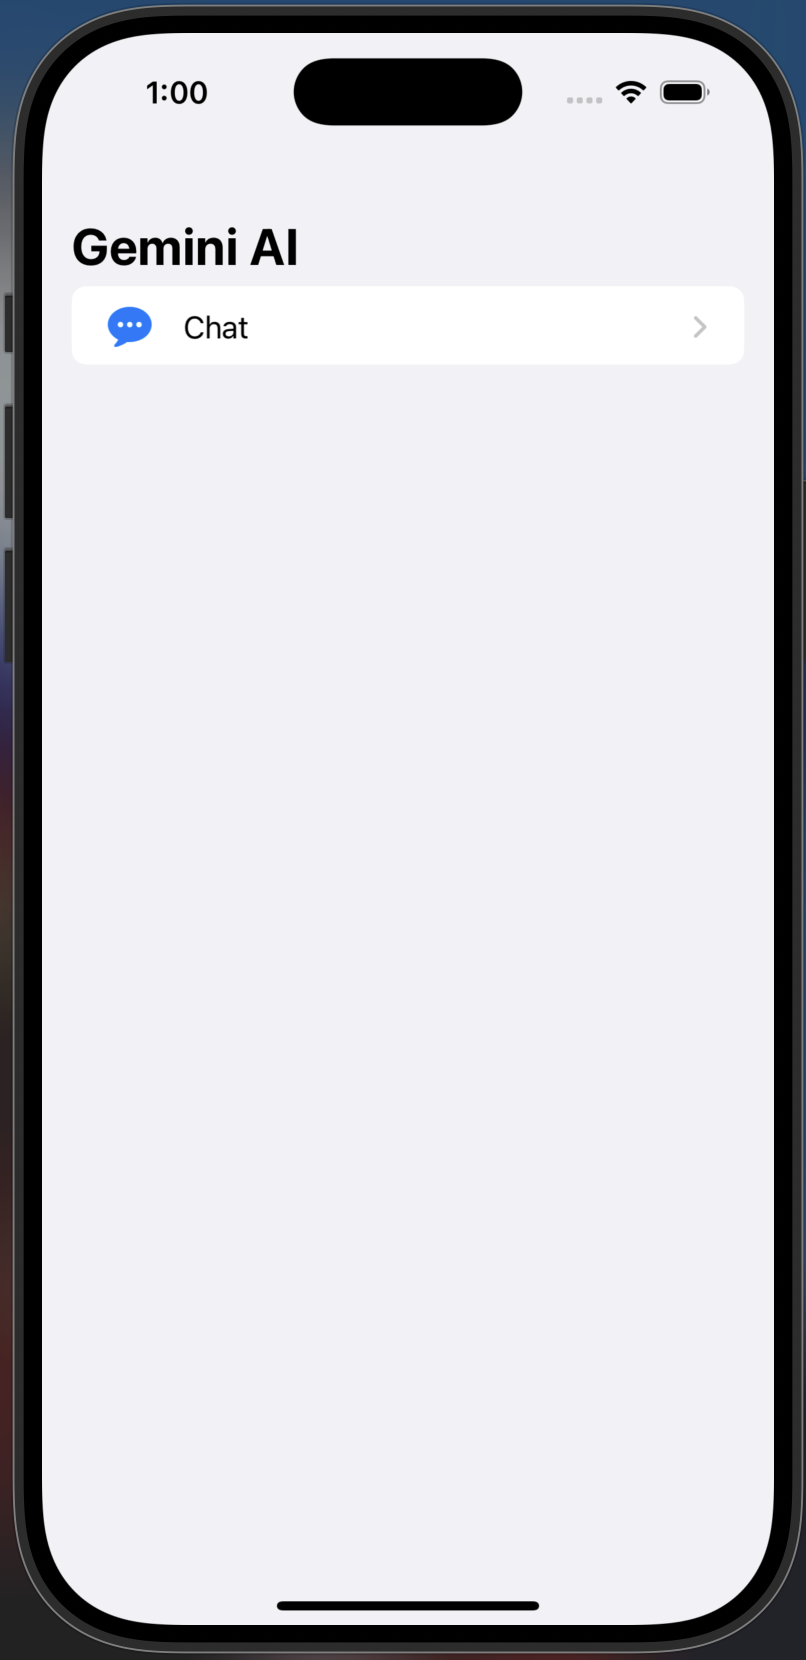
如果想要有
Gemini API字樣,可以自行新增Label。
今天我們為 Gemini 專案打下了第一個樁,成功地建立了專案的入口頁面!
我們將 UITableView 作為一個功能選單,並學會了如何使用 cell.textLabel、cell.imageView 和 accessoryType 來快速客製化系統內建 Cell 的外觀。最重要的是,你掌握了 UINavigationController 的核心功能——pushViewController,實現了 App 開發中最基礎也最重要的畫面跳轉。
隨著大門的開啟,明天我們就要開始打造真正的核心功能了!
今天我們打開了通往聊天室的大門,明天,我們就要開始打造聊天室本身了!
我們將聚焦在 ChatViewController,設計出一個經典的聊天介面:上方是用來顯示對話紀錄的 TableView,下方則是包含「輸入框」和「傳送按鈕」的工具列。你將學會如何運用 Auto Layout,讓這個輸入框永遠緊貼在鍵盤的上方,打造出流暢的輸入體驗!
敬請期待《Day 28|Xcode 專案實戰:打造 Gemini AI 聊天室!(二)》


 iThome鐵人賽