痛點:細節密集的傑作中那「看不見的世界」
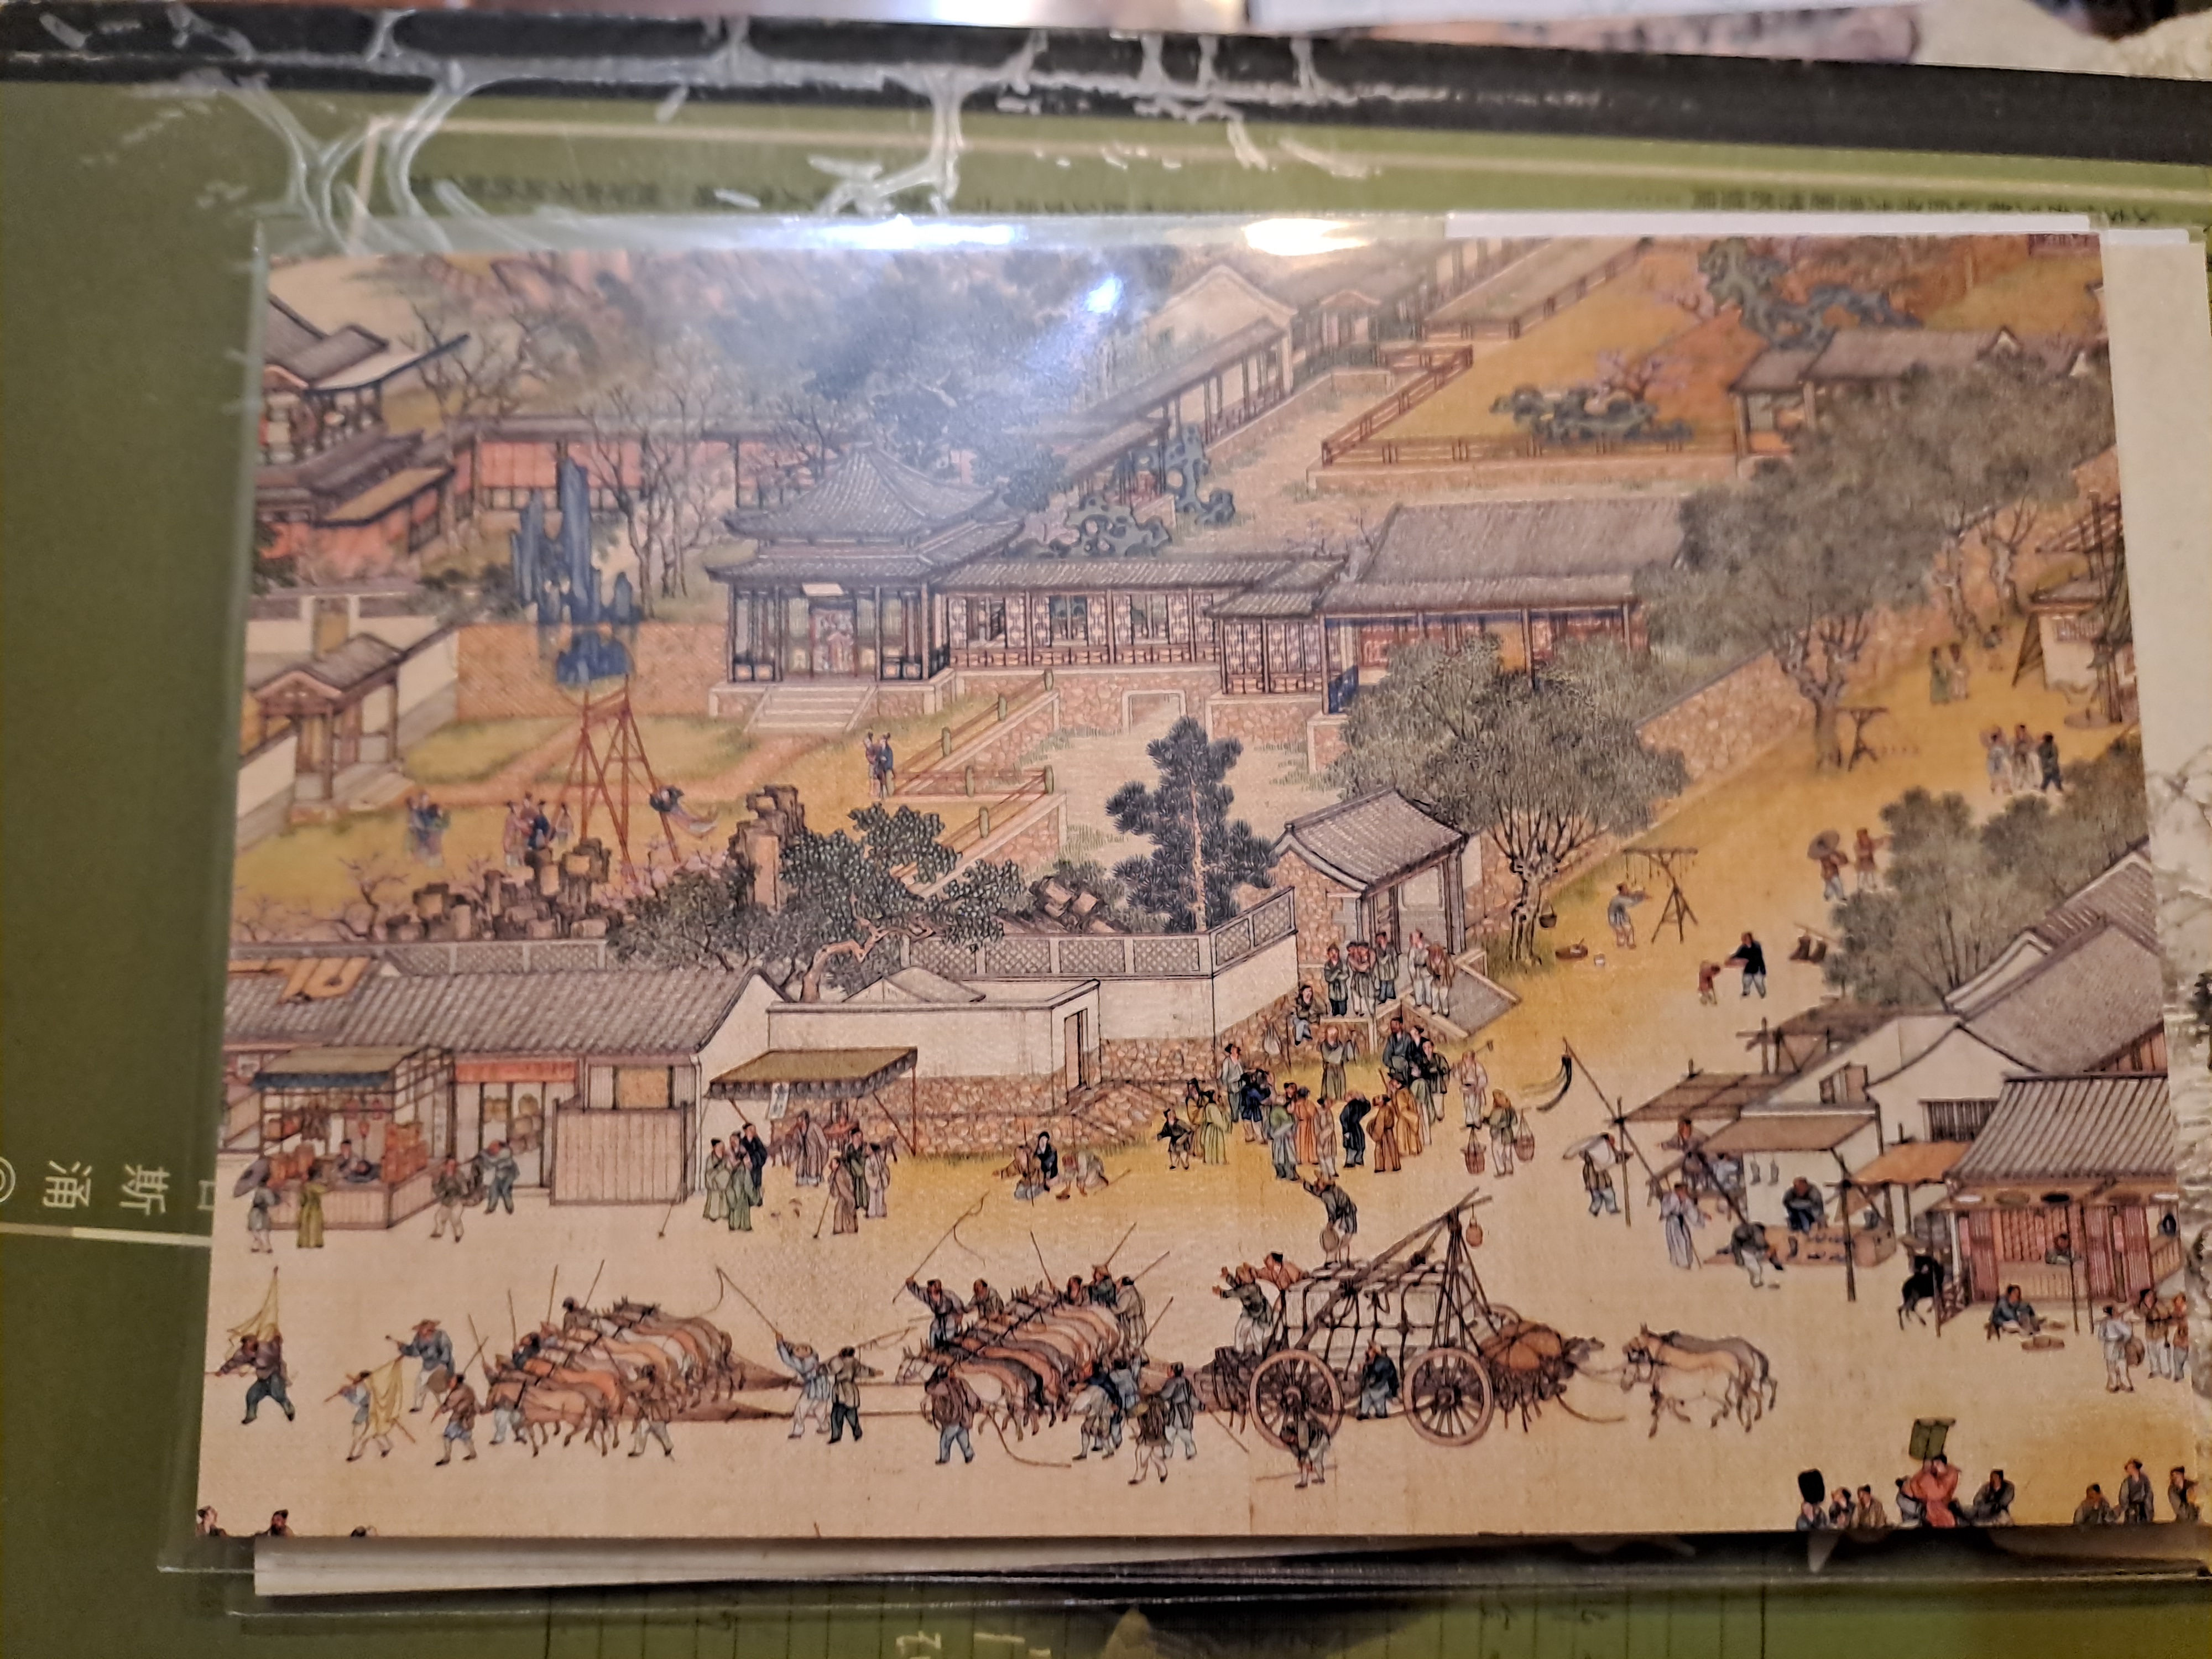
當明信片將傳統中國繪畫縮小時,縮小的比例會遮蔽細節。想像一張標準明信片,描繪著清朝時期擁擠街道上拉著馬車的工人和馬匹。大人和小孩走在繁忙的橋上,兩旁的商店向行人出售商品。對於年長的觀賞者來說,這些僅幾毫米寬的微小細節,變成了無法觸及的模糊。
中國藝術的「密度」成為了一種障礙,將細緻的場景變成了模糊不清的形狀。當眼睛不再能分辨精細的筆觸時,藝術品就失去了它的敘事性。
解決方案:作為數位導覽員的代理式視覺(Agentic Vision)
Gemini 3 的 代理式視覺(Agentic Vision) 彌補了明信片的物理限制與原畫巨大細節之間的差距。它超越了基本的影像理解,使用 思考-行動-觀察(Think-Act-Observe) 迴圈來觀察年長者視力吃力的地方。
給定一個指令,例如 「放大明信片以尋找橋上的人物」,該模型就會變成一個主動的調查員:
結果:視覺輔助功能的改進
代理式視覺讓低視力使用者能夠分辨精細細節。使用者可以「走進」一幅中國繪畫,從宏大的山水筆觸移動到面部或鳥類的精細細節。
這項工具不僅僅是縮放;它透過釐清細節使藝術變得觸手可及,無論明信片的大小如何。
本篇文章將帶您了解如何使用 Colab 筆記本來檢查藝術品明信片、回答視覺問題並識別製造商。
讓我們看看如何使用 Python 和 Gemini SDK 來實現這個「數位導覽員」。
執行 Colab 筆記本來檢查明信片正面以獲得視覺答案,並檢查背面以獲取中繼資料(Metadata),如標題、尺寸和製造商。
公開的 agentic_visions GitHub 資料夾存放了此示範中使用的原始影像。
我載入這些 URL,並使用 Gemini 3 Flash 預覽模型、程式碼執行工具,以及用於影像裁切與資料擷取的文字提示詞。
模型接收到一個提示詞,要求縮放明信片並計算三組中的馬、騾和驢的數量。模型使用程式碼執行工具來尋找答案。我解析 JSON 回應並迭代回應的 parts 陣列以顯示文字和影像。
雖然提示詞只有一句話,但模型會重複執行思考、行動和觀察步驟,直到推導出答案。
要執行 Colab 筆記本,請確保您擁有:
將 Colab 筆記本的副本儲存到 Google 雲端硬碟以執行測試案例。
在 Colab 筆記本中,點選左側工具列的「密鑰」(鑰匙圖示)分頁,新增一個 GOOGLE_CLOUD_API_KEY 密鑰變數。
GOOGLE_CLOUD_API_KEY=<GOOGLE CLOUD API KEY>
在筆記本中,匯入 userdata 以取得 Vertex AI Gemini API 金鑰。
from google.colab import userdata

cloud_api_key = userdata.get('GOOGLE_CLOUD_API_KEY')
筆記本會安裝 Python 函式庫並匯入類別。
%pip install google-genai
%pip install matplotlib
%pip install os
%pip install dotenv
%pip install pydantic

from google import genai
from matplotlib import pyplot as plt
from google.genai import types
from pydantic import BaseModel, Field
from urllib.error import URLError
import requests
from PIL import Image
from io import BytesIO
import os
from typing import Union
我提示模型縮放明信片底部以計算馬匹數量。
提示詞要求模型縮放標籤以擷取標題、尺寸、製造日期、製造地點、品牌、製造商、電話號碼、地址、序號和價格。
我定義一個 Pydantic 模型來儲存資料。
ArtworkDiscovery 儲存程式碼執行的答案和推理。
class ArtworkDiscovery(BaseModel):
    answer: str = Field(..., description="The answer to the prompt")
    reasoning: str = Field(..., description="The reasoning behind the answer")
PostcardLabel 儲存明信片背面標籤資訊。
class PostcardLabel(BaseModel):
    title: str = Field(..., description="The title of the artwork on the postcard")
    dimensions: str = Field(..., description="The dimensions of the postcard")
    manufacturing_date: str = Field(..., description="The manufacturing date of the postcard")
    manufacturing_location: str = Field(..., description="The manufacturing location of the postcard")
    brand: str = Field(..., description="The brand of the postcard")
    manufacturer: str = Field(..., description="The manufacturer of the postcard")
    phone_number: str = Field(..., description="The phone number of the postcard manufacturer")
    address: str = Field(..., description="The address of the postcard manufacturer")
    serial_number: str = Field(..., description="The serial number of the postcard")
    price: float = Field(..., description="The price of the postcard")
    reasoning: str = Field(..., description="The reasoning behind the answer")
VisionTestCase 類別定義了影像 URL、文字提示詞和回應模型類型。回應模型使用 ArtworkDiscovery 或 PostcardLabel 類別。
class VisionTestCase(BaseModel):
    image_url: str = Field(..., description="The URL of the image to be analyzed")
    prompt: str = Field(..., description="The prompt to be answered based on the image")
    response_model: Union[type[ArtworkDiscovery], type[PostcardLabel]]  = Field(..., description="The Pydantic model that defines the expected response format")
代理式視覺在計數方面有時會遇到困難。當我要求它計算明信片上的馬或房子時,答案與我的計數有 +/- 5 的誤差。我在 Pydantic 模型中加入了一個 reasoning 欄位來擷取邏輯。該欄位強制模型進行 思維鏈(Chain-of-Thought, CoT) 處理,這顯著改善了算術和邏輯任務(如計數)。
我使用用戶端呼叫 Gemini 3 Flash Preview 模型,在提供的影像上執行程式碼,尋找請求物件的座標,審查裁切區域,並回傳文字和推理。
def create_vertexai_client():
    cloud_api_key = userdata.get('GOOGLE_CLOUD_API_KEY')
    if not cloud_api_key:
        raise ValueError("GOOGLE_CLOUD_API_KEY not found in .env file")

    # Configure the client with your API key
    client = genai.Client(
        vertexai=True,
        api_key=cloud_api_key,
    )

    return client

client = create_vertexai_client()
curate_artwork_postcard 函式呼叫 generate_content,提示模型在代理迴圈中裁切影像以推導最終答案。
請清楚瞭解,該迴圈是在伺服器端的 generated_content 呼叫中發生的。Python 用戶端在模型迭代時等待結果。
curate_artwork_postcard 將影像 URL 和提示詞發送到 Gemini 3 Flash Preview 以獲取 JSON 答案。配置包含一個啟用程式碼執行的 tools 陣列,以及高思維層級(High thinking)和媒體解析度的設定。
tools=[types.Tool(code_execution=types.ToolCodeExecution())]
config=types.GenerateContentConfig(
    response_mime_type="application/json",
    response_json_schema=test_case.response_model.model_json_schema(),
    thinking_config=types.ThinkingConfig(
        thinking_level=types.ThinkingLevel.HIGH
    ),
    media_resolution=types.MediaResolution.MEDIA_RESOLUTION_HIGH,
    tools=tools,
)

def curate_artwork_postcard(test_case: VisionTestCase) -> types.GenerateContentResponse:
    response = client.models.generate_content(
        model="gemini-3-flash-preview",
        contents=[
            types.Content(
                role="user",
                parts=[
                    types.Part.from_uri(file_uri=test_case.image_url),
                    types.Part(text=test_case.prompt),
                ]
            )
        ],
        config=config
    )

    return response
print_parts 函式接收回應並迭代 response.candidates[0].content.parts 列表,以字串形式印出 JSON 物件、可執行程式碼、程式碼執行結果以及裁切後的影像。
def print_parts(response: types.GenerateContentResponse):
    for part in response.candidates[0].content.parts:
        if part.text is not None and part.text.strip():
            print("part.text -> ", part.text.strip())
        if part.executable_code is not None:
            print("part.executable_code -> ", part.executable_code)
        if part.code_execution_result is not None:
            print("part.code_execution_result -> ", part.code_execution_result)
        if part.as_image() is not None:
            # display() is a standard function in Jupyter/Colab notebooks
            display(Image.open(BytesIO(part.as_image().image_bytes)))
print_artwork_result 呼叫 curate_artwork_postcard。如果模型定義了 response.parsed,函式會透過 model_validate 進行驗證並取得模型執行個體。否則,函式會呼叫 model_validate_json 方法來驗證 response.text 以取得模型執行個體。接著 print_artwork_result 會呼叫 print_parts 來顯示回應部分和 result 物件。
clean_json_string 是一個輔助程式,作為原始文字回應的備案。
def clean_json_string(raw_string):
    # Remove the markdown code blocks
    clean_str = raw_string.strip()
    if clean_str.startswith("```json"):
        clean_str = clean_str[7:]
    if clean_str.endswith("```"):
        clean_str = clean_str[:-3]
    return clean_str.strip()

def print_artwork_result(test_case: VisionTestCase):
    response = curate_artwork_postcard(test_case=test_case)

    if response.parsed:
        result = test_case.response_model.model_validate(response.parsed)
    else:
        result = test_case.response_model.model_validate_json(
            clean_json_string(response.text)
        )

    print_parts(response=response)
    if isinstance(result, ArtworkDiscovery):
        print("Final Answer: ", result.answer, "
Reasoning: ", result.reasoning)
    elif isinstance(result, PostcardLabel):
        print("Title: ", result.title,\n"
Dimensions: ", result.dimensions, \n"
Manufacturing Date: ", result.manufacturing_date,\n"
Manufacturing Location: ", result.manufacturing_location,\n "
Brand: ", result.brand,\n"
Manufacturer: ", result.manufacturer,\n "
Phone Number: ", result.phone_number,\n "
Address: ", result.address,\n "
Serial Number: ", result.serial_number,\n "
Price: ", result.price,\n "
Reasoning: ", result.reasoning)

def print_test_cases(heading: str, cases: list[VisionTestCase]):
    print(heading)
    for test_case in cases:
        print_artwork_result(test_case=test_case)
我使用 show_the_postcard_front_and_back 來建立測試影像 URL 並顯示它們。load_image_from_url 使用函式庫從 URL 載入影像並顯示。
def load_image_from_url(url: str):
    try:
        response = requests.get(url=url)
        img = Image.open(BytesIO(response.content))
        plt.imshow(img)
        plt.axis('off')
        plt.show()
    except requests.HTTPError as e:
        # e.code contains the status code (e.g., 404)
        if e.code == 404:
            print("Error: URL not found (404).")
        else:
            print(f"HTTP Error: {e.code}")

    except URLError:
        print(f"Error: The file at '{url}' was not found.")
    except Exception as e:
        print(f"An error occurred: {e}")

def show_the_postcard_front_and_back(front: str, back: str):
    agent_vision_base_url = "https://raw.githubusercontent.com/railsstudent/colab_images/refs/heads/main/agentic_visions"
    front_url = f"{agent_vision_base_url}/{front}"
    back_url = f"{agent_vision_base_url}/{back}"

    load_image_from_url(url=front_url)
    load_image_from_url(url=back_url)

front_url, back_url = show_the_postcard_front_and_back(front="up-the-river-front.jpg", back="up-the-river-back.jpg")
我要求模型計算 up-the-river-front.jpg 底部的動物數量。
up_the_river_test_cases = [
    VisionTestCase(
        image_url=front_url,
        prompt="Zoom to bottom of the postcard to find the number of horses/donkeys/mules near the wagons",
        response_model=ArtworkDiscovery
    ),
]

print_test_cases(heading="Up the River test cases", cases=up_the_river_test_cases)
出現以下輸出:
executable_code 產生 Python 程式碼來載入影像、裁切部分(例如 bottom_view = get_crop(img, [730, 80, 920, 950]))並將其儲存為 PNG 檔案(例如 bottom_view.png)。code_execution_result 顯示 OUTCOME_OK 且輸出為 null。模型自行產生 get_crop 函式,而非開發者。
當啟用 CodeExecution 時,模型會自動下載 URL 並將其重新命名為 f_https___raw.githubusercontent.com_railsstudent_colab_images...up_the_river_front.jpg 並放入本地沙箱中。沙箱執行產生的程式碼和外部資產以尋找答案。
注意:cv2 和 PIL 等函式庫已預先安裝在 Gemini 模型的安全執行沙箱中。
part.executable_code ->  code='import PIL.Image
import PIL.ImageDraw

# Load the image to get dimensions
img = PIL.Image.open('f_https___raw.githubusercontent.com_railsstudent_colab_images_refs_heads_main_agentic_visions_up_the_river_front.jpg')
width, height = img.size

# Identify the bottom area with wagons and animals
# Wagon 1 area: bottom left/center
# Wagon 2 area: bottom right/center
# Far right animals
# Let's crop the bottom third of the image first to see clearly
bottom_strip = [700, 100, 950, 900] # [ymin, xmin, ymax, xmax] in normalized coordinates

# Better crop: focusing on the animal teams
# Wagon team 1 (left): approx [750, 100, 900, 400]
# Wagon team 2 (center): approx [750, 400, 900, 700]
# Far right: [780, 720, 880, 820]

def get_crop(img, box_norm):
    ymin, xmin, ymax, xmax = box_norm
    left = xmin * width / 1000
    top = ymin * height / 1000
    right = xmax * width / 1000
    bottom = ymax * height / 1000
    return img.crop((left, top, right, bottom))

bottom_view = get_crop(img, [730, 80, 920, 950])
bottom_view.save('bottom_view.png')

# Detailed crops for counting
team1_crop = get_crop(img, [750, 100, 900, 400])
team1_crop.save('team1.png')

team2_crop = get_crop(img, [720, 400, 900, 720])
team2_crop.save('team2.png')

right_animals = get_crop(img, [780, 720, 880, 820])
right_animals.save('right_animals.png')

# Output objects for verification
# [{box_2d: [750, 150, 880, 360], label: "animal team 1"},
#  {box_2d: [750, 400, 885, 545], label: "animal team 2"},
#  {box_2d: [795, 730, 861, 805], label: "right animals"}]
' language=<Language.PYTHON: 'PYTHON'>
part.code_execution_result ->  outcome=<Outcome.OUTCOME_OK: 'OUTCOME_OK'> output=None
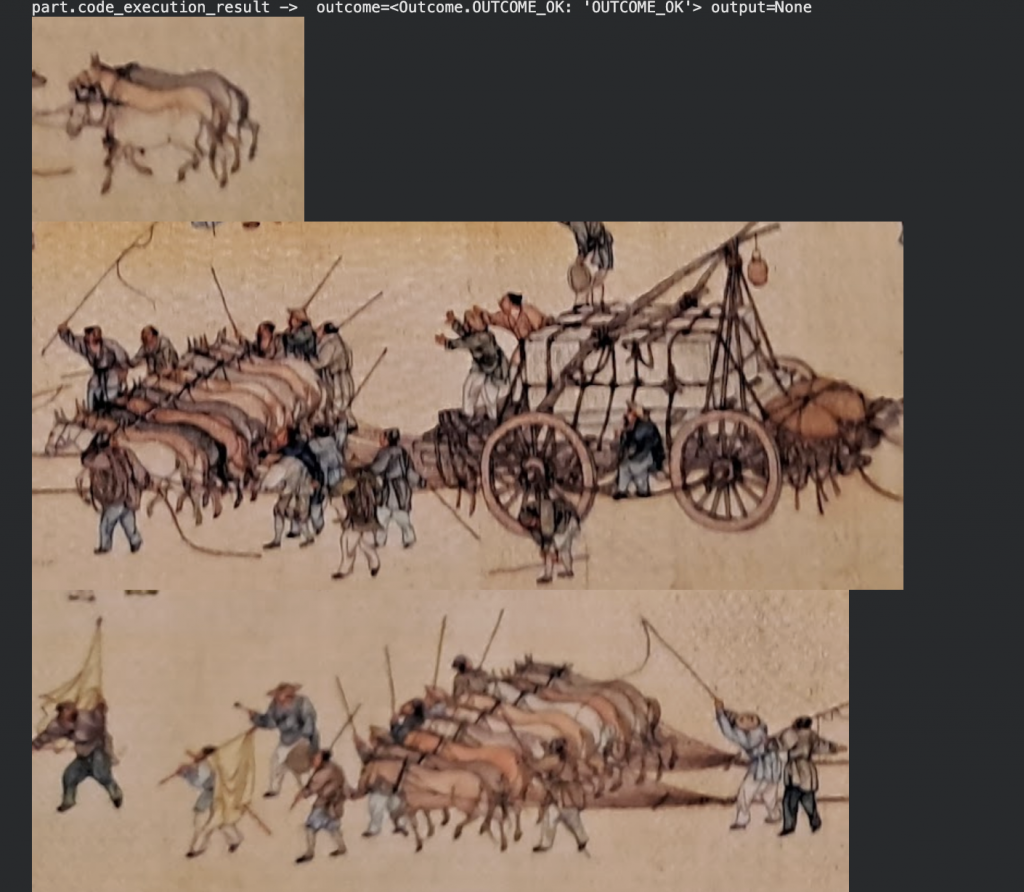
part.text 顯示答案和推理。模型發現了 24 隻動物,而我發現了 23 隻。reasoning 欄位描述了得出答案的過程。
part.text ->  {
 "answer": "24",
 "reasoning": "By zooming into the bottom of the postcard, a large wagon can be seen being pulled by multiple teams of horses, donkeys, or mules. There are two main teams in front of the wagon, each consisting of 8 animals (arranged in pairs). Behind the wagon, there is another group of 6 animals (3 pairs) that appear to be pushing or following closely. Additionally, there is a separate pair of 2 animals to the right of the wagon. Adding these groups together (8 + 8 + 6 + 2) results in a total of 24 animals near the wagon."
}
Final Answer:  24
Reasoning:  By zooming into the bottom of the postcard, a large wagon can be seen being pulled by multiple teams of horses, donkeys, or mules. There are two main teams in front of the wagon, each consisting of 8 animals (arranged in pairs). Behind the wagon, there is another group of 6 animals (3 pairs) that appear to be pushing or following closely. Additionally, there is a separate pair of 2 animals to the right of the wagon. Adding these groups together (8 + 8 + 6 + 2) results in a total of 24 animals near the wagon.
接著我要求模型從明信片的背面標籤擷取資訊。
make_postcard_label_testcase 函式建立一個測試案例,提示模型從 back_url 擷取資訊。
def make_postcard_label_testcase(back_url: str) -> types.GenerateContentResponse:
  return VisionTestCase(
    image_url=back_url,
    prompt=(
        "Zoom to the label and find:
"
        "1) the title of the artwork
"
        "2) the dimensions
"
        "3) the manufacturing date of the postcard
"
        "4) the manufacturing location of the postcard
"
        "5) the brand of the postcard
"
        "6) the manufacturer of the postcard
"
        "7) the phone number of the postcard manufacturer
"
        "8) the address of the postcard manufacturer
"
        "9) the serial number of the postcard
"
        "10) the price of the postcard
"
    ),
    response_model=PostcardLabel
)
print_test_cases(heading="Up the River test cases",
    cases=[
        make_postcard_label_testcase(back_url=back_url),
    ]
)
executable_code 產生 Python 程式碼來裁切左側標籤區域並將其儲存到 price_crop.jpg。程式碼印出了 Original image size: 2500x1875。code_execution_result 顯示 OUTCOME_OK 和 Original image size: 2500x1875 。
part.executable_code ->  code="import cv2
import PIL.Image

img = cv2.imread('f_https___raw.githubusercontent.com_railsstudent_colab_images_refs_heads_main_agentic_visions_up_the_river_back.jpg')
height, width, _ = img.shape

# Crop the left label area
# Roughly [100, 50, 850, 400] in normalized coordinates
label_crop = img[int(0.1*height):int(0.85*height), int(0.05*width):int(0.4*width)]
cv2.imwrite('label_crop.jpg', label_crop)

# Crop the price area at the bottom left
price_crop = img[int(0.65*height):int(0.85*height), int(0.15*width):int(0.35*width)]
cv2.imwrite('price_crop.jpg', price_crop)

# Output for visual confirmation
print(f'Original image size: {width}x{height}')
" language=<Language.PYTHON: 'PYTHON'>
part.code_execution_result ->  outcome=<Outcome.OUTCOME_OK: 'OUTCOME_OK'> output='Original image size: 2500x1875
'
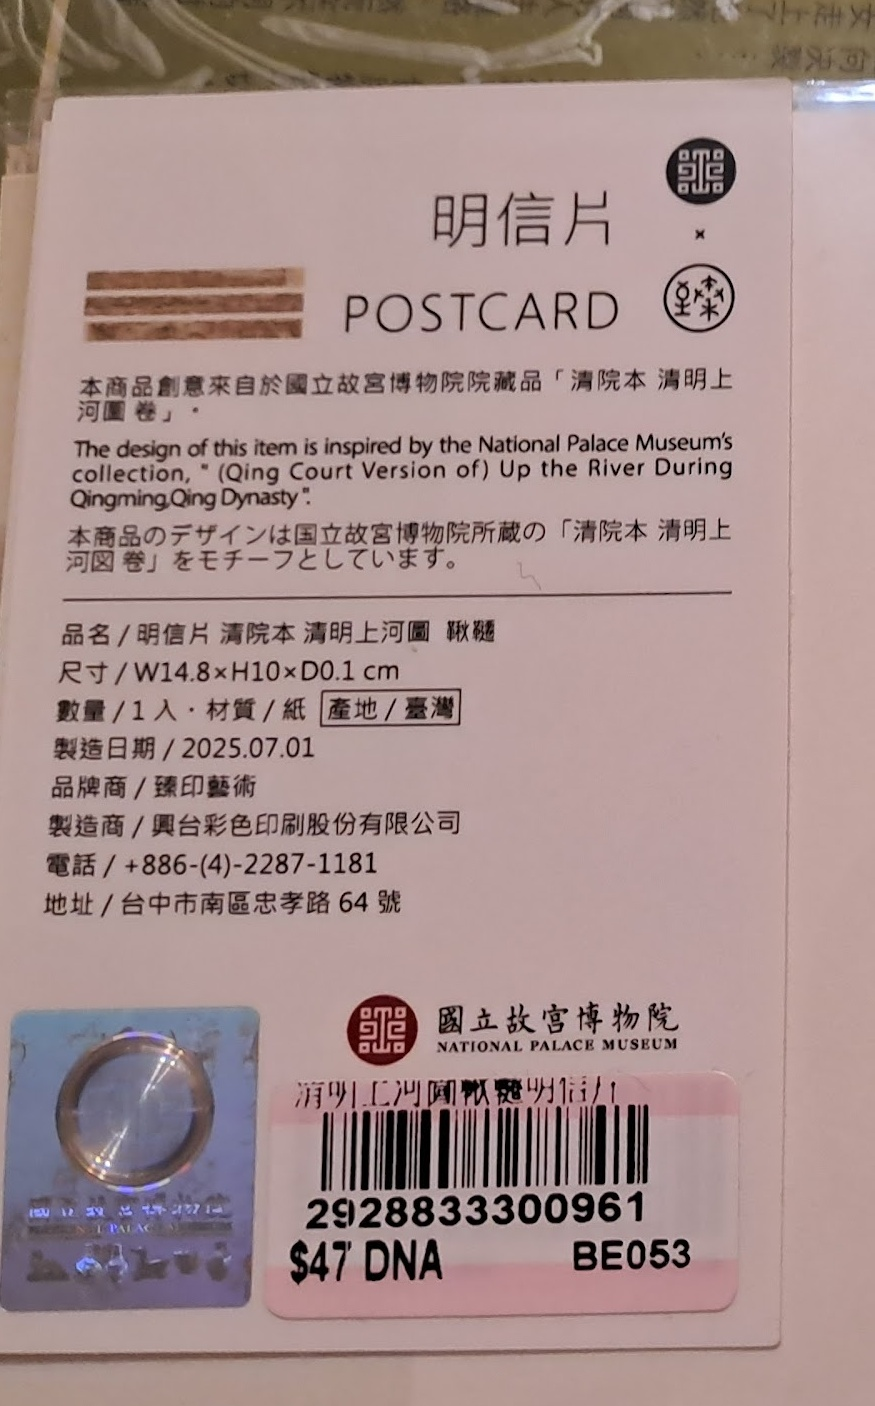
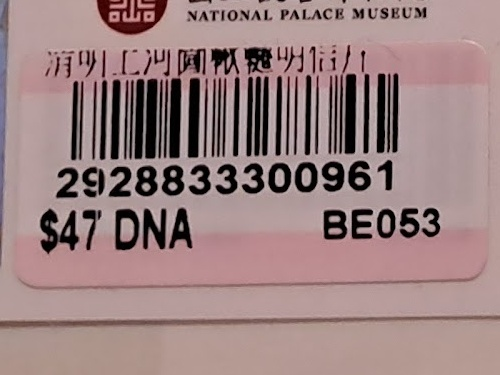
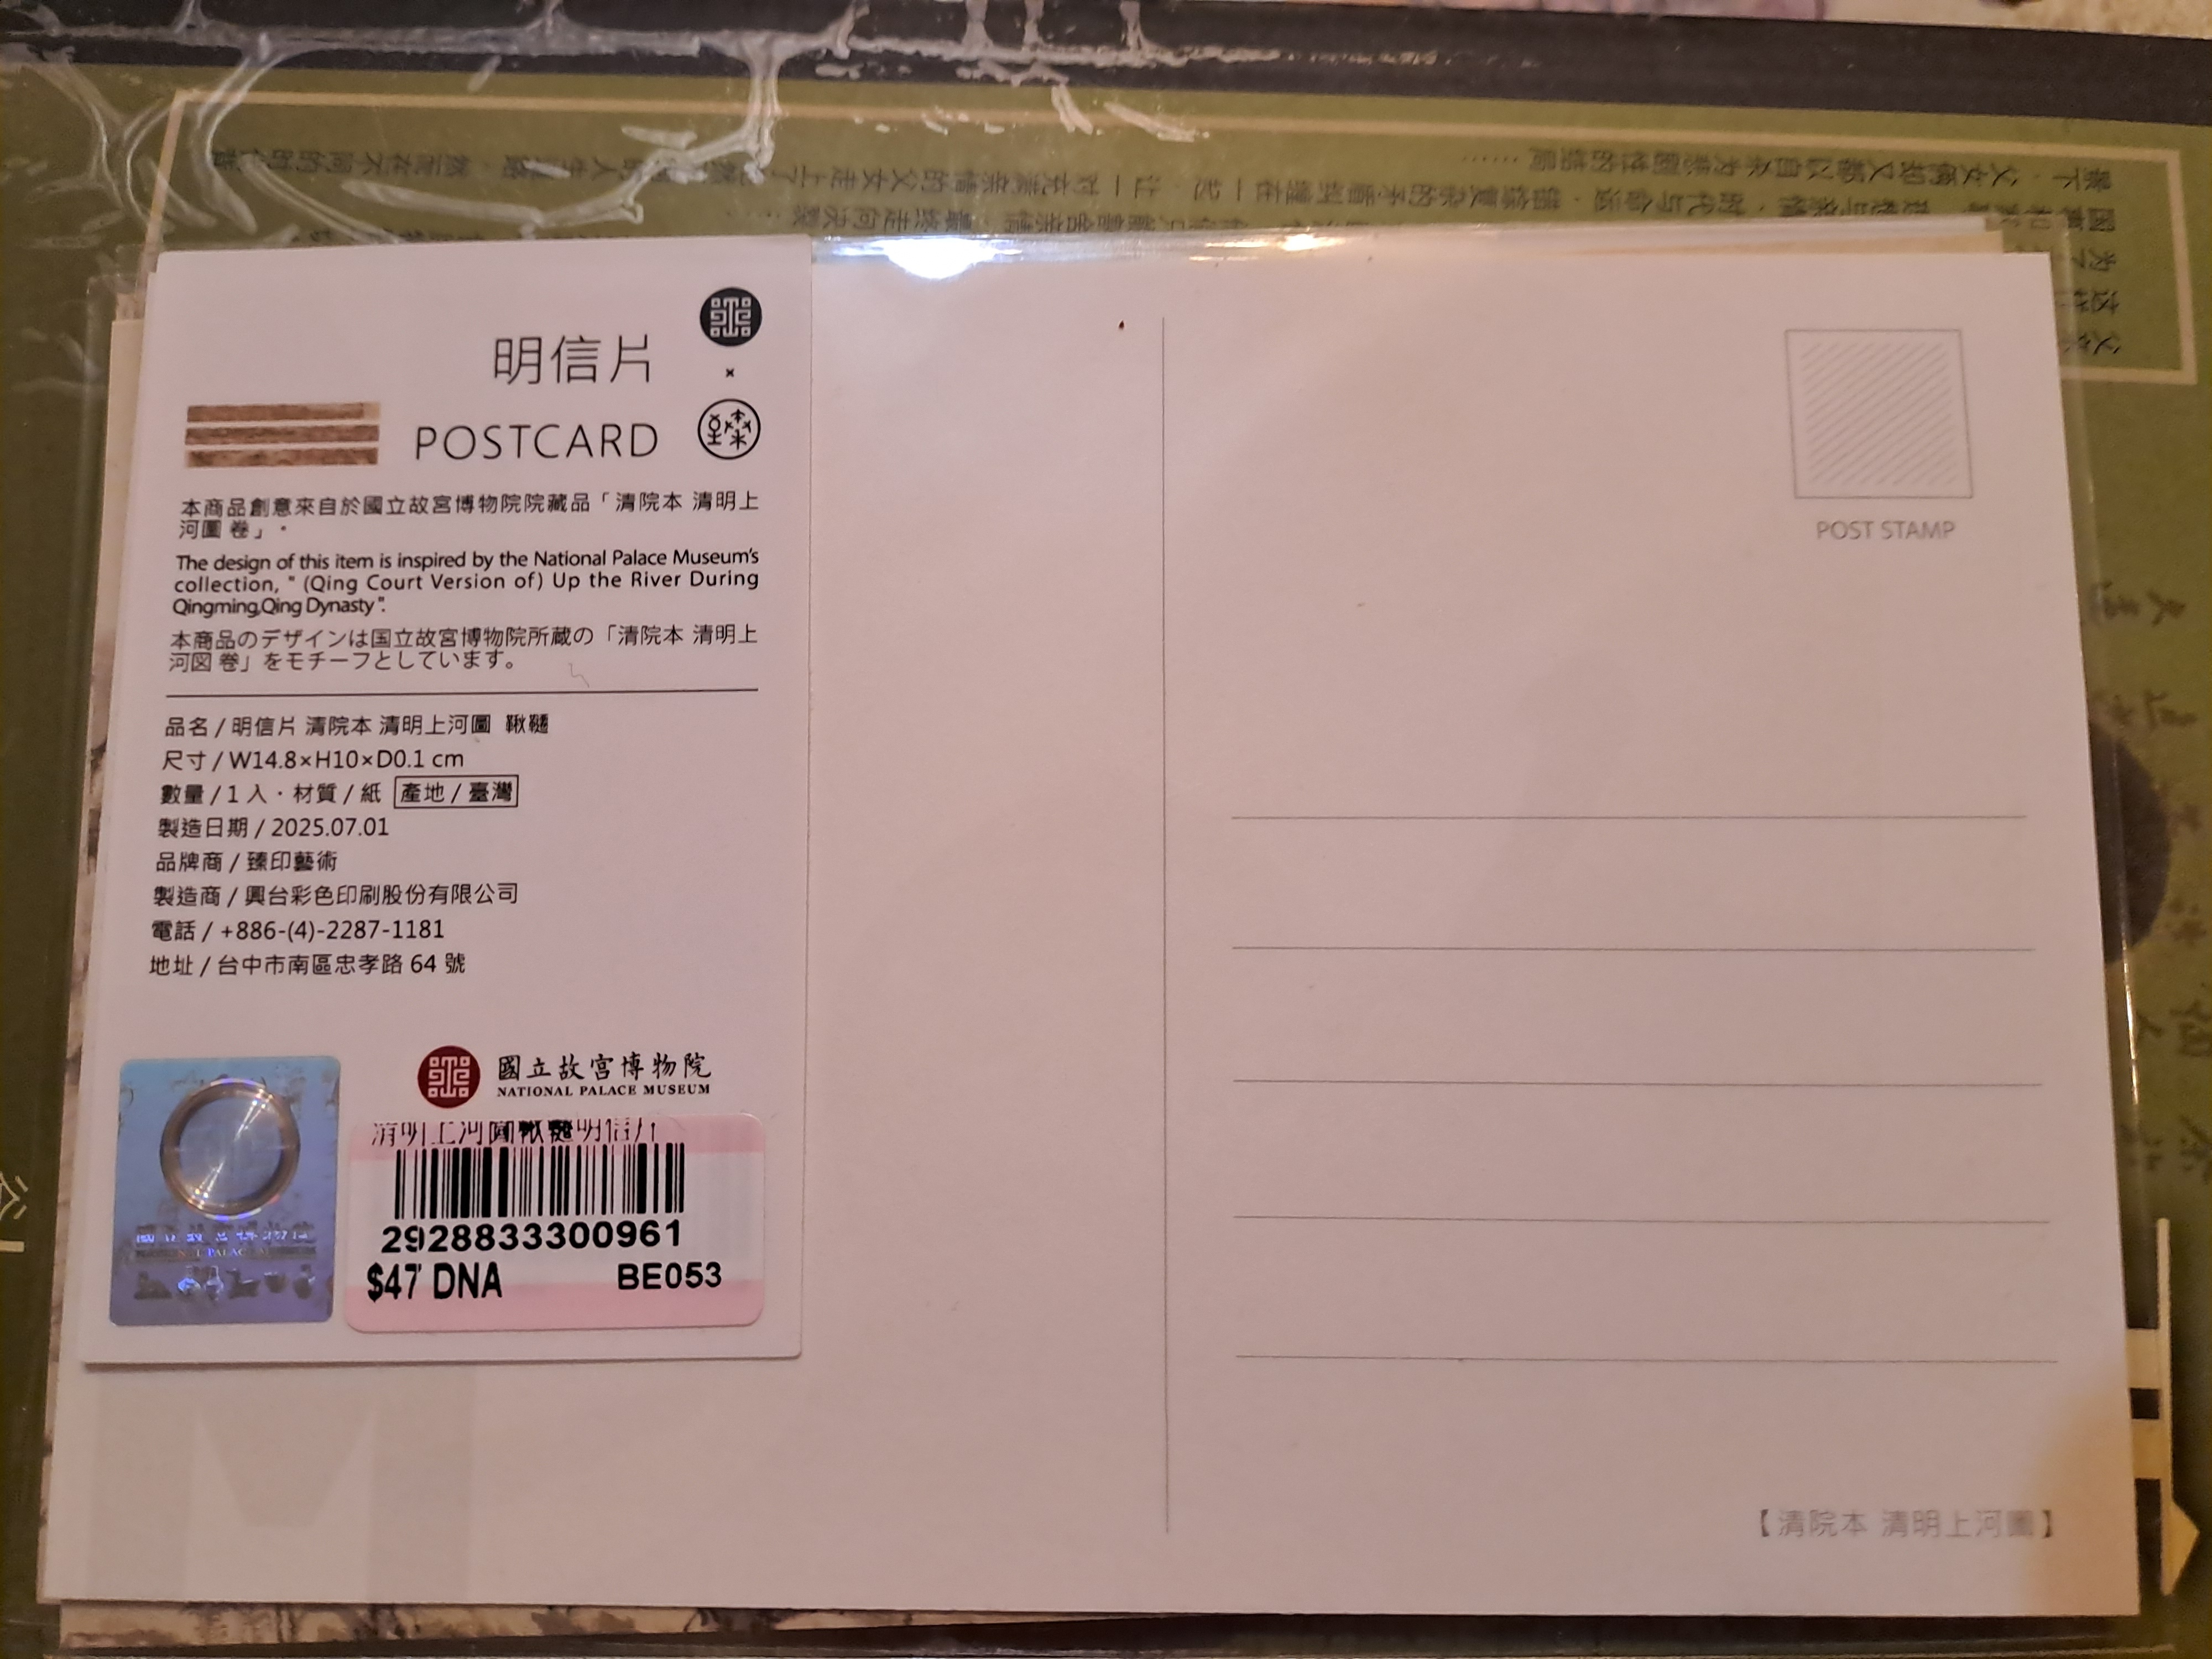
模型將 JSON 物件儲存在 part.text 中,並顯示標題、尺寸、製造日期、製造地點、品牌、製造商、電話號碼、地址、序號和價格。模型可以呈現英文和繁體中文字元。
part.text ->  {
  "title": "(Qing Court Version of) Up the River During Qingming",
  "dimensions": "W14.8 x H10 x D0.1 cm",
  "manufacturing_date": "2025.07.01",
  "manufacturing_location": "Taiwan",
  "brand": "臻印藝術",
  "manufacturer": "興台彩色印刷股份有限公司",
  "phone_number": "+886-(4)-2287-1181",
  "address": "台中市南區忠孝路 64 號",
  "serial_number": "2928833300961",
  "price": 47,
  "reasoning": "The information was extracted from the product label on the back of the postcard. The title is derived from the description mentioning the '(Qing Court Version of) Up the River During Qingming'. Dimensions, manufacturing date (2025.07.01), location (Taiwan), brand (臻印藝術), manufacturer (興台彩色印刷股份有限公司), phone number, and address were all clearly printed on the label. The serial number and price ($47) were identified from the barcode sticker at the bottom."
}
由於結果使用了 PostcardLabel 類型,我可以存取其欄位並顯示其值。
Title:  (Qing Court Version of) Up the River During Qingming
Dimensions:  W14.8 x H10 x D0.1 cm
Manufacturing Date:  2025.07.01
Manufacturing Location:  Taiwan
Brand:  臻印藝術
Manufacturer:  興台彩色印刷股份有限公司
Phone Number:  +886-(4)-2287-1181
Address:  台中市南區忠孝路 64 號
Serial Number:  2928833300961
Price:  47.0
Reasoning:  The information was extracted from the product label on the back of the postcard. The title is derived from the description mentioning the '(Qing Court Version of) Up the River During Qingming'. Dimensions, manufacturing date (2025.07.01), location (Taiwan), brand (臻印藝術), manufacturer (興台彩色印刷股份有限公司), phone number, and address were all clearly printed on the label. The serial number and price ($47) were identified from the barcode sticker at the bottom."
}
Gemini 3 代理式視覺程式碼導覽到此結束。
代理式視覺使用程式碼執行來產生 Python 程式碼,以進行精確、高解析度的明信片裁切。工作流程中的 code_execution_result 展示了 Gemini 3 如何超越標準的物件偵測,並利用模型的新視覺能力將低可辨識度的明信片區域轉化為一系列裁切後的影像。
技術重點:
當您的應用程式可以根據所見採取行動時,您會打造出什麼? 開始嘗試使用 Gemini API,並主動而非被動地觀察。
 Connie
