Google 在 Gemini API、Vertex AI 中的 Gemini 以及 Gemini AI Studio 中發佈了用於 AI 音訊產生的 Gemini 3.1 Flash TTS Preview 模型。此模型引入了全新的「音訊標籤 (Audio tags)」功能,能展現富有表現力的人類情感、節奏與風格。
本應用程式探索使用 Firebase AI Logic 來分析上傳的圖片,並產生建議、描述、替代標籤以及一個冷知識 (obscure fact)。該冷知識會被發送到 Firebase 雲端函式,使用 Gemini TTS 模型產生音訊。雲端函式 將串流 (stream) 回傳給 Angular 應用程式,並將其轉換為 Blob URL 物件。音訊播放器將該 URL 設置為來源,使用者即可點擊「播放」按鈕來播放串流。
在本文中,我將應用程式遷移至使用 Gemini 3.1 Flash TTS Preview 模型,並在 Angular 中建立一個 Signal 表單來輸入場景 (scene)、情感 (emotion) 與節奏 (pace)。接著,Angular 應用程式會將表單值與冷知識提供給 Firebase 雲端函式,使用 GenAI TypeScript SDK 產生富有表現力的聲音。
專案的技術棧 (Technical stack):
http://localhost:5001 測試函式。公開的 Google AI Studio API 在我所在的地區(香港)受到限制。然而,Vertex AI (Google Cloud) 提供的企業級存取在本地運作非常可靠,因此我選擇在本次示範中使用 Vertex AI。
npm i -g firebase-tools
使用 npm 全域安裝 firebase-tools。
firebase logout
firebase login
登出 Firebase 並重新登入,以進行正確的 Firebase 驗證。
firebase init
執行 firebase init 並依照提示設定 Firebase 雲端函式、Firebase Local Emulator Suite、Firebase Cloud Storage 以及 Firebase Remote Config。
如果您已有現有專案或多個專案,可以在命令列中指定專案 ID。
firebase init --project <PROJECT_ID>
在上述兩種情況下,Firebase CLI 都會自動安裝 firebase-admin 與 firebase-functions 依賴項。
完成設定步驟後,Firebase 工具會產生函式模擬器、函式、儲存規則文件、Remote Config 範本以及 .firebaserc 和 firebase.json 等配置檔案。
npm i firebase
Angular 應用程式需要 firebase 依賴項來初始化 Firebase 應用程式、載入 Remote Config,以及呼叫 Firebase 雲端函式 來產生影片。
npm i @cfworker/json-schema @google/genai @modelcontextprotocol/sdk
安裝上述依賴項以存取 Vertex AI 中的 Gemini。@google/genai 依賴於 @cfworker/json-schema 和 @modelcontextprotocol/sdk。若缺少這些,雲端函式 將無法啟動。
專案配置完成後,讓我們看看前端與後端是如何溝通的。
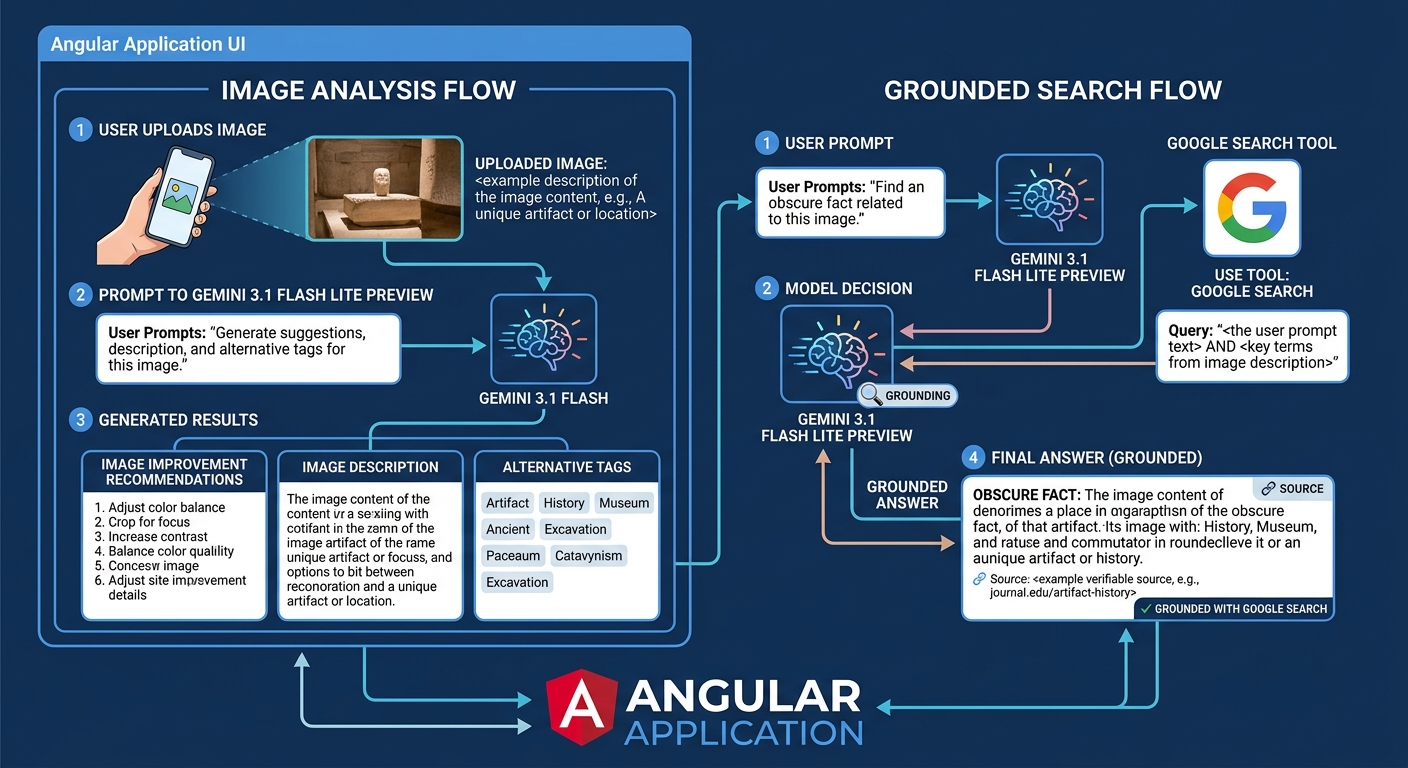
使用者在 Angular 應用程式中上傳圖片,並提示 Gemini 3.1 Flash Lite Preview 模型產生一些改進圖片的建議、描述以及替代標籤。使用者還可以使用相同的模型與 Google 搜尋工具來尋找與圖片相關的冷知識。
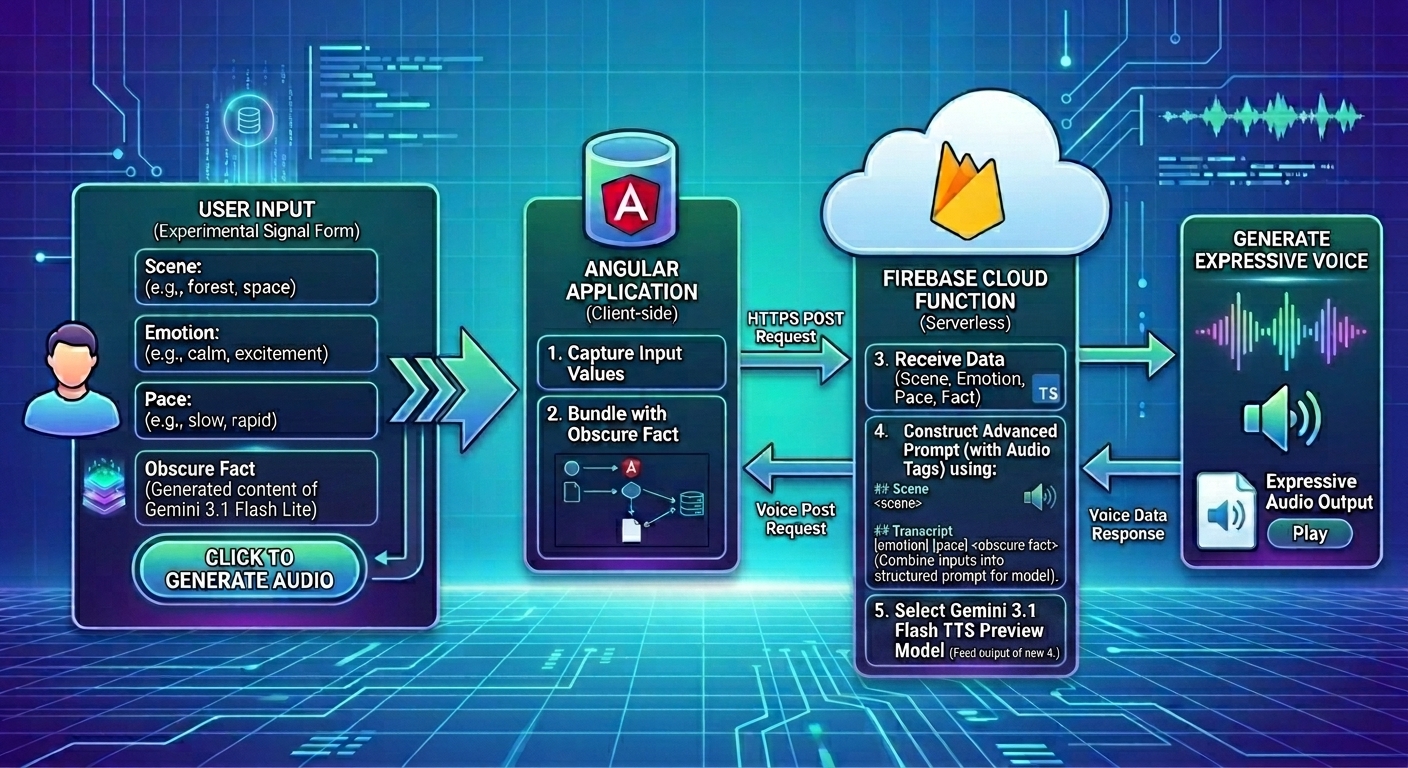
使用者在實驗性的 Signal 表單中輸入場景、情感與節奏。當使用者點擊「產生音訊」按鈕時,Angular 應用程式會將表單值與冷知識發送到 Firebase 雲端函式,使用 GenAI TypeScript SDK 與 Gemini 3.1 Flash TTS Preview 模型產生富有表現力的聲音。
在 Firebase 專案中定義環境變數,可確保函式知道 Google Cloud 專案的區域、Firebase 雲端函式 的位置以及所需的 TTS 模型。
.env.example
GOOGLE_CLOUD_LOCATION="global"
GOOGLE_FUNCTION_LOCATION="asia-east2"
GEMINI_TTS_MODEL_NAME="gemini-3.1-flash-tts-preview"
WHITELIST="http://localhost:4200"
REFERER="http://localhost:4200/"
| 變數 | 描述 |
|---|---|
| GOOGLE_CLOUD_LOCATION | Google Cloud 專案的區域。我選擇 global 以便 Firebase 專案能存取最新的 Gemini 3.1 Flash TTS preview 模型。 |
| GOOGLE_FUNCTION_LOCATION | Firebase 雲端函式 的區域。我選擇 asia-east2,因為這是我居住的區域。 |
| WHITELIST | 請求必須來自 http://localhost:4200。 |
| REFERER | 請求源自 http://localhost:4200/。 |
http://localhost:4200 是我本地 Angular 應用程式的主機與連接埠號。
在 雲端函式 進行任何 AI 呼叫之前,確保所有必要的環境變數都存在至關重要。我實作了一個 AUDIO_CONFIG IIFE (立即呼叫函式運算式) 來驗證環境變數,例如 TTS 模型名稱、Google Cloud 專案 ID 與位置。
import logger from "firebase-functions/logger";

export function validate(value: string | undefined, fieldName: string, missingKeys: string[]) {
    const err = `${fieldName} is missing.`;
    if (!value) {
        logger.error(err);
        missingKeys.push(fieldName);
        return "";
    }

    return value;
}
export const AUDIO_CONFIG = (() => {
    logger.info("AUDIO_CONFIG initialization: Loading environment variables and validating configuration...");

    const env = process.env;

    const missingKeys: string[] = [];
    const location = validate(env.GOOGLE_CLOUD_LOCATION, "Vertex Location", missingKeys);
    const model = validate(env.GEMINI_TTS_MODEL_NAME, "Gemini TTS Model Name", missingKeys);
    const project = validate(env.GCLOUD_PROJECT, "Google Cloud Project", missingKeys);

    if (missingKeys.length > 0) {
        throw new HttpsError("failed-precondition", `Missing environment variables: ${missingKeys.join(", ")}`);
    }

    return {
        genAIOptions: {
            project,
            location,
            vertexai: true,
        },
        model,
    };
})();
截至 2026 年 5 月,我使用的是 Node 24。自 Node 20 起,我們可以使用內建的 process.loadEnvFile 函式從 .env 檔案載入環境變數。
在 env.ts 中,try-catch 區塊嘗試從 .env 檔案載入環境變數。
try {
    process.loadEnvFile();
} catch {
    // Ignore error if .env file is not found (e.g., in production where env vars are set by the platform)
}
在 src/index.ts 中,第一條語句在匯入其他檔案與函式庫之前先匯入 env.ts。
import "./env";

... 其他匯入語句 ...
如果您使用的 Node 版本不支援 process.loadEnvfile,替代方案是安裝 dotenv 來載入環境變數。
npm i dotenv
import dotenv from "dotenv";

dotenv.config();
Firebase 提供了 GCLOUD_PROJECT 變數,因此它未在 .env 檔案中定義。
當 missingKeys 陣列不為空時,AUDIO_CONFIG 會拋出一個錯誤,列出所有缺失的變數名稱。如果驗證成功,則會回傳 genAIOptions 與 model。genAIOptions 用於初始化 GoogleGenAI,而 model 是選定的 TTS 模型名稱。
雲端函式 在撰寫音訊提示詞之前,會先清理場景 (scene) 與逐字稿 (transcript)。
sanitizeScene 函式接受場景,並將換行字元 ('\n') 以 '\\n' 進行跳脫。換行字元會建立空白行,通常標誌著區塊的結束。這種清理方式能有效地將場景扁平化為單一的連續行資料,並讓 LLM 的 Markdown 解析器將其識別為單一且安全的段落。清理過程還會移除注入場景中的所有 Markdown 標題。
function sanitizeScene(text: string): string {
    return (text || "").trim().replace(/\r?\n/g, "\\n").replace(/^[#\s]+/gm, "");
}
sanitizeTranscript 函式接受逐字稿,並移除注入其中的所有 Markdown 標題與三引號。
function sanitizeTranscript(text: string): string {
    return (text || "").trim().replace(/^#+/gm, "").replace(/"""/g, '"');
}
AudioPrompt 介面封裝了場景、情感、節奏、逐字稿與聲音選項,用以設置音訊的位置、音訊標籤、文字與角色 (persona)。
export type AudioPrompt = {
  scene: string;
  emotion: string;
  pace: string;
  transcript: string;
  voiceOption: string;
}
SCENE_DICTIONARY 是一個場景陣列。當使用者未提供場景時,會從陣列中隨機選擇一個場景。
export const SCENE_DICTIONARY = [
    "A dimly lit, dusty library filled with ancient leather-bound books.\n" +
        "The air is thick with history. A scholarly archivist is leaning closely into a warm, vintage ribbon microphone.\n" +
        "They speak with an infectious, hushed intensity, eager to share a forgotten secret they just uncovered in a decaying manuscript.",

    "It is 10:00 PM in a glass-walled studio overlooking the moonlit London skyline, but inside, it is blindingly bright.\n" +
        "The red 'ON AIR' tally light is blazing. The speaker is standing up, bouncing on the balls of their heels to the rhythm of a thumping backing track.\n" +
        "It is a chaotic, caffeine-fueled cockpit designed to wake up an entire nation.",

    "A meticulously sound-treated bedroom in a suburban home.\n" +
        "The space is deadened by plush velvet curtains and a heavy rug, creating an intimate, close-up acoustic environment.\n" +
        "The speaker delivers the information like a trusted friend sharing an inside joke.",

    "A high-tech, minimalist laboratory humming with servers.\n" +
        "Crisp, clean acoustics reflect off glass and steel.\n" +
        "A brilliant but eccentric scientist is pacing back and forth, speaking rapidly and enthusiastically into a headset microphone, excited to explain a complex phenomenon.",
];
我定義了一個 buildAudioPrompt 函式來構建進階音訊提示詞。
當定義了情感時,標籤為 [<emotion>]。當定義了節奏時,標籤為 [<pace>]。組合後的音訊標籤為 [<emotion>] [<pace>]<空格>,以建立正確的 token 邊界。
insertAudioTagsToTranscript 使用正規表達式將逐字稿分割成行,在每行之前插入組合音訊標籤,然後用空字串將它們連接起來。
buildAudioPrompt 在回傳字串之前,會將場景與富有表現力的逐字稿連接起來。
import { SCENE_DICTIONARY } from './constants/scenes.const';
import { AudioPrompt } from './types/audio-prompt.type';

function makeTag(value: string) {
    const trimmedValue = value.trim();
    return trimmedValue ? `[${trimmedValue}] ` : "";
}

function insertAudioTagsToTranscript({ transcript, pace, emotion }: AudioPrompt): string {
    const audioTags = `${makeTag(emotion)}${makeTag(pace)}`;
    const cleanedTranscript = sanitizeTranscript(transcript);

    const parts = cleanedTranscript.split(/(?<!\b(?:Mr|Mrs|Ms|Dr|St|i\.e|e\.g))([.!?\n\r]+[”"’']*\s*)/);
    return parts
        .map((text, i, arr) => {
            if (i % 2 !== 0) {
                return ""; // Skip delimiters, they are appended to the text blocks
            }
            const delimiter = arr[i + 1] || "";
            return text.trim() ? `${audioTags}${text.trim()}${delimiter}` : delimiter;
        })
        .join("");
}

export function buildAudioPrompt(data: AudioPrompt): string {
    const randomIndex = Math.floor(Math.random() * SCENE_DICTIONARY.length);
    const selectedScene = SCENE_DICTIONARY[randomIndex];

    const trimmedScene = (data.scene || "").trim() || selectedScene;
    const escapedScene = sanitizeScene(trimmedScene);
    const transcript = insertAudioTagsToTranscript(data);

    return `## Scene:
${escapedScene}

## Transcript:
"""
${transcript}
"""
`;
}
提示詞的輸出如下所示:
## Scene:
<scene>

## Transcript:
[<emotion>] [<pace>] <句子 1>[<emotion>] [<pace>] <句子 2>...[<emotion>] [<pace>] <句子 N>
createVoiceConfig 函式會構建一個 GenerateContentConfig 執行個體,該執行個體輸出由指定聲音名稱敘述的語音。
import { GenerateContentConfig } from "@google/genai";

export function createVoiceConfig(voiceName = "Kore"): GenerateContentConfig {
    return {
        responseModalities: ["audio"],
        speechConfig: {
            voiceConfig: {
                prebuiltVoiceConfig: {
                    voiceName,
                },
            },
        },
    };
}
const splitList = (whitelist?: string) => (whitelist || "").split(",").map((origin) => origin.trim());

export const whitelist = splitList(process.env.WHITELIST);
export const cors = whitelist.length > 0 ? whitelist : true;
export const refererList = splitList(process.env.REFERER);
所有的 雲端函式 都強制執行 App Check、CORS 以及 600 秒的逾時期間。如果未指定 WHITELIST,CORS 預設為 true。雖然在示範環境中可以接受,但在實際生產環境中請將 CORS 配置為特定的網域或 false,以防止未經授權的存取。
當 isStreaming 為 true 時,readFact 雲端函式會委派給 readFactStreamFunction。否則,它會委派給 readFactFunction。
readFactFunction 函式回傳一個 Promise<string>,即編碼後的 Base64 字串。
readFactStreamFunction 函式回傳一個 Promise<number[] | undefined>,代表 WAV 標頭位元組的緩衝區。
import { onCall } from "firebase-functions/v2/https";
import { cors } from "../auth";
import { buildAudioPrompt } from './audio-prompt';
import { readFactFunction, readFactFunctionStream } from "./read-fact";
import { createVoiceConfig } from './voice-config';

const options = {
    cors,
    enforceAppCheck: true,
    timeoutSeconds: 600,
};

export const readFact = onCall(options, (request, response) => {
    const { data, acceptsStreaming } = request;
    const isStreaming = acceptsStreaming && !!response;
    const prompt = buildAudioPrompt(data);
    const voiceOption = createVoiceConfig(data.voiceOption);

    return isStreaming
        ? readFactStreamFunction(prompt, voiceOption, response)
        : readFactFunction(prompt, voiceOption);
});
withAIAudio 函式是一個高階函式,它呼叫回呼 (callback) 來產生音訊串流。
async function withAIAudio(callback: (ai: GoogleGenAI, model: string) => Promise<string | number[] | undefined>) {
    try {
        const variables = AUDIO_CONFIG;
        if (!variables) {
            return "";
        }

        const { genAIOptions, model } = variables;
        const ai = new GoogleGenAI(genAIOptions);
        return await callback(ai, model);
    } catch (e) {
        if (e instanceof HttpsError) {
            throw e;
        }
        throw new HttpsError("internal", "An internal error occurred while setting up the AI client.", {
            originalError: (e as Error).message,
        });
    }
}
generateAudio 是一個回呼函式,使用 Gemini 3.1 Flash TTS Preview 模型來產生回應。getBase64DataUrl 呼叫 extractInlineAudioData 從回應中擷取原始資料與 MIME 類型。encodeBase64String 函式首先將原始資料轉換為 WAV 格式,然後編碼為 Base64 格式,最後回傳 Base64 字串。
createAudioParams 函式構建一個包含 Gemini TTS 模型、音訊提示詞與語音配置的參數。
async function generateAudio(aiTTS: AIAudio, prompt: string, voiceOption: GenerateContentConfig) {
    try {
        const { ai, model } = aiTTS;
        const response = await ai.models.generateContent(createAudioParams(model, prompt, voiceOption));
        return getBase64DataUrl(response);
    } catch (error) {
        console.error(error);
        throw error;
    }
}

function createAudioParams(model: string, prompt: string, config?: GenerateContentConfig) {
    return {
        model,
        contents: [
            {
                role: "user",
                parts: [
                    {
                        text: prompt,
                    },
                ],
            },
        ],
        config,
    };
}

function extractInlineAudioData(response: GenerateContentResponse): {
    rawData: string | undefined;
    mimeType: string | undefined;
} {
    const { data: rawData, mimeType } = response.candidates?.[0]?.content?.parts?.[0]?.inlineData ?? {};

    return { rawData, mimeType };
}

function getBase64DataUrl(response: GenerateContentResponse) {
    const { rawData, mimeType } = extractInlineAudioData(response);

    if (!rawData || !mimeType) {
        throw new Error("Audio generation failed: No audio data received.");
    }

    return encodeBase64String({ rawData, mimeType });
}

export function encodeBase64String({ rawData, mimeType }: RawAudioData) {
    const wavBuffer = convertToWav(rawData, mimeType);
    const base64Data = wavBuffer.toString("base64");
    return `data:audio/wav;base64,${base64Data}`;
}
generateAudioStream 是一個回呼函式,使用 Gemini 3.1 Flash TTS Preview 模型來串流傳輸音訊區塊 (chunks) 列表。區塊會被反覆運算,以便將每個區塊傳遞給 extractInlineAudioData 函式來擷取原始資料與 MIME 類型。函式將區塊的原始資料轉換為緩衝區並發送給用戶端;累計位元組長度以確定所有區塊的總大小。
在所有區塊都發送給用戶端後,createWavHeader 函式會使用總位元組長度與音訊選項來構建 WAV 標頭並回傳。
async function generateAudioStream(
    aiTTS: AIAudio,
    prompt: string,
    voiceOption: GenerateContentConfig,
    response: CallableResponse<unknown>,
): Promise<number[] | undefined> {
    try {
        const { ai, model } = aiTTS;
        const chunks = await ai.models.generateContentStream(createAudioParams(model, prompt, voiceOption));
        let byteLength = 0;
        let options: WavConversionOptions | undefined = undefined;
        for await (const chunk of chunks) {
            const { rawData, mimeType } = extractInlineAudioData(chunk);
            if (!options && mimeType) {
                options = parseMimeType(mimeType);
                response.sendChunk({
                    type: "metadata",
                    payload: {
                        sampleRate: options.sampleRate,
                    },
                });
            }

            if (rawData && mimeType) {
                const buffer = Buffer.from(rawData, "base64");
                byteLength = byteLength + buffer.length;
                response.sendChunk({
                    type: "data",
                    payload: {
                        buffer,
                    },
                });
            }
        }

        if (options && byteLength > 0) {
            const header = createWavHeader(byteLength, options);
            return [...header];
        }

        return undefined;
    } catch (error) {
        console.error(error);
        throw error;
    }
}
readFactFunction 呼叫 withAIAudio 高階函式來產生 Base64 編碼字串。
readFactStreamFunction 函式呼叫 withAIAudio 高階函式來將區塊寫入回應主體並發送給用戶端。接著,generateAudioStream 函式回傳 WAV 標頭的位元組。
export async function readFactFunction(prompt: string, voiceOption: GenerateContentConfig) {
    return withAIAudio((ai, model) => generateAudio({ ai, model }, prompt, voiceOption));
}

export async function readFactStreamFunction(prompt: string, voiceOption: GenerateContentConfig, response: CallableResponse<unknown>) {
    return withAIAudio((ai, model) => generateAudioStream({ ai, model }, prompt, voiceOption, response));
}
我實作了一個 FIREBASE_APP_CONFIG IIFE (立即呼叫函式運算式),僅執行一次來驗證 Firebase 應用程式的環境變數。
export const FIREBASE_APP_CONFIG = (() => {
    const env = process.env;
    const missingKeys: string[] = [];
    const apiKey = validate(env.APP_API_KEY, "API Key", missingKeys);
    const appId = validate(env.APP_ID, "App Id", missingKeys);
    const messagingSenderId = validate(env.APP_MESSAGING_SENDER_ID, "Messaging Sender ID", missingKeys);
    const recaptchaSiteKey = validate(env.RECAPTCHA_ENTERPRISE_SITE_KEY, "Recaptcha site key", missingKeys);
    const projectId = validate(env.GCLOUD_PROJECT, "Project ID", missingKeys);

    if (missingKeys.length > 0) {
        throw new Error(`Missing environment variables: ${missingKeys.join(", ")}`);
    }

    return {
        app: {
            apiKey,
            appId,
            projectId,
            messagingSenderId,
            authDomain: `${projectId}.firebaseapp.com`,
            storageBucket: `${projectId}.firebasestorage.app`,
        },
        recaptchaSiteKey,
    };
})();
getFirebaseConfig 函式在將 FIREBASE_APP_CONFIG 回傳給 Angular 應用程式之前會將其快取一小時。
Angular 應用程式從 雲端函式 接收 Firebase 應用程式配置與 reCAPTCHA 網站金鑰,以初始化 Firebase AI Logic 並保護資源免受未經授權的存取與濫用。
export const getFirebaseConfig = onRequest({ cors }, (request, response) => {
    if (!validateRequest(request, response)) {
        return;
    }

    try {
        response.set("Cache-Control", "public, max-age=3600, s-maxage=3600");
        response.json(FIREBASE_APP_CONFIG);
    } catch (err) {
        console.error(err);
        response.status(500).send("Internal Server Error");
    }
});
對於本地開發,我使用 Firebase Local Emulator Suite 以節省成本與時間。在 bootstrapFirebase 程序中,應用程式呼叫 connectFunctionsEmulator 來連結至在 http://localhost:5001 運行的 雲端函式。
執行 firebase init 時,連接埠號預設為 5001。
function connectEmulators(functions: Functions, remoteConfig: RemoteConfig) {
  if (location.hostname === 'localhost') {
    const host = getValue(remoteConfig, 'functionEmulatorHost').asString();
    const port = getValue(remoteConfig, 'functionEmulatorPort').asNumber();
    connectFunctionsEmulator(functions, host, port);
  }
}
loadFirebaseConfig 是一個輔助函式,它向 Cloud 函式發送請求以獲取 Firebase App 配置與 reCAPTCHA 網站金鑰。
{
  "getFirebaseConfigUrl": "http://127.0.0.1:5001/vertexai-firebase-6a64f/us-central1/getFirebaseConfig"
}
export type FirebaseConfigResponse = {
  app: FirebaseOptions;
  recaptchaSiteKey: string
}
import { HttpClient } from '@angular/common/http';
import { inject } from '@angular/core';
import { catchError, lastValueFrom, throwError } from 'rxjs';
import config from '../../public/config.json';
import { FirebaseConfigResponse } from './ai/types/firebase-config.type';

async function loadFirebaseConfig() {
  const httpService = inject(HttpClient);
  const firebaseConfig$ =
    httpService.get<FirebaseConfigResponse>(config.getFirebaseConfigUrl)
      .pipe(catchError((e) => throwError(() => e)));
  return lastValueFrom(firebaseConfig$);
}
bootstrapFirebase 函式初始化 FirebaseApp 與 App Check,載入 Firebase 遠端配置與雲端函式,並將其儲存在配置服務中供稍後使用。
export async function bootstrapFirebase() {
    try {
      const configService = inject(ConfigService);
      const firebaseConfig = await loadFirebaseConfig();
      const { app, recaptchaSiteKey } = firebaseConfig;
      const firebaseApp = initializeApp(app);
      const remoteConfig = await fetchRemoteConfig(firebaseApp);

      initializeAppCheck(firebaseApp, {
        provider: new ReCaptchaEnterpriseProvider(recaptchaSiteKey),
        isTokenAutoRefreshEnabled: true,
      });

      const functionRegion = getValue(remoteConfig, 'functionRegion').asString();
      const functions = getFunctions(firebaseApp, functionRegion);
      connectEmulators(functions, remoteConfig);

      configService.loadConfig(firebaseApp, remoteConfig, functions);
    } catch (err) {
      console.error(err);
    }
}
AppConfig 保持不變。
import { ApplicationConfig, provideAppInitializer } from '@angular/core';
import { bootstrapFirebase } from './app.bootstrap';

export const appConfig: ApplicationConfig = {
  providers: [
    provideAppInitializer(async () => bootstrapFirebase()),
  ]
};
我在 Angular 前端建立了一個 AudioTagsComponent 與一個新的 Signal 表單,用以輸入場景、情感、節奏與聲音名稱。
<div>
  <h3>
    <span class="text-xl">🎙️</span> 自訂音訊產生
  </h3>

  <div class="grid grid-cols-1 md:grid-cols-2 gap-4">
    <!-- Scene -->
    <div class="flex flex-col gap-1.5 md:col-span-2">
      <label for="scene">場景描述</label>
      <textarea id="scene" [formField]="audioPromptForm.scene"
      ></textarea>
    </div>

    <!-- Emotion -->
    <div class="flex flex-col gap-1.5">
      <label for="emotion">人聲情感</label>
      <input type="text" id="emotion" [formField]="audioPromptForm.emotion"
        placeholder="例如:驚慌、私語"
      />
    </div>

    <!-- Pace -->
    <div class="flex flex-col gap-1.5">
      <label for="pace">說話語速</label>
      <input type="text" id="pace" [formField]="audioPromptForm.pace"
        placeholder="例如:極慢、快速"
      />
    </div>

    <!-- Voice Option -->
    <div class="flex flex-col gap-1.5 md:col-span-2">
      <label for="voiceOption">AI 聲音模型</label>
      <select id="voiceOption" [formField]="audioPromptForm.voiceOption"
      >
        <option value="" disabled selected>請選擇聲音...</option>
        @for (option of sortedVoiceOptions(); track option.name) {
          <option [value]="option.name" class="bg-slate-800">{{ option.label }}</option>
        }
      </select>
    </div>
  </div>
</div>
import { ChangeDetectionStrategy, Component, computed, signal } from '@angular/core';
import { form, FormField } from '@angular/forms/signals';
import { VOICE_OPTIONS } from './constants/voice-options.const';
import { AudioPromptData } from './types/audio-prompt-data.type';

@Component({
  selector: 'app-audio-tags',
  imports: [FormField],
  templateUrl: './audio-tags.component.html',
  changeDetection: ChangeDetectionStrategy.OnPush,
})
export class AudioTagsComponent {
    #audioPromptModel = signal<AudioPromptData>({
      scene: 'A news anchor reading the news in a busy newsroom',
      emotion: 'professional, slightly serious',
      pace: 'moderate, clear enunciation',
      voiceOption: 'Kore'
    });
    audioPromptForm = form(this.#audioPromptModel);

    sortedVoiceOptions = computed(() => {
      const sortedList = VOICE_OPTIONS.sort((a, b) => a.name.localeCompare(b.name));

      return sortedList.map(option => ({
        name: option.name,
        label: `${option.name} - ${option.description}`
      }));
    });

    audioPromptModel = this.#audioPromptModel.asReadonly();
}
AudioTagsComponent 被匯入至 ObscureFactComponent 中,以便使用者能在實驗性 Signal 表單中輸入數值。
在 ObscureFactComponent 的 HTML 範本中,<app-audio-tags> 有一個範本變數 audioTags,且 audioTags.audioPromptModel() 會解析為 AudioPromptData 的執行個體。資料會被指派給 generateSpeech 方法的 audioTags 屬性。
<div class="w-full mt-6">
    <app-audio-tags #audioTags />

    <h3>關於標籤的一個驚人或冷知識</h3>
    @if (interestingFact()) {
      <p>{{ interestingFact() }}</p>

      <app-error-display [error]="ttsError()" />

      <app-text-to-speech
        [isLoadingSync]="isLoadingSync()"
        [isLoadingStream]="isLoadingStream()"
        [isLoadingWebAudio]="isLoadingWebAudio()"
        [audioUrl]="audioUrl()"
        (generateSpeech)="generateSpeech({ mode: $event, audioTags: audioTags.audioPromptModel() })"
        [playbackRate]="playbackRate()"
      />
    } @else {
      <p>該標籤沒有任何有趣的冷知識。</p>
    }
</div>
import { AudioPromptData } from './audio-prompt-data.type';
import { GenerateSpeechMode } from '../../generate-audio.util';

export type ModeWithAudioTags = {
  mode: GenerateSpeechMode;
  audioTags: AudioPromptData;
};

export type AudioPrompt = {
  scene: string;
  emotion: string;
  pace: string;
  transcript: string;
  voiceOption: string;
};
generateSpeech 方法使用 fact 與 audioTags 構建一個 AudioPrompt 執行個體。當 mode 為 stream 時,SpeechService 呼叫 generateAudioBlobURL 使用 audioPrompt 構建 Blob URL。當 mode 為 sync 時,SpeechService 呼叫 generateAudio 使用 audioPrompt 產生編碼後的 Base64 字串。當 mode 為 web_audio_api 時,AudioPlayerService 呼叫 playStream 來串流播放音訊。
import { SpeechService } from '@/ai/services/speech.service';
import { AudioPrompt } from '@/ai/types/audio-prompt.type';
import { ChangeDetectionStrategy, Component, inject, input, OnDestroy, signal } from '@angular/core';
import { revokeBlobURL } from '../blob.util';
import { AudioTagsComponent } from './audio-tags/audio-tags.component';
import { ModeWithAudioTags } from './audio-tags/types/mode-audio-tags.type';
import { generateSpeechHelper, streamSpeechWithWebAudio, ttsError } from './generate-audio.util';
import { AudioPlayerService } from './services/audio-player.service';

@Component({
  selector: 'app-obscure-fact',
  templateUrl: './obscure-fact.component.html',
  imports: [
    TextToSpeechComponent,
  ],
  changeDetection: ChangeDetectionStrategy.OnPush,
})
export class ObscureFactComponent implements OnDestroy {
  interestingFact = input<string | undefined>(undefined);

  speechService = inject(SpeechService);
  audioPlayerService = inject(AudioPlayerService);

  isLoadingSync = signal(false);
  isLoadingStream = signal(false);
  isLoadingWebAudio = signal(false);

  audioUrl = signal<string | undefined>(undefined);

  ttsError = ttsError;

  async generateSpeech({ mode, audioTags }: ModeWithAudioTags) {
    const fact = this.interestingFact();

    if (fact) {
      revokeBlobURL(this.audioUrl);
      this.audioUrl.set(undefined);

      const audioPrompt = {
          ...audioTags,
          transcript: fact,
      };
      if (mode === 'sync' || mode === 'stream') {
        const loadingSignal = mode === 'stream' ? this.isLoadingStream : this.isLoadingSync;
        const speechFn = (audioPrompt: AudioPrompt) => mode === 'stream' ?
            this.speechService.generateAudioBlobURL(audioPrompt) :
            this.speechService.generateAudio(audioPrompt);

        await generateSpeechHelper(audioPrompt, loadingSignal, this.audioUrl, speechFn);
      } else if (mode === 'web_audio_api') {
        await streamSpeechWithWebAudio(
          audioPrompt,
          this.isLoadingWebAudio,
          (audioPrompt: AudioPrompt) => this.audioPlayerService.playStream(audioPrompt));
      }
    }
  }

  ngOnDestroy(): void {
    revokeBlobURL(this.audioUrl);
  }
}
SpeechService 有一個 generateAudio 方法,它呼叫 readFact 雲端函式以獲取編碼後的 Base64 字串。
同樣地,該服務也有一個 generateAudioBlobURL 方法,它串流傳輸區塊以建立緩衝區,並在其前方加上 WAV 標頭。constructBlobURL 從 Blob Part 陣列建立一個 Blob URL。
export function constructBlobURL(parts: BlobPart[]) {
  return URL.createObjectURL(new Blob(parts, { type: 'audio/wav' }));
}
import { AudioPrompt } from '@/ai/types/audio-prompt.type';
import { constructBlobURL } from '@/photo-panel/blob.util';
import { inject, Injectable } from '@angular/core';
import { Functions, httpsCallable } from 'firebase/functions';
import { StreamMessage } from '../types/stream-message.type';
import { ConfigService } from './config.service';

@Injectable({
  providedIn: 'root'
})
export class SpeechService  {
    private configService = inject(ConfigService);

    private get functions(): Functions {
      if (!this.configService.functions) {
        throw new Error('Firebase Functions has not been initialized.');
      }
      return this.configService.functions;
    }

    async generateAudio(audioPrompt: AudioPrompt) {
      const readFactFunction = httpsCallable<AudioPrompt, string>(
        this.functions, 'textToAudio-readFact'
      );

      const { data: audioUri } = await readFactFunction(audioPrompt);
      return audioUri;
    }

    async generateAudioStream(audioPrompt: AudioPrompt) {
      const readFactStreamFunction = httpsCallable<AudioPrompt, number[] | undefined, StreamMessage>(
        this.functions, 'textToAudio-readFact'
      );

      return readFactStreamFunction.stream(audioPrompt);
    }

    async generateAudioBlobURL(audioPrompt: AudioPrompt) {
      const { stream, data } = await this.generateAudioStream(audioPrompt);

      const audioParts: BlobPart[] = [];
      for await (const audioChunk of stream) {
        if (audioChunk && audioChunk.type === 'data') {
          audioParts.push(new Uint8Array(audioChunk.payload.buffer.data));
        }
      }

      const wavHeader = await data;
      if (wavHeader && wavHeader.length) {
        audioParts.unshift(new Uint8Array(wavHeader));
      }

      return constructBlobURL(audioParts);
    }
}
與 SpeechService.generateAudioBlobURL 類似,AudioPlayerService 的 playStream 方法也呼叫 generateAudioStream 以獲取區塊串流並立即播放每個區塊。
import { SpeechService } from '@/ai/services/speech.service';
import { AudioPrompt } from '@/ai/types/audio-prompt.type';
import { inject, Injectable, OnDestroy, signal } from '@angular/core';

@Injectable({
  providedIn: 'root'
})
export class AudioPlayerService implements OnDestroy  {

  async playStream(audioPrompt: AudioPrompt) {
      const { stream } = await this.speechService.generateAudioStream(audioPrompt);
      for await (const audioChunk of stream) {
        ... 處理每個區塊 ...
      }
  }


  ngOnDestroy(): void {
    ... 釋放資源以防止記憶體洩漏 ...
  }
}
示範的解說到此結束。您現在應該能夠輸入場景、情感與節奏的不同組合,為音訊片段中的特定文字創造出獨特的個性。
Gemini AI Studio 與 Vertex AI Studio 中的範例使用靜態音訊標籤與逐字稿,且在我的測試中運作正常。
當我在示範中應用動態音訊標籤與逐字稿時,Gemini 3.1 TTS Flash Preview 模型忽略了音訊標籤。在 Gemini CLI 中偵錯數小時後,此問題才得以解決。
以下是注意事項與經驗教訓:
Token 邊界陷阱 (The Token Boundary Trap): 程式碼原本在沒有空格的情況下連接標籤與逐字稿(例如 [giggle][slow]Before)。LLM 分詞器 (tokenizer) 無法識別出更改音訊行為與節奏的指令。我的修復方法是在標籤與逐字稿之間插入空格,例如 [giggle] [slow] Before。
注入提示詞範本前先清理輸入: 清理函式會從場景與逐字稿中移除 Markdown 標題 (#) 與三引號。經過清理後的場景與逐字稿會被注入提示詞範本中,以構建最終的音訊提示詞。
LLM 不理解成語: 我在 Signal 表單中輸入了 "at a snail's pace"(慢如蝸牛),並在行前插入了 [at a snail's pace]。然而,模型照字面意思讀出了標籤,且沒有發生語速變化。
「重複加權」是真正的策略: 如果標準標籤(如 [slow] 和 [fast])不夠戲劇化,請在語速前加上 "very" 來增加語速的戲劇效果。顯而易見地,[very, very, very slow] 產生的音訊比 [slow] 長。
將換行字元 (\n) 替換為 \\n: 以便將行扁平化為單一語句段落。當場景與逐字稿被清理與跳脫後,它們會被注入提示詞範本中,同時為 LLM 解析器保留結構。
文字轉語音與 Firebase 無伺服器擴展性的結合,為 Angular 應用程式提供了即時音訊產生的能力。
首先,Angular 應用程式既不需要 genai 依賴項,也不會在 .env 檔案中儲存 Vertex AI 環境變數。用戶端應用程式呼叫 雲端函式 來執行文字轉語音任務,以產生音訊串流。
雲端函式 接收來自用戶端的參數,並執行 TTS 操作,回傳完整的編碼 Base64 字串或以區塊形式傳輸音訊位元組。在本地開發期間,Firebase 模擬器會呼叫 http://localhost:5001 的函式,而不是部署在 Cloud Run 平台上的函式,從而節省成本。
嘗試複製 GitHub 存放庫,上傳圖片以產生冷知識,並使用 Gemini 3.1 Flash TTS preview 模型以指定的場景、情感與節奏將其讀出。
 Connie
