
紀錄使用 Rust + Embassy 撰寫第一個 nRF54L15 LED 閃爍程式,並透過 nRF5340-DK 的 J-Link / SWD 介面燒錄與除錯 Raytac AN54LV-DB-15 的流程。
最近想嘗試開發低功耗藍牙(Bluetooth Low Energy, BLE)應用,因此選擇了 Nordic 的 nRF54L15 SoC。
由於未來如果想把模組直接整合到自己的 PCB 上,選擇已經整合天線與 RF 電路的模組,可以省去自行設計 RF 與天線的麻煩,也能降低硬體設計的複雜度。
一開始原本想使用 u-blox 的開發板,不過 u-blox 的開發板價格比較高,雖然模組本身的價格還可以接受,而且還需要從國外運送到台灣,整體上比較麻煩。
後來發現 Raytac 是台灣的廠商,可以直接在露天拍賣上購買。相較之下,Raytac 的開發板便宜不少,而且收到開發板時還發現裡面附了一條 10-pin SWD debug cable (如果沒有這條線可以省一些錢)。
所以最後選擇 Raytac 的 AN54LV-DB-15,算是價格比較實惠。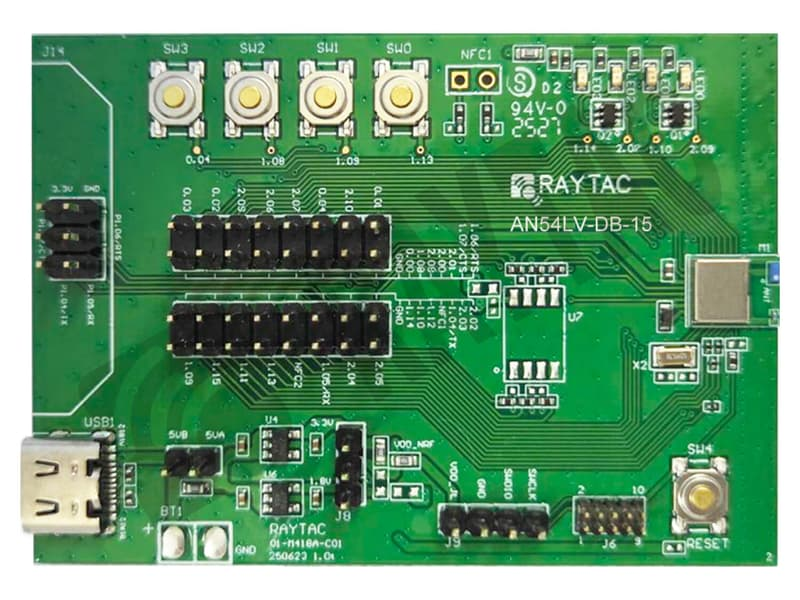
由於手邊沒有專用的 Debugger,剛好有一張 nRF5340-DK,因此直接使用 nRF5340-DK 上的 onboard J-Link,透過 Debug Out 來燒錄與除錯 AN54LV-DB-15。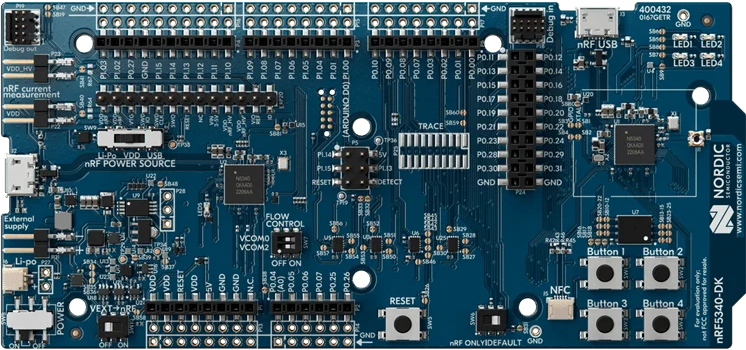
連接方式: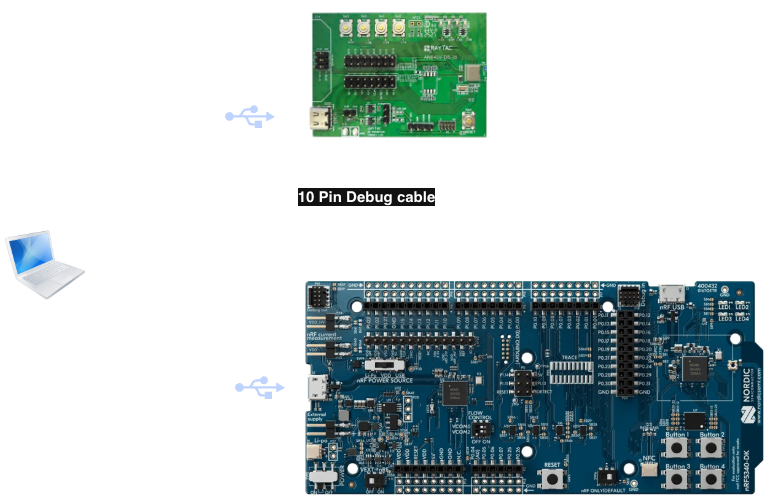
nRF DK 的開發板有一些開關需要設定,一開始 USB 接上 nRF5340-DK 後,板子上的 LED 都沒有亮,也沒有被 Mac 正確看到,找了很久問題才發現我的 Power 開關切在 OFF 的地方。
使用前要確認 nRF5340 DK 的開關:
POWER ON/OFF → ON
nRF POWER SOURCE → VDD
這樣設定後 MacOS 可以看到 nRF5340-DK 上的 J-Link。
可以使用 ioreg 命令檢查:
ioreg -p IOUSB | grep -i -E "nordic|segger|j-link|nrf"
確認 USB 裝置。
看到類似:
| | | +-o **J-Link**@01122400 <class IOUSBHostDevice, id 0x10010fafb, registered, matched, active, busy 0 (325 ms), retain 41>
代表 J-Link USB interface 已經被 MacOS 偵測到。
一開始我以為我會用到 Nordic Command Line Tools 但後來發現完全不需要使用。
我當時安裝的是在 Nordic 下載的最新版本 nrf-command-line-tools-10.24.2-darwin.dmg,Nordic 網路超慢下載速度大概 20 KB/s 下載超久,安裝之後由於我是要使用 Rust 開發所以只有用到 J-Link ,但這個 package 內的 J-Link 版本(v7.94e)太舊,沒有 nRF54L15 的選項可以用,也許可以用相同 CPU (Cortex-M33)的選項替代,但我直接到 J-Link 抓最新的版本。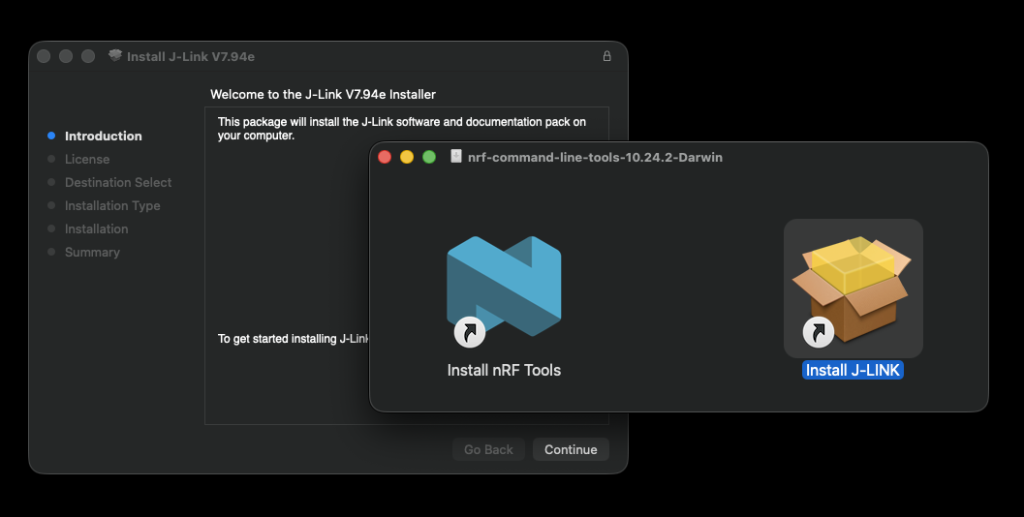
安裝 Nordic Command Line Tools 後,可以使用 nrfjprog 確認 J-Link ID,確認電腦有正常識別 nRF5340 DK:
nrfjprog --ids
得到:
1050042847
nrfjprog 這裡只是用來確認 J-Link 是否被 macOS 正確識別,後續 Rust 開發流程並不需要使用 nrfjprog。
原本 J-Link:
J-Link Software V7.94e
到 segger.com 下載最新的 J-Link
更新後:
J-Link Software V9.74
更新後 JLinkExe 已經可以正確選擇:
nRF54L15 Cortex-M33
由於我是第一次使用 Rust 開發 Raytac AN54LV-DB-15 的應用程式,我不確定我可以正確的使用 Rust 開發並且燒錄。所以我要寫一個燈光閃爍的程式來測試這樣是可行的。
查看 Raytac AN54LV-DB-15 schematic:
![[Raytac_AN54LV-DB-15_LEDs.png]]
| LED | nRF54L15 GPIO |
|---|---|
| LED0 | P2.09 |
| LED1 | P1.10 |
| LED2 | P2.07 |
| LED3 | P1.14 |
這幾個 GPIO 是 AN54LV-DB-15 上的 LED 實際連接腳位。
參考 Embassy Github example nRF54L15-app 建立專案:
cargo new nrf54l15-led
cd nrf54l15-led
nRF54L15 Application Core 使用的 Rust thumbv8m.main-none-eabihf target,先檢查:
rustup target list --installed
檢查是否有這個 target
thumbv8m.main-none-eabihf
如果沒有加入這個 target:
rustup target add thumbv8m.main-none-eabihf
[package]
name = "nrf54l15-led"
version = "0.1.0"
edition = "2024"

[dependencies]
embassy-futures = { version = "0.1.2"}
embassy-executor = { version = "0.10.0", features = ["platform-cortex-m", "executor-thread", "executor-interrupt", "defmt"] }
embassy-time = { version = "0.5.1", features = ["defmt", "defmt-timestamp-uptime"] }
embassy-sync = { version = "0.8.0", features = ["defmt"] }
embassy-nrf = { version = "0.11.0", features = ["defmt", "nrf54l15-app-s", "time-driver-grtc", "gpiote", "unstable-pac", "time"] }
embedded-io = { version = "0.7.0", features = ["defmt"]  }
embedded-io-async = { version = "0.7.0", features = ["defmt"] }

rand = { version = "0.9.0", default-features = false }

defmt = "1.0.1"
defmt-rtt = "1.0.0"
panic-probe = { version = "1.0.0", features = ["print-defmt"] }

cortex-m = { version = "0.7.6", features = ["inline-asm", "critical-section-single-core"] }
cortex-m-rt = "0.7.0"

embedded-storage = "0.3.1"
portable-atomic = "1"

static_cell = "2"
hex-literal = "1.1"
最簡單的版本:
#![no_std]
#![no_main]

use defmt::info;
use defmt_rtt as _;
use embassy_executor::Spawner;
use embassy_nrf::gpio::{Level, Output, OutputDrive};
use embassy_time::Timer;
use panic_probe as _;

#[embassy_executor::main]
async fn main(_spawner: Spawner) {
    let p = embassy_nrf::init(Default::default());
    let mut led0 = Output::new(p.P2_09, Level::Low, OutputDrive::Standard);
    let mut led1 = Output::new(p.P1_10, Level::Low, OutputDrive::Standard);
    let mut led2 = Output::new(p.P2_07, Level::Low, OutputDrive::Standard);
    let mut led3 = Output::new(p.P1_14, Level::Low, OutputDrive::Standard);

    loop {
        info!("led on!");
        led0.set_high();
        // led1.set_high();
        // led2.set_high();
        // led3.set_high();
        Timer::after_millis(500).await;

        info!("led off!");
        led0.set_low();
        // led1.set_low();
        // led2.set_low();
        // led3.set_low();
        Timer::after_millis(500).await;
    }
}
可以使用這個指令來 build
cargo build --target thumbv8m.main-none-eabihf
但由於 .cargo/config.toml 已經設定好要使用的 target 為 thumbv8m.main-none-eabihf 所以可以直接使用
cargo build
Rust build 成功後得到:
target/thumbv8m.main-none-eabihf/debug/nrf54l15-led
這是一個 ELF executable。
可以確認:
file target/thumbv8m.main-none-eabihf/debug/nrf54l15-led
得到類似:
ELF 32-bit LSB executable, ARM, EABI5
由於 J-Link 不能直接使用 ELF,所以需要將 ELF 轉為 HEX,可以使用 rust-objcopy 轉檔。
安裝命令:
cargo install cargo-binutils
確認:
rust-objcopy --version
將 Rust 產生的 ELF 轉成 Intel HEX。
命令:
rust-objcopy -O ihex target/thumbv8m.main-none-eabihf/debug/nrf54l15-led target/thumbv8m.main-none-eabihf/debug/nrf54l15-led.hex
HEX 是較適合直接描述「哪些 address 要寫入哪些資料」的 firmware image format。
J-Link 要使用的參數如下:
Device: NRF54L15
Core: Cortex-M33
Interface: SWD
Speed: 4000 kHz
啟動 J-Link 命令:
JLinkExe
然後:
J-Link> connect
Device> ?
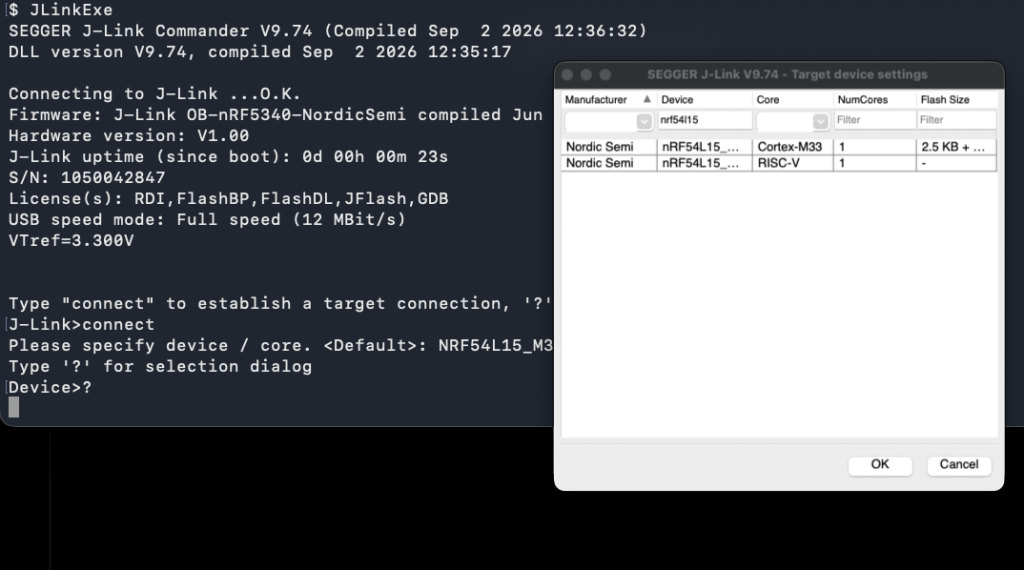
GUI 畫面選好 device 後接下來要設定 interface & interface speed,設定完他會執行一段測試,如下的顯示就是成功了。
Please specify target interface:

  J) JTAG (Default)

  S) SWD

  T) cJTAG

TIF>S

Specify target interface speed [kHz]. <Default>: 4000 kHz

Speed>

Device "NRF54L15_M33" selected.


Connecting to target via SWD

ConfigTargetSettings() start

ConfigTargetSettings() end - Took 278us

InitTarget() start

InitTarget() end - Took 3.53ms

Found SW-DP with ID 0x6BA02477

DPIDR: 0x6BA02477

CoreSight SoC-400 or earlier

AP map detection skipped. Manually configured AP map found.

AP[0]: AHB-AP (IDR: Not set, ADDR: 0x00000000)

AP[1]: APB-AP (IDR: Not set, ADDR: 0x00000000)

AP[2]: MEM-AP (IDR: Not set, ADDR: 0x00000000)

Iterating through AP map to find AHB-AP to use

AP[0]: Core found

AP[0]: AHB-AP ROM base: 0xE00FE000

CPUID register: 0x411FD210. Implementer code: 0x41 (ARM)

Feature set: Mainline

Cache: No cache

Found Cortex-M33 r1p0, Little endian.

FPUnit: 8 code (BP) slots and 0 literal slots

Security extension: implemented

Secure debug: enabled

CoreSight components:

ROMTbl[0] @ E00FE000

[0][0]: E00FF000 CID B105100D PID 000BB4C9 ROM Table

ROMTbl[1] @ E00FF000

[1][0]: E000E000 CID B105900D PID 000BBD21 DEVARCH 47702A04 DEVTYPE 00 Cortex-M33

[1][1]: E0001000 CID B105900D PID 000BBD21 DEVARCH 47701A02 DEVTYPE 00 DWT

[1][2]: E0002000 CID B105900D PID 000BBD21 DEVARCH 47701A03 DEVTYPE 00 FPB

[1][3]: E0000000 CID B105900D PID 000BBD21 DEVARCH 47701A01 DEVTYPE 43 ITM

[1][5]: E0041000 CID B105900D PID 002BBD21 DEVARCH 47724A13 DEVTYPE 13 ETM

[0][1]: E0040000 CID B105900D PID 000BBD21 DEVARCH 00000000 DEVTYPE 11 TPIU

Memory zones:

  Zone: "Default" Description: Default access mode

Cortex-M33 identified.
這代表:
Mac
 ↓
nRF5340-DK J-Link
 ↓
SWD
 ↓
AN54LV-DB-15
 ↓
nRF54L15 Cortex-M33
整條 debugger path 已經成功。
然後:
J-Link> loadfile /path/to/nrf54l15-led.hex
成功後需要手動啟動 go 讓 target 開始執行:
J-Link> g
可以使用 reset 對 target 執行 reset
J-Link> r
過程中曾經遇到:
loadfile 成功
但是程式沒有正常運作 (LED 沒有反應)
後來發現按下 AN54LV-DB-15 上的 RESET 後,程式正常執行。
因此需要注意:
loadfile
代表 firmware 已經寫入 target memory,
但在 debug workflow 中,不應該假設 target 一定已經以你預期的狀態重新啟動 firmware。
遇到:
燒錄成功
但程式沒反應
可以先使用實體按鍵 reset 或斷電重連。
今天實際驗證了整條 embedded development pipeline:
┌─────────────────────┐
│       Rust          │
└──────────┬──────────┘
           ↓
┌─────────────────────┐
│      Embassy        │
└──────────┬──────────┘
           ↓
┌─────────────────────┐
│  Cortex-M33 binary  │
└──────────┬──────────┘
           ↓
┌─────────────────────┐
│        ELF          │
└──────────┬──────────┘
           ↓
┌─────────────────────┐
│        HEX          │
└──────────┬──────────┘
           ↓
┌─────────────────────┐
│       J-Link        │
└──────────┬──────────┘
           ↓
┌─────────────────────┐
│        SWD          │
└──────────┬──────────┘
           ↓
┌─────────────────────┐
│      nRF54L15       │
│     Cortex-M33      │
└──────────┬──────────┘
           ↓
┌─────────────────────┐
│        GPIO         │
└──────────┬──────────┘
           ↓
┌─────────────────────┐
│     LED0 ~ LED3     │
└─────────────────────┘
實際上開發 embassy 的時候其實不需要使用 JLinkExe,使用 Probe-rs 更方便。
可以注意到 Embassy nRF54L15 example code .cargo/config.toml 已經設定好了。
[target.'cfg(all(target_arch = "arm", target_os = "none"))']
# replace nRF82840_xxAA with your chip as listed in `probe-rs chip list`
runner = "probe-rs run --chip nrf54l15"
所以只要把設備上的線接好,直接執行 run 就可以了。
cargo run
執行後顯示
    Finished `dev` profile [unoptimized + debuginfo] target(s) in 0.05s
     Running `probe-rs run --chip nrf54l15 target/thumbv8m.main-none-eabihf/debug/nrf54l15-led`
     Erasing ✔ 100% [####################]  52.00 KiB @  41.86 KiB/s (took 1s)
 Programming ✔ 100% [####################]  52.00 KiB @  15.25 KiB/s (took 3s)
    Finished in 4.75s
0.000329 [INFO ] led on! (nrf54l15_led nrf54l15-led/src/main.rs:20)
0.500895 [INFO ] led off! (nrf54l15_led nrf54l15-led/src/main.rs:27)
1.001531 [INFO ] led on! (nrf54l15_led nrf54l15-led/src/main.rs:20)
1.502165 [INFO ] led off! (nrf54l15_led nrf54l15-led/src/main.rs:27)
2.002800 [INFO ] led on! (nrf54l15_led nrf54l15-led/src/main.rs:20)
2.503434 [INFO ] led off! (nrf54l15_led nrf54l15-led/src/main.rs:27)
3.004069 [INFO ] led on! (nrf54l15_led nrf54l15-led/src/main.rs:20)
3.504703 [INFO ] led off! (nrf54l15_led nrf54l15-led/src/main.rs:27)

 不懂就學
不懂就學

 iThome鐵人賽
 看影片追技術
