

任何擁有公開網址的人都能使用我的權杖(Token)執行影像分析與文字轉語音(TTS),這會讓我的帳單費用迅速飆升。為了防止未經授權的使用,我想透過 Firebase Auth 加入 Email/Password 身分驗證,將 /dashboard 轉換為受保護的路由。
Firebase Auth 內建支援多種身分驗證供應商,而我選擇 Email/Password 是因為這是最容易設定的方式。在第 1 部分中,我們將設定 Firebase Auth Local Emulator、建置延遲載入(Lazy-Loaded)的 AuthService 與函式型路由守衛(Functional Route Guard),並使用 CanActivateFn 保護 /dashboard 路由。
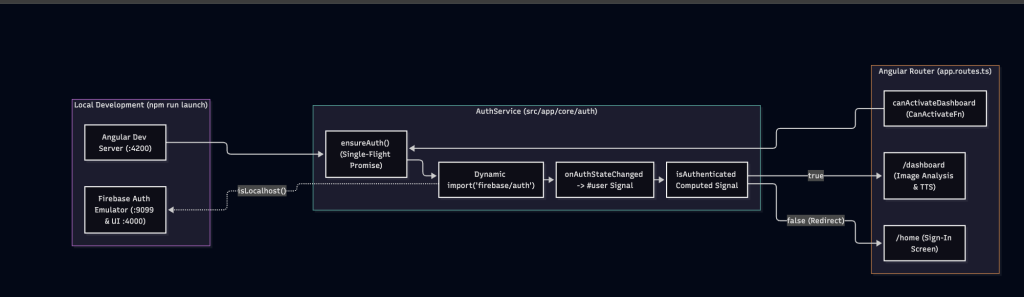
第 1 部分的重點在於同時執行 Firebase Auth Emulator 與 Angular 開發伺服器,並設定身分驗證狀態管理。
此架構使用 Firebase 的瀏覽器工作階段持久性(browserSessionPersistence)來管理使用者的身分驗證狀態,這提供了兩項主要優點:
sessionStorage 中。當使用者重新整理瀏覽器頁面時,瀏覽器會保留其登入狀態。sessionStorage 清除身分驗證狀態。下次使用者造訪應用程式時,就必須重新登入。若沒有工作階段持久性,應用程式就需要額外的自訂邏輯來檢查權杖是否過期、明確從儲存空間清除使用者狀態,並觸發路由重新導向。
同樣地,由於 firebase/auth 是體積龐大的第三方 SDK,若採用預先載入(Eager Loading)會增加初始打包大小(Initial Bundle Size)。因此,AuthService 會透過動態 import() 延遲載入該 SDK,藉此更新響應式的 isAuthenticated Signal。
firebase.json 中啟用 Auth Emulatorfirebase/firebase.json 中的 { "emulators": { "auth": ... } } 區塊會將 Firebase Auth Emulator 設定為在主機連接埠 9099(127.0.0.1:9099)上執行,而 "ui": { "enabled": true } 則會在連接埠 4000(http://127.0.0.1:4000)上啟用 Emulator UI。
// firebase/firebase.json
{
  // ... rest of configuration omitted for brevity
  "emulators": {
    "auth": {
      "port": 9099
    },
    "ui": {
      "enabled": true
    }
  }
}
concurrently 安裝為開發相依套件這個步驟是選用的,但我不喜歡分兩個步驟啟動 Firebase Auth Emulator 與 Angular 開發伺服器——先開啟一個終端機分頁執行模擬器,再開第二個終端機分頁執行 Angular 開發伺服器。安裝 concurrently 能讓我們用單一指令同時執行這兩個程序,立即開始開發工作。
npm install --save-dev concurrently
package.json 中加入模擬器與啟動指令碼在本地開發期間,我會將 Angular 應用程式連線至 Firebase Authentication Emulator,以便建立測試使用者進行登入。AuthService 會透過程式碼連線至模擬器,並由 package.json 中新增的指令碼負責啟動。
// package.json (scripts excerpt)
{
  "scripts": {
    "start": "ng serve",
    "firebase:emulate:auth": "firebase --config firebase/firebase.json emulators:start --only auth",
    "launch": "concurrently \"npm run firebase:emulate:auth\" \"npm run start\""
  }
}
以下是各個指令碼的作用:
start:在 http://localhost:4200 上啟動本地 Angular 開發伺服器(ng serve)。firebase:emulate:auth:讀取 firebase/firebase.json 設定檔,僅啟動 Authentication Emulator。launch:同時啟動 Angular 用戶端與 Firebase 模擬器,讓我能指示 Antigravity CLI 在背景執行該指令。建立種子使用者(Seed User)需要手動操作,因此我開啟位於 http://localhost:4000 的 Emulator UI,使用 aaa@example.com 與 123456 這組憑證建立一個測試使用者。請注意,123456 是為了方便本地身分驗證測試而建立的弱密碼。
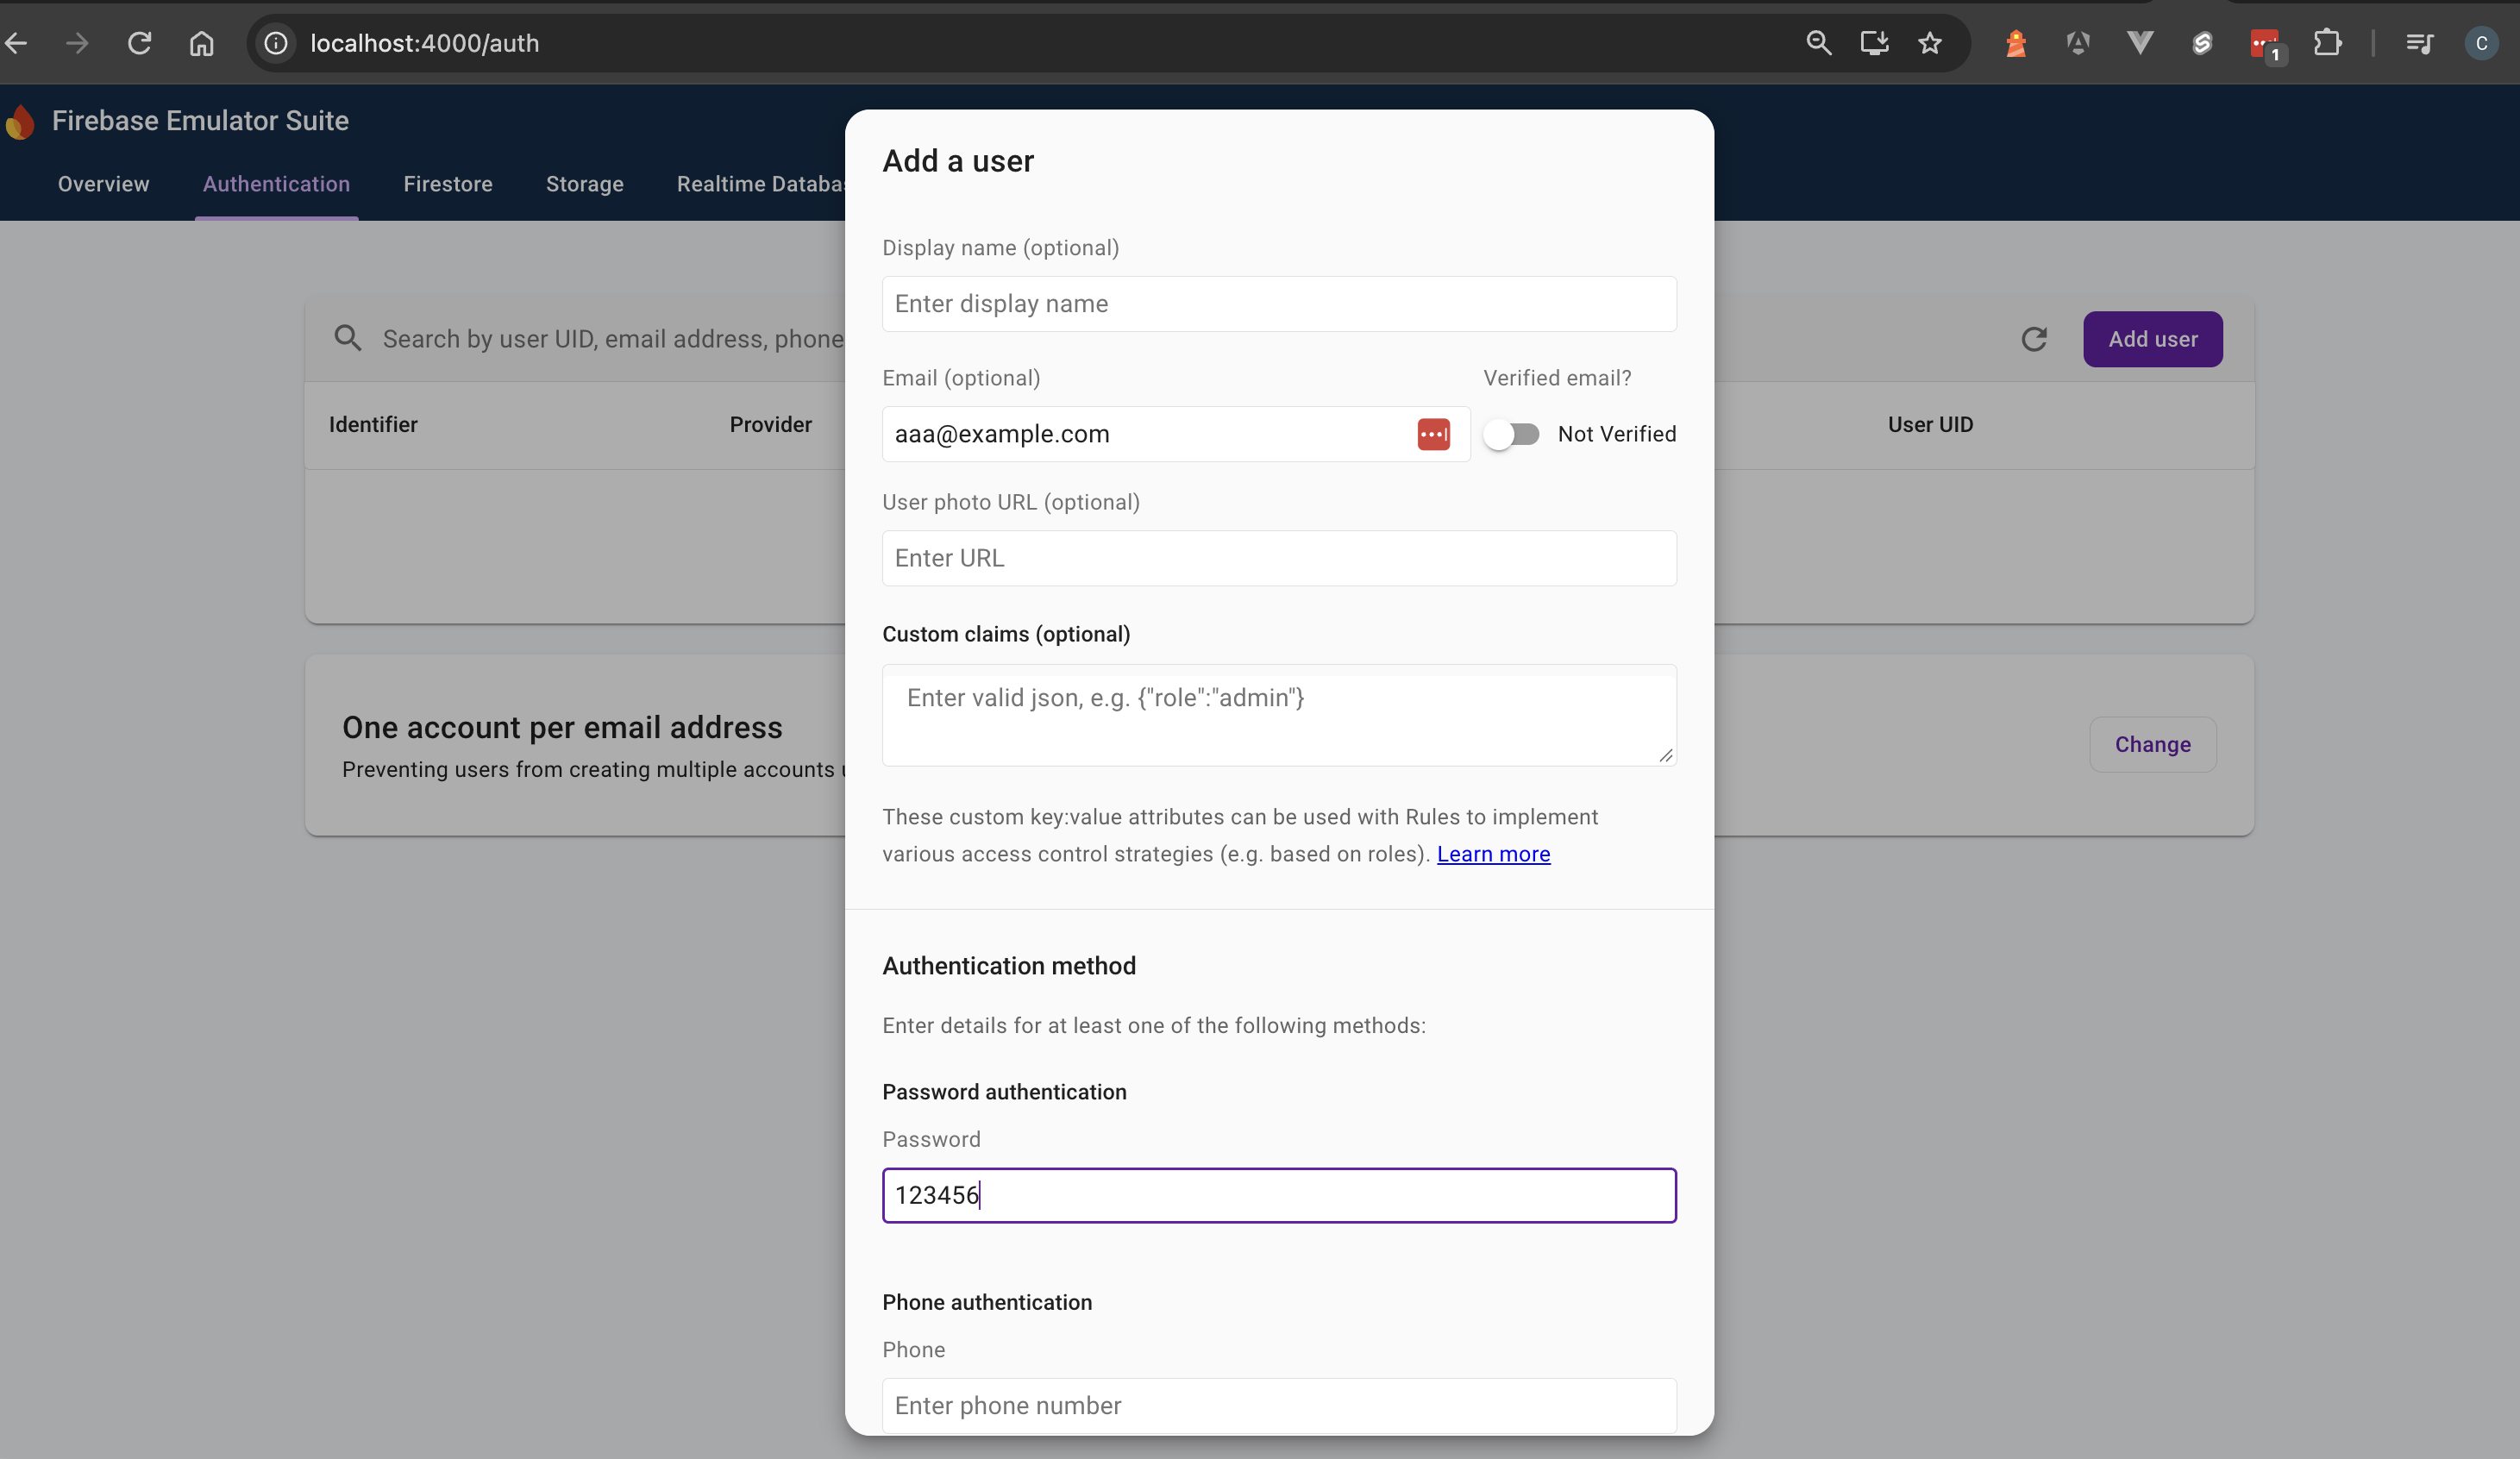
圖說:在 http://localhost:4000 的 Firebase Emulator UI 中使用電子郵件與密碼建立新的測試使用者。
儲存表單後即可成功建立使用者帳號。由於使用者清單僅會顯示電子郵件地址而不顯示密碼,我建議使用容易記住的密碼,或將密碼儲存在密碼管理工具中。
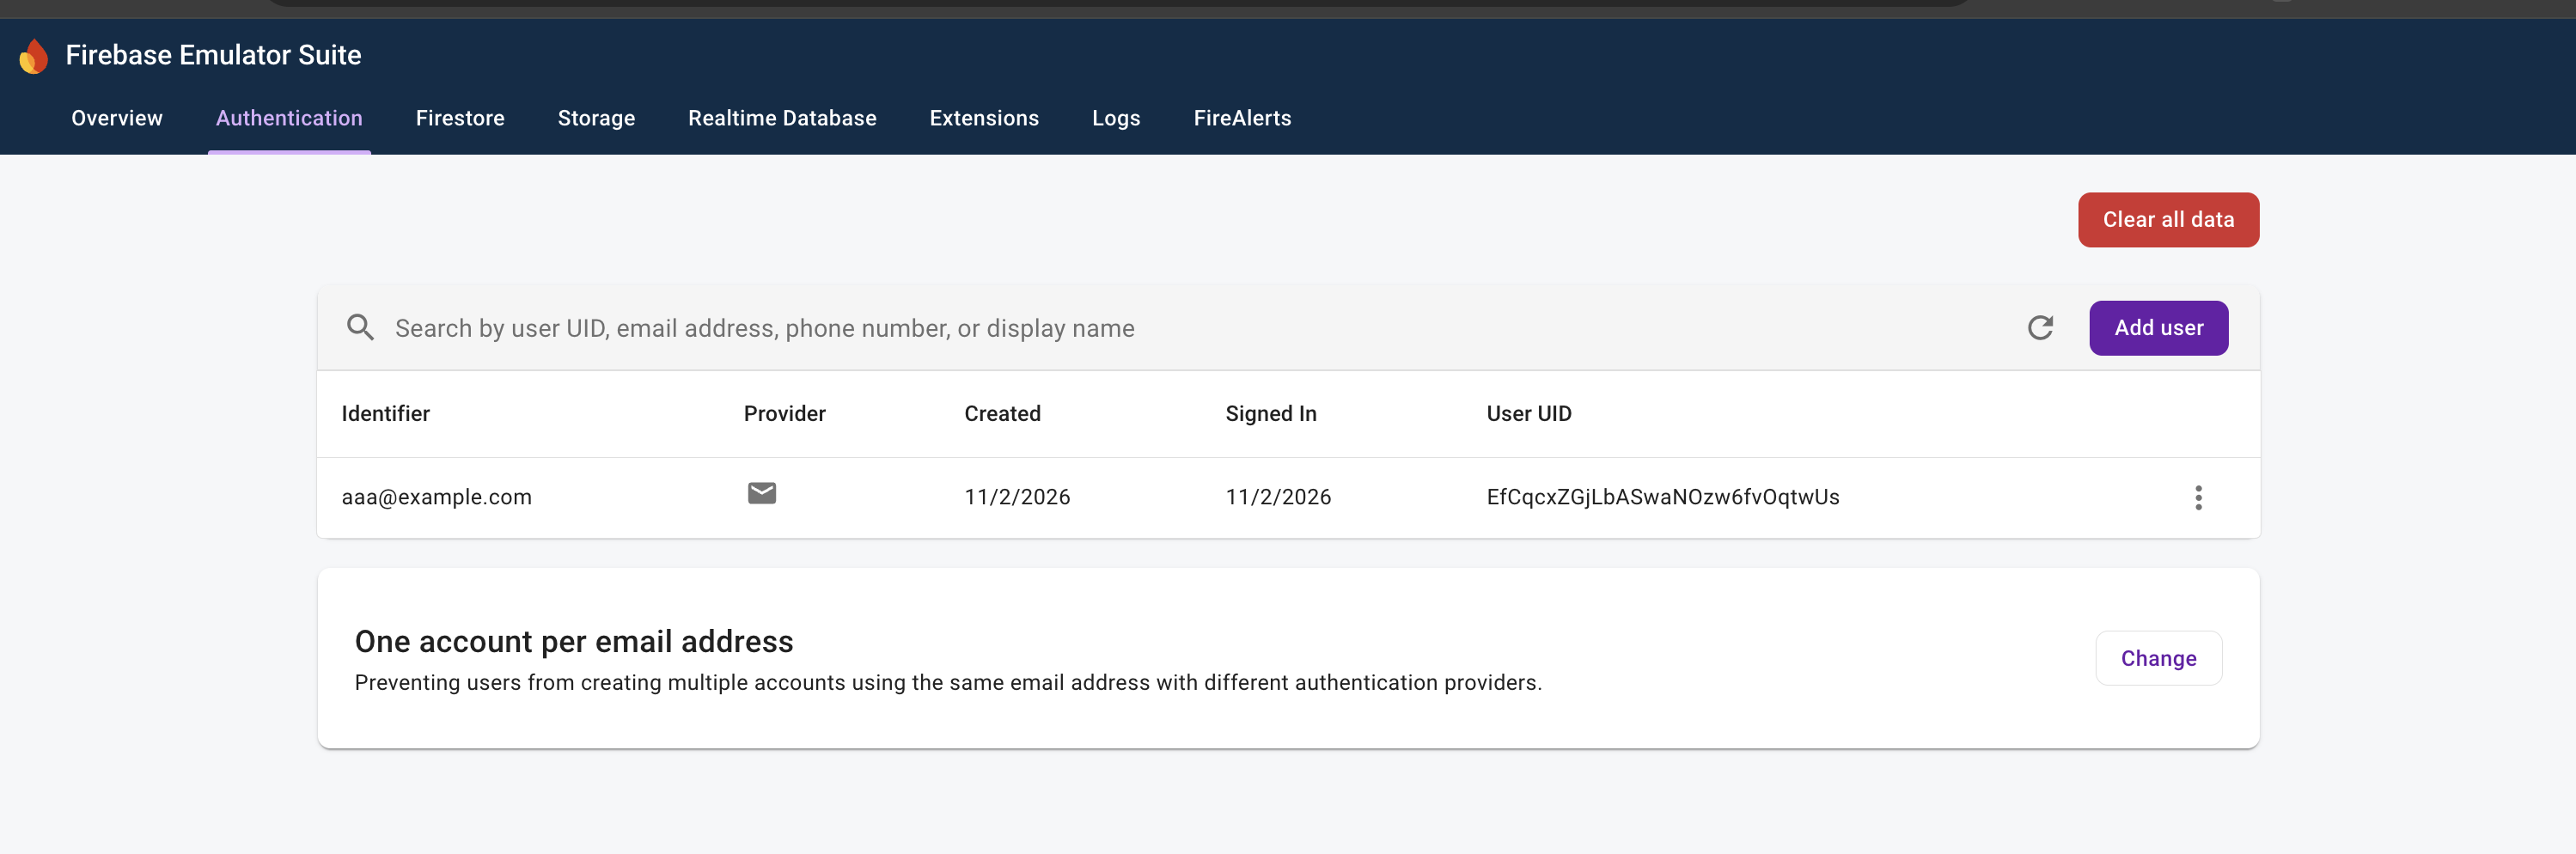
圖說:顯示在 Firebase Authentication Emulator 中新建立的電子郵件/密碼使用者帳號。
AuthServiceAuthCredentials 介面AuthCredentials 介面定義了使用者登入憑證所需的 email 與 password 屬性。
// src/app/core/auth/auth-credentials.interface.ts
export interface AuthCredentials {
  email: string;
  password: string;
}
AuthService首先,AuthService 會注入 WINDOW、ConfigService 與 DestroyRef,並宣告 #user Signal、isAuthenticated Computed Signal,以及用來快取 Firebase Auth 執行個體與 SDK 模組的私有欄位:
// src/app/core/auth/auth.service.ts
import { WINDOW } from '@/core/constants/navigator.const';
import { ConfigService, isLocalhost } from '@/core/firebase';
import { computed, DestroyRef, inject, Service, signal } from '@angular/core';
import type { Auth, User } from 'firebase/auth';
import type { AuthCredentials } from './auth-credentials.interface';

const AUTH_EMULATOR_URL = 'http://127.0.0.1:9099';

@Service()
export class AuthService {
  readonly #window = inject(WINDOW);
  readonly #configService = inject(ConfigService);
  readonly #destroyRef$ = inject(DestroyRef);

  readonly #user = signal<User | null>(null);
  user = this.#user.asReadonly();
  isAuthenticated = computed(() => !!this.#user());

  #auth: Auth | null = null;
  #authSdk: typeof import('firebase/auth') | null = null;
  #authReady: Promise<void> | null = null;
接著,AuthService 透過四個核心方法來管理 Firebase Auth 的生命週期:
loadAuth()
firebase/auth,並取得目前的 Firebase 應用程式執行個體。localhost 上執行時,將 Angular 應用程式連線至 Firebase Auth Emulator。browserSessionPersistence),註冊 onAuthStateChanged 以監聽身分驗證狀態變更,並等待 auth.authStateReady() 完成初始身分驗證狀態的解析。auth 執行個體儲存至 #auth,並將 Auth SDK 模組儲存至 #authSdk。 private async loadAuth(): Promise<void> {
const [firebaseApp, authSdk] = await Promise.all([this.#configService.getApp(), import('firebase/auth')]);
const auth = authSdk.getAuth(firebaseApp);
if (isLocalhost(this.#window)) {
authSdk.connectAuthEmulator(auth, AUTH_EMULATOR_URL, { disableWarnings: true });
}
await authSdk.setPersistence(auth, authSdk.browserSessionPersistence);
const unsubscribe = authSdk.onAuthStateChanged(auth, (user) => this.#user.set(user));
this.#destroyRef$.onDestroy(unsubscribe);
await auth.authStateReady();
this.#auth = auth;
this.#authSdk = authSdk;
}
ensureAuth()
loadAuth() 只會被解析一次,並同時回傳 auth 執行個體與 #authSdk 模組。將兩者保留在記憶體中,能讓 signIn() 與 signOut() 在處理使用者登入或登出時重複使用它們。 async ensureAuth(): Promise<{ auth: Auth; sdk: typeof import('firebase/auth') }> {
if (!this.#authReady) {
this.#authReady = this.loadAuth();
}
await this.#authReady;
if (!this.#auth) {
throw new Error('Auth is not initialized');
}
if (!this.#authSdk) {
throw new Error('Auth SDK does not exist');
}
return { auth: this.#auth, sdk: this.#authSdk };
}
signIn()
email 與 password,驗證引數後呼叫 sdk.signInWithEmailAndPassword() 來驗證使用者身分。當身分驗證成功時,authSdk.onAuthStateChanged(auth, (user) => this.#user.set(user)) 監聽器會偵測到狀態變更、更新 #user Signal,並重新計算 isAuthenticated Computed Signal。 async signIn({ email, password }: AuthCredentials): Promise<void> {
if (!email || !password) {
this.#user.set(null);
return;
}
const { auth, sdk } = await this.ensureAuth();
await sdk.signInWithEmailAndPassword(auth, email, password);
}
signOut()
sdk.signOut(auth) 將目前已登入的使用者登出。同樣地,onAuthStateChanged 監聽器會將 #user Signal 重設為 null,並重新計算 isAuthenticated Computed Signal。 async signOut(): Promise<void> {
const { auth, sdk } = await this.ensureAuth();
await sdk.signOut(auth);
}
}
canActivateDashboard 保護 Dashboard 路由CanActivateFn 路由守衛canActivateDashboard 是型別為 CanActivateFn 的函式型路由守衛。它會注入 AuthService 與 Router 來驗證使用者的身分驗證狀態並處理路由重新導向。呼叫 await authService.ensureAuth() 會初始化 Firebase Auth(在 localhost 上執行時會連線至 Auth Emulator),並以目前的身分驗證狀態更新 isAuthenticated Computed Signal。當使用者已通過身分驗證時,守衛會回傳 true 以允許導覽至該路由;否則,它會透過 router.createUrlTree([APP_LINKS.HOME]) 將使用者重新導向回 /home。
// src/app/core/auth/auth.guard.ts
import { AuthService } from './auth.service';
import { APP_LINKS } from '@/core/constants/routes.const';
import { inject } from '@angular/core';
import type { CanActivateFn } from '@angular/router';
import { Router } from '@angular/router';

export const canActivateDashboard: CanActivateFn = async () => {
  const authService = inject(AuthService);
  const router = inject(Router);

  await authService.ensureAuth();

  if (authService.isAuthenticated()) {
    return true;
  }

  return router.createUrlTree([APP_LINKS.HOME]);
};
最後,我們透過單一 Barrel 檔案(src/app/core/auth/index.ts)重新匯出 AuthCredentials 介面、canActivateDashboard 路由守衛與 AuthService。這為 /dashboard 路由設定以及我們將在第 2 部分建置的 Sign-In 元件提供了乾淨且統一的匯入路徑。
// src/app/core/auth/index.ts
export * from './auth-credentials.interface';
export * from './auth.guard';
export * from './auth.service';
app.routes.ts 中掛載 canActivateDashboardDashboard 路由的 canActivate 屬性會在陣列中接收 canActivateDashboard 函式。當使用者在網址列輸入 /dashboard 或透過程式碼導覽至該路徑時,路由器就會執行這個路由守衛函式。已通過身分驗證的使用者可以順利進入 Dashboard,而未通過身分驗證的訪客則會被守衛阻擋,並重新導向回 /home。
// src/app/core/constants/routes.const.ts
export const ROUTE_PATHS = {
  HOME: 'home',
  DASHBOARD: 'dashboard',
} as const;
// src/app/app.routes.ts (dashboard route excerpt)
  {
    path: ROUTE_PATHS.DASHBOARD,
    title: 'Firebase TTS',
    providers: [provideEnvironmentInitializer(() => inject(ConfigService).initialize())],
    loadComponent: () => import('./features/dashboard/dashboard.component'),
    canActivate: [canActivateDashboard],
  },
在第 1 部分中,我們設定了 Firebase Auth 來保護影像分析與 TTS 端點:
firebase.json 中設定 Auth Emulator,並使用 concurrently 同時啟動模擬器與 Angular 應用程式。AuthService:動態匯入 firebase/auth 一次,並使用 Signal(#user 與 isAuthenticated)追蹤登入狀態。app.routes.ts 中加入 canActivateDashboard,將未通過身分驗證的使用者重新導向回首頁畫面。在第 2 部分中,我們將在前端建置互動式的登入體驗。我們會使用 Angular 22 的 Signal Forms 建立讓使用者輸入電子郵件與密碼的表單、使用 Angular CDK Dialog 在使用者點擊首頁畫面上的 Sign In 按鈕時開啟登入互動視窗(Modal),並將 Sign-In 元件與 AuthService 串接以呼叫 signIn() 方法。


 iThome鐵人賽
 看影片追技術