一個 Vue 實體有生老病死,而 Vue 實體會在各個生命階段提供鉤子事件( Hook Event )讓開發者可以在實體的不同階段做想要的處理,本文介紹各個 Hook 的叫用時機。
官方製作了一張詳細的生命週期鉤子函式示意圖:
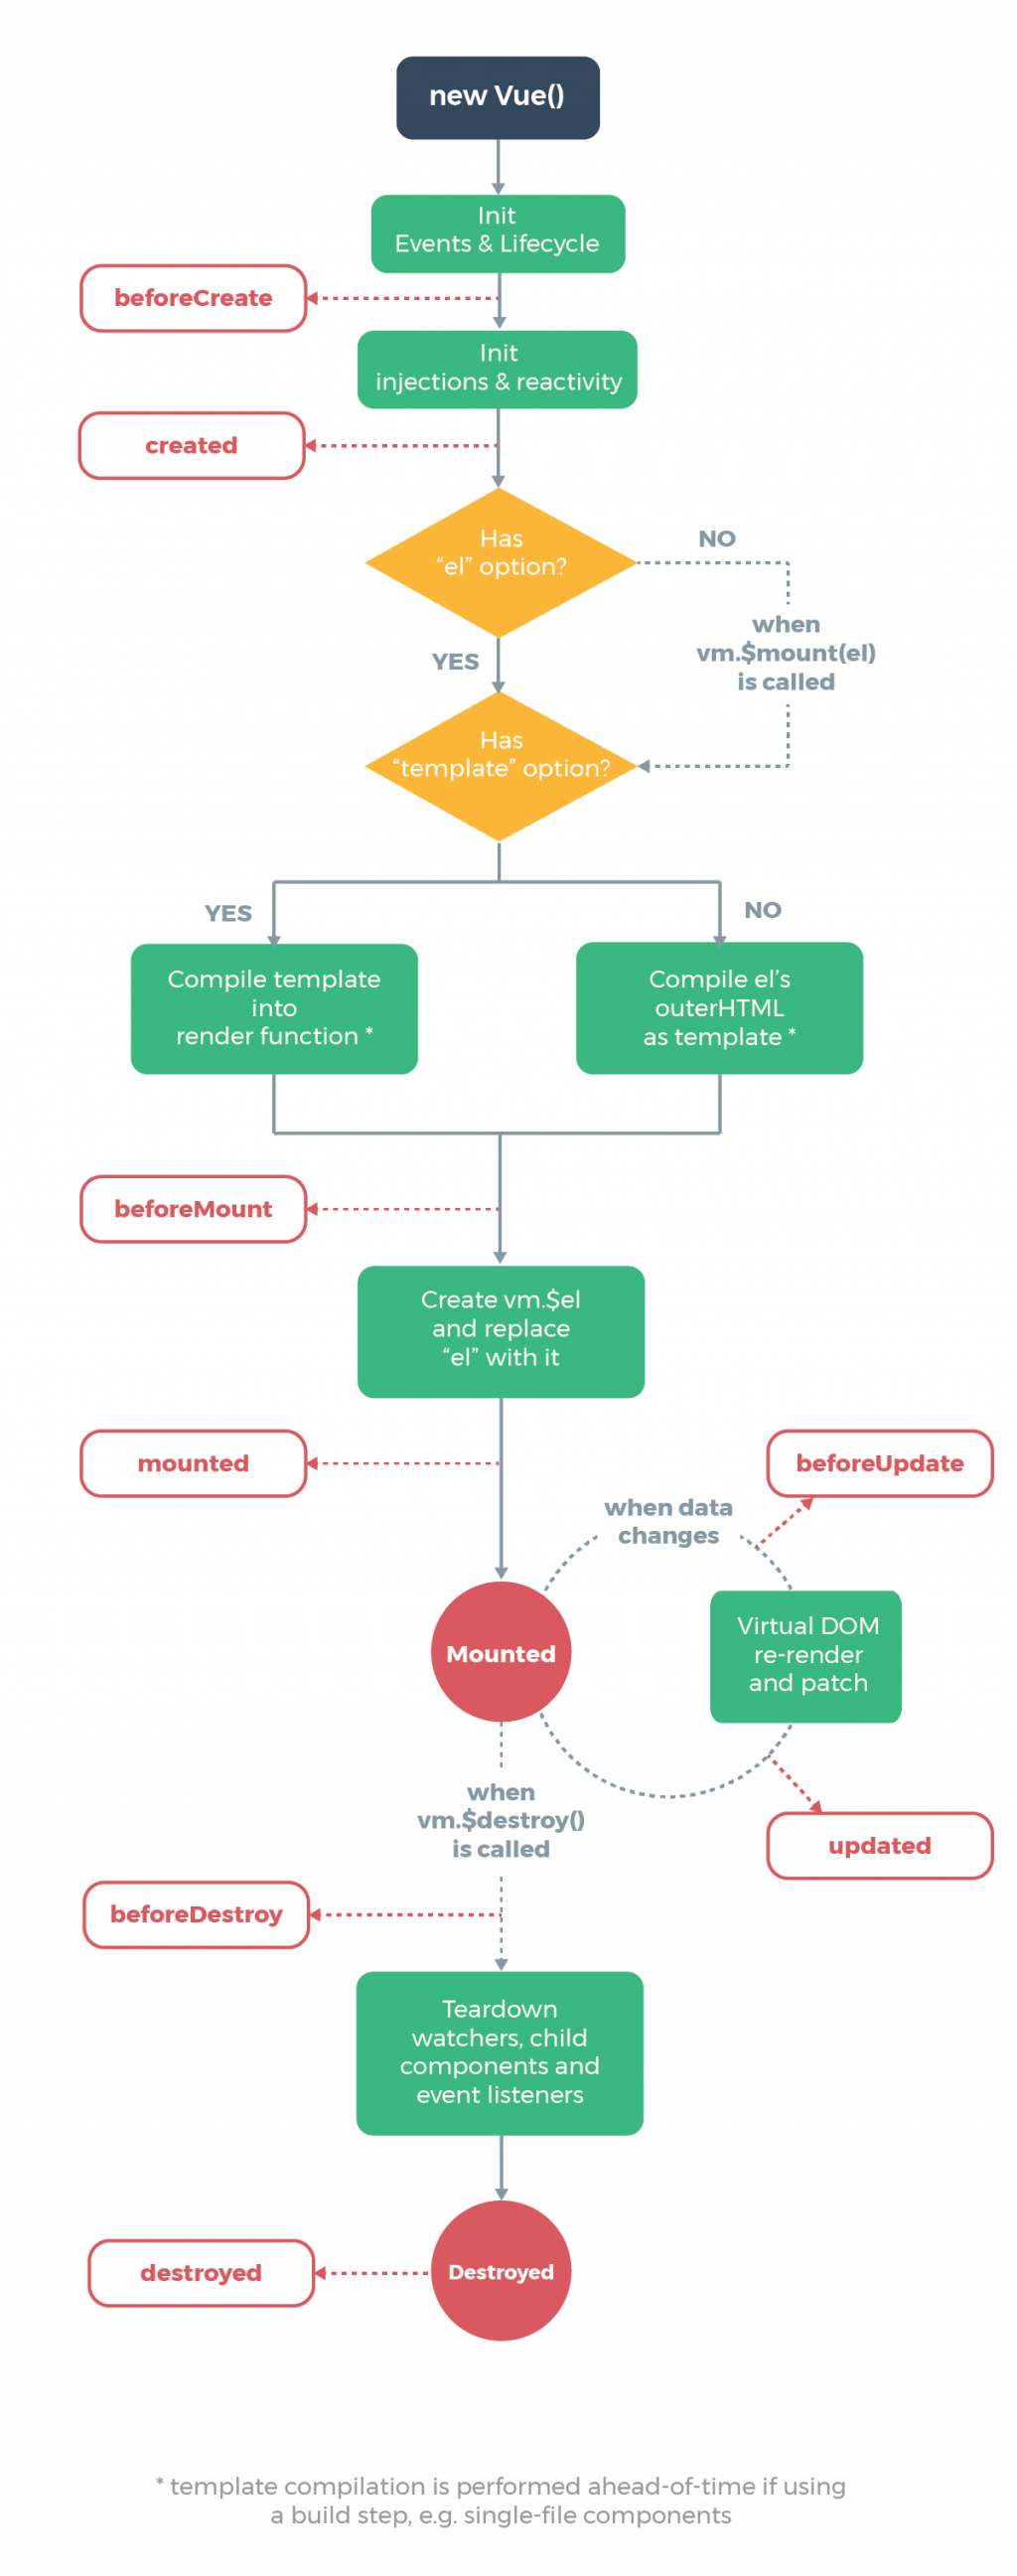
紅框白底的是各個鉤子函式的名稱,這些鉤子代表 Vue 實體的每個階段,分別的介紹如下:
beforeCreate : 實例初始化立即叫用,這時還未創建實例,所以任何 Vue 實體中的設定(例如: data )都還未配置。created : 完成創建實例,這時 Vue 實體中的配置除了 $el 外已全部配置,而 $el 要在掛載模板後才會配置。beforeMount : 在 Vue 實體中的定義被掛載到目標元素之前叫用,這時的 $el 會是還未被 Vue 實體中的定義渲染的初始設定模板。mounted : Vue 實體上的設置已經安裝上模板,這時的 $el 是已經藉由實體中的定義渲染而成的真正的頁面。beforeUpdate : 當實體中的 data 產生變化後或是執行 vm.$forceUpdate() 叫用,這時的頁面還未被重渲染為改變後的畫面。updated : 在重新渲染頁面後叫用,這時的頁面已經被重渲染成改變後的畫面。beforeDestroy : 在此實體被銷毀前時叫用,這時實體還是擁有完整的功能。destroyed : 此實體被銷毀後叫用,這時實體中的任何定義( data 、 methods...等)都已被解除綁定,代表在此做的任何操作都會失效。鉤子函式會因為引用了其他的工具(例如: vue-router)或是 Vue 實體配置的不同(例如: keep-alive)而有所增減。
接著我們實際來操作各個鉤子函數,然後印出 data 及 $el 看看在各階段會如何變化。
以下是我們使用的例子:
<div id="app">
  {{a}}
</div>
var vm = new Vue({
  el: '#app',
  data: {
    a: 1
  }
});
這個例子在之前的文章中也有使用,只有一個很單純 a 資料以及綁定 Vue 實體到 <div id="app"> 的範例。
下面會將鉤子函數拆成四組來分析,分別是:
beforeCreate 及 created : 創建實體。beforeMount 及 mounted : 掛載目標元素。beforeUpdate 及 updated : data 改變後的重渲染。beforeDestroy 及 destroyed : 銷毀實體。在設定中加上 beforeCreate 及 created:
var vm = new Vue({
  el: '#app',
  data: {
    a: 1
  },
  beforeCreate() {
    console.log('Hook: beforeCreate');
    console.log(` this.a: ${this.a}`);
    console.log(` this.$el: ${this.$el}`);
    console.log();
  },
  created() {
    console.log('Hook: created');
    console.log(` this.a: ${this.a}`);
    console.log(` this.$el: ${this.$el}`);
    console.log();
  },
  ...
});
結果如下:
Hook: beforeCreate
 this.a: undefined
 this.$el: undefined

Hook: created
 this.a: 1
 this.$el: undefined
beforeCreate : 在 beforeCreate 時因實體還沒創建,所以 a 跟 $el 都是 undefined 。created : 到了 created 時已經創建實例,所以 a 已變為 1 ,但是 $el 因為還未掛載至目標元素,所以依然是 undefined 。所以在
beforeCreate是不能操作實體中的物件的。
設定中加入 beforeMount 及 mounted :
var vm = new Vue({
  el: '#app',
  data: {
    a: 1
  },
  ...
  beforeMount() {
    console.log('Hook: beforeMount');
    console.log(this.$el.outerHTML);
    console.log();
  },
  mounted() {
    console.log('Hook: mounted');
    console.log(this.$el.outerHTML);
    console.log();
  },
  ...
});
結果如下:
Hook: beforeMount
<div id="app">
  {{a}}
  <button v-on:click="a++">add</button>
  <button v-on:click="$destroy()">Destroy instance</button>
</div>

Hook: mounted
<div id="app">
  1
  <button>add</button> <button>Destroy instance</button></div>
beforeMount : 流程圖上有提到,在叫用 beforeMount 前 Vue 已經決定模板的樣式,所以在 beforeMount 中的 $el 已經有值了,只是它還未依照 Vue 實體上的定義所渲染,只是個初始設定的模板,因此可以看到 {{a}} 、 v-on 這些模板語法都還未被轉換。mounted : 在 mounted 被叫用時已經把 Vue 實體上的定義綁定到元素上,所以這裡看到的是經由 Vue 渲染後的配置。所以在
beforeMount前不能操作 DOM 元素。
加上 beforeUpdate 及 updated 鉤子函數:
var vm = new Vue({
  el: '#app',
  data: {
    a: 1
  },
  ...
  beforeUpdate() {
    console.log('Hook: beforeUpdate');
    console.log(` this.a: ${this.a}`);
    console.log(` this.$el: ${this.$el}`);
    console.log(this.$el.outerHTML);
    console.log();
  },
  updated() {
    console.log('Hook: updated');
    console.log(` this.a: ${this.a}`);
    console.log(` this.$el: ${this.$el}`);
    console.log(this.$el.outerHTML);
    console.log();
  },
  ...
});
然後在頁面上加顆按鈕來改變 a 的數值:
<div id="app">
  {{a}}
  <button v-on:click="a++">add</button>
</div>
按下 add 按鈕,輸出的結果如下:
Hook: beforeUpdate
 this.a: 2
 this.$el: [object HTMLDivElement]
<div id="app">
  1
  <button>add</button> <button>Destroy instance</button></div>

Hook: updated
 this.a: 2
 this.$el: [object HTMLDivElement]
<div id="app">
  2
  <button>add</button> <button>Destroy instance</button></div>
beforeUpdate : a 改變後觸發 beforeUpdate ,可以看到 a 已經變為 2 了,可是頁面上還是 1 ,表示這時雖然 data 已經改變,可是還沒有重新渲染畫面。updated : 完成重新渲染的作業後觸發,這時可以看到畫面已經將 1 改為 2了。
updated時盡量避免修改data,這樣有可能再次觸發update造成無限循環,如果data要連動變化可以使用後面的章節會介紹的 computed 屬性。
加上 beforeDestroy 及 destroyed 的鉤子函數:
var vm = new Vue({
  el: '#app',
  data: {
    a: 1
  },
  ...
  beforeDestroy() {
    console.log('Hook: beforeDestroy');
    console.log();
  },
  destroyed() {
    console.log('Hook: destroyed');
    console.log();
  }
});
在頁面上加一個按鈕叫用 $destroy() 銷毀實體:
<div id="app">
  {{a}}
  <button v-on:click="a++">add</button>
  <button v-on:click="$destroy()">Destroy instance</button>
</div>
在按下 Destroy instance 按鈕後,結果如下:
Hook: beforeDestroy

Hook: destroyed
beforeDestroy : 叫用 beforeDestroy 表示即將執行銷毀動作,如果有些物件要釋放資源可以在這處理。destroyed : 叫用 destroyed 時,實體已經銷毀。由於 Vue 會將 Vue 實體綁定在
this上,所以在 Vue 實例中只要有使用到this的函式都不能使用箭頭函數,因箭頭函數的this會綁定上層(父親)的內容,所以箭頭函數中的this不會是期望的 Vue 實體。
本篇介紹了 Vue 實體的整個生命週期,並用範例實際操作,演繹在各種不同的鉤子時實體的狀態,這樣對於 Vue 實體的生命週期就不再只是一個概念,而是具體的行為。
有了本篇的知識,在開發時對於要修改資料或是操作 DOM 的時機可以掌握得更好。
謝謝你
對於生命週期看了好幾篇文章都不太理解,但看完這裡和實際的演練我終於懂了
能否讓我斗內你?
請問可以提供個人部落格或FB嗎
另外想請問,為什麼一定得要加上``這個符號呢?
console.log(` this.a: ${this.a}`);
謝謝你實際操演的分享,讓過去比較多接觸後端的我想學前端框架變得更容易理解XD
看了你前幾篇的教學後我決定一定要把這系列看完!


 iThome鐵人賽