前面在講組件基礎時有提到在 <component> 中加上 is 的屬性,綁定一個變數,這個 <component> 元素就會依照這個變數去尋找相同名字的組件渲染到頁面上。
如下面的例子所示:
Vue.component('width', {
  template: `
    <div>
      <input>
      <span>m</span>
    </div>
  `
});

Vue.component('high', {
  template: `
    <div>
      <input>
      <span>m</span>
    </div>
  `
});

var vm = new Vue({
  el: '#app',
  data: {
    inputComponent: 'high'
  }
});
<div id="app">
  <button @click="inputComponent='high'">High</button>
  <button @click="inputComponent='width'">Width</button>
  <component :is="inputComponent"></component>
</div>
這裡註冊了兩個組件: high 及 width ,而在父組件中使用 <component :is="inputComponent"> 來設定組件目標要依照 inputComponent 的組件來渲染頁面。
如此一來在我們點擊不同的按鈕時, <component> 會因 inputComponent 的改變而渲染不同的組件。
上面的例子有一個問題,當你輸入了高度後切換到重量,再切回高度時,原本輸入的資料就會消失。
這是因為組件的每一次切換都會建立一個新的組件實體,這表示你切到重量時,高度的組件已經被銷毀,而切回來所看到的組件已經是一個全新的高度組件了。
這在大部分的組件使用情境中是適用的,因為你改變了要渲染的組件,代表之前的組件已經不需要使用了,而渲染出來的組件也需要是全新的狀態,不能殘留之前留下的資料,所以銷毀及重建組件的行為是合理的。
但像是需要反覆來回切換的組件就有可能會需要保留之前的值,例如有一個網頁是個問券,裡面有分好幾類,如果你填完了一類,之後想要在回去看之前填好的類別,這時如果資料狀態不能保留,勢必就會造成開發上的困擾。
<keep-alive> 標籤創造了一個區塊,這個區塊中所有的組件都不會銷毀。
我們將剛剛的例子加上 <keep-alive> :
<keep-alive>
  <component :is="inputComponent"></component>
</keep-alive>
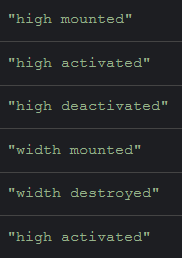
我們可以觀察再加上 <keep-alive> 後,切換組件時不會觸發 destroyed 鉤子函數,代表組件沒有被銷毀,所以高度及重量的數值在切換後都會被保留。
<keep-alive> 中也可以放一般的組件,下面的例子使用 v-if 判斷要使用哪個組件:
<keep-alive>
  <high v-if="inputComponent==='high'"></high>
  <width v-else></width>
</keep-alive>
activated 及 deactivated 鉤子函數在 <keep-alive> 內的所有組件都會被加上 activated 及 deactivated 鉤子函數,他們觸發在組件啟用及休眠時。
在 high 中加上 activated 及 deactivated 鉤子函數:
Vue.component('high', {
  template: `
    <div>
      <input>
      <span>m</span>
    </div>
  `,
  mounted: function() {
    console.log('high mounted');
  },
  destroyed: function() {
    console.log('high destroyed');
  },
  activated: function() {
    console.log('high activated');
  },
  deactivated: function() {
    console.log('high deactivated');
  }
});
可以看到一開始 activated 會被叫用,如果切換到 width 時就會叫用 deactivated 。
include 及 exclude 屬性在 <keep-alive> 上可以使用 include 屬性設定只有那些組件要做 cached ,而 exclue 則是設定那些組件不要做 cached 。
如下例所示:
<keep-alive include="high">
  <component :is="inputComponent"></component>
</keep-alive>
這樣的設定表示只有 high 組件要 cached ,而 width 則不會被保存。
下圖是原本在 high ,然後切換到 width ,之後在切換回來的鉤子函數叫用的情形:

可以看到 width 在切換回 high 時已經被銷毀了。
如果要設定多個 include 組件的話可以使用逗號分隔組件名稱:
<keep-alive include="high,width">
  <component :is="inputComponent"></component>
</keep-alive>
如此一來 high 及 width 組件都會包含了。
include 及 exclude 屬性除了直接寫出完整的名稱外,還可以使用正規表達式設定:
<keep-alive :include="/high|width/">
  <component :is="inputComponent"></component>
</keep-alive>
使用正規表達式時記得因為不是直接綁定字串,所以要使用 v-bind 。
include 及 exclude 屬性還可以使用陣列設定:
<keep-alive :include="['high']">
  <component :is="inputComponent"></component>
</keep-alive>
與正規表達式相同,因為不是字串所以要使用 v-bind 綁定。
max 屬性同時保留過多的組件會產生效能問題,為此 max 屬性可以設定最多要保留的組件數量。
<keep-alive include="high,width,weight" max="2">
  <component :is="inputComponent"></component>
</keep-alive>
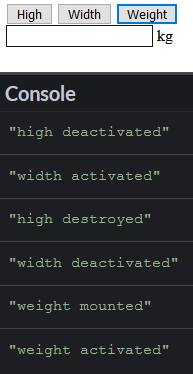
我們加上一個 weight 組件,接著看看切換時會如何運作:

依序按下 Width 及 Weight ,可以看到在按到 Weight 時因為組件數量超過 2 ,所以在駐列中最前面(也就是最先被產生的)的 high 組件被銷毀了。
這章講述了 <keep-alive> 的功能及使用方式,它是確保組件在切換時不會被銷毀的標籤,可以使用 include 及 exclued 屬性設定特定組件的保留或是排除,也可以使用 max 屬性確保組件保留的數量。
