Subversion是一個自由/開放原始碼的版本控制系統,且目標在功能上能取代Concurrent Versions System(CVS),本文將實作介紹於RHEL平台安裝Subversion
[Subversion Overview]
Subversion可分為三種方式進行連線:
・Apache + mod_dav_svn
・svnserve
・svnserver over SSH
Client/Server流程及架構圖大致如下:

相關文獻可參閱What Is Subversion?了解其運作原理
[Lab Information]
本文測試環境已事先部署yum server,本文測試環境規格如下:
OS: Rat Hat Enterprise Linux 6.2 64 bit
Linux Kernel: 2.6.32
CPU Type: Intel Xeon CPU E5-2620 2.00GHz
CPU Core: 8
Memory: 16GB
實作使用之設定檔及目錄如下:
・Html Directory Path: /var/www/html
・Apache Configure Directory Path: /etc/httpd/conf and /etc/httpd/conf.d
・Apache Authentication Configure File: /etc/htpasswd.user
・Subversion Apache Configure File: /etc/httpd/conf.d/subversion.conf
・SVN Parent Directory Path: /usr/local/svn
測試環境帳號密碼如下:
OS root password: 12345678
Subversion user: godspeedyen
Subversion user password: godspeedyen
[Install on Linux]
本文實作使用Apache + mod_dav_svn模式進行連線,故須安裝下列套件:
・subversion.x86_64
・mod_dav_svn.x86_64
・neon.x86_64
・sqlite.x86_64
・sqlite-devel.x86_64
下列指令皆以root帳號使用yum command進行實作:
/usr/bin/yum install sqlite sqlite-devel neon subversion mod_dav_svn -y
安裝完畢後即可執行svnadmin command進行create repository並指定fs-type為fsfs,
後續將staging目錄使用者及群組更改為apache,以避免日後存取時出現Access Denied等錯誤訊息:
/bin/mkdir /usr/local/svn/
/usr/bin/svnadmin create --fs-type fsfs /usr/local/svn/staging
/bin/chown -R apache:apache /usr/local/svn/staging
在/tmp目錄建立staging目錄,並在其目錄下建立trunk、branches、tags三個目錄
並使用svn command將staging目錄匯入至staging repository
匯入完畢後可使用svn command查看repository內容:
/bin/mkdir -p /tmp/Staging/{trunk,branches,tags}
/usr/bin/svn import -m "Initial trunk branches tags Folder" /tmp/Staging file:///usr/local/svn/staging
/usr/bin/svn list file:///usr/local/svn/staging
異動Apache設定檔,編輯檔案:/etc/httpd/conf.d/subversion.conf,並於檔案內增加下列參數:
vi /etc/httpd/conf.d/subversion.conf
#Add or amend the following lines in the "/etc/httpd/conf.d/subversion.conf" file.
# Be sure that it comes before the mod_dav_svn line:
LoadModule dav_svn_module     modules/mod_dav_svn.so
LoadModule authz_svn_module   modules/mod_authz_svn.so

# Appending the string of following:
<Location /svn/>
    DAV svn
    SVNParentPath /usr/local/svn
    SVNListParentPath on
    Order deny,allow
    Deny from all
    Satisfy any

    AuthType Digest
    AuthName "Subversion Reository"
    AuthDigestDomain /svn
    AuthUserFile /etc/htpasswd.user

    # Read-Only Access
    <Limit GET OPTIONS PROPFIND REPORT>
        Require valid-user
    </Limit>

    # Write Access
    <LimitExcept GET OPTIONS PROPFIND REPORT>
        Require valid-user
    </LimitExcept>
</Location>
建立使用者認證檔案,並建立Subversion使用者,使用者名稱及密碼請自行命名設定:
# Create Authentication User File
/usr/bin/htdigest -c /etc/htpasswd.user "Subversion Reository" godspeedyen
# Change /etc/htpasswd.user File Permission
/bin/chmod 400 /etc/htpasswd.user
啓動Apache Daemon,並設定為開機則預先啟動:
/etc/init.d/httpd start
/sbin/chkconfig httpd on
[Use Subversion]
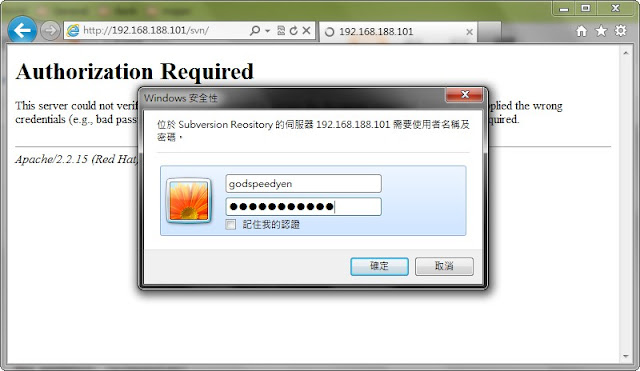
接下來打開瀏覽器,並於網址列中輸入:http://subversion-serverip/svn
請將subversion-serverip自行更換為已完成安裝的Subversion Server IP,如下圖示:

登入帳號及密碼則是輸入先前在/etc/htpasswd.user檔案之設定
登入成功後即可存取staging repository,如下圖示:

[Reference]
Subversion Online Documentation
Apache Subversion Binary Packages
Linux Subversion Server and Trac Server
