本文分享Splunk各個元件介紹,並於RHEL平台安裝Splunk Forwarder
[About Splunk Components]
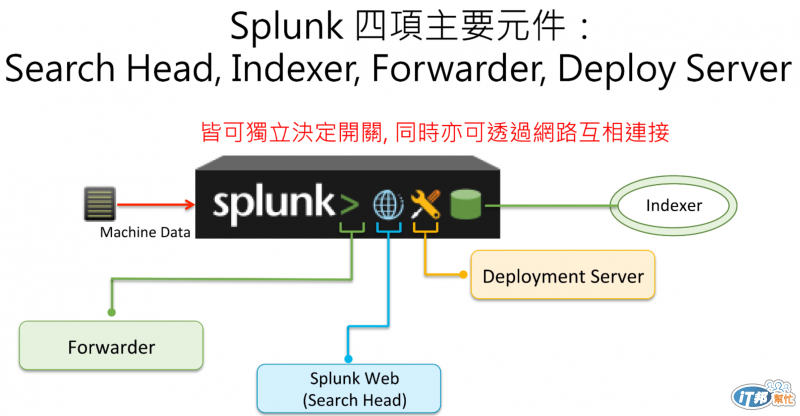
Splunk主要元件有下列四項:
・Indexer
提供本地及遠端資料的索引功能,並收集來自各種不同的應用系統和網路設備資料
・Search head
具備快速自定的各種型態搜尋,而不是只有固定幾種的欄位,不需要指定資料的格式(format),更可結合時間與關鍵字進行搜尋,呈獻出清楚的搜尋結果
・Forwarder
可使用Splunk software package進行安裝,但不會在本地端儲存索引資料,所有的索引資料皆傳遞至遠端的Indexer Server。為了降低導入成本,Splunk Web不使用此元件
・Deployment server
經由已啓用的推送機制設定,將設定檔資訊發佈至正在運作中的Splunk server。Indexers和Forwarders皆可作為Deployment server
詳細介紹可參閱Components of A Splunk deployment
[Lab Information]
此次分享內容為安裝Universal Forwarder於RHEL平台,系統需求可參照官方建議規格

OS: Rat Hat Enterprise Linux 6.2 64 bit
Linux Kernel: 2.6.32
CPU Type: Intel Xeon CPU E5-2620 2.00GHz
CPU Core: 8
Memory: 16GB
Universal Forwarder version: 5.0.4
OS root password: 12345678
Splunk Web(Indexer)IP: 192.168.0.101
Splunk Web admin password: changeme
Splunk Forwarder IP: 192.168.0.102
Splunk Forwarder admin password: changeme
Splunk Forwarder package directory: /root/plugin
Splunk Forwarder home directory: /opt/splunkforwarder
[Download Package]
因為測試環境所使用之Linux Kernel為2.6.32,故選擇2.6+ kernel Linux distributions (64-bit)的rpm file進行下載,如下圖紅框所示:

後續頁面將導致Splunk註冊網頁,若尚未註冊Splunk Account則可以直接在此頁面進行註冊作業,註冊完畢後即可下載splunkforwarder-5.0.4-172409-linux-2.6-x86_64.rpm
[Install on Linux]
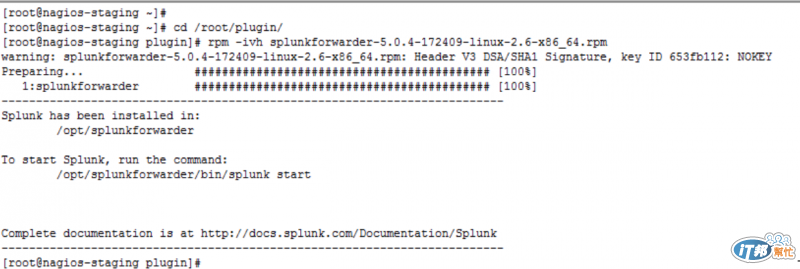
使用帳號:root登入Server,並執行rpm command進行安裝,如下步驟:
cd /root/plugin
rpm -ivh splunkforwarder-5.0.4-172409-linux-2.6-x86_64.rpm
執行結果如下圖示:
預設安裝完畢後的目錄為/opt/splunkforwarder,若不想將Splunk Forwarder安裝於該目錄下,可另外執行下列指令:
rpm -ivh --prefix=/usr/local/ splunkforwarder-5.0.4-172409-linux-2.6-x86_64.rpm
[Start Splunk Forwarder]
透過帳號:splunk啓動Splunk Forwarder daemon,執行步驟如下:
su - splunk
/opt/splunkforwarder/bin/splunk start
'# 若安裝時有變更安裝目錄($SPLUNK_HOME),則使用下列方式啓動 #'
$SPLUNK_HOME/bin/splunk start
啓動過程中會詢問是否同意Splunk規範,按下『y』即可啓動Splunk Forwarder daemon
後續透過下列指令可確認Splunk Forwarder daemon是否正常運作,結果如下圖示:
/opt/splunkforwarder/bin/splunk status

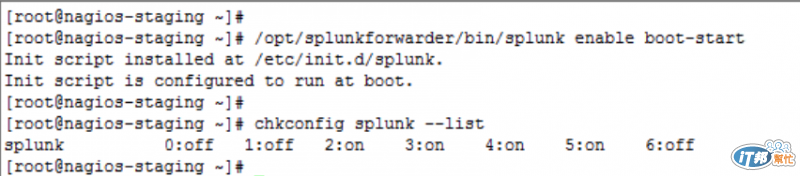
若需將Splunk Forwarder daemon作為開機自動啓動,可透過帳號:root進行下列指令,結果如下圖示:
'# 以下步驟為使用帳號:root執行 #'
/opt/splunkforwarder/bin/splunk enable boot-start
chkconfig splunk --list
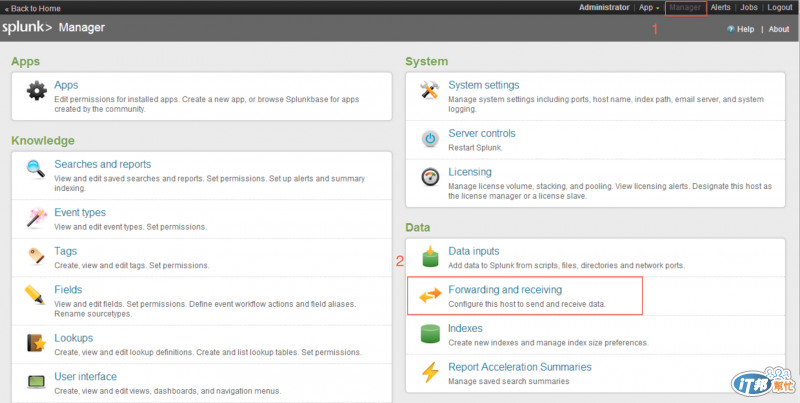
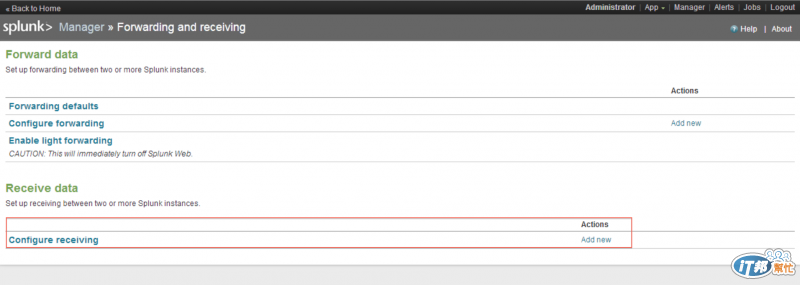
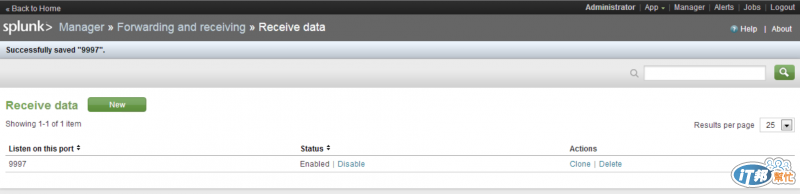
[Enable Receiving input on the Index Server]
於Splunk Web設定資料接收Port,步驟如下:
[Configure Forwarder connection to Index Server]
使用帳號:splunk登入Splunk Forwarder,並執行下列步驟:
設定Indexer Server相關資訊:
/opt/splunkforwarder/bin/splunk add forward-server 192.168.0.101:9997
執行過程需輸入Splunk Forwarder的admin帳號密碼
2. 確認設定狀態:
/opt/splunkforwarder/bin/splunk list forward-server
[Add Data]
可透過下列步驟進行資料匯入設定:
/opt/splunkforwarder/bin/splunk add monitor /path/to/app/logs/ -index main -sourcetype %app%
/path/to/app/logs/:欲匯入至Splunk Server的本機應用程式log file路徑
%app%:與Indexer相對應的資料類型名稱
上述步驟執行完畢將於/opt/splunk/etc/apps/search/local目錄下產生檔案:inputs.conf
[Reference]
How do I configure a Splunk Forwarder on Linux
Components of A Splunk deployment