首先必須先從客製化 checkbox 樣式下手.. 有興趣可以參考其他參加 CSS 主題的鐵人們,或者搜尋網路上就有很多非常棒的範例,就不詳細解說怎麼做客製化 checkbox 囉。
在這邊也提供一個我們參考的範例:
決定選用 squaredFour 這個樣式與結構來修改。
$emit, $on 是用來在元件之間傳遞的方法,還滿方便的,不過這樣的方法有一個小缺點,就是元件的階層關係比較沒有彈性,但是在某些狀況卻還是必要的,如:自訂輸入框,自訂按鈕,自訂彈窗(dialog) 等等..紀錄短暫狀態或者元件本身只是封裝結構/樣式,並不包含邏輯的狀況。
在 Vue 1.x 的時候可以使用 .sync 讓 props 與 model 做雙向綁定,
到了 Vue 2.x 就要使用 $emit, $on 或者記錄在 vuex 裡面囉。
| Event | 用途 |
|---|---|
| $emit | 用於子元件,向上傳遞事件與資料,事件可以自訂義。 |
| $on | 用於父層元件,接收事件。 |
我們可以直接在元件上面使用 v-model 做雙向綁定。
怎麼接收綁定的值呢?在元件內的 props 預設 value 是接收 v-model 的 value。
因此只需要使用 $emit 向上(父層)發出 event 帶入值,就會直接對父層 data 做同步修改。
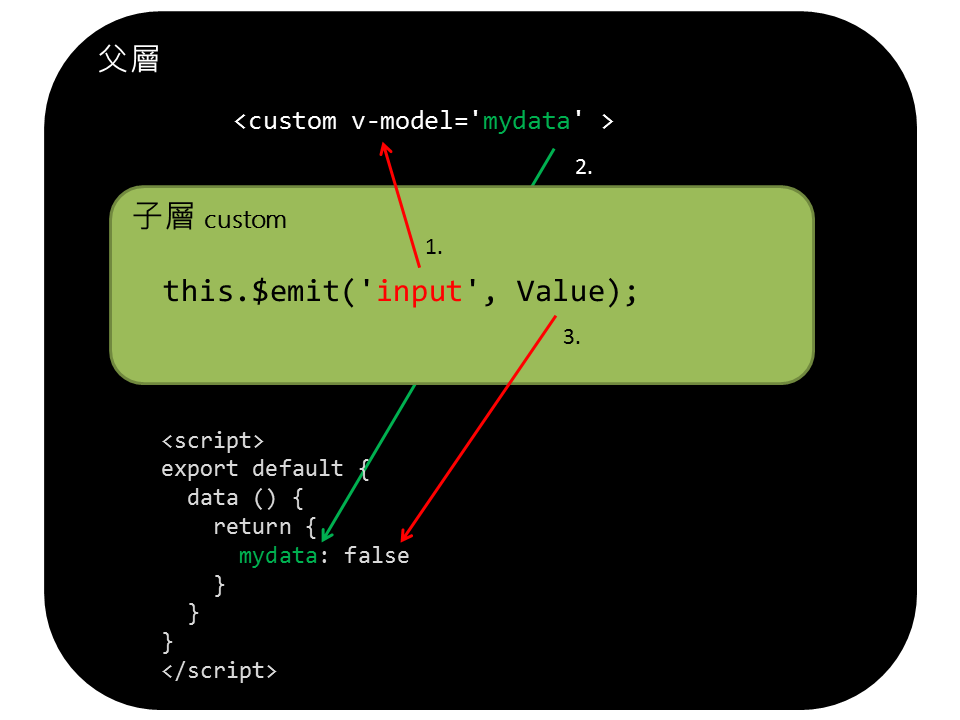
"input" $emit 可直接與父層 model 溝通元件本身不需要改變自己 value,改變父層,就會綁定回來。
user 改的 value 往上丟就對了。
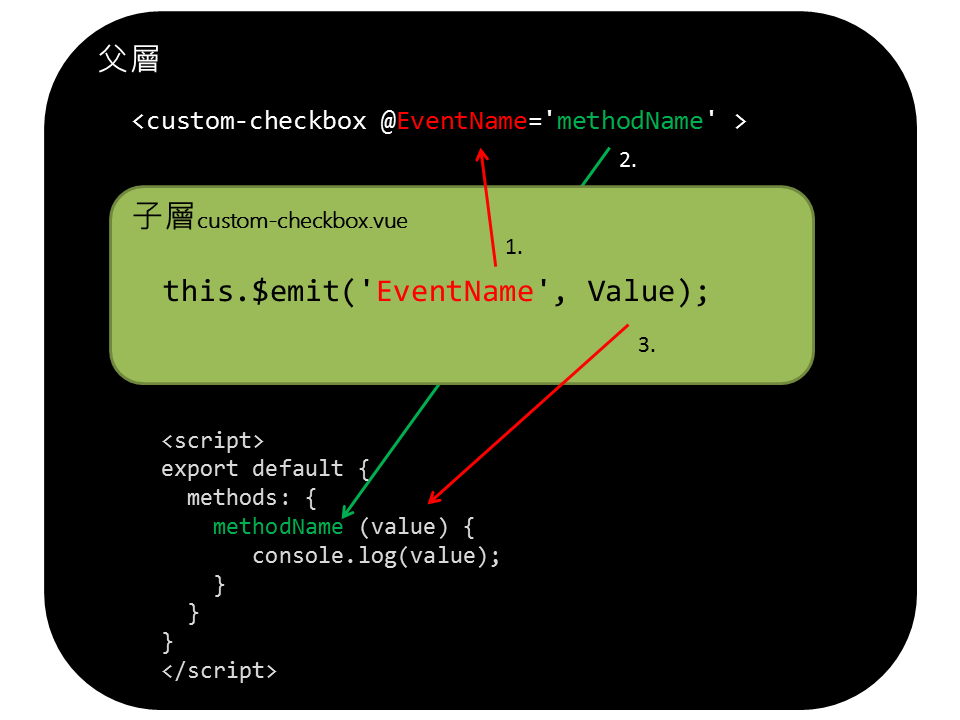
我們自訂義 Event name 就可以在父/子層自由傳遞資料了。
$emit 夾帶 value如果接收 Event 的函式綁定為 action 會直接將 value 帶過去。
組合技的概念。
<template>
  <div class="squaredFour">
    <input
      type="checkbox"
      :id="getID"
      :checked="item.done"
      @change="handleChange" />
    <label :for="getID" class="checkbox-icon"></label>
    <label :for="getID">{{ item.content }}</label>
  </div>
</template>

<script>
export default {
  props: {
    item: Object
  },
  computed: {
    getID() {
      // 為了解決 input 與 label 對應的 id
      // 暫時解法.. 不知道有沒有更簡單的方法哩..
      // 使用 ES6 String Template
      // ES5: "custom_" + Math.floor(Math.random() * 9999).toString();
      return `custom_${Math.floor(Math.random() * 9999)}`;
    },
  },
  methods: {
    handleChange($event) {
      // $emit 向上傳遞的 value 直接打包成 object
      this.$emit('toggleTodo', {
        key: this.item.key,
        // checked(done) 直接使用 chackbox 狀態
        checked: $event.target.checked
      });
    },
  },
};
</script>
以下只紀錄有改的地方。
<template>
  <li>
    <div v-if="!updateMode">
	  <!-- 使用 custom-checkbox -->
      <custom-checkbox :item="item" @toggleTodo="toggleTodo" />
      <button class="btn btn-xs btn-primary" @click="showEditMode">
        <span class="glyphicon glyphicon-pencil" aria-hidden="true"></span>
      </button>
      <button class="btn btn-xs btn-danger" @click="deleteTodo( item.key )">
        <span class="glyphicon glyphicon-trash" aria-hidden="true"></span>
      </button>
    </div>
    <!-- 修改模式沒動,略.. -->
  </li>
</template>

<script>
import customCheckbox from './customCheckbox.vue';
export default {
  components: {
    customCheckbox
  },
}
<template>
    <!-- 略 -->
    <div class="row">
      <div class="col-md-6">
        <h2>Todo List:</h2>
        <ol>
		   <!-- todoItem 已經使用了 custom-checkbox -->
           <todoItem v-for="(item, index) in todoList" :item="item" />
        </ol>
      </div>
      <div class="col-md-6">
        <h2>Done List:</h2>
        <ol >
          <li v-for="(item, index) in doneList">
		    <!-- custom-checkbox -->
            <custom-checkbox :item="item" @toggleTodo="toggleTodo" />
          </li>
        </ol>
      </div>
    </div><!-- end row -->
  </div>
</template>
[types.TOGGLE_TODO] (state, obj) {
  for(var i in state.todos){
    var item = state.todos[i];
    if ( item.key === obj.key){
      item.done = obj.checked; //直接使用 chenkbox $emit 的 value
      console.log('TOGGLE_TODO:', item.content, '| obj.checked?', obj.checked, '| done?', item.done);
      break;
    }
  }
},

圖:電影 - Inaeption | 出處
到底哪一層拉..
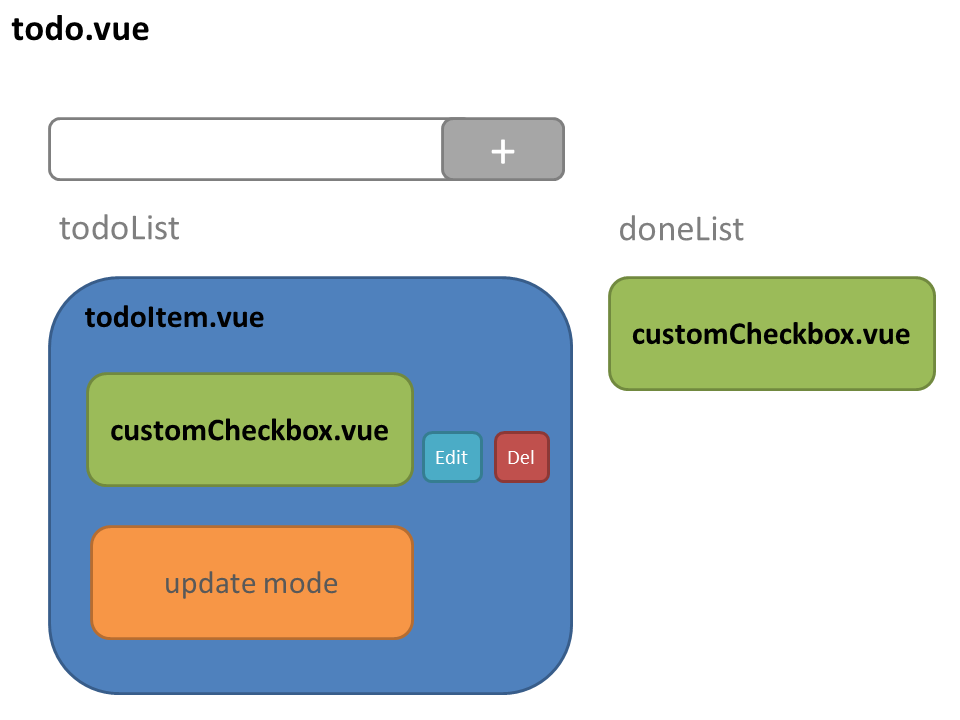
畫的不是很專業,大概勾勒出來結構是這樣滴,參考一下囉。
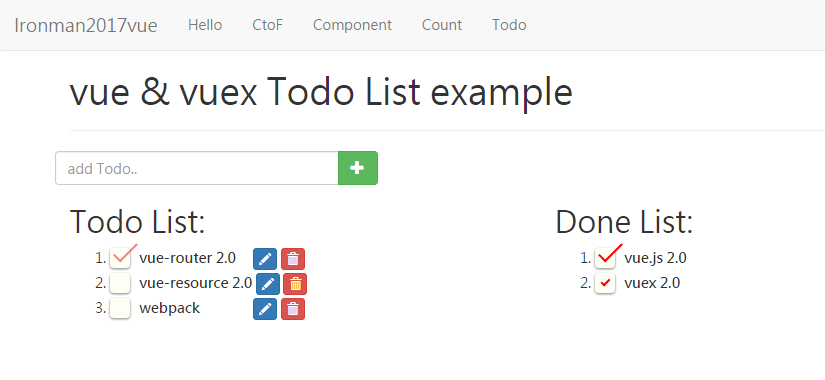
實作小範例入門 Vue & Vuex 2.0 - github 完整範例
使用 git checkout 切換每天範例。