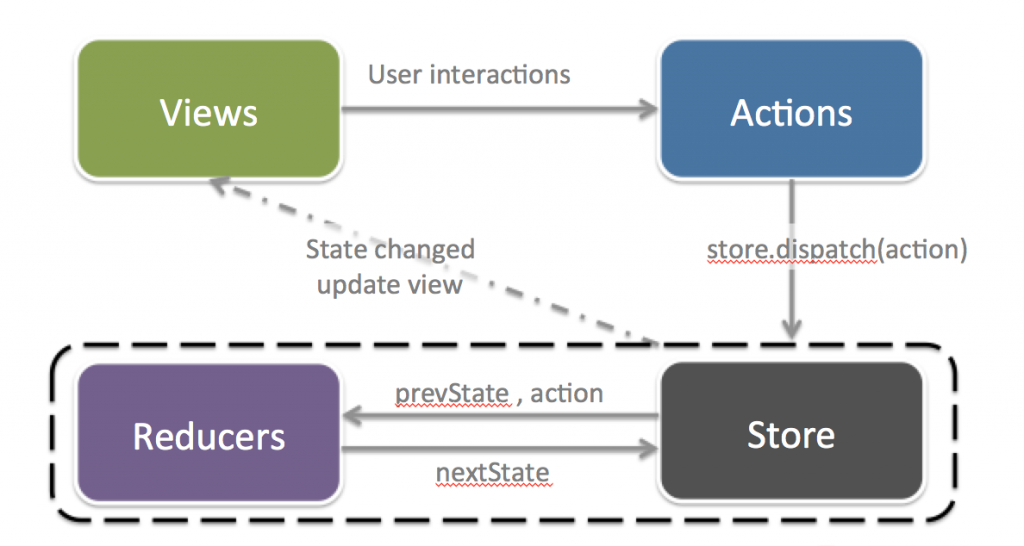
到目前我們已經學會Redux的概念,也知道如何和React結合,今天要再來深入一點點的介紹好用的middleware,Redux Middleware裡面提到:
It provides a third-party extension point between dispatching an action, and the moment it reaches the reducer.
還記得我們之前的那張Redux流程圖嗎?
Middleware就是 dispatch action 和 action到reducer 之間中間層,也就是說在action和reducer中間加上的某些功能,當每次有dispatch action產生,都會先經過middleware才到reducer。
因為官網說明的很好,接下來會使用官網的Logging例子,來解釋middleware實作。
前面我們提到Redux讓state是可以被預測的,因為state是依據actoin來決定要如何改變,如果我們希望加上log action動作,以及執行完action後的state,這樣的功能就可以用middleware來實作。
先假設我們還沒有使用react-redux,直接傳入store給component使用,然後,我們在dispatch的時候希望可以做log。
原本呼叫的動作是這樣:
store.dispatch(addTask('New Task'));
加上我們希望的log功能,很直覺的寫法:
let action = addTask('New Task');

console.log('dispatching', action);
store.dispatch(action);
console.log('next state', store.getState());
每當我們想要dispatch action時,都希望可以做log,如果使用Step1的方式會顯得很麻煩,每次只要有store.dispatch時都要寫一堆,然後又有許多不同的地方做store.dispatch,所以我們用一個函式把dispatch和log的動作包裝起來:
function dispatchAndLog(store, action) {
  console.log('dispatching', action);
  store.dispatch(action);
  console.log('next state', store.getState());
}
每當我們要呼叫dispatch,我們都可以用這個函式包裝:
dispatchAndLog(store, addTask('New Task'));
Monkeypatch就是指說用有點髒的方式,在runtime的時候把某些功能修改掉。在這邊我們每次要做dispatch時,都要透過呼叫dispatchAndLog函式,並且需要先把函式import進來,也還是有點麻煩,如果我們可以包在原本的store.dispatch裡面,似乎會更省事。所以如果我們先用Monkeypatch的方式,直替換掉store.dispatch:
// 先把原本的dispatch指定給next
let next = store.dispatch;

// Monkeypatch改變store.dispatch
store.dispatch = function dispatchAndLog(action) {
  console.log('dispatching', action);
  let result = next(action);
  console.log('next state', store.getState());
  return result;
};
這樣我們依然可以透過呼叫原本的store.dispatch(),但做出log的功能:
store.dispatch(addTask('New Task'));
但~假設我們還需要其他功能,也要包裝在store.dispatch裡面。新功能會是另一個函式,因為我們要用模組化的方式來區分功能,而每個模組就是一個middleware,那我們可以這樣寫:
// log的middleware
function patchStoreToAddLogging(store) {
  let next = store.dispatch;

  store.dispatch = function dispatchAndLog(action) {
    console.log('dispatching', action);
    let result = next(action);
    console.log('next state', store.getState());
    return result;
  };
}

// do something的middleware
function patchStoreToDoSomething(store) {
  let next = store.dispatch;

  store.dispatch = function dispatchAndDoSomething(action) {
    // something part 1
    let result = next(action);
    // something part 2
    return result;
  }
}
但是,當我們要使用的時候就必須兩個都呼叫:
patchStoreToAddLogging(store);
patchStoreToDoSomething(store);
第一次呼叫patchStoreToAddLogging的時候,next指向的是原本的store.dispatch,而store.dispatch被替換成dispatchAndLog函式。第二次呼叫patchStoreToDoSomething的時候,next變成指向dispatchAndLog函式,而store.dispatch最後指向patchStoreToDoSomething函式。
所以當我們呼叫:
store.dispatch(addTask('New Task'));
執行順序就會如下:
patchStoreToDoSomething,並處理something part 1的程式區塊next(action),這裡的next指的是dispatchAndLog,並處理console.log('dispatching', action)
next(action),這裡的next指的是原本的store.dispatch,發送actionstore.dispatch之後,執行console.log('next state', store.getState())
了解上面這樣寫法後,我們已經滿足使用多個middleware的方式囉!但是透過Monkeypatch的方法並不是很好。
我們先試著移掉重新指定store.dispatch的部分,讓logger和doSomething回傳函式:
function logger(store) {
  let next = store.dispatch;

  // 改成return 一個函式
  return function dispatchAndLog(action) {
    console.log('dispatching', action);
    let result = next(action);
    console.log('next state', store.getState());
    return result;
  }
}

function doSomething(store) {
  let next = store.dispatch;

  // 改成return 一個函式
  return function dispatchAndDoSomthing(action) {
    // something part 1
    let result = next(action);
    // something part 2
    return result;
  }
}
並且在Redux library裡面提供一個helper,把重新指定store.dispatch部分拉出來做:
// 目前是假設的函式,並非實際Redux有的
function applyMiddlewareByMonkeypatching(store, middlewares) {
  middlewares = middlewares.slice();
  middlewares.reverse();

  // 用這個helper把先前middleware回傳的function,重新指定給store.dispatch
  // 當然這樣也還是Monkeypatch,等下會再做變化
  middlewares.forEach(middleware =>
    store.dispatch = middleware(store)
  );
}
透過這個helper,我們可以使用陣列傳入這兩個函式:
applyMiddlewareByMonkeypatching(store, [ logger, doSomething ]);
我們把呼叫的指令透過helper變成一行了,在我們撰寫的函式裡面也沒有Monkeypatch,不過,我們只是把Monkeypatch換成寫在Redux library的helper裡面而已,依然要再改改。
每次store.dispatch都會被重新指定為前一個middleware的回傳函式,除了第一個middleware會是原本的store.dispatch。
再看一次Step4的logger,我們用next保存前一個middleware的回傳函式,達到鏈結(chaining)的效果:
function logger(store) {
  // 必須指向前面的middleware回傳的function
  let next = store.dispatch;

  return function dispatchAndLog(action) {
    console.log('dispatching', action);
    let result = next(action);
    console.log('next state', store.getState());
    return result;
  }
}
所以如果我們把要chaining的函式,也當作一個參數(next)傳進去,我們可以改寫成這樣:
function logger(store, next) {
  return function dispatchAndLog(action) {
    console.log('dispatching', action);
    let result = next(action);
    console.log('next state', store.getState());
    return result;
  };
}

function doSomething(store, next) {
  return function dispatchAndDoSomthing(action) {
    // something part 1
    let result = next(action);
    // something part 2
    return result;
  };
}
helper也必須做一點改寫,說明在註解中:
function applyMiddleware(store, middlewares) {
  middlewares = middlewares.slice();
  middlewares.reverse();

  // store.dispatch只有第一次被傳入當參數
  // 這邊不必再改寫store.dispatch
  // 而middleware改傳入兩個參數
  let dispatch = store.dispatch;
  middlewares.forEach(middleware =>
    dispatch = middleware(store, dispatch)
  );

  // 最後複製一個store的物件,不直接覆蓋到store
  // 並把dispatch覆蓋過去
  return Object.assign({}, store, { dispatch });
}

applyMiddleware(store, [ logger, doSomething ]);
當我們呼叫:
store.dispatch(addTask('New Task'));
執行的順序還是和Step3一模一樣,但我們已經移除Monkeypatch的方式了!
不過,我們和官網範例還有些不同,因為官網用了Currying的方式,我們先來看一下Currying的概念:
Currying 可以預存先前參數的運算結果,將擁有多個參數的函式,化為擁有單一參數的函式的形式。
用下面這個例子來說明:
// 多個參數
function add(x, y) {
  return x + y;
};
add(3, 4);

// 單一參數
function addWithCurrying(x) {
  return function(y) {
    return x + y;
  };
};
addWithCurrying(3)(4);
所以我們把Currying的概念加到我們的middleware,把傳入的第二個參數當作return function的參數:
function logger(store) {
  return function wrapDispatchToAddLogging(next) {
    return function dispatchAndLog(action) {
      console.log('dispatching', action);
      let result = next(action);
      console.log('next state', store.getState());
      return result;
    };
  };
}
上面的logger就是Redux裡面middleware的基本架構,可以用ES6的Arrow function寫法,會更簡潔:
const logger = store => next => action => {
  console.log('dispatching', action);
  let result = next(action);
  console.log('next state', store.getState());
  return result;
};
但是呼叫的helper也必須改寫呼叫的方式。
由於middleware用Currying的概念改寫,Redux library的helper也必須改寫,只有呼叫的那一行傳參數方式改變:
// Redux確實有提供applyMiddleware
// 但下面這段code只是概念性描述,並不是真實內容
function applyMiddleware(store, middlewares) {
  middlewares = middlewares.slice();
  middlewares.reverse();

  let dispatch = store.dispatch;
  // middleware改成傳入兩次參數,Currying化
  middlewares.forEach(middleware =>
    dispatch = middleware(store)(dispatch)
  );

  return Object.assign({}, store, { dispatch });
}
當我們設定applyMiddleware時,第二個參數傳入middleware的陣列,往左依序作為middleware的next(),而最左邊middleware的next()就是原本的store.dispatch。
applyMiddleware(store, [ logger, doSomething ]);
簡單的說middleware就是 用包裝的方式,改變store.dispatch的行為 ,可以加強store的功能,實際上middleware只會接收到store的dispatch和getState當作參數。
Middleware架構:
const someMiddleware = ({ dispatch, getState  }) => next => action => {
  // 在dispatch action之前,放執行的程式碼區段
  // ...
  let result = next(action);
  // 在dispatch action之後,放執行的程式碼區段
  // ...
  return result;
}
Redux內建提供applyMiddleware function,我們可以使用這個function來串接多個middleware,每個middleware都會接收store的dispatch和getState當作參數,並回傳一個function。回傳的function就會是下一個middleware的dispatch function,由右往左,最後一個middleware會收到原始的store.dispatch當作dispatch function。
上面描述過程一直到Currying確實是滿複雜的,雖然官網的介紹已經說得滿清楚,但我想試著再描述一次,我覺得可以通過這個過程,了解middleware的寫法與作用,下一篇就會來介紹常用到的middleware,直接看實際案例也許更能了解喔!
官方 Middleware
Redux Middleware大略架構
