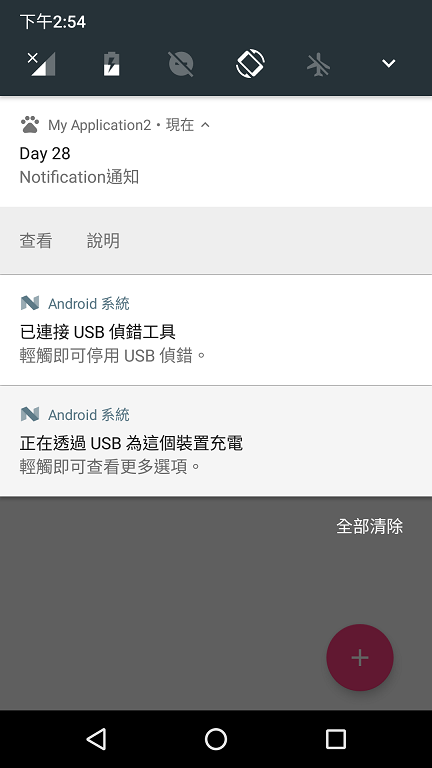
Notification是顯示在狀態列(Status bar)的訊息,並在展開後可以顯示更多內容,常用在電子郵件或通訊軟體的通知。

// 取得NotificationManager物件
NotificationManager manager = (NotificationManager)
            getSystemService(Context.NOTIFICATION_SERVICE);

// 建立大圖示需要的Bitmap物件
Bitmap largeIcon = BitmapFactory.decodeResource(getResources(), R.drawable.ic_pets);

// 建立通知物件,設定小圖示、大圖示、內容標題、內容訊息、時間
Notification notification = new NotificationCompat.Builder(this)
        .setSmallIcon(R.drawable.ic_pets)
        .setLargeIcon(largeIcon)
        .setContentTitle("標題")
        .setContentText("訊息內容")
        .setWhen(System.currentTimeMillis())
        .build();

// 使用0為編號發出通知
manager.notify(0, notification);
小圖示是出現在狀態列的Icon,建議大小為32x32
大圖示是展開後標題左邊的Icon,建議大小為64x64
時間若要立即發出就用System.currentTimeMillis()
而當我們的訊息內容較長會超過一行時預設會將訊息結尾變成...而不能完整顯示,此時可以再加入一行BigText讓長訊息能完整顯示
.setStyle(new NotificationCompat.BigTextStyle().bigText("訊息內容"))
所以當我們的訊息內容是動態改變的時候,可以將setContentText和BigText都用上,因為兩者是依照訊息長度擇一出現的,這樣當短訊息時會用setContentText顯示,長訊息則用BigText。
發出Notification時可以用setDefaults設置提醒,有以下三種類型,要全部則用DEFAULT_ALL。
Notification notification = new NotificationCompat.Builder(this)
        .setSmallIcon(R.drawable.ic_pets)
        .setLargeIcon(largeIcon)
        .setContentTitle("標題")
        .setContentText("訊息內容")
        .setWhen(System.currentTimeMillis())
        .setDefaults(Notification.DEFAULT_ALL) // 加上提醒效果
        .build();
若有用到震動則需在AndroidManifest.xml加入權限
<uses-permission android:name="android.permission.VIBRATE" />
若要用自訂的提醒效果的話,就不要用上面的DEFAULT,改用以下方式
// 自訂震動,陣列值依序為停止、震動的時間,單位為毫秒
long[] vibrate_effect = {1000, 1000, 1000, 1000};

// 自訂音效,使用res/raw資料夾裡的檔案
Uri uri = Uri.parse("android.resource://" + getPackageName() + "/" + R.raw.underwater);

Notification notification = new NotificationCompat.Builder(this)
        .setSmallIcon(R.drawable.ic_pets)
        .setLargeIcon(largeIcon)
        .setContentTitle("標題")
        .setContentText("訊息內容")
        .setWhen(System.currentTimeMillis())
        .setVibrate(vibrate_effect) // 自訂震動
        .setSound(uri) // 自訂音效
        .setLights(Color.GREEN, 1000, 1000); // 自訂燈光,參數為燈光顏色和打開、關閉的時間
        .build();
當點擊時預設是沒有反應,若要在點選時打開SecondActivity要用PendingIntent來做
// 點擊時要啟動的PendingIntent,當中包含一個Intent設置要開啟的Activity
PendingIntent pendingIntent =
        PendingIntent.getActivity(this, 0, new Intent(this, SecondActivity.class), 0);

Notification notification = new NotificationCompat.Builder(this)
        .setSmallIcon(R.drawable.ic_pets)
        .setLargeIcon(largeIcon)
        .setContentTitle("標題")
        .setContentText("訊息內容")
        .setWhen(System.currentTimeMillis())
        .setContentIntent(pendingIntent)  // 設置Intent
        .setAutoCancel(true)    // 點擊後讓Notification消失
        .build();
可以注意的是若要用setAutoCancel()的話,就算只是要點擊以後就讓Notification消失而不開啟任何Activity,還是要在setContentIntent()裡放一個PendingIntent喔,單單設置setAutoCancel()是沒有效用的,此時可將PendingIntent的第三個參數改成new Intent(),即不開啟任何Activiy
若要在通知中附帶操作按鈕,如文首圖片的查看和說明,可以用addAction()以及PendingIntent來做
// 建立一個PendingIntent讓點擊Action時使用
PendingIntent pendingIntent =
        PendingIntent.getActivity(this, 0, new Intent(this, SecondActivity.class), 0);

Notification notification = new NotificationCompat.Builder(this)
        .setSmallIcon(R.drawable.ic_pets)
        .setContentTitle("標題")
        .setContentText("訊息內容")
        .setWhen(System.currentTimeMillis())
        .addAction(R.drawable.ic_help, "說明", pendingIntent)  // 增加「說明」
        .build();
我們可以用NotificationManager來發送和取消通知
// 取得NotificationManager物件
NotificationManager manager = (NotificationManager)
            getSystemService(Context.NOTIFICATION_SERVICE);

// 建立通知物件
Notification notification = new NotificationCompat.Builder(this)
        .setSmallIcon(R.drawable.ic_pets)
        .setContentTitle("標題")
        .setContentText("訊息內容")
        .setWhen(System.currentTimeMillis())
        .build();

/* 以下為管理通知的各種方式 */

// 使用0為編號發出通知,當已有編號0的通知時就會更新其內容
manager.notify(0, notification);

// 使用標籤tag和編號0發出通知,當已有相同標籤和編號時會更新其內容
manager.notify("tag", 0, notification);

// 清除編號為0的通知
manager.cancel(0);

// 清除標籤為tag且編號為0的通知
manager.cancel("tag", 0);

// 清除所有通知
manager.cancelAll();
以上是基本的Notification用法,還有一些加入大張圖片等內容可以參考Michael老師的文章,有介紹更多類型的通知。
