Service是在背景運作的應用程式元件,本身並沒有使用者介面並在離開APP時仍會繼續執行,適合用在上傳下載檔案等用途。
Service類別中共有Service本身和其子類別IntentService兩種,後者算是比較簡易的用法,以順序的方式一次執行一件事情,不用控制各個回呼和生命週期,所以我們從IntentService開始吧。
建立IntentService只要有建構子和onHandleIntent()方法就可以了
public class HelloIntentService extends IntentService {

    // 建構子
    public HelloIntentService() {
        super("HelloIntentService");
    }

    @Override
    protected void onHandleIntent(Intent intent) {
        // 要做的事情寫在這裡,如下載檔案等等

        // demo使用所以我們讓它執行後印出Log,沉睡5秒再印出Log
        Log.d("HelloIntentService","onHandleIntent start");
        long endTime = System.currentTimeMillis() + 5*1000;
        while (System.currentTimeMillis() < endTime) {
            synchronized (this) {
                try {
                    wait(endTime - System.currentTimeMillis());
                } catch (Exception e) {
                }
            }
        }
        Log.d("HelloIntentService","onHandleIntent finish");
    }
}
建立完成之後要在AndroidManifest.xml中加入,就跟加入Activity一樣只是前面換成service而已
<service android:name=".HelloIntentService"/>
啟動Service:跟啟動Activity一樣使用Intent來啟動
Intent intent = new Intent(MainActivity.this, HelloIntentService.class);
startService(intent);
執行結果:於Log可以看到印出的start和五秒後的finish
當onHandleIntent的內容執行完後IntentServie會自動結束,我們不用控制其生命週期。
當您的需要多執行緒等IntentService無法滿足的用途就可以使用Service,使用起來稍微複雜一點點,但可以運作的範圍也就更廣。需特別注意的是Service預設是在主線程執行,所以若要執行消耗時間的工作務必用Thread等方式到背景線呈執行,以免造成畫面卡頓。
public class HelloService extends Service {

    @Override
    public void onCreate() {
        // 僅初次建立時呼叫
    }

    @Override
    public int onStartCommand(Intent intent, int flags, int startId) {
        // 每次startService時會呼叫
        Log.d("HelloService","onStartCommand Start");
        long endTime = System.currentTimeMillis() + 5*1000;
        while (System.currentTimeMillis() < endTime) {
            synchronized (this) {
                try {
                    wait(endTime - System.currentTimeMillis());
                } catch (Exception e) {
                }
            }
        }
        Log.d("HelloService","onStartCommand End");

        stopSelf();  // 停止Service

        return START_STICKY;
    }

    @Nullable
    @Override
    public IBinder onBind(Intent intent) {
        return null;
    }

    @Override
    public void onDestroy() {
        Log.d("HelloService", "onDestroy");
    }
}
與前例IntentService一樣印出Log後沉睡五秒,Service可寫在onStartCommand()裡,而特別注意的是Service需手動將其結束,所以我們在Log印完呼叫stopSelf()來結束。
onStartCommand的回傳值
一樣要在AndrodiMenifest.xml加入喔
<service android:name=".HelloService"/>
啟動方式也跟IntentService一樣
// 在MainActivity中啟動HelloService
Intent intent = new Intent(MainActivity.this, HelloService.class);
startService(intent);
此外Service也可以透過別的Activity來結束,若不在Service裡寫stopSelf()的話可以在別處用stopService()來完成
// 在MainActivity中停止HelloService
Intent intent = new Intent(MainActivity.this, HelloService.class);
stopService(intent);
在結束之前都可以到手機的設定->開發人員選項->運作中的服務,查看Service是否還在進行中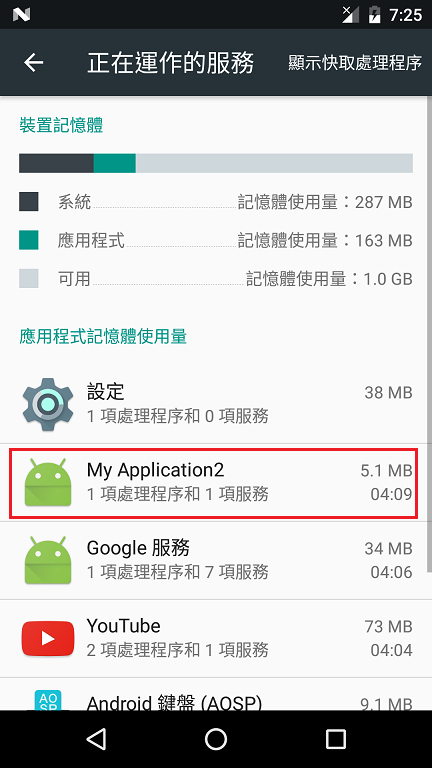
以上是Service的基礎寫法,對於其原理及更多的用法可以參考官方網站有很詳細的中文說明哦。