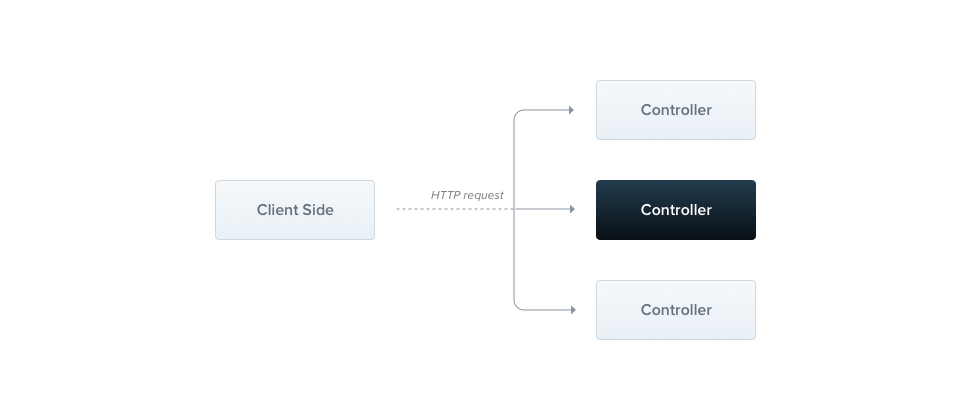
說明: 主要是接收從Client發出的HTTP Request,Controllers作為路由層,商業邏輯盡量別在Controllers裡撰寫,讓Controllers專心處理HTTP Request,接下來我們來實際寫程式。
cd src/modules & mkdir Users
import { Controller, Get, Post } from '@nestjs/common';

@Controller()
export class UsersController {

    @Get('users')
    getAllUsers() { }

    @Get('users/:id')
    getUser() { }

    @Post('users')
    addUser() { }
}
說明: UsersController是一個帶有裝飾器(Decorator)的類,裝飾器(Decorator)會把metadata連接到controller上,我們定義好了上述/users、/users/:id,但ApplicationModule(根模組),尚未引用UsersController,程式會完全沒變化,所以要去src/modules/app.module.ts改寫程式碼。
import { Module } from '@nestjs/common';
import { UsersController } from './Users/users.controller';

@Module({
  modules: [],
  controllers: [UsersController],
  components: [],
})
export class ApplicationModule { }
說明: 如此ApplicationModule就知道有UsersController的存在,程式也會去執行它。
ctrl+C
npm start
[Nest] 8472   - 2017-12-5 21:19:20   [NestFactory] Starting Nest application...
[Nest] 8472   - 2017-12-5 21:19:20   [InstanceLoader] ApplicationModule dependencies initialized +7ms
[Nest] 8472   - 2017-12-5 21:19:20   [RoutesResolver] UsersController {/}: +55ms
[Nest] 8472   - 2017-12-5 21:19:20   [RouterExplorer] Mapped {/users, GET} route +2ms
[Nest] 8472   - 2017-12-5 21:19:20   [RouterExplorer] Mapped {/users/:id, GET} route +1ms
[Nest] 8472   - 2017-12-5 21:19:20   [RouterExplorer] Mapped {/users, POST} route +1ms
[Nest] 8472   - 2017-12-5 21:19:20   [NestApplication] Nest application successfully started +3ms
Application based on Express is listening on port 3000
postman畫面
說明: 觀察到Console畫面,UserController有load進去、路徑也有map,且Postman的結果會得到200狀態碼,代表Controller已經有被運行成功。
import { Controller, Get, Post } from '@nestjs/common';

@Controller()
export class UsersController {

    @Get('users')
    getAllUsers() {
        //假資料
        const users = [{ "Name": "Michael","Age":25 }];
        return users;
    }

    @Get('users/:id')
    getUser() { }

    @Post('users')
    addUser() { }
}
ctrl+C
npm start

說明: 結果符合預期。
import { Controller, Get, Post } from '@nestjs/common';

@Controller('users')
export class UsersController {

    @Get()
    getAllUsers() {
        //假資料
        const users = [{ "Name": "Michael","Age":25 }];
        return users;
    }

    @Get('/:id')
    getUser() { }

    @Post()
    addUser() { }
}
說明: 程式碼精簡許多,適合寫Restful API。
import { Controller, Get, Post, Request, Response, Param, Next, HttpStatus } from '@nestjs/common';

@Controller('users')
export class UsersController {

    @Get()
    //使用Express的參數
    getAllUsers( @Request() req, @Response() res, @Next() next) {
        //假資料
        const users = [{ "Name": "Michael","Age":25 }];
        //多種HttpStatus可用
        res.status(HttpStatus.OK).json(users);
    }

    @Get('/:id')
    //使用Express的參數
    getUser( @Param() params) {
        return { "getUser": params.id };
    }

    @Post()
    addUser() { }
}
對http://localhost:3000/user 發出GET請求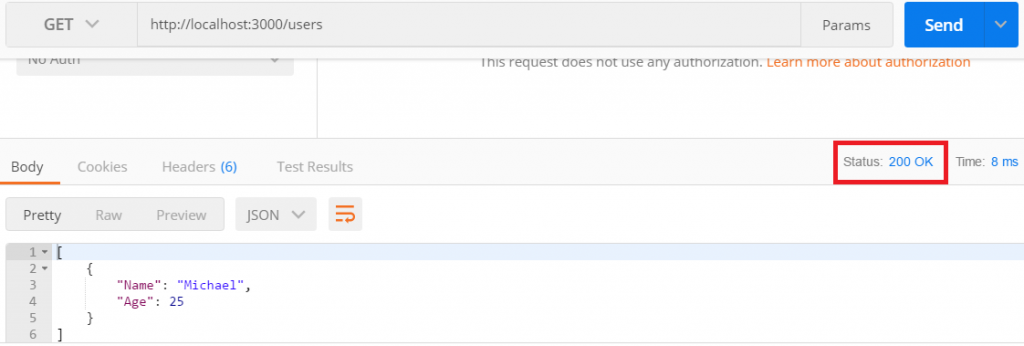
說明:可以看出來HttpStatus.OK等於200狀態碼。
對http://localhost:3000/user/2 發出GET請求
說明:確認有捕捉到params。
import { Controller, Get, Post, Request, Response, Param, Next, HttpStatus, Body } from '@nestjs/common';
import { CreateUserDTO } from './DTO/create-users.dto';

@Controller('users')
export class UsersController {

    @Get()
    //使用Express的參數
    getAllUsers( @Request() req, @Response() res, @Next() next) {
        //假資料
        const users = [{ "Name": "Michael", "Age": 25 }];
        //多種HttpStatus可用
        res.status(HttpStatus.OK).json(users);
    }

    @Get('/:id')
    //使用Express的參數
    getUser( @Param() params) {
        return { "getUser": params.id };
    }

    @Post()
    addUser(@Body() body) {
        //顯示POST過來的body請求體
        console.log(body);
    }
}
使用Postman,向http://localhost:3000/users 發出POST請求,如下圖: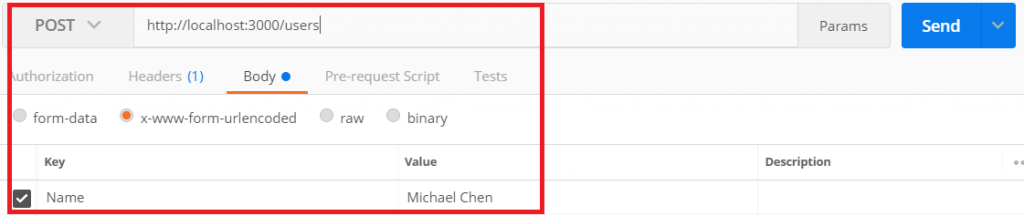
console顯示如下圖:
[Nest] 9812   - 2017-12-5 22:27:37   [NestFactory] Starting Nest application...
[Nest] 9812   - 2017-12-5 22:27:38   [InstanceLoader] ApplicationModule dependencies initialized +9ms
[Nest] 9812   - 2017-12-5 22:27:38   [RoutesResolver] UsersController {/users}: +39ms
[Nest] 9812   - 2017-12-5 22:27:38   [RouterExplorer] Mapped {/, GET} route +5ms
[Nest] 9812   - 2017-12-5 22:27:38   [RouterExplorer] Mapped {/:id, GET} route +1ms
[Nest] 9812   - 2017-12-5 22:27:38   [RouterExplorer] Mapped {/, POST} route +2ms
[Nest] 9812   - 2017-12-5 22:27:38   [NestApplication] Nest application successfully started +1ms
Application based on Express is listening on port 3000
{ Name: 'Michael Chen' }
說明:接收到POST請求的body。
cd src/modules/Users & mkdir DTO
cd DTO
export class CreateUserDTO{
    readonly _name:string;
    readonly _age:number;
}
import { Controller, Get, Post, Request, Response, Param, Next, HttpStatus, Body } from '@nestjs/common';
import { CreateUserDTO } from './DTO/create-users.dto';

@Controller('users')
export class UsersController {

    @Get()
    //使用Express的參數
    getAllUsers( @Request() req, @Response() res, @Next() next) {
        //假資料
        const users = [{ "Name": "Michael", "Age": 25 }];
        //多種HttpStatus可用
        res.status(HttpStatus.OK).json(users);
    }

    @Get('/:id')
    //使用Express的參數
    getUser( @Param() params) {
        return { "getUser": params.id };
    }

    @Post()
    //post過來的body要符合DTO class所描述的屬性
    addUser(@Body() createUserDTO:CreateUserDTO) {
        //顯示POST過來的body請求體
        console.log('姓名:',createUserDTO._name,'年紀:',createUserDTO._age);
    }
}
接著,透過Postman 往http://localhost:3000/users POST 一組資料,如下圖所示。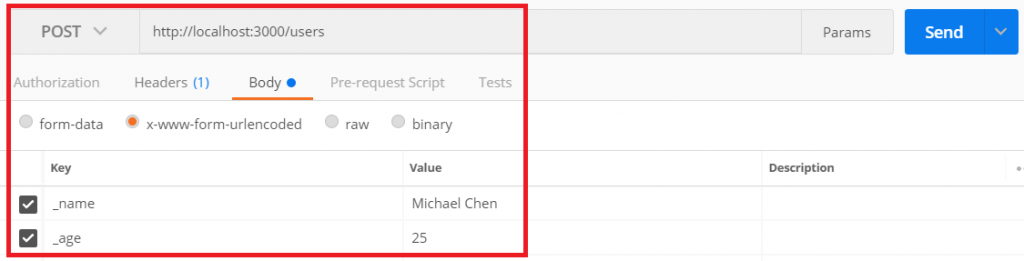
POST 部分大功告成,可以收到POST過來的參數物件,且已經map到DTO 的class屬性,之後就可以對這組資料做物件操作,console畫面如下。
[Nest] 12128   - 2017-12-5 22:37:25   [NestFactory] Starting Nest application...
[Nest] 12128   - 2017-12-5 22:37:25   [InstanceLoader] ApplicationModule dependencies initialized +7ms
[Nest] 12128   - 2017-12-5 22:37:25   [RoutesResolver] UsersController {/users}: +26ms
[Nest] 12128   - 2017-12-5 22:37:25   [RouterExplorer] Mapped {/, GET} route +4ms
[Nest] 12128   - 2017-12-5 22:37:25   [RouterExplorer] Mapped {/:id, GET} route +2ms
[Nest] 12128   - 2017-12-5 22:37:25   [RouterExplorer] Mapped {/, POST} route +1ms
[Nest] 12128   - 2017-12-5 22:37:25   [NestApplication] Nest application successfully started +2ms
Application based on Express is listening on port 3000
姓名: Michael Chen 年紀: 25
程式碼在github
如果使用 TypeScript 轉寫,CreateUserDTO,也可以宣告成 Interfaces,但是我都會先將屬性加上問號讓它變成可選屬性(Optional Properties),這有點本末倒置,會失去它開發時期的稽核機制,但是我比較喜換 IntelliSense 帶來的便利。
感謝 Jonny Huang建議,我剛剛特地去查了一下,其實作者比較建議使用class,理由是這是es6標準的方式,似乎使用interface的話,interface在轉譯過程會消失,nestjs會參考不到它。
不過我剛剛改成interface程式也沒問題,日後我有更多實作了解後,再來補這塊的說明。
Firstly, we need to establish the DTO (Data Transfer Object) schema. A DTO is an object that defines how the data will be sent over the network. We could do it using TypeScript interfaces, or by simple classes. What may be surprising, we recommend using classes here. Why? The classes are the part of the JavaScript ES6 standard, so they're just plain functions. On the other hand, TypeScript interfaces are removed during the transpilation, Nest can't refer to them. It's important because features such as Pipes enables additional possibilities when they've access to the metatype of the variable.


 iThome鐵人賽