介紹
ApolloData Server 主要有三個任務
第一個是解析 Client payload map 打進來的資料,並且符合 Type Query 與 Type Mutation 的定義(即開放的 API )
第二個是 Resolver 解析 , Resolver 解析要符合定義的 Schema Type
第三個是 是驗證功能
當然支援 GraphQL Spec 的 Server 還有很多 但是可以透過下面官方提供的比較表可以看到 ApolloData 是非常用心
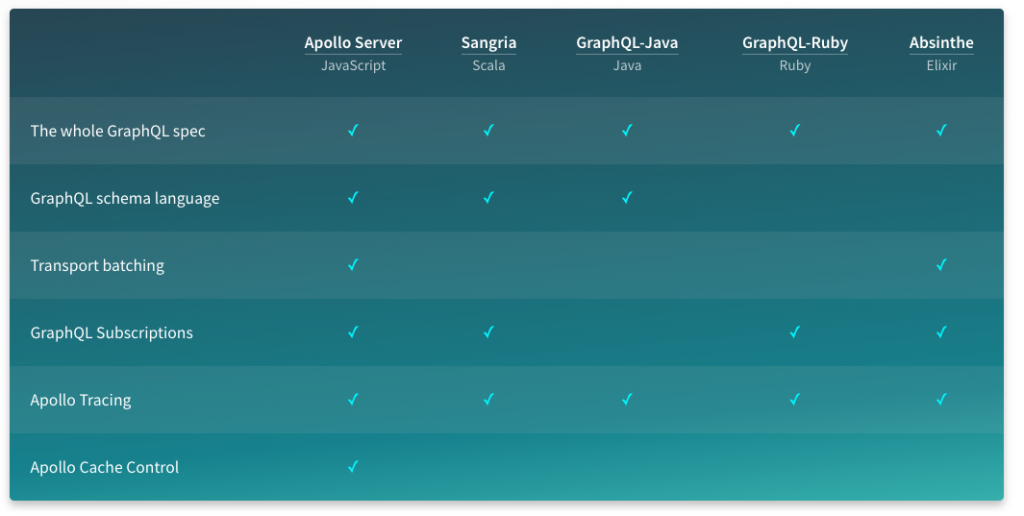
ApolloData Server 的運作方式
https://www.apollographql.com/docs/graphql-tools/
ApolloData 把原生的撰寫 Schema 方式調整過了所以寫作起來就好像在寫NOSQL的定義檔,
typeDefs 就是定義 Type 而Type 中可以返回另外一個 Type 像關連般的樣子,
如下面的 Author 底下的 posts:[POST] 定義 posts 為 POST 的 Type 並且為陣列,另外 id:Int! 的驚嘆號就是表示必須,其他基本型態就有 Int ,String,Boolean,也可以像 POST 那樣自定義 Type
官方範例
const typeDefs = `
  type Author {
    id: Int!
    firstName: String
    lastName: String
    posts: [Post] # the list of Posts by this author
  }

  type Post {
    id: Int!
    title: String
    author: Author
    votes: Int
  }

  # the schema allows the following query:
  type Query {
    posts: [Post]
    author(id: Int!): Author
  }

  # this schema allows the following mutation:
  type Mutation {
    upvotePost (
      postId: Int!
    ): Post
  }
`;
接下來可以看到 type Query 與 type Mutation 這兩個都是開放 Client 端可以操作的 API 所以 Client 是不能直接操作 Schema 必須透過開放的 API , 符合之後才能到 Resolver ,而這邊的
posts:[Post] 左邊的就是開放的 API 介面右邊的就是 Resolver 要符合的形態
 type Query {
    posts: [Post]
    author(id: Int!): Author
  }
再來看一個 author(id:Int!):Author 左邊的多了一個小()裡面的意思就是 API 開放的參數要是id並且是數子, Resolver 回傳形態則為是 Author
接下來會看到 Mutation 相對於 Query 是查詢 Mutation 則包含新增刪除修改 只要有異動資料庫的都叫做 Mutation
其他都跟query一樣
 type Mutation {
    upvotePost (
      postId: Int!
    ): Post
  }
Resolver 的部分官方範例 用假資料 Mock 起來 ,符合回傳形態沒有連結資料庫,這樣比較好說明
import { find, filter } from 'lodash';

// example data
const authors = [
  { id: 1, firstName: 'Tom', lastName: 'Coleman' },
  { id: 2, firstName: 'Sashko', lastName: 'Stubailo' },
  { id: 3, firstName: 'Mikhail', lastName: 'Novikov' },
];
const posts = [
  { id: 1, authorId: 1, title: 'Introduction to GraphQL', votes: 2 },
  { id: 2, authorId: 2, title: 'Welcome to Meteor', votes: 3 },
  { id: 3, authorId: 2, title: 'Advanced GraphQL', votes: 1 },
  { id: 4, authorId: 3, title: 'Launchpad is Cool', votes: 7 },
];

const resolvers = {
  Query: {
    posts: () => posts,
    author: (_, { id }) => find(authors, { id: id }),
  },
  Mutation: {
    upvotePost: (_, { postId }) => {
      const post = find(posts, { id: postId });
      if (!post) {
        throw new Error(`Couldn't find post with id ${postId}`);
      }
      post.votes += 1;
      return post;
    },
  },
  Author: {
    posts: (author) => filter(posts, { authorId: author.id }),
  },
  Post: {
    author: (post) => find(authors, { id: post.authorId }),
  },
};
Resolver 的部分要上面程式碼開放的 API 介面相符合 type Query 與 type Mutaion
Resolver 的格式 也是分成 Query 與 Mutaion ,寫法都一樣基本上會有三個參數
第一個是 PARENT 通常會用"_", 第二個是傳入的參數第三個通常是用來驗證身份使用
如果沒有參數傳入就直接像上方的 posts這樣直接打回去 posts (這邊是上面定義好的陣列形態就是post)
const resolvers = {
  Query: {
    posts: () => posts,
    author: (_, { id }) => find(authors, { id: id }),
  },
有參數要查詢的話就會至少要兩個參數如下,如果有加上驗證資訊的話就會放在第三個
author: (_, { id }) => find(authors, { id: id }),
另外我們可以在 Client 端使用 Nest 巢狀查詢
例如
{
 Post{
  title,
   Author{
      name
   }
 }
}
例如上方的 payload query 那是因為 Resolver 這邊有做一個關聯查詢會把Post的post.authorId當下一個Author的Id查詢條件,這樣就串起來了
  Post: {
    author: (post) => find(authors, { id: post.authorId }),
  },
Schema 跟 Resolver 基本的設定就完成了
ApolloData Server貼心的把邏輯開發分開並且簡化,接下來把它還原成原生的CODE
import { makeExecutableSchema } from 'graphql-tools';

const jsSchema = makeExecutableSchema({
  typeDefs,
  resolvers,
});
總結
ApolloData Server 貼心的幫忙開發者省下許多重複的工作並且把邏輯變得更清楚,讓開發更順暢 ,輕鬆上路了
day4 再來說明 Server 驗證的部分
官方網站有介紹與範例
https://www.apollographql.com/Servers/