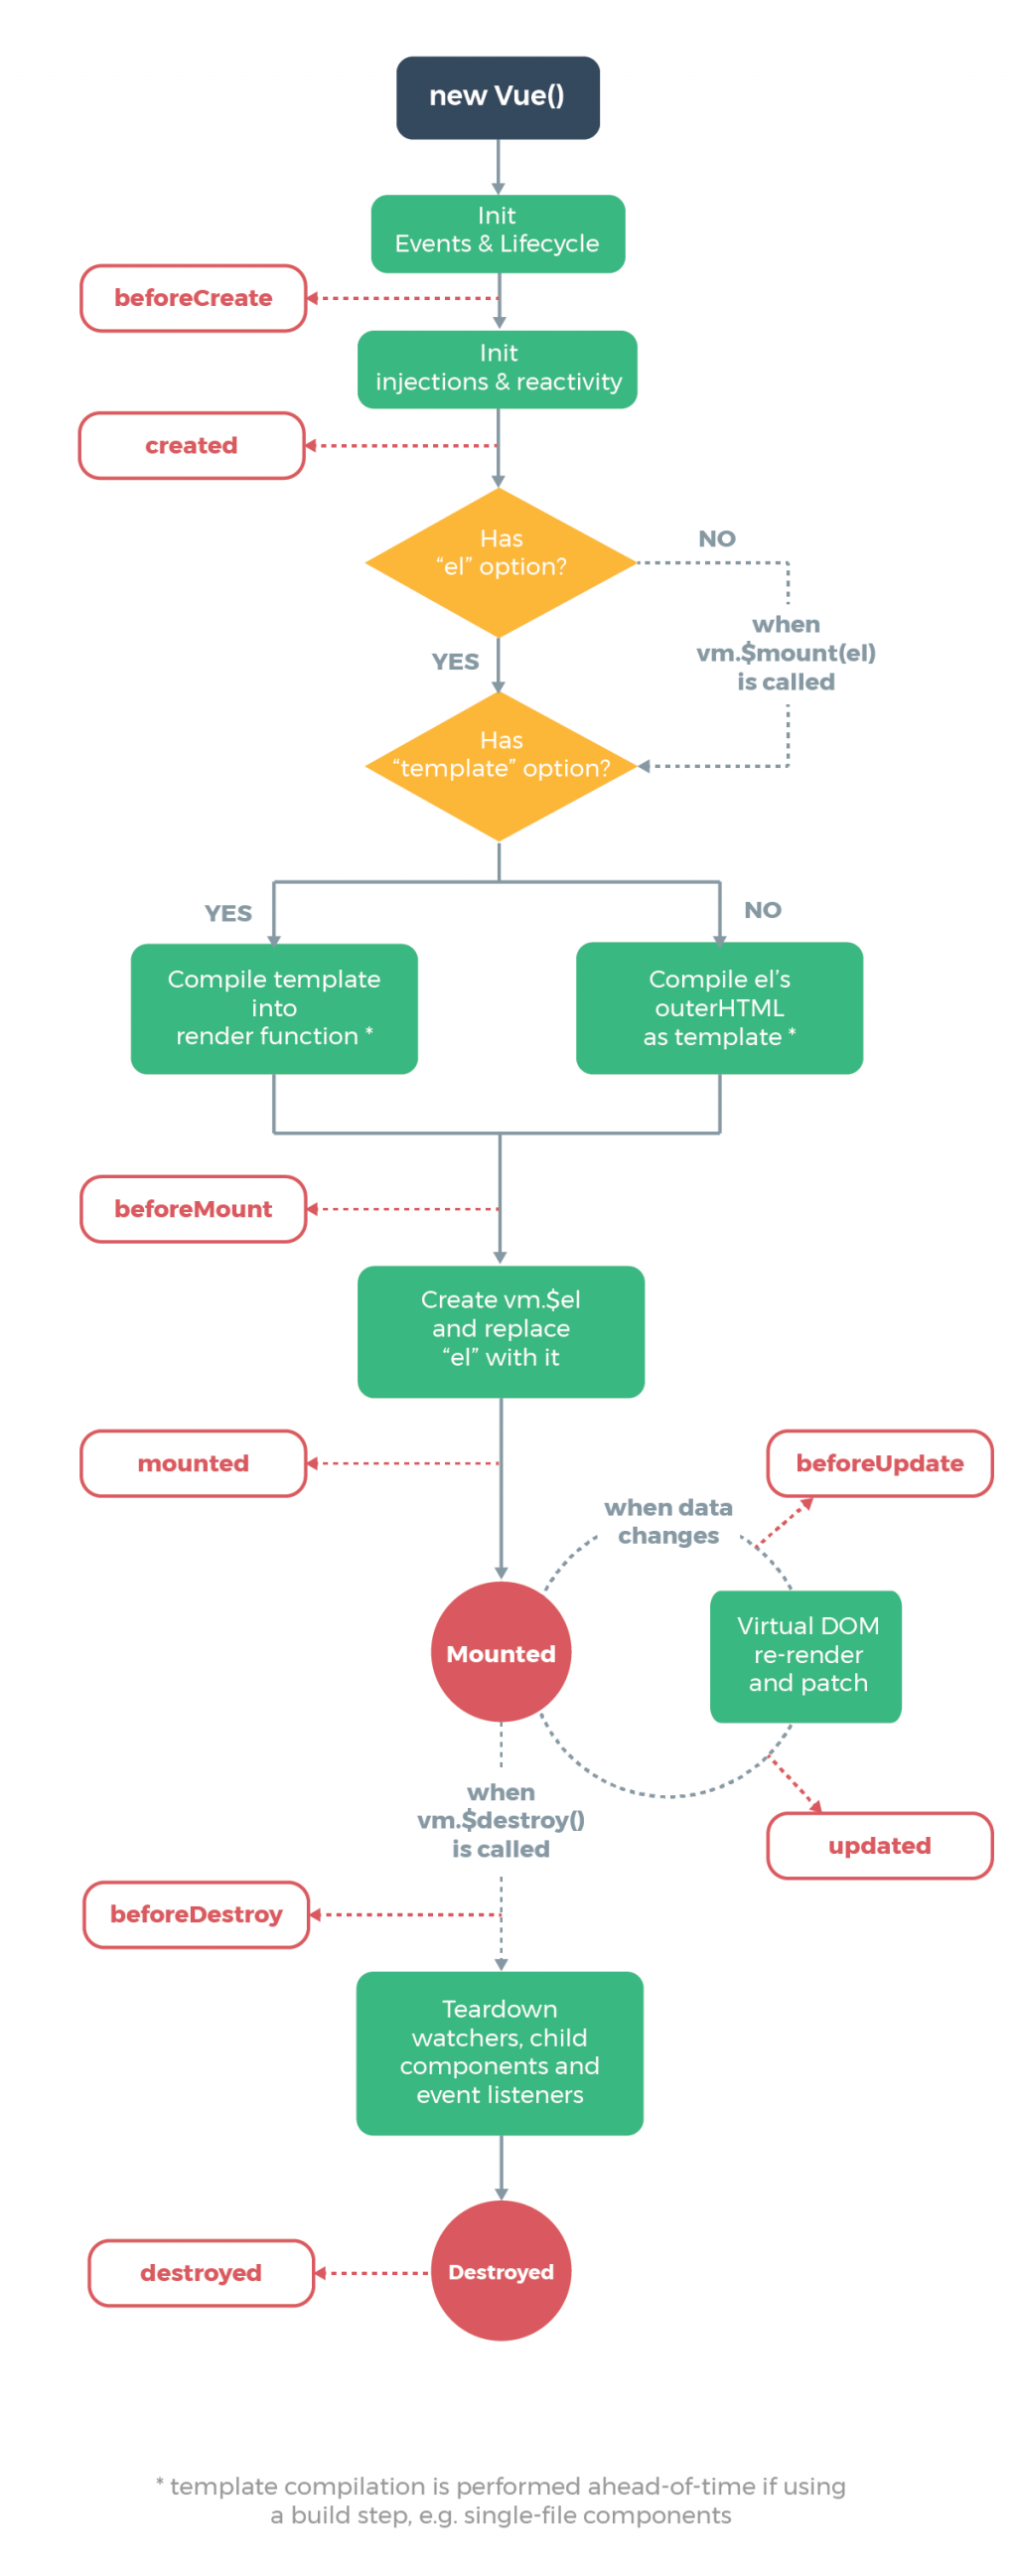
上圖為官網所繪製的Instance Lifecycle(生命週期),Vue其實在我們下執行命令後,會做很多事情,因為它將資料(data)與UI樣板(template)綁在一起,開發者只需要宣告好資料、填入正確的UI components以及router的path設定好後,結果就會呈現。
而在我們執行後,Vue在這個Lifecycle中,會建立Vue Instance、綁定資料、事件配置、編譯樣板、經過無限修改更新資料等步驟,直到整個Vue Instance被銷毀(destroyed),這個Vue Instance底下的資料、樣板、事件、元件才會解除綁定,完成一整個Lifecycle。
那什麼是Instance Lifecycle Hooks(生命週期鉤子)呢?看到上面的Lifecycle diagram,鉤子就是上圖虛線延伸出去白底紅字的8個方法,這些鉤子的用意是在Vue在Lifecycle中做每件事情的時機點前後,可以讓你有選擇處理的方式,相當客製化。
這8個鉤子的資料型態皆為function,以下我們就介紹這8個鉤子分別可以使用的時機
在初始化vue instance並開啟整個Lifecycle後,資料綁定與事件配置之前。目前階段還無法調用$data。
應用場景:loading進頁面的事件
vue instance創建完成,$data已可以取得,屬性與事件也已綁定好。目前階段尚未掛載el,DOM也尚未生成。
在掛載el開始之前。目前階段是相關render函式首次被調用,尚未被DOM給綁定。
el被剛創建好的vm.$el替換取代,並且掛載到vm上。目前階段已被DOM綁定。
應用場景:對後端發出請求或讀取新資料
在資料更新時調用,Virtual DOM重新render與patch之前,可以在這個階段變更資料狀態。目前階段還不會繪製view。
資料更新後會使Virtual DOM重新render頁面。目前階段會繪製出正確的view。
在vue instance被銷毀前調用。目前階段還可以完全使用這個vue instance。
vue instance銷毀後可以調用,調用後這個vue instance底下的資料與樣板會解除綁定,事件會取消監聽,所有子元件也會被銷毀。
var vm = new Vue({
data: {
name: 'Eva',
},
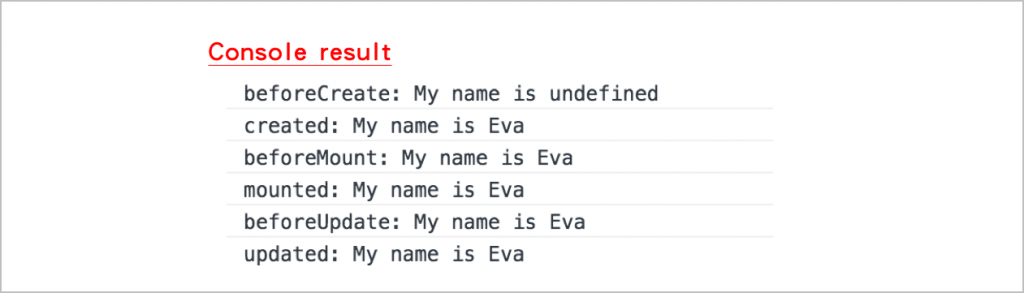
beforeCreate: function() {
// vue instance尚未創建完成,還不能讀取到資料
console.log('beforeCreate: My name is ' + this.name);
},
created: function() {
// vue instance創建完成,資料已綁定
console.log('created: My name is ' + this.name);
},
beforeMount: function() {
// 尚未掛載el與綁定DOM
console.log('beforeMount: My name is ' + this.name);
},
mounted: function() {
// 綁定DOM之後
console.log('mounted: My name is ' + this.name);
},
beforeUpdate: function() {
// 資料更新時調用,尚未更新DOM
console.log('beforeUpdate: My name is ' + this.name);
},
updated: function() {
// 因為資料更新而更新DOM
console.log('updated: My name is ' + this.name);
},
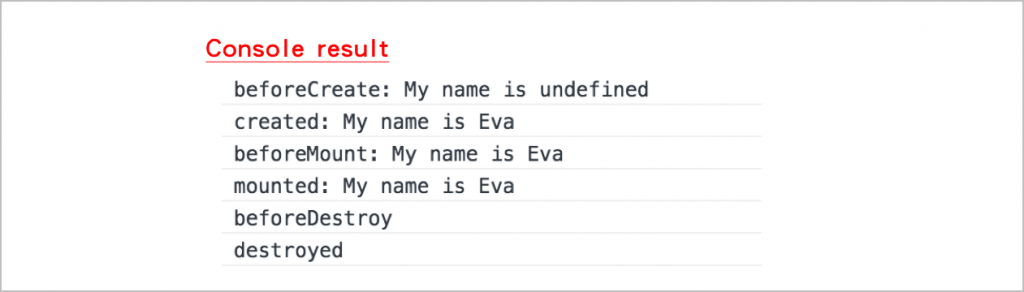
beforeDestroy: function() {
// 銷毀整個vue instance之前
console.log('beforeDestroy');
},
destroyed: function() {
// 銷毀整個vue instance之後
console.log('destroyed');
},
});
我們分四階段來看
在綁定el之前,beforeCreate階段還不能讀取資料

在程式碼下面加入這行程式碼
vm.$mount('#app');
或者加入el屬性在物件裡
var vm = new Vue({
  el: '#app',
  data: {
    name: 'Eva',
  },
  ...
});

因為要變更資料才會觸發這兩個function,這邊我們使用強制變更資料
vm.$forceUpdate();
因為上面第三階段強制變更資料的方法會導致一直執行更新資料,所以先將剛剛新增的vm.$forceUpdate();刪掉,加入destroy的方法
vm.$destroy();
總結來說,從Lifecycle可以觀察得出Vue的執行順序,對於Vue在執行後並顯示出結果的流程會比較熟悉。